
A flocked Christmas tree already brings the snowy texture. The decorating decisions that matter most are the color you put against it, how much of that white coating you leave visible, and the shape of your ornaments. Champagne makes the tree feel soft and luminous; red velvet gives it a traditional Christmas punch; navy and gold can turn a narrow tree into a little night sky.
These 12 flocked Christmas tree ideas pair a distinct look with details you can actually use: ribbon placement, ornament finishes, a fitting topper, and a way to finish the base. Start with the look that works with your room and the decorations you already own.

The images are AI-generated decorating concepts, created to illustrate the palettes and arrangements described below.
Before You Decorate: Let the Snow Be Part of the Design
Flocking is the white coating that gives branches a snow-covered appearance. On a heavily flocked tree, that coating acts as a major color in the scheme. You do not need to add a white ornament to every branch to make the tree feel wintry.
Set up an artificial tree in its final position, following its assembly instructions. Shape the branches gently, support them near the stem, and avoid rubbing the coated tips. Check the lights before hanging decorations. For an unlit tree, add compatible indoor-rated lights before ribbon and ornaments; leave factory-installed lights in place on a pre-lit model.
Measure the tree’s widest point, its stand, and the height of your intended topper. A pencil tree can fit a narrow corner, but gifts, a collar, and a ribbon tail can still spill into the walkway. Choose a base cover that fits around the actual stand rather than relying on a decorative basket to hold the tree upright.
1. Layer Champagne and Pearl for a Soft, Glowing Tree
This look is a good fit for cream upholstery, pale wood, and rooms where you want the tree to feel elegant without becoming the loudest object. Champagne ornaments add warmth, while pearl-white pieces echo the flocking with a smoother finish.
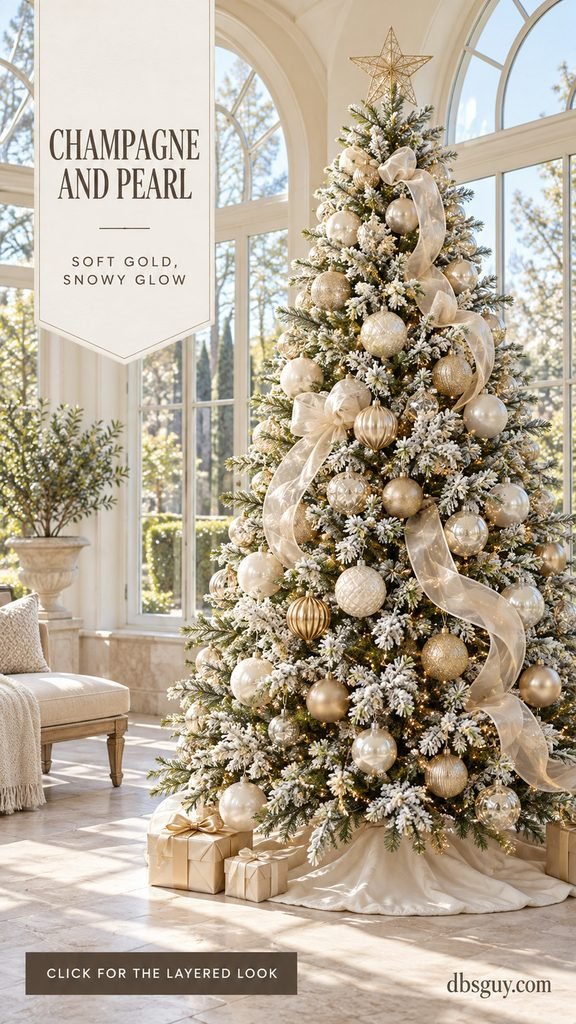
The important detail is the mix of surfaces. Combine a few ribbed or faceted champagne baubles with satin-finish ivory balls and small reflective ornaments. Put some of the plain baubles slightly inside the tree so the outside branches still show their snowy edges.
Use soft ivory or champagne ribbon in loose, separate cascades. For a full-size tree, ribbon around 2½ to 4 inches wide is a useful starting point; choose a narrower width if the branches are compact. Secure an end to an inner branch with a soft tie, allow a relaxed loop to come forward, then tuck the next section inward. The ribbon should change direction gently rather than form a straight stripe down the front.
A light wire-style star and an ivory skirt finish the airy effect. If the tree starts looking uniformly gold, remove a few metallic pieces and let more pearl, ribbon, and white branch tips show through.
Also read: How to Put Ribbon on a Christmas Tree: 7 Beautiful Styles for Beginners
2. Use Red Velvet Bows as the Main Decoration
Red velvet gives snowy branches a clear focal point, even from across the room. Instead of filling every gap with a red ornament, make the bows the stars and use smaller red and ivory baubles to connect them.

Begin with the topper bow, then position the other bows at alternating heights and on different sides. A gentle zigzag down the visible face looks more natural than three perfectly straight columns. Turn each bow slightly toward the room so both loops can be seen.
Paper bells bring a lighter shape into the arrangement. Hang them where they have room to drop below a branch; a bell wedged into the needles loses its silhouette. Glossy red balls can sit farther inward, where they reflect the lights through the flocking.
Keep the supporting colors simple: ivory paper, deep red velvet, and a small amount of warm metallic shine if you already have it. A red skirt makes the base feel intentional. Avoid adding a second large patterned ribbon—the bows already provide enough movement.
Also read: 21 Christmas Tree Bow Ideas That Turn Simple Ribbon Into a Statement
3. Mix Icy Blue, Silver, and Clear Icicles
For a crisp winter look, choose pale blue ornaments with a silver accent rather than several unrelated shades of blue. The contrast comes from the difference between satin blue, reflective silver, and transparent icicles.

As a starting color recipe, try about two silver ornaments for every icy-blue one, then adjust after stepping back. That is a styling suggestion, not a required ratio. More blue will make the tree feel colorful; more silver will make the flocking and light reflections lead the scene.
Place silver snowflakes near the outer tips, and hang clear icicles from branches with open space beneath them. Small acrylic pieces can give the same transparent effect without the weight of larger glass decorations. Check each branch’s support before using anything heavy.
Cool-white lights suit the icy palette shown here. If your tree already has warm-white lights, keep them and let the blue ornaments carry the winter mood. A silver collar and a few matching gifts tie the base to the tree without adding another color. Skip a broad ribbon garland so the vertical icicle shapes stay visible.
Also read: 25+ Christmas Tree Decorating Ideas That Make the Whole Room Feel Magical
4. Build a Woodland Tree With Paper, Wood, and Pinecones
A woodland flocked tree works especially well in a room with linen, woven furniture, or soft green walls. Its appeal comes from contrasting textures: rough pinecones, smooth pale wood, folded paper, and fluffy white branch tips.
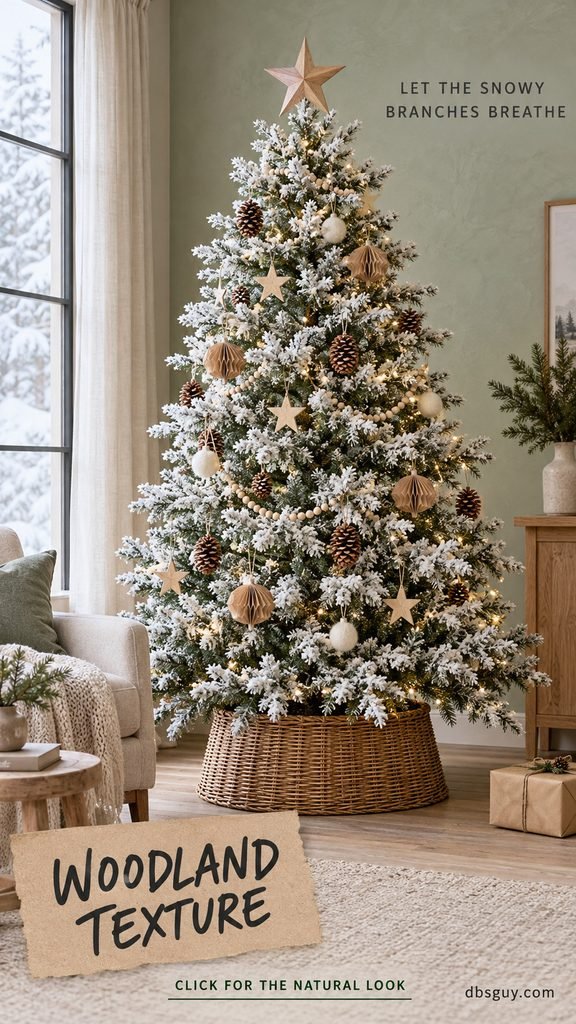
Gather a small family of decorations—wooden stars, kraft-paper fans, pinecone ornaments, and ivory felt balls. Repeat those shapes around the tree instead of adding one of every woodland animal you find. The repetition makes a small collection feel considered.
Drape a fine wooden-bead garland in shallow curves. Leave visible spaces between it and the ornaments, particularly on a heavily coated tree. The white branches are an important part of this look; covering them with thick burlap would hide the texture you chose the tree for.
A wooden star and a woven collar finish the natural palette. If you have shiny ornaments you want to reuse, place just a few toward the interior. For paper pieces, secure their hanging loops before decorating so you do not have to keep handling the flocked tips while making adjustments.
Also read: 13 DIY Paper Christmas Decorations That Look Surprisingly Expensive
5. Pair Burgundy Velvet With Aged Bronze
Burgundy and bronze create a richer evening tree than bright red and polished yellow gold. The snowy coating keeps the darker colors from becoming a solid mass, making this a strong choice for a library, den, or living room with dark wood.
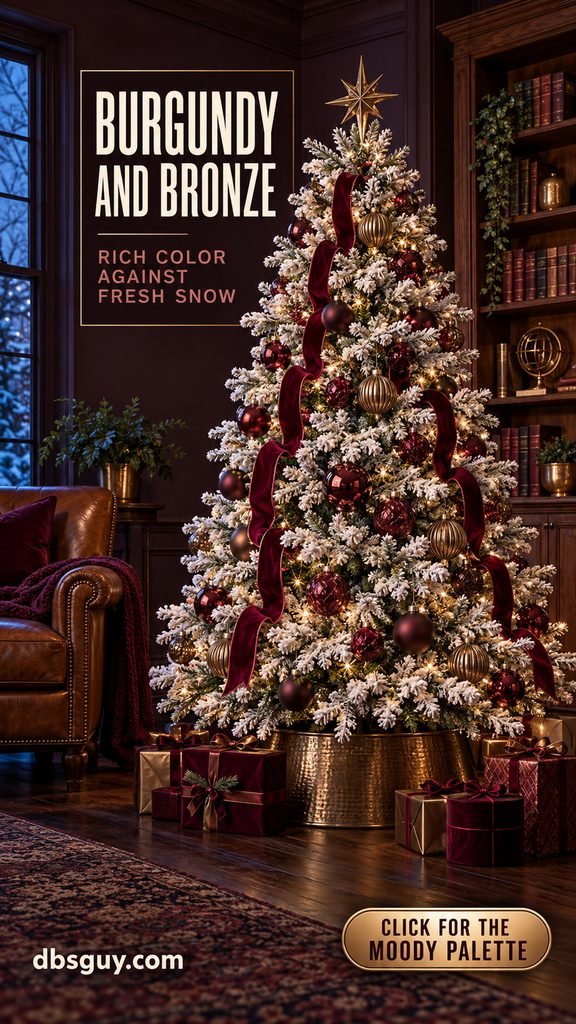
Use both matte and glossy burgundy balls. Matte ornaments create quiet patches of color; shiny ones catch the tiny lights. Add bronze ribbed baubles or elongated shapes where their outlines can be seen against the white tips.
Place burgundy velvet ribbon in separate loose runs rather than winding it tightly around the entire tree. Let a loop come forward, disappear into the branches, and reappear lower down. Move each run slightly to the side as it descends so the front does not look divided into bands.
A bronze star and matching collar keep the finishes connected. If the tree looks dark when the lights are off, bring a few bronze ornaments forward or remove some of the largest burgundy pieces. You should still be able to trace the snowy branch edges from top to bottom.
Also read: 21 Burgundy and Gold Christmas Tree Ideas That Feel Rich and Inviting
6. Soften the Tree With Blush and Rose Gold
Dusty blush feels gentle against flocking, especially in a bedroom nook or a living room with pale upholstery. Choose a muted pink rather than combining several candy-pink shades; rose gold supplies enough warmth and reflection on its own.
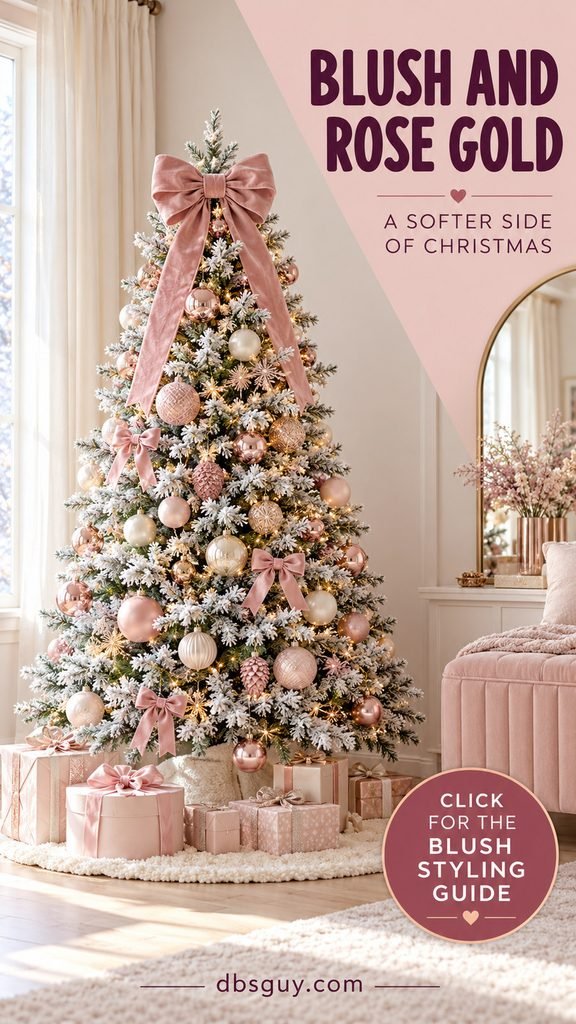
The concept uses a generous blush bow at the top, with smaller bows lower down. Secure the topper to a sturdy part of the tree and shorten its tails if they hide too much of the upper silhouette. On a smaller tree, a light fabric bow is often easier to balance than a large rigid topper.
Mix blush balls with pearly cream ornaments and a few rose-gold pieces. Textured pink ornaments help the color read against the white coating, while the cream pieces keep the palette from feeling like a wall of pink.
Leave broad gaps around the smaller bows. Their tails should fall freely rather than sit over neighboring ornaments. Finish with an ivory skirt and pale pink wrapping paper. If your room has strong yellow lighting, look at the blush and metallic ornaments together there before buying more; the apparent shade can change with the light.
Also read: 21 Christmas Tree Bow Ideas That Turn Simple Ribbon Into a Statement
7. Tuck Emerald Ornaments Into a Gold-Accented Tree
Emerald brings the green back into a snowy tree without taking away its winter character. This arrangement uses depth instead of broad ribbon: dark green baubles sit within the branches, while gold ornaments and delicate beads catch the light nearer the front.
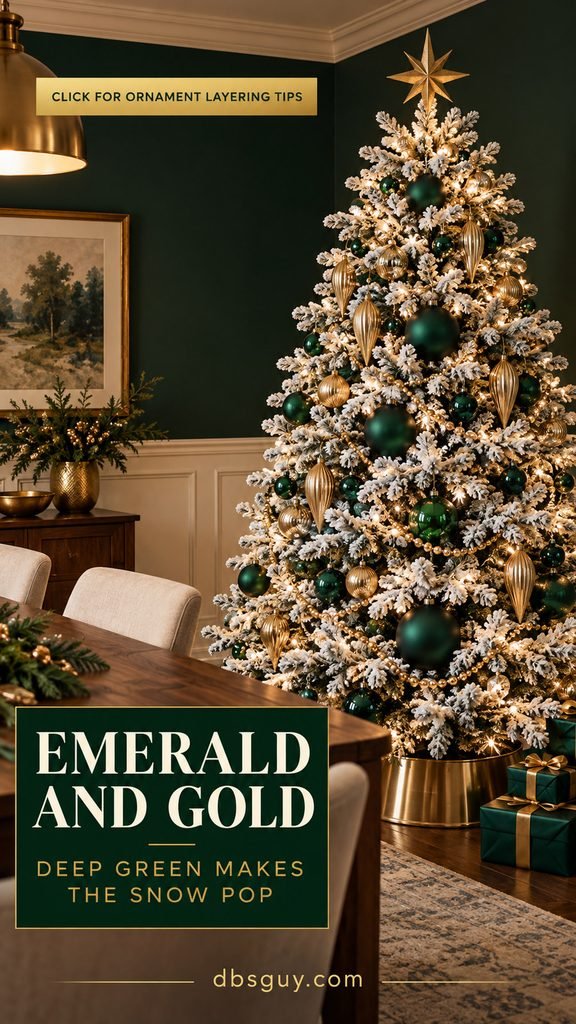
Start by distributing the largest emerald pieces across the tree’s height. Move some toward the inner branches, keeping them visible through openings. They create pockets of rich color behind the white edges rather than hanging like a row of dots on the surface.
Next, place gold ribbed or elongated ornaments where their shapes have room to stand out. A fine bead garland can connect those points with shallow curves. Keep it loose enough to look graceful, but supported so it does not pull down branch tips.
A gold star, brass-toned collar, and emerald gift wrap repeat the two main colors. This is also a useful way to refresh an existing ornament set: plain green balls can do the background work, leaving only a few special gold pieces needed at the front. Avoid mixing several very different gold finishes if you want a quieter result.
Also read: 21 Budget Christmas Tree Decorating Ideas That Make Affordable Ornaments Look Expensive
8. Give Snowy Branches a Black-and-White Striped Accent
A graphic tree can work beautifully in an entryway with black hardware, a dark doorframe, or simple modern furniture. Matte black ornaments stand out sharply against the flocking, and striped ribbon adds pattern without requiring a third color.
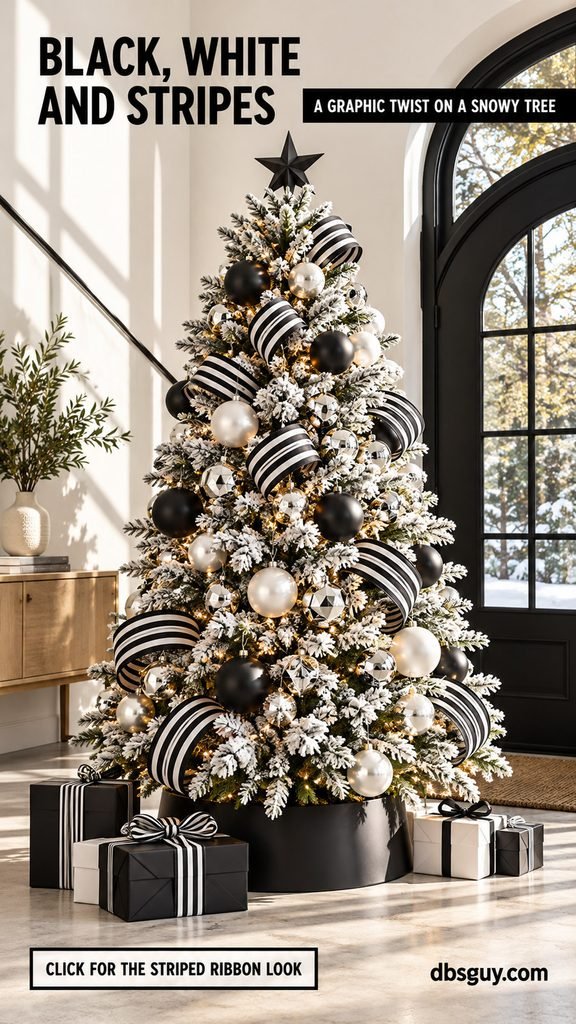
Use separate lengths of wired black-and-white ribbon to make sculpted loops. Start with one test loop near the middle of the tree: tuck both ends inward and bring the curved center forward. Once its scale looks right, repeat it at different heights, changing the direction slightly each time.
Pair those loops with plain black and pearl-white baubles. A few silver geometric pieces are enough to break up the round shapes. Keep other prints off the branches so the stripes remain clear.
Finish with a small black star and a black collar. Coordinating gift wrap makes the base part of the design, but avoid towering stacks that hide the lower branches. If the result feels too stark, remove a few black ornaments and show more of the warm lights and green branch interiors.
Also read: 25 Indoor Christmas Decor Ideas That Make the Whole House Feel Magical
9. Create a Gingerbread Look With Felt and Copper
The white flocking makes a lovely backdrop for gingerbread-style decorations because it echoes the look of icing. Use felt houses and gingerbread people with stitched white details, then add copper baubles to give the brown palette some shine.
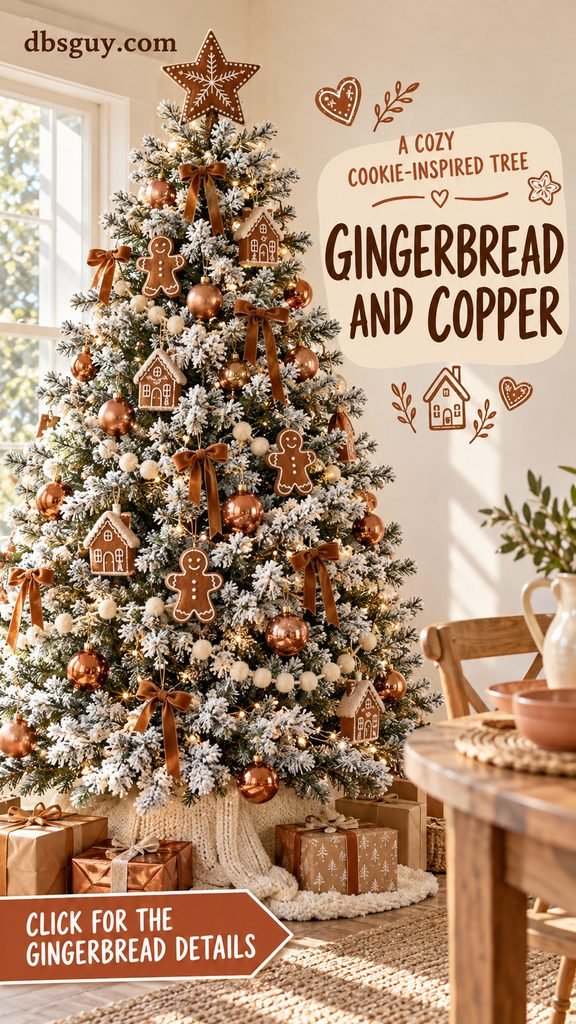
Choose decorative ornaments rather than hanging fresh cookies on the tree. Felt pieces are easy to position, and their flat shapes are especially readable against the snow. Hang the houses near the outside, turning their decorated faces toward the room.
Small caramel bows and a fine cream pom-pom garland connect the ornaments without competing with them. Place the copper balls in the spaces between the felt pieces. Too many house shapes grouped together can look crowded; spreading them down the tree gives each little roofline room.
A gingerbread-style star and a knitted cream skirt reinforce the handmade feeling. You can make the look simpler by using just one felt shape, copper balls, and narrow ribbon. Keep the theme on the tree and a few gifts rather than filling the surrounding table with more props.
Also read: 13 DIY Paper Christmas Decorations That Look Surprisingly Expensive
10. Bring Back Colorful Vintage Ornaments
A flocked tree does not have to be neutral. Bright reflector-style ornaments, jewel-tone baubles, and multicolored lights can create a nostalgic family-room tree with plenty of personality.
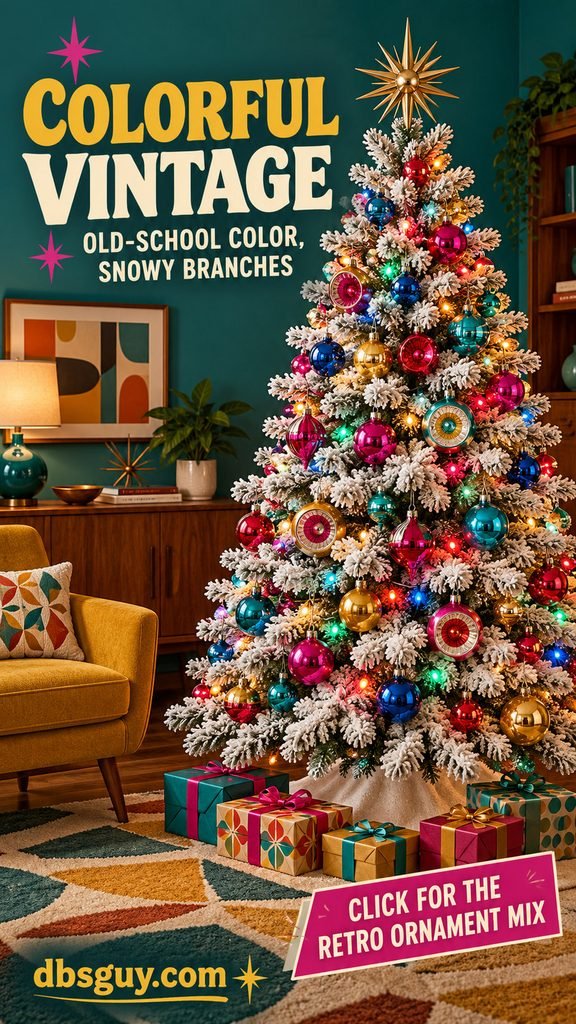
Choose a repeating group of colors, such as turquoise, magenta, sapphire, red, and gold. The collection can include different shapes and patterns, but repeating the colors helps heirlooms and newer pieces sit comfortably together.
Give reflector ornaments pride of place toward the front, where their recessed centers are visible. Place a few plain balls farther back so not every branch tip holds a statement piece. Turn on the lights as you arrange the ornaments; the colored glow changes how the finishes read.
A gold starburst topper is enough to finish the silhouette. Leave off thick ribbon and heavy tinsel so the reflector shapes remain easy to see. If cherished glass ornaments are fragile, reserve secure, higher branches for them and use lightweight alternatives where children or pets might reach. Let the patterned gift wrap echo a few tree colors rather than introduce a whole new palette.
Also read: 23 Vintage Christmas Tree Decorating Ideas That Bring Back Childhood Christmas
11. Style a Slim Flocked Tree With Navy Stars and Moons
A narrow tree needs decorations that respect its outline. Navy baubles, small gold stars, and thin crescent moons create a celestial look while keeping the tree slender enough for an apartment corner.

Begin with small ornaments—roughly 1½ to 2½ inches is a useful scale to try on a compact pencil tree. Place navy balls at different depths, then bring the gold shapes forward. A few larger accents can work, but keep them close to the branches so they do not widen the silhouette.
Use a lightweight gold star at the top and a compact navy collar at the base. Skip the wide ribbon; the little stars already provide movement. Warm-white lights give the dark blue a soft glow against the white coating.
Before committing to the spot, check the tree’s listed diameter and stand footprint. Leave the walkway and any door swing clear. Put gifts beside the collar only if they stay out of that route. A narrow tree is most useful when the entire arrangement—not just the branches—fits the room.
Also read: 17 Small Christmas Tree Decorating Ideas That Won’t Take Over Your Living Room
12. Make a Handmade Tabletop Tree Feel Fully Decorated
A small flocked tree can be a complete Christmas moment on a sideboard you already own. This concept combines red felt hearts, ivory clay discs, and a fine kraft-paper pennant garland in a warm kitchen setting.
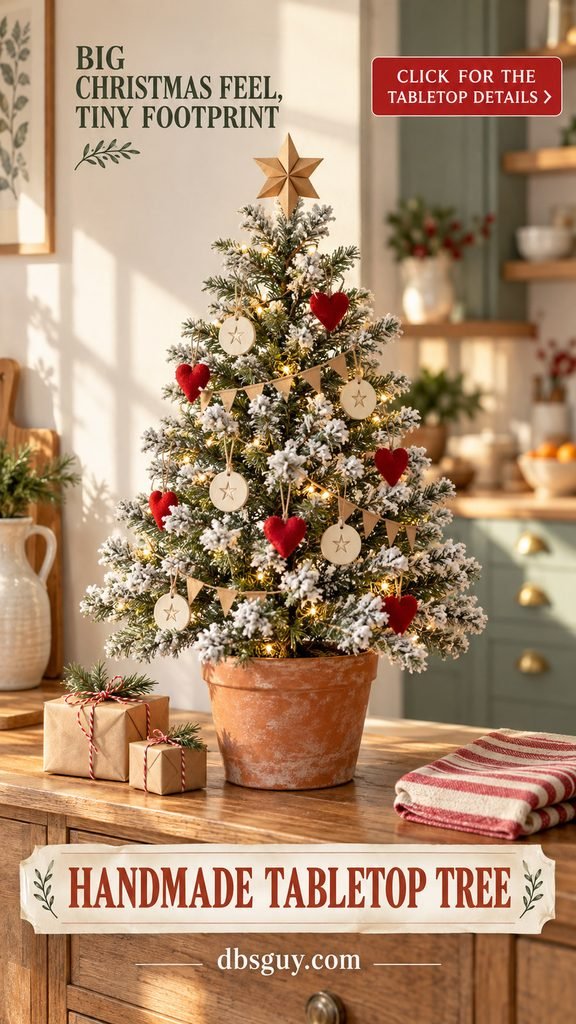
For a tree around 2 to 3 feet tall, keep the ornaments small and light. Make a hole for the hanging loop before air-dry clay hardens, and follow the clay maker’s drying directions before placing the discs on the tree. Red felt hearts supply the color; stamped star details give the ivory ornaments interest without adding another finish.
Drape the pennant garland in a few shallow curves and top the tree with a folded paper star. Use a compatible mini LED string; if it is battery-operated, tuck the pack behind the base where you can still reach its switch. Keep the tree away from the stove, sink, and food-preparation area.
A terracotta pot-style cover can conceal the tree’s own stand. Confirm that the stand fits securely inside and the sideboard can support the arrangement. Two small kraft parcels and a folded tea towel are enough around it. Leave usable surface space rather than turning the whole cabinet into a display.
Also read: 17 Small Apartment Christmas Decor Ideas That Save Precious Floor Space
How to Decorate a Flocked Tree Without Hiding the Flocking
The point is not to fill every opening. Build the design in layers, then stop when the palette and shapes read clearly from the room’s main viewing spot.
- Start with the silhouette and lights. Shape the branches gently, then check the light distribution. Turn off and unplug the lights while handling electrical connections or following the manufacturer’s adjustment instructions.
- Place the topper and ribbon. Position the largest fabric shapes before ornaments so you do not keep moving finished pieces to make room.
- Distribute your main colors. Set some plain baubles inside the branches and bring special shapes forward. Spread the largest ornaments around the height instead of concentrating them at one level.
- Add a few connecting details. A fine garland or a repeated small ornament can tie the look together. You do not need both on every tree.
- Check the base and step back. Cover the stand without blocking its controls. View the tree with lights on and off, and remove anything that hides a detail you like.
If you are decorating on a budget, shop your existing boxes first. Choose one idea, gather the ornaments that already fit it, and identify the single missing element—perhaps velvet bows or a small star topper. Buying a whole new ornament collection is rarely necessary to change the tree’s character.
Care and Placement Tips for an Artificial Flocked Tree
Some loose flocking can fall during assembly and reshaping. Lay down a sheet while setting up the tree, then clean the floor before adding the skirt or gifts. Support branches gently and handle them as little as possible once the decorating is finished.
Follow your tree’s own care instructions. Do not assume a cleaning method recommended for a plain green artificial tree also suits its flocked coating. Avoid spraying water, household cleaners, or extra snow products onto the branches unless the manufacturer specifically permits it. At the end of the season, remove decorations carefully, use an appropriately sized storage bag, and keep the tree in a cool, dry place without crushing the branches.
For placement and lighting, the U.S. Fire Administration’s holiday fire-safety guidance recommends keeping a tree at least 3 feet from heat sources, keeping exits clear, inspecting light strands for damaged wires, and following the manufacturer’s limits for connected strands. Keep open flames out of the tree arrangement.
Flocked Christmas Tree Decorating FAQs
What colors look best on a flocked Christmas tree?
Choose based on the contrast you want. Red, emerald, navy, and black make the snowy coating stand out. Champagne, blush, silver, and pearl create a softer effect. Start with one main accent and one supporting finish; the flocking already supplies plenty of white.
Should I put ribbon or ornaments on first?
For the ribbon-heavy looks here, place the ribbon before most ornaments. It is easier to secure the inner tucks without moving fragile pieces. Afterward, hang baubles around the loops. If you are using only small bows as finishing accents, you can add those after the main ornament arrangement.
How many ornaments does a flocked tree need?
There is no single useful number for every height, branch density, and style. Start with your largest pieces and one small group of supporting ornaments. Step back before adding more. A sparse woodland tree should show plenty of branches; a layered champagne tree will naturally use more decorations. Let the chosen look determine the amount.
What is the difference between a white tree and a flocked tree?
A white artificial tree has white needles. A flocked tree has a snow-like coating applied to its branches; many show green needles beneath it. Check close-up product images, because the amount of coating and the terms used in listings can vary.
What should I use at the base?
Repeat a material already in the design: an ivory skirt for champagne or blush, a woven collar for woodland, a bronze-toned collar for burgundy, or a compact navy collar for the slim celestial tree. Check the fit around the stand and keep plugs, pedals, or switches accessible.
How do I make a flocked tree look fuller?
First check whether the branches are shaped and spread as the manufacturer directs. Then use a few appropriately sized baubles or ribbon loops in visible gaps. Avoid pressing decorations into the snowy tips or adding filler everywhere; a little open space keeps the tree’s outline and ornaments readable.
The most satisfying choice is the one that fits your room and feels like your Christmas. Pick a palette, repeat a few shapes, and let the snowy branches do some of the decorating for you.