17 Small Christmas Tree Decorating Ideas That Won’t Take Over Your Living Room


A small Christmas tree can give the room a lovely focal point while leaving you space to sit, open the cabinet, and walk comfortably past the sofa. The trick is to plan the whole display: the branches, the stand, the topper, and whatever goes underneath.
These small Christmas tree decorating ideas cover both placement and styling. Some suit a slim floor tree; others work with a miniature tree on furniture you already own. Choose a spot that keeps the room usable, then add the details that make the tree feel like Christmas to you.
1. Create a Corner Tree With a Slim Profile
A narrow tree can turn an overlooked corner into the room’s holiday focal point. You still get height and lights, with a branch outline that is easier to fit beside existing furniture.

Measure the corner’s usable width and depth, then compare those measurements with the tree’s assembled dimensions. Terms such as “slim,” “narrow,” and “pencil” can describe different proportions, so check the actual width rather than relying on the name.
Style it: distribute a small collection of ornaments up the tree and use a compact topper. Keep ribbon and hanging decorations inside the planned outline instead of letting them trail into the walking route.
A corner beside a radiator or behind an opening door is not spare decorating space. If the tree crowds the sofa arm, reposition it or choose a smaller profile. The best corner is one you can see from your usual seat and move past easily.
2. Turn an Existing Side Table Into a Tree Spot
A tabletop tree brings the lights closer to eye level and uses a surface already in the room. This is a lovely option beside an armchair when there is little spare floor space.

Choose a sturdy table with a top large enough for the entire base. Check the tree’s branch spread, too: a stand that fits does not guarantee that the finished tree will stay clear of the chair or table edge.
Keep it useful: remove a few decorative objects, then leave room for the things you genuinely use there. Tiny ornaments, a small bow, and a neatly fitted base cover can complete the tree without covering the whole tabletop.
If this is your only place for a drink or reading lamp, consider another surface. Avoid gaining a tree spot by losing an everyday function you need. Set the tree directly on the stable table rather than raising it on a stack of books or an improvised stand.
3. Use a Console or Low Cabinet Instead of More Floor Space
A low cabinet can hold a slightly taller tabletop tree and keep the floor around it open. The display becomes part of the furniture arrangement rather than another object to walk around.
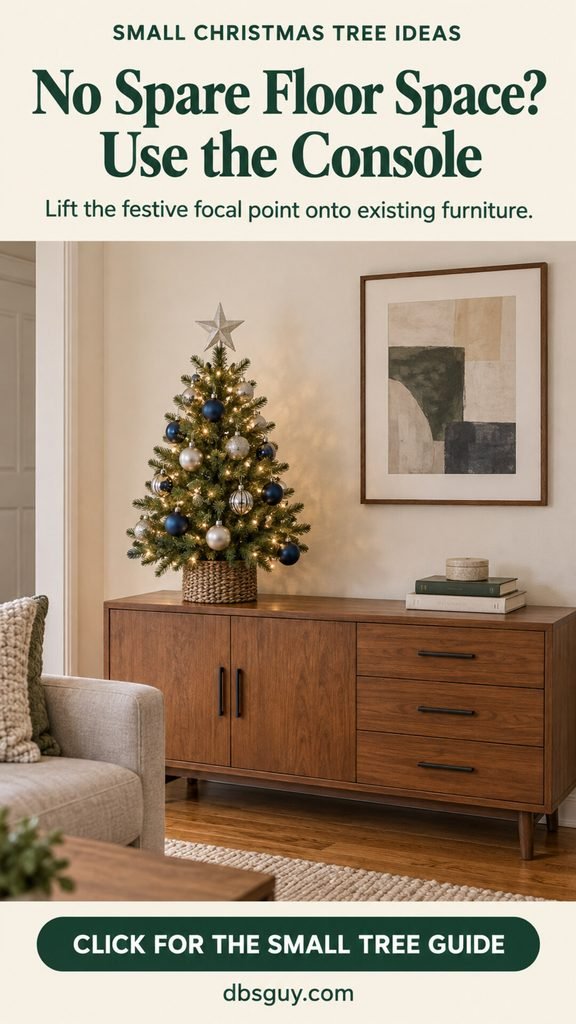
Measure the cabinet’s depth and the tree’s full base before choosing a tree. Place it where all support points sit securely on the top, with space around the edge. Include the furniture’s height when checking the tree and topper against the ceiling.
Make the arrangement feel balanced: let the tree occupy one part of the surface and keep nearby accessories simple. A closed book or existing picture can be enough; every inch does not need holiday decor.
Open the drawers and doors after positioning the tree, and check access to switches or other equipment. Keep the display clear of electronics’ ventilation openings. If you need the whole cabinet top daily, a smaller tree or a different location will be more practical.
4. Choose a Short Floor Tree With a Complete Silhouette
A shorter tree can look intentional when its shape and finishing details are complete. A compact floor tree beside an armchair often feels cozy, with comfortable open space above it.

Consider a tree around 4 to 5 feet tall as a starting point, then check its actual width. A short, broad tree may still occupy more floor space than a taller narrow one.
Give it a finished look: repeat a few ornaments from top to bottom, use a small topper, and dress the stand neatly. Let the whole tree stay visible rather than placing it behind tall gift bags or furniture.
Keep its supplied stand level on the floor. If you want the tree higher, choose a suitable tabletop tree and stable furniture designed to support the display. An improvised crate can add bulk and instability. A short tree does not need extra height to be the loveliest part of the room.
5. Try a Purpose-Made Flat-Back Tree Along a Shallow Wall
Sometimes the room has enough wall width for a tree but very little depth. A purpose-made flat-back tree is designed with a shallower rear profile, giving you a decorated front along that wall.

Check both width and depth in the product’s assembled measurements, including its stand. The reduced rear profile will help most when depth is your main constraint; it does not make every tree narrow.
Style the visible front: use small ornaments in a few repeated colors and keep ribbon close to the foliage. Set it up with the complete stand and follow its placement instructions.
Choose a tree designed for this shape instead of removing the back branches from a conventional tree. If you already own a suitable slim tree, check whether its existing outline fits the wall before buying another. Leave clearance for nearby furniture doors, access to the stand, and any connections you need to reach.
6. Let an Open-Branched Tree Feel Light and Airy
An intentionally open tree gives a small display a different kind of charm. Visible trunk sections and spaces between the branches make individual decorations easier to appreciate.

Choose this look because you enjoy its branch pattern, then check the assembled width as you would with any other tree. An airy appearance alone does not guarantee a smaller footprint.
Decorate lightly: hang thin paper stars, small wooden ornaments, or other lightweight pieces with enough space for their outlines to show. Place ornaments on branches that support them comfortably, and keep loops short enough that they do not collide with the layer below.
Skip the urge to fill every gap. If the tree becomes visually heavy, move a few decorations apart. For an artificial tree designed to be fuller, shape it according to its instructions; an open-branched style is a deliberate design choice, rather than the result of leaving the tree compressed from storage.
7. Repeat Two Colors That Already Belong in the Room
A small tree can still look busy when many colors compete in a tight area. Repeating two colors from nearby textiles or artwork helps the display settle into the room.

Look at the cushions, throw, rug, or picture beside the tree. Cream and muted blue could suit a calm room; red and natural wood might complement a warm traditional space. The greenery supplies another color of its own.
Use the collection you have: sort existing ornaments before shopping. Different shapes and finishes can work together when their colors repeat. Spread them through the tree so one side does not become a solid patch of a single shade.
You can still include a favorite ornament outside the palette. Give it a visible place and quieter neighbors. If the result feels too plain, add texture through a paper star or fabric detail before introducing several more colors. This keeps the small display easy to read.
8. Use Small, Lightweight Ornaments With One Favorite Focal Piece
A little tree has less branch space, so ornament size matters. Small pieces make room for the needles and lights, while one slightly larger favorite can give the arrangement a focal point.
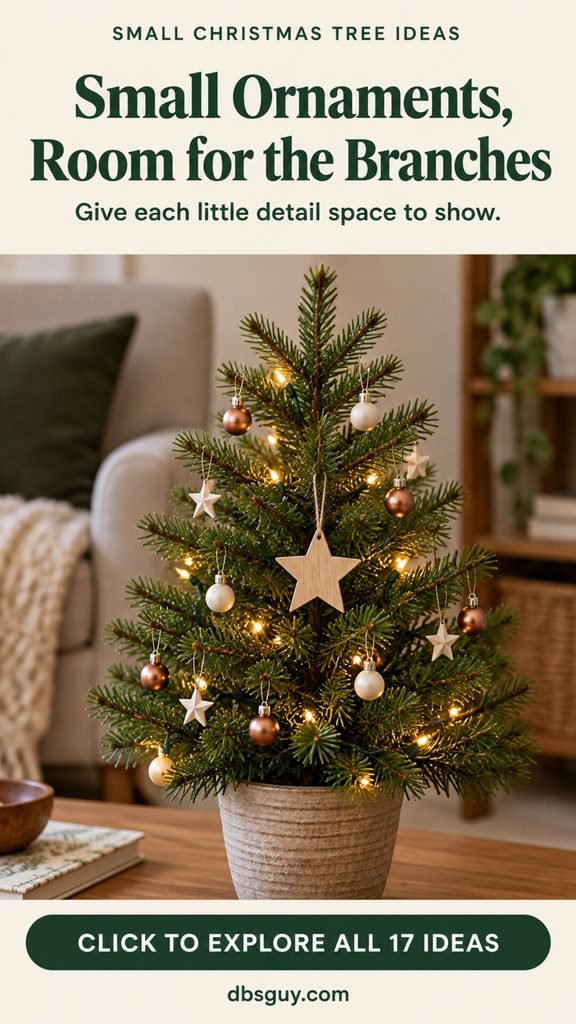
Test a few ornaments on the tree before hanging the whole collection. Check that branches hold their position and that decorations have space between them. Paper, thin wood, fabric, and lightweight unbreakable baubles are useful options.
Place the favorite first: choose a supported, visible branch for a special star, heart, or keepsake. Fill nearby areas with smaller, simpler pieces, leaving its edges easy to see.
If a heavy ornament pulls a branch downward or knocks into another piece, choose a more suitable decoration or display that keepsake elsewhere. Shorten adjustable hanging loops where it helps the fit. A miniature tree can show a small selection beautifully; the rest of the collection can wait for another display.
9. Let Narrow Ribbon Fall in Gentle Vertical Lines
Slender ribbon can add movement to a small tree while keeping its shape visible. A few gentle vertical sections are easier to scale than a large mass of loops.
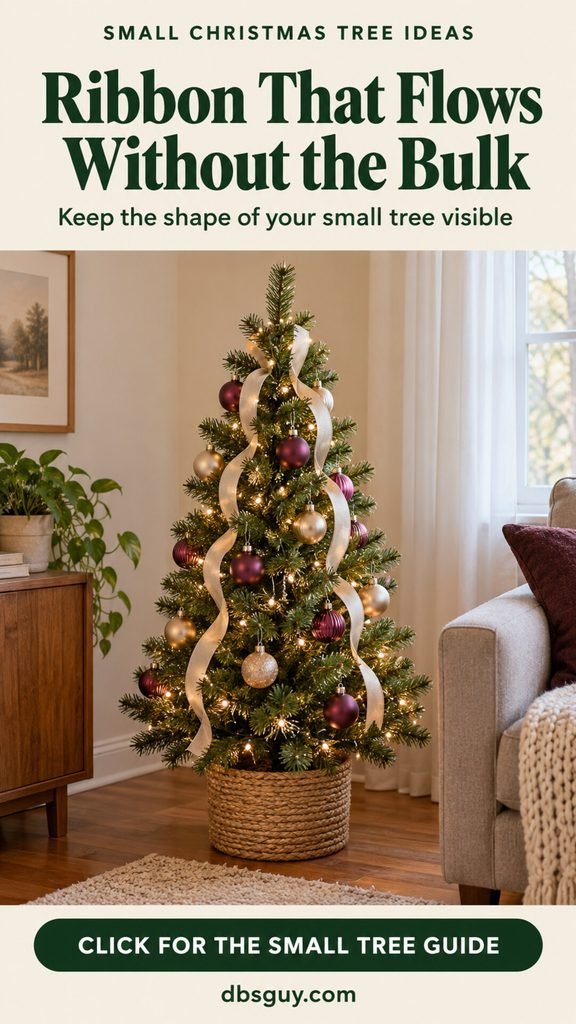
Try one narrow ribbon section first. Secure it near the upper branches with a suitable decoration tie, let it fall in a loose curve, and tuck or secure it again farther down. Keep the curve close to the foliage so it does not increase the tree’s usable width.
Check from your seat: you should be able to see both the ribbon and green branches around it. Repeat another section only if the tree needs it. Soft ribbon can drape naturally; wired ribbon can hold a more deliberate curve.
Finish the ends within the tree’s outline, above the floor or tabletop. If the ribbon hides several ornaments, adjust its route or use a narrower piece. Match its scale to the tree you have, rather than copying a full-size tree’s ribbon quantity.
10. Add Petite Bows With Short, Neat Tails
Small bows are a cheerful way to repeat a color without using a continuous garland. They are especially charming on a tabletop tree where each little detail is easy to see.

Make one sample with narrow ribbon and hold it beside an ornament to judge the scale. Tie two small loops, adjust the center, and trim the tails so they end neatly within their branch pocket. Secure each bow to a supported branch.
Space them out: start with a few bows in different parts of the tree, then add plain ornaments between them. Keep the upper bows particularly compact where the tree narrows.
If a bow covers the ornament below it, shorten its tails or move it sideways. Use saved ribbon if it has enough length for secure ties. A few tidy bows can carry the theme; there is no need to turn every branch into a ribbon display.
11. Finish With a Compact, Lightweight Topper
The topper is often the piece that makes a small tree feel finished. A simple star or modest bow can do that while preserving the tree’s proportions.

Hold the topper in position before securing it, then look from across the room. Check the width against the upper branches and the weight against the support point. A flat paper star may suit a miniature tree better than a heavy finial or tall spray arrangement.
Measure the finished height: include the stand, any furniture beneath the tree, and the amount the topper adds above the tip. Leave suitable overhead clearance and follow the tree and topper’s attachment instructions.
If the top leans, use a lighter topper or another compatible attachment instead of forcing the tip upright. A small bow tied to stronger upper branches can be an alternative. Keep the topper’s color connected with at least one detail below so it belongs to the display.
12. Keep the Skirt or Collar Close to the Stand
A narrow tree can lose its small-space advantage when the base spreads across the floor. Plan the skirt or collar as part of the display’s footprint.

Measure the complete stand, including its feet, before choosing a cover. A skirt needs to cover those supports neatly; a collar needs to fit around them and allow proper setup. Check the collar’s outside dimensions as well as its opening.
Keep the finish compact: arrange fabric in shallow folds within the space you planned, with edges clear of the walking route. Use the full supplied stand; its feet should not be shortened or tucked away to make a decorative cover fit.
Leave access to a fresh-cut tree’s water reservoir. Keep electrical connections uncovered and accessible, and avoid running cords under the fabric. If the only skirt you own is much too large, neatly folded suitable fabric may be easier to fit around the stand.
13. Give Real Gifts One Small, Tidy Spot
Gift wrapping can finish the tree’s color story, but packages quickly occupy more space than the branches. A small, deliberate group is easier to live around.

Choose a few real gifts to display near the base, with larger packages stored in another suitable spot until you need them. Place boxes close together where they do not block access to the stand or extend into the walking route.
Connect the colors: repeat one tree color in the ribbon or tags. Kraft paper with a dark-green tie, or ivory wrap with red ribbon, can make an ordinary package part of the display.
Keep any stack low and stable, and check the arrangement after adding new gifts. There is no need to buy decorative boxes to make the base look fuller. If packages are becoming the room’s obstacle course, pare the visible group back. The tree can still look festive with clear floor around it.
14. Use Small Bulbs for a Gentle Evening Glow
Small bulbs suit the scale of a miniature tree and leave its ornaments visible. In the evening, a modest tree with a balanced glow can become the room’s most inviting detail.

Check suitable light strings before decorating, or test a pre-lit tree according to its instructions. For a tree you string yourself, distribute lights through visible branch areas and at different depths where the product’s instructions allow, rather than concentrating them along one front edge.
Judge the effect with the lights on: look for very bright patches and dark sections while keeping the greenery visible. Warm white is a styling option for a soft look; small multicolored bulbs can suit a more playful tree.
Use lights listed by a qualified testing laboratory and rated for their location. Follow the manufacturer’s connection limits and keep damaged strings out of the display. Brightness and bulb count vary by product, so a single universal lights-per-foot number is not a useful rule for every small tree.
15. Put a Tiny Village on the Branches
If you love a little Christmas village, let that theme live on the tree. Lightweight house ornaments can bring the storybook feeling while keeping the cabinet or floor below clear.

Choose small house ornaments designed to hang, with secure loops or eyelets. Place them on supported visible branches, then add simple baubles between them. Thin wood, card, or fabric shapes can be easier to balance on a miniature tree than bulky pieces.
Keep the theme focused: repeat a few roof or house colors and let the lights provide the atmosphere. A plain topper and small base cover give the little houses room to stand out.
Use hanging ornaments for this idea rather than trying to suspend heavy ceramic village buildings. If your treasured village is a separate display, choose which spot has room for it instead of expanding the tree’s base to accommodate every decoration. A small collection can still tell a lovely holiday story.
16. Extend the Display Up the Wall With One Simple Accent
A little tree can feel like part of a larger holiday moment when one detail continues above it. A small wreath or seasonal picture makes use of existing wall space.

Start with the tree’s position, then place the wall accent where the two shapes remain distinct. Leave a visible gap above the topper rather than letting the wreath touch the tree. An unlit wreath is an easy styling option because it does not add another lighting connection.
Use suitable support: follow the hanging hardware’s instructions for the wall surface and the decoration’s weight. Existing appropriate hardware may give you a simple way to replace a picture for the season.
Repeat one color or material, such as an ivory bow, in both parts of the display. Keep the surface below simple. If you add several wall pieces and more accessories, the small tree may lose its focal role; one well-positioned accent is enough to try first.
17. Make Room With One Deliberate Furniture Swap
Sometimes an existing small tree already fits the room once an unnecessary object moves. A spare stool, extra plant stand, or occasional accent table may be occupying the most useful tree spot.

Choose something you can comfortably store elsewhere for the season. Keep the seating, work surfaces, and storage access you use every day. Place the tree in the cleared area, then walk the room’s usual routes and check nearby drawers and doors.
Style within the space: keep ornaments, ribbon, the base cover, and displayed gifts inside the area you have made. Moving one item will not help if several new accessories expand the tree into the path again.
If the room only works when a chair is pushed aside or a door stays closed, try a smaller tree or a tabletop option. The goal is a holiday arrangement you can enjoy comfortably for the whole season, with the room’s ordinary routines still intact.
Measure the Finished Display Before Choosing the Tree
“Small” can mean shorter, narrower, or shallower. Decide which measurement is causing the problem in your room before choosing a tree.
- Width and depth: measure the area you can use while keeping the walking route open. Compare it with the assembled branch spread, stand, base cover, and gift arrangement.
- Total height: include the tree’s stand, the surface underneath, and the height the topper adds. Check how the seller measures its tree height; do not assume every listing uses the same convention.
- Tabletop fit: check the full base against the furniture top and its supported load. Keep support points on the surface, with space around the edges.
- Everyday access: open nearby doors and drawers, sit in the adjacent seat, and walk the route you normally use. Leave room to reach the tree stand and lighting controls.
For example, a tree described as 24 inches (about 61 cm) wide can still need more space once a larger skirt and packages sit below it. Compare the finished display with the available area, rather than treating branch width as the whole footprint.
Height matters differently on furniture. An 8-foot ceiling is 96 inches tall; a 30-inch cabinet leaves 66 inches above its top before allowing for the topper and clearance. That is about 244 cm minus 76 cm, leaving 168 cm. Use your room’s actual measurements instead of assuming that a tree which fits on the floor will fit on a cabinet.
Mark the proposed footprint with removable tape suited to your floor, or measure its edges with a tape measure. Live with that outline briefly before setting up the tree. It is much easier to adjust an empty footprint than a fully decorated display.
A Simple Decorating Order for a Small Tree
A compact tree is easier to balance when you add its biggest visual pieces first. Check the view from your usual seat between stages.
- Set up the base and shape the tree. Follow the tree’s instructions, check that it sits securely, and arrange artificial branches as intended.
- Test the lights. Check the glow before ornaments obscure the branches, and keep connections accessible.
- Try the topper and ribbon. Confirm their scale and position before filling the remaining spaces.
- Hang the focal ornaments. Give the pieces you love supported, visible positions, then add simpler ornaments around them.
- Finish the base and edit the display. Add a neat cover and a few real gifts if there is room. Move or remove pieces that crowd the outline.
Keep the tree clear of exits and at least 3 feet (about 0.9 m) from heat sources. Replace light strings with damaged cords or loose bulb connections, never decorate the tree with lit candles, and turn its lights off before going to bed or leaving home. For a fresh-cut tree, check the reservoir and add water daily. Compact placement still needs room for these basics.
Questions About Decorating Small Christmas Trees
What size Christmas tree works best in a small living room?
Choose according to the limiting dimension. A slim tree may help when width is tight, a flat-back design may help with depth, and a tabletop or shorter floor tree may suit lower ceilings or crowded layouts. Check the full assembled dimensions and the finished display before deciding. There is no one height that fits every apartment.
Can a small tree be the main Christmas tree?
Yes. Give it a clear focal position, a simple topper, and a nicely finished base. A selected ornament collection can make it feel personal and complete. You can display other decorations elsewhere if there is room, but the tree does not need a second larger tree beside it.
How do I make a tabletop tree look intentional?
Fit the tree to a sturdy surface, repeat a few colors, and keep the surrounding objects simple. Check the total height with the furniture included. Small ornaments, a proportionate topper, and an appropriate base cover help the display feel finished. Keep the table useful for the room’s everyday needs.
Do all the ornaments need to be miniature?
No. A slightly larger lightweight focal ornament can work well when a branch supports it and there is space around it. Use smaller pieces for the rest of the display. Test the weight and hanging length rather than choosing by diameter alone, and avoid pieces that pull branches out of shape.
Can I use ribbon on a very small tree?
Yes. Try narrow ribbon, petite bows, or a small number of tucked sections. Make one sample and view it on the tree before cutting the rest. Keep curves and tails within the branch outline so the ribbon complements the small silhouette.
Where should the presents go if the tree has very little space underneath?
Display a small group near the base if it fits, and keep larger gifts in another suitable place until you need them. A tabletop tree may need no presents around it at all. Coordinate the wrapping if you enjoy that detail, while leaving access to the stand and keeping the walking route clear.
Keep the Christmas Feeling and the Room You Use
The most satisfying small tree is one that belongs in the room. Its lights are visible from your favorite seat, its ornaments have space to show, and its base leaves you a comfortable route past the sofa.
Choose the location first, then build a display that fits it. Try a few decorations, check their scale, and finish the details you notice most. A little tree can hold plenty of Christmas feeling while your living room stays comfortable throughout the season.




