

A paper star can change the feeling of an entire corner. A few folded ornaments can give an ordinary tree a softer, more personal look. And a small village made from cardstock can feel just as inviting as a collection you’ve spent years gathering.
The lovely part is that the material doesn’t need to be fancy. Clean cuts, repeated colors, and a little space around the finished pieces do much of the work.
These DIY paper Christmas decorations range from simple garlands to projects that need a bit more patience. Each one includes materials, a workable starting size, construction steps, and a finishing detail that helps it look at home in a living room, entryway, or dining space. You can make them with scissors; a cutting machine is optional.
Choose one large decoration and a smaller project that shares its colors. There is no need to spend December making all thirteen.
Choose Your Paper Before You Cut
Start by deciding whether the paper needs to fold, curve, or stand upright. Those are different jobs.
- For stars, snowflakes, rosettes, and angels: use paper that folds without fighting back. Plain copy paper, uncoated wrapping paper, and thin kraft paper are useful starting points.
- For baubles, leaves, and bows: try medium-weight craft paper or light cardstock. It needs enough body to hold a curve, but it should still bend cleanly.
- For freestanding trees and house fronts: choose firm cardstock. Around 200–250 gsm is a reasonable starting range for small pieces; make a sample because papers with the same weight can behave differently.
Gsm describes the paper’s weight per square meter. If a package only lists a US pound weight, don’t assume the number converts directly across all types of paper. A quick fold-and-stand test is more helpful than buying by the label alone.
Gather scissors, a ruler, pencil, glue stick, paper-safe craft glue, strong double-sided craft tape, and string. A blunt scoring tool or an empty ballpoint pen helps with thick card. Use it gently against a ruler to crease the surface without cutting through.
Pick two main colors and, if you want, one accent. Ivory with antique gold feels soft. Olive with burgundy feels warmer. White and kraft paper work with almost any tree ornaments you already own.
Keep these projects away from cooking areas, heaters, and active fireplaces. Paper decorations should remain unlit, with separate room lighting providing the atmosphere. The U.S. Fire Administration’s holiday guidance recommends battery-operated flameless candles as an alternative to burning candles. Give even flameless accessories their own clear space, and follow the light manufacturer’s instructions.
1. Turn Plain Paper Bags into Oversized Hanging Stars
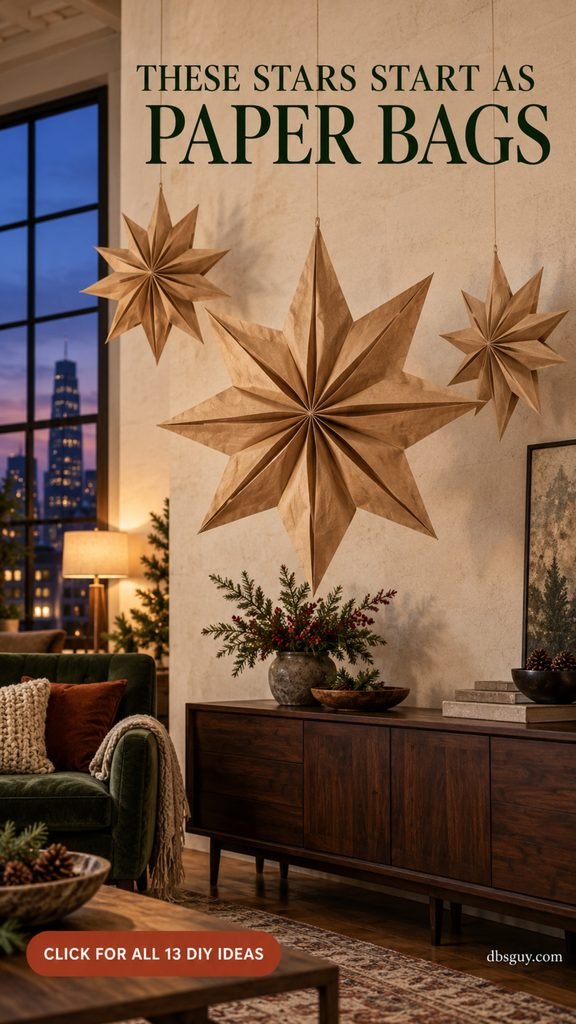
This is a satisfying place to start if you want one decoration that has presence. The folded bags open into a dimensional star, so the finished piece looks much more substantial than its flat stack of materials.
You’ll need: eight matching plain paper lunch bags, a glue stick, scissors, a hole punch, and string. Thin bags are easier to cut through than thick shopping bags.
How to make it:
- Lay a flattened bag with its opening at the top. Apply glue across the closed bottom edge and up the center, forming an upside-down T.
- Press another bag onto it in the same orientation. Repeat until all eight are stacked.
- Cut the open end of the stack into a centered point. Keep the glued bottom and center intact.
- Gently open the stack into a circle. If it won’t reach without strain, close it and add another matching bag rather than pulling harder.
- Glue the first and last faces together. Reinforce a hanging point with a small paper patch, punch through that area, and add string.
Hobbycraft’s paper bag star tutorial shows the glue placement if you want to see the bag orientation before starting.
The finishing detail: make one large star the focal point and put smaller stars nearby with space between them. A loose cluster looks lighter than a tightly packed wall.
For a collapsible version, try clips at the closing seam instead of permanently gluing it. Test whether the clips hold your particular bags securely before hanging. Keep strings short and away from areas where children or pets can reach them.
2. Build a Christmas Wall with Pleated Paper Rosettes
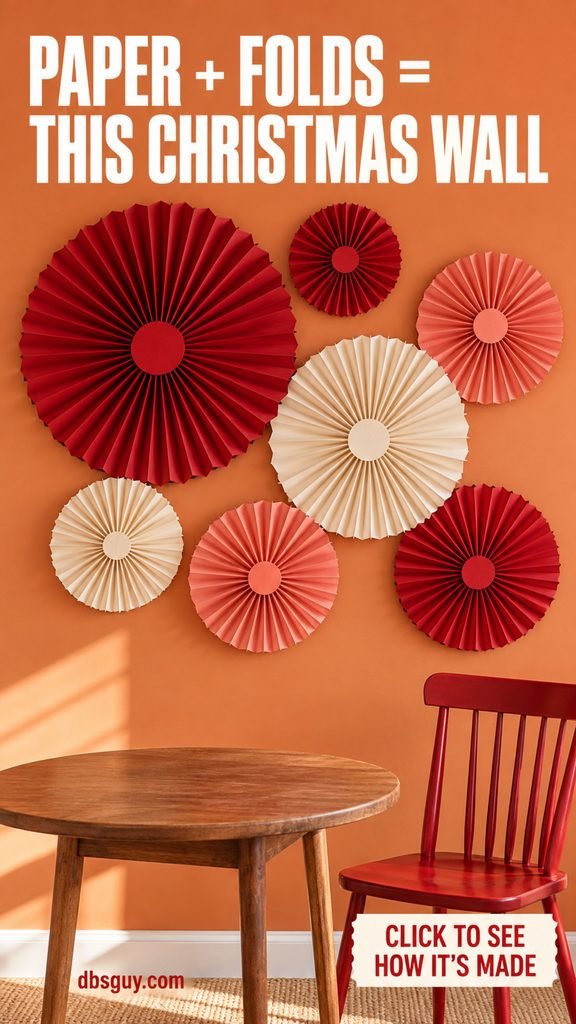
Rosettes bring color to an empty wall without needing a shelf underneath. A handful in burgundy, ivory, and muted coral can make a dining nook feel dressed for the holidays.
You’ll need: foldable paper, a ruler, pencil, glue or craft tape, small card circles, and hanging loops.
How to make it:
- For a practice rosette, cut three equal rectangles about 8 by 10 inches. On each one, fold back and forth in half-inch pleats across the 10-inch direction, making an accordion strip about 8 inches long.
- Fold each compressed strip in half end to end. Glue the two inner edges together so it opens into a small fan.
- Join the outer edges of the three fans. Open them gently into a round rosette, then join the final seam.
- Add a small matching card circle at the front and back of the center to support the joins.
- Secure a short hanging loop to the reinforced back. Use a mounting method suited to the surface and the decoration’s actual weight.
The tesa paper rosette guide illustrates how folded fans join together.
If the circle feels strained, add another fan rather than forcing the folds open. Paper thickness and pleat width affect how willingly it spreads.
The finishing detail: vary the rosette diameters while keeping the colors consistent. Arrange the pieces on the floor before mounting them. Let two overlap slightly, then leave a visible gap beside the largest one. Those pauses give the wall a shape instead of turning it into a solid patch of paper.
3. Make Cardstock Trees That Stand Up and Pack Flat
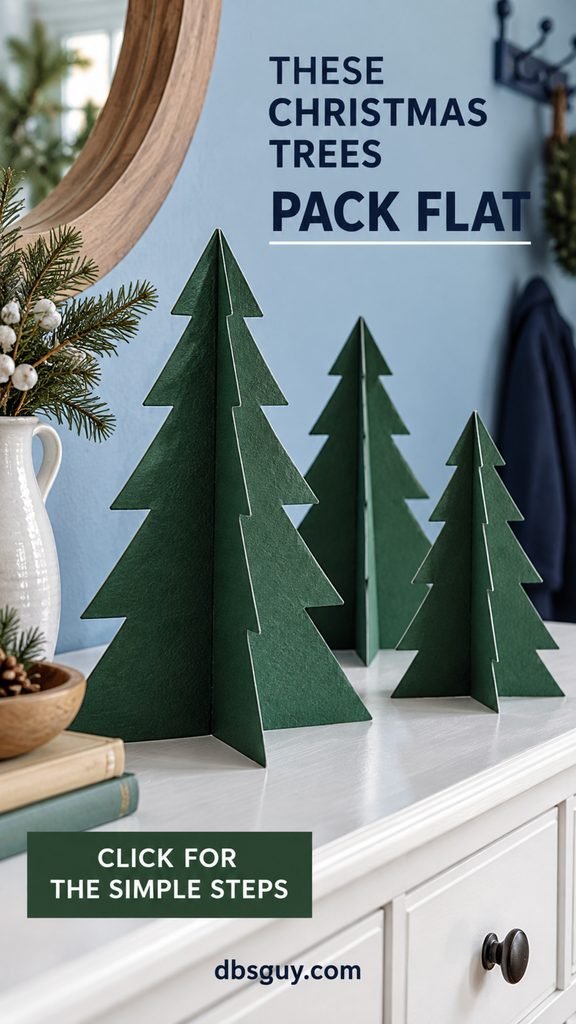
These small trees suit a console, bookshelf, or desk. Two flat shapes cross at a right angle to create a freestanding tree, and they separate again when it’s time to pack away Christmas.
You’ll need: firm cardstock, scissors, a ruler, and a pencil. Start with one tree about 7 inches tall and 4 inches wide at the base.
How to make it:
- Draw a simple fir silhouette with a broad, level bottom. Cut it out and trace it to make an identical second piece.
- Mark the halfway point of both trees’ full height.
- Cut one narrow center slot from the top down to that mark. Cut the other from the bottom up to its halfway mark.
- Slide the slots together so the pieces meet at a right angle. Widen each slot only enough to accommodate the card thickness.
- Set the tree on a flat surface and trim any uneven bottom edges.
This uses the same interlocking principle shown in Crayola’s 3D paper shape ornament instructions.
The finishing detail: keep the outline simple and make trees in slightly different heights. Deep green card looks good against a pale wall; ivory silhouettes stand out on darker furniture.
A floppy tree needs firmer paper or a smaller silhouette. More glue won’t fix a narrow, unstable base. If your first tree leans, check that both slots reach the midpoint and that the bottom edges sit level. Fit them while the pieces are still plain, then add any decoration.
4. Glue Folded Circles into Ribbed Paper Baubles
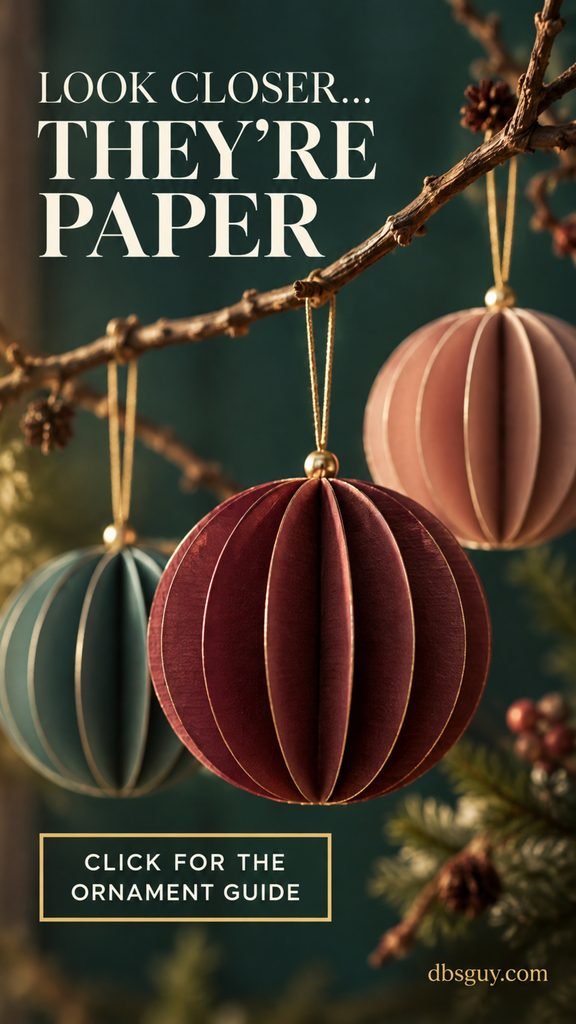
These ornaments get their shape from repeated paper circles. Light catches the edges of the ribs, giving them a sculptural look even when the paper is completely matte.
You’ll need: ten matching paper circles, a cup or circle punch, scissors, glue, and a short hanging loop. Circles around 3 inches across make a manageable first ornament.
How to make it:
- Trace and cut the circles carefully. Trim irregular edges before assembly.
- Fold each circle in half with your chosen display side facing inward.
- Glue the outside half of one folded circle to the outside half of the next, keeping the straight folds and curved edges aligned.
- Continue until you have a stack. Before closing the ornament, secure the ends of a hanging loop along its central spine.
- Join the remaining exposed halves to form the sphere. Let the glue set, then distribute the ribs evenly.
Red Ted Art’s paper bauble tutorial includes photos of this folded-circle method.
These are ribbed ornaments, with open spaces between the paper fins. True honeycomb ornaments use a different, more detailed gluing pattern.
The finishing detail: make several in related colors, with one color repeated. Burgundy, dusty rose, and muted teal feel rich without needing glitter.
Use thin layers of glue so the edges don’t curl. If a rib looks crooked, correct it while the join is still movable. An optional small bead threaded above the bauble can tidy the hanging loop. Let the ornament dry completely before hanging it, and store it in a small box that protects the open shape.
5. Roll Kraft Paper into a Minimal Tabletop Forest
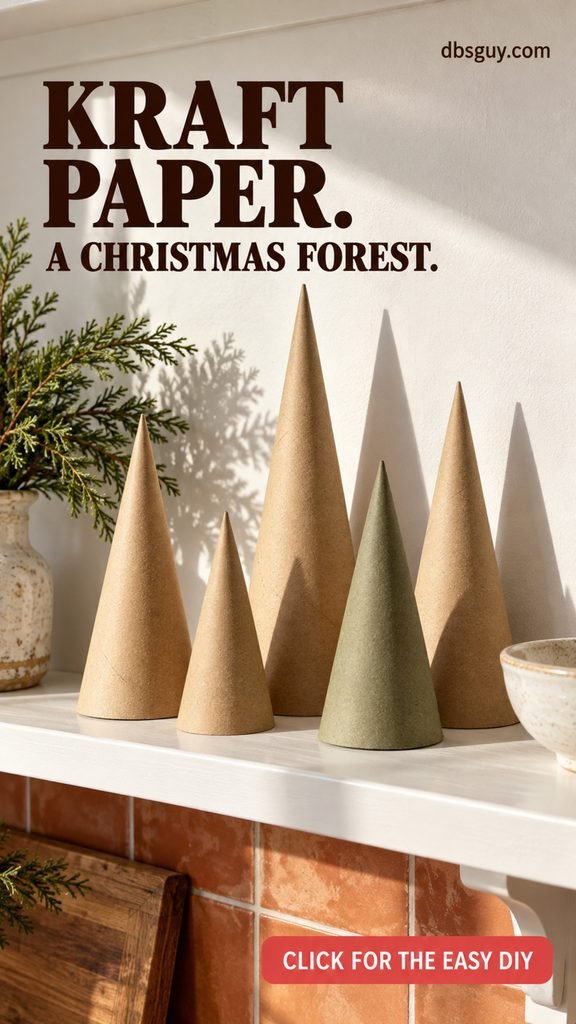
A cluster of smooth paper cones brings a little Christmas shape to a shelf without adding much visual clutter. The appeal comes from the quiet surface and the shadows between the trees.
You’ll need: kraft card or firm craft paper, scissors, craft tape or glue, a pencil, and a plate to trace.
How to make it:
- Trace a circle about 10–12 inches across and cut it out. Divide it into quarters.
- Take one quarter-circle sector. Curve its two straight edges toward each other, keeping the original center point at the cone’s tip.
- Overlap the straight edges slightly to form a narrow cone. Secure the seam along its length.
- Set it upright and trim the bottom carefully if it rocks. Avoid cutting away so much that one side becomes visibly shorter.
- Repeat with smaller sectors for different heights. The finished tree will be a little shorter than the sector’s straight-edge length.
Keep the cone hollow and unlit. It’s a paper sculpture, not a shade for a candle or bulb.
The finishing detail: face the seams toward the wall and vary the heights enough that each tree is visible. Try three kraft trees with one sage-green cone, or keep the whole group brown for a softer look.
If you only have thin gift wrap, attach it to light card before forming the cone. Let the adhesive set while the sheet lies flat. A shiny pattern on every tree can overwhelm this simple arrangement; one patterned cone among plain ones is plenty.
6. Layer Paper Leaves into a Full Christmas Wreath
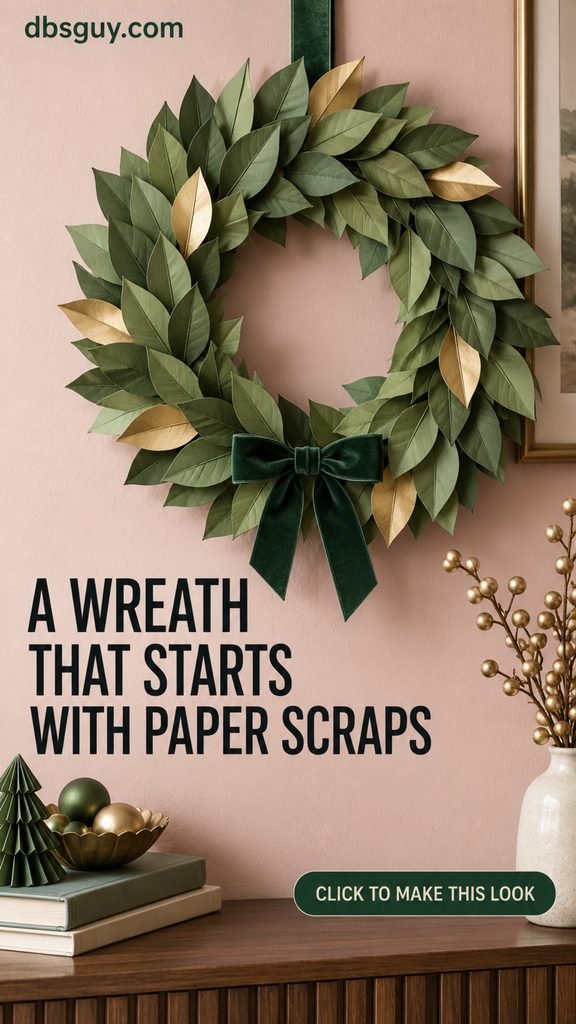
A paper leaf wreath is a good project for using several shades of one color. Olive, sage, and a few antique-gold leaves create depth without adding lots of different decorations.
You’ll need: a cardboard ring, foldable craft paper, scissors, paper-safe craft glue, and a short hanging loop. For a small wreath, start with a ring about 10 inches across with a 6-inch opening. Prepare around fifty leaves, then cut more if your arrangement needs them.
How to make it:
- Draw one pointed oval leaf about 3 inches long and use it as a tracing pattern.
- Cut the leaves and gently crease each along its length. Open it slightly so the sides angle away from the center.
- Attach a hanging loop securely to the back of the ring before covering the front.
- Glue a row of leaves onto the ring by their lower ends, with the tips pointing in the same direction around the circle.
- Add overlapping rows toward the inner and outer edges. Cover the leaf bases and any visible cardboard, then let the wreath dry flat.
Remodelaholic’s paper leaf wreath project shows how overlapping paper leaves can cover a cardboard form.
The finishing detail: distribute your accent color lightly rather than putting gold into every section. Add a small ribbon bow if you like, then stop before the wreath becomes too busy.
Test the hanging loop over a table before mounting the wreath. For a thin cereal-box ring, glue two rings together to make the base firmer. Use clean, dry cardboard so stains and moisture don’t become part of the finished decoration.
7. String Cut-Paper Stars into a Simple Garland

This is the easiest project to match to decorations you already own. Repeat a color from your tree ornaments, or make ivory stars for a dark console or bookcase.
You’ll need: light cardstock, a pencil, scissors, string, and tape or small paper tabs with glue. A star-shaped cookie cutter can help if drawing isn’t your favorite part.
How to make it:
- Measure the display area, allowing extra string at both ends for attachment and a shallow drape.
- Draw or trace one star about 3 inches across. Cut it out and use it as the pattern for the others.
- Cut enough stars for your chosen spacing. Lay them out beside the string before attaching anything.
- Fix the string to the back of each star with craft tape, or glue a small paper tab across it. Keep the stars facing the same way.
- Let all glued tabs set before lifting the garland. Attach the ends to secure, suitable supports.
The finishing detail: keep the distance between the stars fairly consistent. Begin with gaps of about 2–3 inches, then adjust the layout to suit the space. A little more open string can be useful above a narrow shelf.
If a star keeps tipping forward, move its attachment closer to the top. Don’t hang it from a fragile point.
Make the first garland shorter than you think you need. You can add another length later, but a single clean curve often gives a small wall enough Christmas detail. Keep it separate from light strands, and leave drawers, doors, and walking routes easy to use.
8. Hang a Small Cluster of Cut-Paper Snowflakes
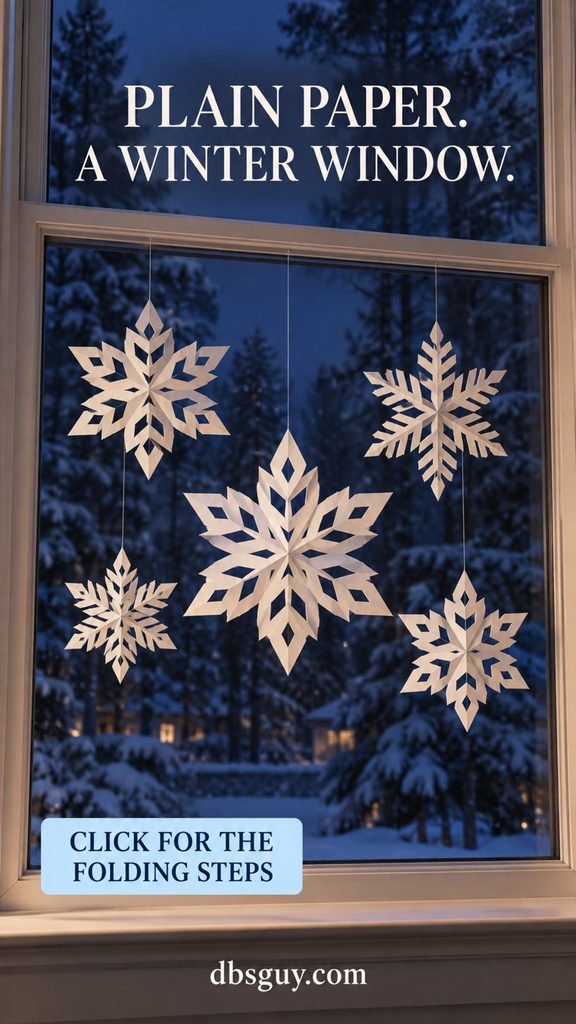
White paper snowflakes look especially pretty against dark glass or a deep-colored wall. Their cut openings create the detail; you don’t need glitter to make them interesting.
You’ll need: plain paper, scissors, pencil, thin thread, and a suitable hanging point. Try a 6-inch square for your first snowflake.
How to make it:
- Fold the square diagonally into a triangle, then fold that triangle in half again.
- Keeping the fully folded center point as the tip, fold the small triangle into thirds. Bring one side inward, then the other over it, adjusting until the three layers overlap evenly.
- Trim off the uneven ends opposite the center tip so the narrow wedge has a clean outer edge.
- Snip small triangles or curves from the sides. Leave connected paper along both folded edges; a cut all the way across will separate the design.
- Open the snowflake gently. Flatten it between clean sheets of paper under a book before attaching a short thread to a sturdy section.
For a visual check on the folding sequence, Gathered’s paper snowflake tutorial includes step photos.
The finishing detail: hang a small group in two or three sizes instead of covering the entire window. Keep the lower view clear so the shapes have a quiet backdrop.
Choose a fixed pane or a wall location where threads won’t interfere with window handles, blinds, or an escape route. Keep paper away from damp glass. If condensation is common, move the snowflakes to an interior wall rather than trying to coat them into weatherproof decorations.
9. Create a Standing Paper House Village
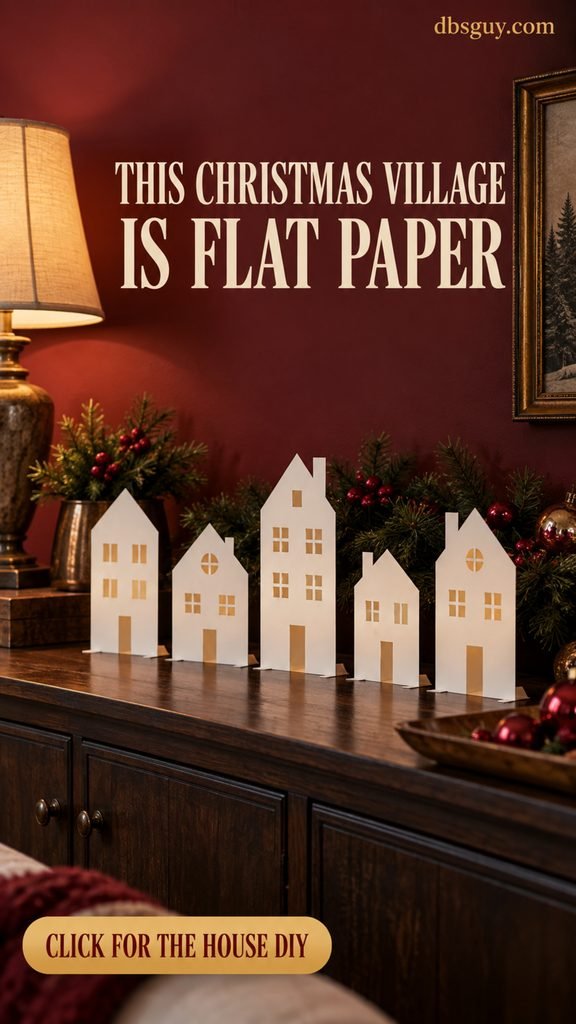
A paper village can be wonderfully simple. Flat house fronts with different rooflines suggest a little street without requiring box construction or printable building templates.
You’ll need: firm cardstock, scissors, pencil, glue, and extra card for supports. A cutting mat and craft knife are optional for window openings; adults should handle those cuts.
How to make it:
- Draw house fronts about 4–7 inches tall, using rectangles with pitched roofs. Vary the widths, but give every house a level bottom.
- Cut out the fronts. Draw windows and doors, or carefully cut openings while the card lies flat on a cutting mat.
- For each house, cut two support strips about 1 inch wide and 2 inches long.
- Fold each strip in half at a right angle to make an L. Glue one upright half to the back of the house near its bottom, leaving the other half extending backward as a foot.
- Let the supports dry. Set the houses upright and spread the feet enough to keep them balanced.
The finishing detail: leave space between buildings and put the tallest house slightly away from the center. A row of identical roofs feels more like a repeated pattern; a few different heights feel like a small neighborhood.
A warm table lamp nearby can give the scene an evening atmosphere. Keep the houses separate from the lamp and leave them unlit inside.
If the fronts lean, use firmer card, wider support feet, or smaller houses. For a window display, put them on a broad, dry sill where they won’t touch the glass or obstruct the window. Keep the paper shapes indoors.
10. Fold Paper into Small Pleated Angel Ornaments
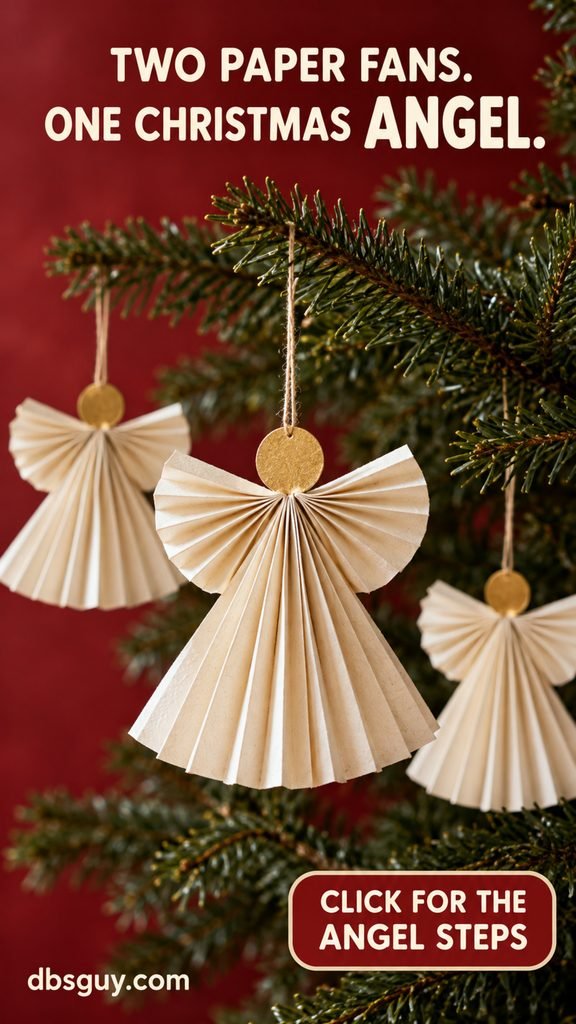
Pleated angels bring a gentle handmade detail to an unlit branch display or a clear part of the tree. The symmetrical folds do most of the decorating.
You’ll need: two matching paper rectangles per angel, scissors, ruler, glue or strong craft tape, a small cardstock circle, and a short hanging loop. Try rectangles about 4 by 6 inches for your first pair.
How to make it:
- Accordion-fold each rectangle in quarter-inch pleats across its 4-inch width, making two compressed strips about 6 inches long.
- Measure about 2 inches down from the top of each strip. Bend the upper section outward at a right angle, one to the left and one to the right.
- Join the long lower inner edges together to form the skirt. Secure the hanging-loop ends between the halves near the top.
- Spread the skirt gently. Fan each short upper section into a wing, attaching its lower edge to the skirt where needed to hold the shape.
- Glue a small flat cardstock circle above the joined body for the head. You can pass the loop through a small hole near the top of the circle to guide it, with the loop ends still anchored to the body. Let all joins set before hanging.
The finishing detail: use ivory paper with a plain gold card head, or keep everything white. A simple face-free circle suits the clean folds.
If the skirt closes up, add a narrow paper brace behind it while holding the folds open. Make the ornament smaller if the paper feels heavy or stiff. The body should carry the hanging loop; don’t depend on the small head to support the whole angel.
A trio looks lovely on a branch, with short loops and enough space that the wings don’t bump into one another.
11. Make Layered Paper Poinsettias for Place Settings
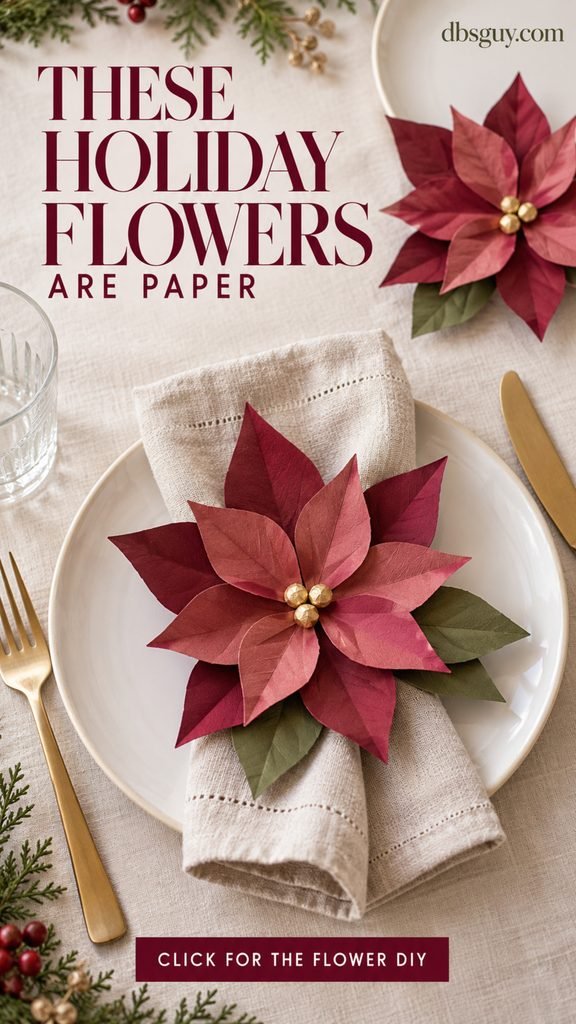
A small paper flower on a cloth napkin makes a dinner place setting feel considered. You can repeat the same design around the table without buying a separate ornament for every guest.
You’ll need: burgundy or red craft paper, a second shade of the same color, green paper, small gold paper scraps, scissors, glue, and a small card circle for the backing.
How to make it:
- Draw a pointed, leaf-like petal about 2 inches long. Trace and cut six petals in your main color.
- Cut another six slightly smaller petals in the second shade, plus three green leaves.
- Give each petal a gentle lengthwise crease, keeping it open rather than folded shut.
- Glue the six larger petal bases around the backing circle. Add the smaller layer above, rotating it so the petals sit between the first layer.
- Attach the green leaves underneath. Crumple three tiny gold paper scraps into dots and glue them at the center. Let the flower dry before placing it on a napkin.
The finishing detail: use a low, fairly flat flower so it stays in place and doesn’t dominate the plate. Burgundy with dusty rose looks softer than mixing several unrelated reds.
Put the finished flower on a clean napkin or beside the plate, and remove it before serving food. Craft paper, glue, and metallic finishes aren’t food-contact materials.
If you’re hosting a larger group, cut all the petals first, then assemble the flowers in batches. Keep the first completed flower beside you as a guide so the others have a similar scale. Save the leftover petal scraps for the tiny dots, a few garland stars, or center bands for paper bows.
12. Give the Classic Paper Chain a Grown-Up Palette
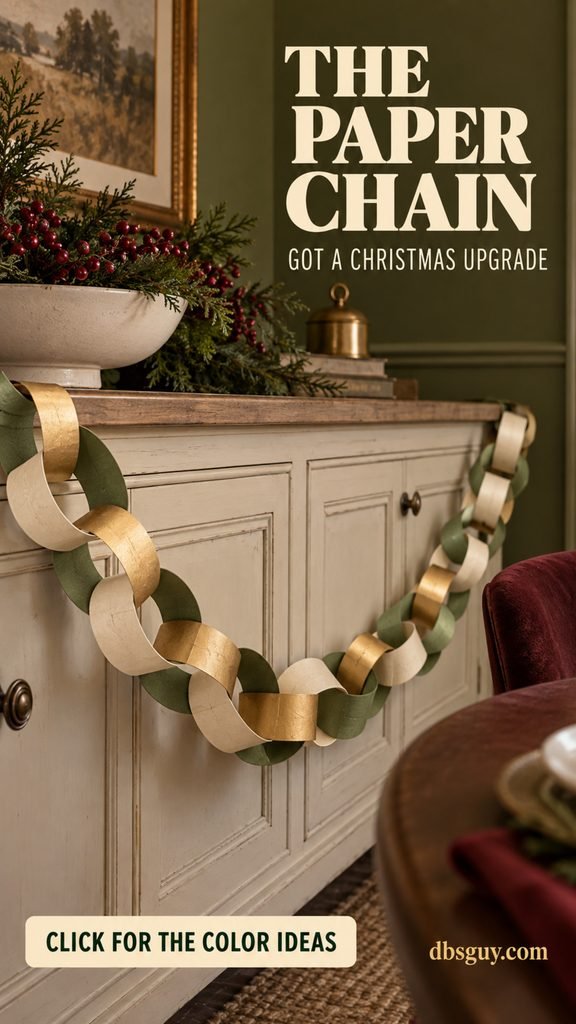
There is something cheerful about a paper chain. It also fits nicely into a more restrained Christmas room when the strips are equal in size and the colors follow a clear pattern.
You’ll need: craft paper, a ruler, scissors, glue or strong craft tape, and two suitable attachment points.
How to make it:
- Cut strips about three-quarters of an inch wide and 6 inches long. Test one link before cutting the full batch.
- Curve the first strip into a loop and overlap its ends by about half an inch. Secure the join.
- Pass the next strip through the first loop, then close it the same way.
- Continue in a repeated color order. For example: olive, ivory, gold, olive, ivory, gold.
- Measure the finished chain against the space. Attach it with a shallow drape, keeping the end supports secure.
The finishing detail: keep the joins on the less visible side and use gold sparingly if it is very shiny. A matte olive-and-ivory chain can look lovely with just a few gold links.
Allow glued joints to set before lifting a long chain. The whole strand depends on every individual seam, so test it gently over a table.
A lighter, shorter chain is a better choice for a narrow console than a heavy run of thick cardstock. If it twists awkwardly, lay it down and rotate the links into their natural alternating directions before hanging. Keep it clear of light strands, door swings, and chair backs that move.
13. Turn Scrapbook Paper into Sculptural Bow Ornaments

Paper bows are a lovely final project because the scraps from other decorations can become part of them. Their curved loops give a tree branch or a small wrapped gift a little more shape.
You’ll need: flexible scrapbook paper or light cardstock, scissors, a pencil, strong craft tape, and a short hanging loop. Make a plain-paper sample before using your favorite sheet.
How to make it:
- Draw a solid bow-loop piece about 6 inches wide: two broad oval lobes joined by a narrow center, with a small tab at each outer end. It should resemble a pair of glasses without holes.
- Cut a separate tail piece about 3 inches wide and 1 inch tall, with a shallow V cut into each outer end. Cut a narrow rectangle for the center band.
- With the display side facing down, gently curve the two lobes. Bring the outer tabs to the middle and secure them, making two rounded loops. Keep the curved edges uncreased.
- Attach the loop piece to the tail backing. Wrap the narrow band around the middle and secure it at the back.
- Add a short hanging loop to the reinforced back. Let the joins set, then check that the bow holds its shape.
Gathering Beauty’s paper bow guide shows the three-piece construction. The hand-drawn version above lets you choose your own proportions without needing a printer.
The finishing detail: use one strong color for a whole bow. Emerald, burgundy, and muted gold each look good on green branches.
If a loop cracks, try more flexible paper and curve it gently around a pencil before assembly. A glue stick may not hold springy loops closed; strong craft tape can be more useful here. Store finished bows upright in a shallow box so the curved tops aren’t crushed.
Make the Finished Decorations Feel Like They Belong Together
The best time to plan the arrangement is before the last scrap of paper gets used. Put the finished pieces near the place where they’ll live and look at them from the doorway.
Repeat a color, then change the shape. An ivory paper star can work with ivory angels and a few green tabletop trees. You don’t need the same motif everywhere.
Give one piece the most attention. A large star or wreath can carry a whole corner. Smaller bows or baubles can repeat its palette elsewhere without making every wall equally busy.
Keep the useful space useful. Leave room for a bowl of keys, the dinner plates, or the books you actually take down from the shelf. A decoration feels more settled when you don’t have to move it every time you use the room.
Let paper cast shadows. Side light from an ordinary room lamp brings out pleats, leaf folds, and bauble ribs. Keep lamps separate from the paper rather than adding bulbs inside handmade pieces.
For a small apartment, try one star above a console and a few bows on the tree. For a dining room, the rosette wall and paper poinsettia place settings make a natural pair. For an entryway, a leaf wreath and three slotted trees give you a finished arrangement without needing a large display.
Fix the Small Problems Before You Make a Whole Batch
A practice piece is useful because paper, adhesive, and humidity all affect the result. Adjust the first decoration, then repeat the version that works.
| What you notice | What to adjust |
|---|---|
| The paper cracks along a fold | Use more flexible paper, score firm card lightly, and try folding in the other direction on a scrap. |
| A star or rosette won’t open comfortably | Add another matching bag or fan section instead of pulling against the seams. |
| The glue wrinkles the paper | Apply a thinner layer or try paper-safe craft tape on a sample. Let pieces dry before handling. |
| The trees or house fronts lean | Check the base edges, use firmer card, and widen the house support feet. |
| A hanging point tears | Attach the loop to a reinforced patch or structural join rather than a narrow cut point. |
| The chain or bow keeps coming apart | Use an adhesive suited to the paper finish, allow it to set, and test each join over a table. |
| The display feels crowded | Remove one piece, increase the gaps, and repeat fewer colors. |
Move window decorations away from condensation, and keep hanging threads out of reach of young children and pets. A paper project belongs in a dry indoor spot where its shape can stay intact.
Keep the Decorations in Good Shape for Next Christmas
Let glue dry fully before packing anything. Remove hanging threads if they’ll tangle, and coil reusable garlands loosely.
Store flat stars, snowflakes, and separated tree silhouettes between clean sheets of paper. Keep bows, baubles, and leaf wreaths in boxes that leave room around their raised parts. A permanently glued rosette needs space for its full circle; don’t flatten it unless you deliberately made a closing seam that can reopen.
Keep your tracing patterns in an envelope with the paper scraps. Write the successful starting dimensions on them so you don’t have to rediscover the proportions next year.
Clean leftover gift wrap, unused cardstock, and a plain paper bag can all find a place in the next batch. Skip greasy or damp scraps, and use ordinary paper for your first attempt whenever you’re unsure about a fold.
Questions About DIY Paper Christmas Decorations
What is the easiest paper Christmas decoration for a beginner?
Start with a short paper chain or a cut-paper star garland. Neither needs a complex fold, and you can test one link or star before committing to the whole project. Slotted trees are another good choice if you have firm cardstock and can cut a simple silhouette.
Which paper works best for Christmas ornaments?
Match it to the structure. Foldable paper suits pleated angels and rosettes; light cardstock suits ribbed baubles and curved bows. Very thick card can make small folds awkward, while thin tissue won’t support a freestanding tree. Make one sample in the paper you plan to use.
Can I make these decorations without a printer or cutting machine?
Yes. Trace bowls, cups, and cookie cutters, or draw simple leaves, trees, and houses by hand. Turn the first successful shape into a reusable tracing pattern. A printer is useful for detailed templates, but it isn’t required for the projects here.
How can I hang paper decorations without damaging the wall?
Choose a mounting product whose instructions cover your surface and the decoration’s weight. Follow its preparation, waiting, and removal directions. No adhesive works the same way on every paint finish or wallpaper. When wall mounting isn’t suitable, use an existing display hook or choose a freestanding project.
Can DIY paper stars have lights inside them?
Keep the handmade paper projects in this guide unlit. Ordinary paper, glue, and hanging seams aren’t a tested lighting assembly. If you want a glowing paper star, use a purpose-made product with the lighting system specified by its manufacturer, and keep your DIY stars separate from it.
A handmade Christmas room can begin with one sheet, one color, and one little project you enjoy making. Give the folds time, let the glue set, and leave enough space for the finished piece to be noticed. That care is what turns a simple paper decoration into something you’ll be happy to bring out again.




