
A milky pink base, a few icy-blue dots, and one small silver accent are enough for a January manicure. You can wear each detail on its own, or put dots on the index finger, a line on the middle finger, and shimmer on the ring finger. Leave the thumb and pinky plain so the little details have room.
The looks below use regular, air-drying nail polish. Start with whichever mark feels manageable: a dot needs a light touch, a stripe needs one deliberate pull, and the shimmer corner leaves room for a softer edge.
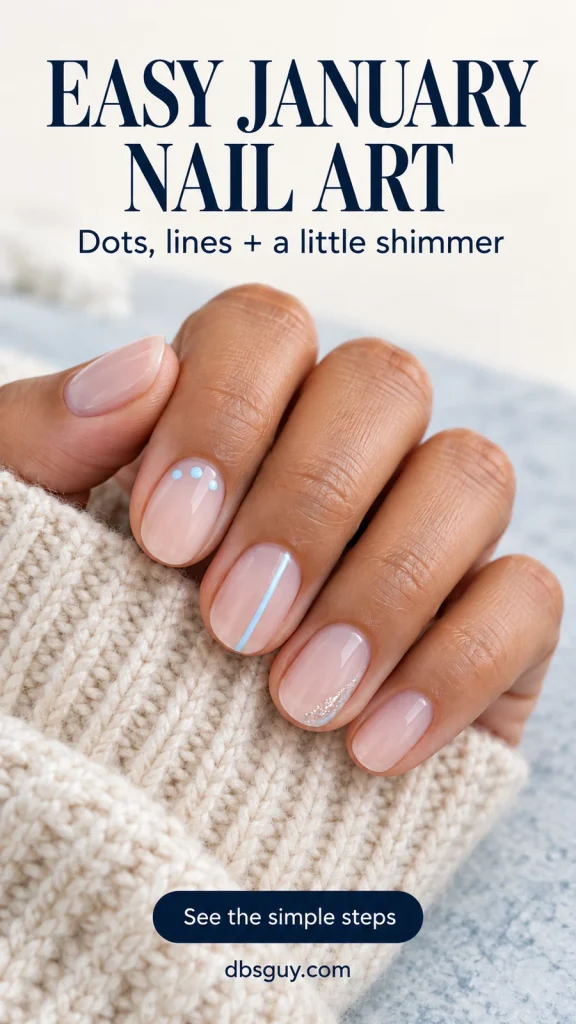
The visuals are AI-generated nail-art concepts for dbsguy.com. They illustrate colors, placement, and tools; they do not document a tested manicure or guarantee an identical result.
Set Out a Small Kit Before You Start
For all four looks, you need a base coat, sheer milky pink polish, opaque icy-blue polish, silver shimmer polish, and a compatible clear top coat. Add a small dotting tool, a fine liner brush, a nonporous palette, and nail polish remover for cleanup. A clean, intact rounded bobby-pin end can stand in for the dotting tool.
Choose the blue for its coverage rather than its name. Make a dot on your palette: if it looks nearly clear, it will be difficult to see over pink. For the silver, choose a brush-on shimmer or fine-glitter polish that lets the base show through. Large glitter pieces will give a more scattered, textured effect than the delicate sweep pictured here.
- Remove old polish, file the shape you want, and begin with clean, dry nails. The short oval shapes shown leave enough space for these small details without needing extensions.
- Apply your base coat and milky pink color according to their directions. Use thin coats; add a second color coat if the first is patchy.
- Let the base dry before adding artwork. Follow the polish instructions rather than treating a universal minute count as a promise.
- Rest your painting hand and the finger you are decorating on the table. Put a small, fresh drop of blue on the palette when you are ready to use it.
Essie’s nail-art guide also recommends working over a dry base and using a light touch for dots. A thin color coat being ready for the next coat is different from a finished manicure being ready for pressure, pockets, or chores.
1. Three Icy-Blue Dots Near the Cuticle
This is the smallest design in the group: three blue dots following the curve at the base of the nail. Keep a visible strip of pink between the dots and your skin. That little gap makes the placement look deliberate and leaves the rest of the nail open.

- Touch the small ball end of your dotting tool into the blue polish. Test one dot on the palette first to see how much polish the tool carries.
- Place the middle dot near the nail’s base, leaving a clear gap above the cuticle. Press lightly, then lift straight away.
- Add one dot to each side, a little farther toward the tip, to form a shallow arc. Leave pink visible between all three dots.
- Reload lightly for similar-sized dots. If the polish on the palette starts getting stringy, use a fresh drop instead of pulling a thread onto the nail.
Use the image as a placement guide, not a demand for a particular dot diameter. On a narrow nail, smaller dots with clear spaces between them will read more cleanly than three circles squeezed together. Decorate just one index finger per hand if you want to keep the manicure quiet.
If a dot becomes an oval: you may be moving the tool sideways as you lift it. Try a straight lift on the palette before continuing. Avoid circling the wet dot to reshape it; that can turn a tiny mark into a much larger patch.
Also Read: 15 Elegant January Nail Art Ideas to Pair With Your Winter Jewelry.
2. One Off-Center Blue Line
A single lengthwise stripe gives the same pink base a more graphic look. Place it slightly to one side of the center, with pink visible on both sides. You do not need to match a second parallel stripe or draw a curved French tip.
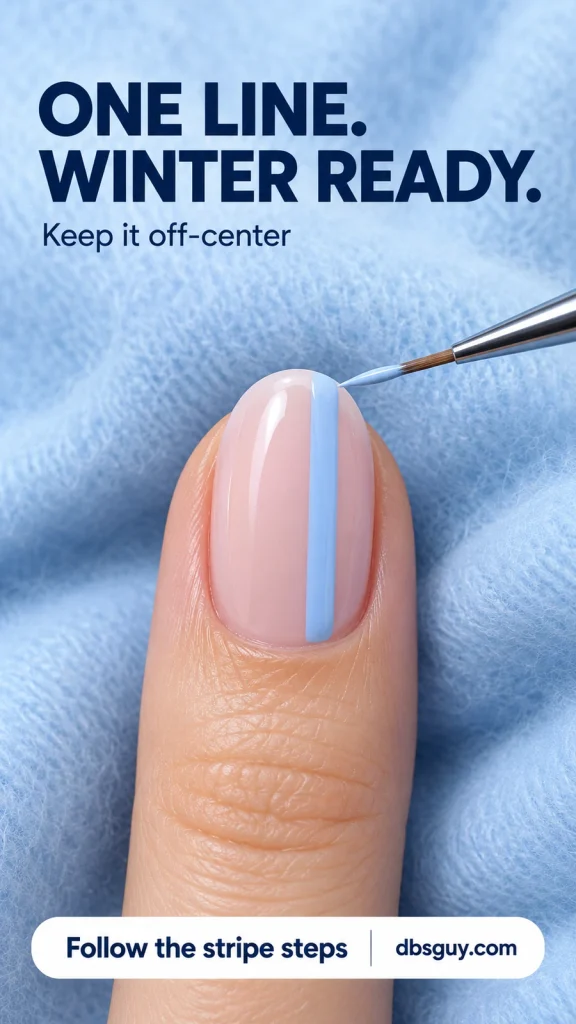
- Load a fine liner brush with blue polish, then draw a short practice line on the palette. You want a continuous mark without a heavy bead at the end.
- Set the brush down just above the cuticle, keeping it on the polished nail. Aim slightly off-center rather than against the sidewall.
- Pull toward the tip in one controlled motion, keeping the supporting hand still. Lift at the free edge or just before it.
- Pause before making a correction. If the line is readable and the pink remains visible beside it, a small wobble does not need another coat.
Keep the stripe slim enough that it reads as a line, rather than a block of blue. The close-up shows a slightly wider practice version; the full-set image shows how delicate it can look when reduced. A shorter nail still has room for the design—keep the placement simple instead of adding more marks.
If the stripe breaks halfway: try reloading the brush and making a fresh practice stroke. Repeatedly brushing over polish that has begun to set can leave a rough, widened line. For a first attempt, it is easier to repaint one accent nail than to keep repairing it.
Also Read: 23 Winter Nail Designs: Snowflakes, Chrome and Cozy Knits.
3. A Silver Shimmer Sweep at One Tip Corner
Save the sparkle for one outer corner of the free edge. The silver should taper into the pink, leaving most of the nail plain. This placement gives you a small reflective detail without needing to draw a crisp metallic outline.
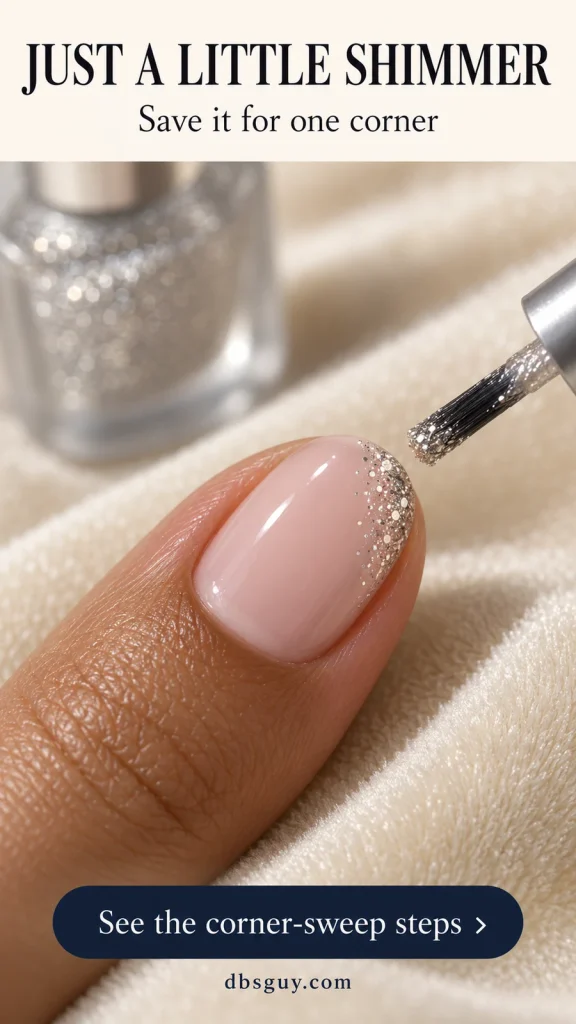
- Wipe excess polish from the shimmer brush so it is lightly loaded. If its brush is too wide for the corner, transfer a little polish to a small nail-art brush.
- Touch the brush to one tip corner and make a short sweep along that corner. Aim to cover roughly a quarter of the nail or less.
- Lift as you move inward so the silver becomes sparser toward the pink center. Keep the opposite side of the nail clear.
- If the corner needs more sparkle, let the first pass dry as directed before adding a small amount to the outermost edge.
A soft boundary belongs in this design. You can leave a few particles scattered just inside the corner; there is no need to draw a solid triangle. Stop once the sweep is visible. More layers can make the accent thicker and more opaque than you intended.
If it looks too heavy: reduce the brush load on the next nail. Painting pink back over a wet silver patch usually creates a bigger area to fix. Keep this as the single ring-finger accent if you prefer only a little shimmer.
Also Read: 21 New Year’s Nails to Ring In the Year Sparkling.
4. Put the Three Details Together in One January Set
Use the same milky pink base on every nail, then assign one job to each decorated finger. Repeating the blue connects the dots and stripe; the silver changes the finish without adding another bold color.
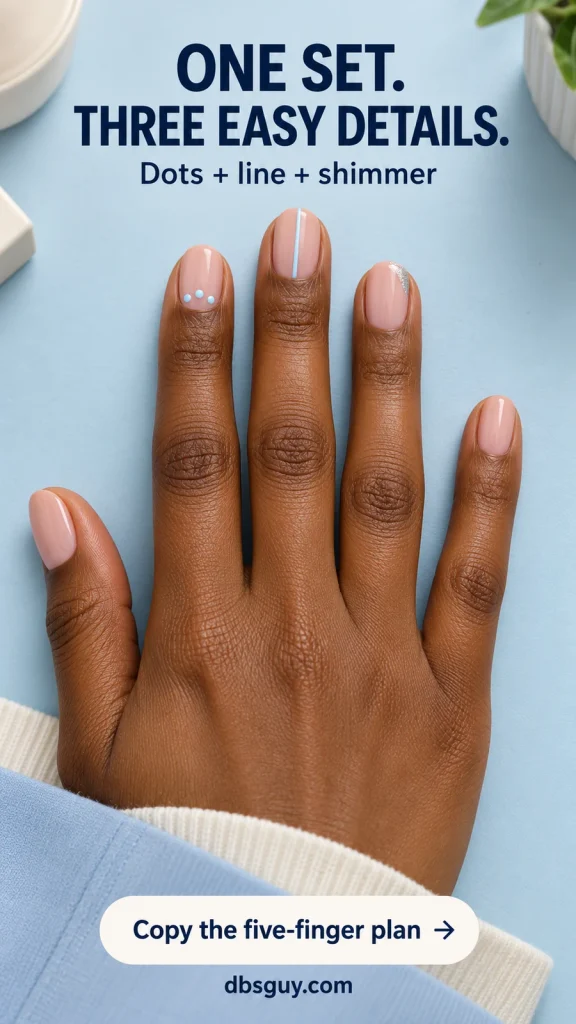
- Thumb: plain milky pink.
- Index: three icy-blue dots near the cuticle.
- Middle: one off-center icy-blue stripe.
- Ring: silver shimmer at one outer tip corner.
- Pinky: plain milky pink.
Repeat the same finger assignments on the other hand. The stripes do not have to be perfectly mirrored; keeping their width similar matters more to the overall look. Make the corner sweep smaller on a narrow ring nail so it does not become an all-over shimmer finish.
If painting with your other hand makes the line frustrating, give that hand the dot and shimmer accents and leave its middle finger plain. The shared base and colors still connect the two hands. There is no need to turn an easy manicure into ten separate drawing exercises.
Also Read: 15 Elegant January Nail Art Ideas to Pair With Your Winter Jewelry.
Finish Without Dragging the Details
Let the artwork dry before applying a compatible top coat, following its label. Use smooth strokes and avoid repeatedly brushing over the same blue mark. If the brush picks up blue, stop and allow more drying time before continuing.
For a small smudge on surrounding skin, use a cleanup brush lightly moistened with nail polish remover, keeping it away from the finished nail. A mistake in the middle of the design is different: remover can disturb the pink beneath it, so repainting that accent nail may give a cleaner result.
Leave yourself a quiet window afterward. A shiny top coat does not mean the layers underneath are ready for pressure. Keep tools and bottles within reach before you start, so you are not searching through a drawer with freshly painted nails.
Questions About Easy January Nail Art
Do I need gel polish or a nail lamp?
No. These instructions use regular air-drying polish throughout, including the base coat and top coat. Check the labels when choosing products so you do not accidentally buy a gel color that requires its own curing system.
Which detail should I try first?
Try three dots on one accent nail if you want to avoid a drawn stroke. Choose the shimmer corner if you would rather work with the bottle brush. The single line asks for a steadier pull, so practice it on the palette before adding it to your manicure.
Will the designs work on very short nails?
Yes, with smaller marks. Leave clear space between the dots, keep the stripe narrow, and confine the silver to a small corner. You do not need a long free edge for this shimmer placement because it sits on the nail’s top surface near the tip.
How long should I wait between the base and nail art?
Use your polish’s drying guidance and allow extra time before working on top of the base. Formula, coat thickness, and conditions affect drying. Try the combination on a practice tip if you are unsure; avoid pressing a finger into your finished base to check it.
How can I keep the manicure subtle?
Choose just one detail for each hand and leave the other nails milky pink. You can always try the complete set next time. A single well-spaced accent is enough to carry the icy-blue and silver palette into January.