
The best small-space Christmas decorations have a second trick: when the holidays end, they fold, unclip, untie, or come apart. You get the festive color and texture without finding a year-round home for another oversized wreath or box of ornaments.
These 12 DIY Christmas decorations use paper, felt, ribbon, and a few lightweight craft supplies. Each idea includes how to make it, where it works, and exactly what to do when you pack it away. Start with the ribbon wall tree if floor space is tight, the paper stars for a window, or the pillow wrap for the simplest makeover.

The images are AI-generated decorating concepts, not photographs of tested projects. Sizes below are suggested starting points; adjust them to your materials and display space.
Before cutting anything, measure the drawer, shelf, or box you plan to use for storage. A decoration that lies flat can still be too wide for your container. Choose two or three projects that suit your room; you do not need to make all 12.
1. Fold-Flat Accordion Paper Stars
A few paper stars can fill the empty space above a narrow console or beside a window without taking over the sill. Cream paper looks quiet and wintry; one terracotta star gives the arrangement a warmer focal point.

Gather: Lightweight craft paper, a ruler, scissors, string, a glue stick, and two small paper clips. For a first attempt, try an 8-by-16-inch rectangle and roughly 1-inch pleats.
- Accordion-fold the paper along its length so the closed stack is about 8 inches long. Keep the folds even.
- Fold that stack in half and tie string snugly around the midpoint. Trim both ends at matching angles for pointed tips.
- Open one half into a fan and glue its two meeting edges together. Let that join dry.
- Open the other half to complete the star. Secure this second join with paper clips instead of glue, and add a hanging loop through a reinforced edge.
The important storage adjustment is the removable second join. Ann Martin’s accordion-star tutorial explains the basic folding method; keeping one join clipped lets this version close again.
Pack away: Remove the clips, close the fan gently, and lay it in a shallow box. Protect the pointed ends from heavier items. Never force a permanently glued star flat.
2. A Ribbon Wall Tree That Rolls Up
No corner for a tree? Give an empty wall the outline of one. A continuous ribbon zigzag creates the branches, while a flat star and a few clipped ornaments provide enough detail to make the shape read as Christmas.
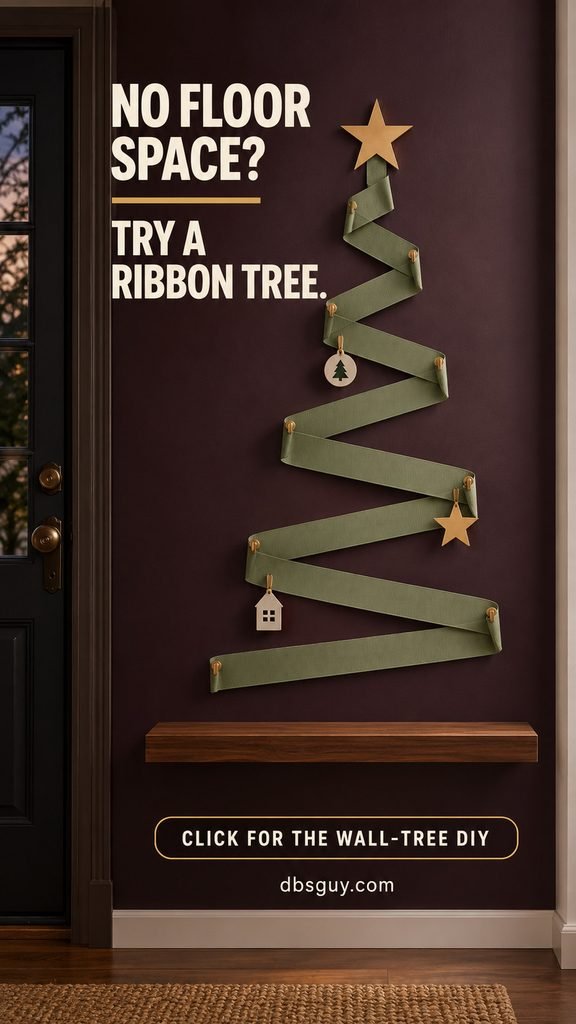
You will need: Unwired grosgrain ribbon, surface-compatible removable hooks, lightweight cardstock ornaments, and tiny clips. Lay out a tree roughly 18 inches wide and 30 inches tall before deciding how much ribbon to cut.
- Arrange the ribbon on the floor first. Start with a narrow span at the top and widen each successive zigzag toward the bottom.
- Mark the turning points on the wall with a method suitable for its finish. Install hooks according to their package instructions.
- After the required wait, drape the ribbon over the hooks. Keep a little slack so it does not pull sideways on them.
- Add a flat topper and a few lightweight ornaments. Step back before adding more; the ribbon should remain easy to see.
Removable adhesive is not a guarantee for every wall. Check the surface and weight restrictions. For example, 3M’s clear-hook instructions specify a one-hour wait before loading and removal by stretching the strip down against the wall.
Pack away: Unclip the ornaments into an envelope, roll the ribbon around a clean card, and keep the hook bodies in a pouch. Follow the maker’s removal instructions and use replacement adhesive strips as directed next year.
3. A Fabric Chain With Reopenable Links
A chain garland is cheerful on a bookcase, but glued paper loops are awkward to store without crushing them. Fabric links with reopenable fasteners turn back into a small stack of strips.

Choose two or three fabrics with enough contrast to show the linked shape: red plaid, ivory, and olive work well. Cut a starter set of 12 strips, approximately 2 by 10 inches each. Lightweight cotton benefits from a backing that gives it some body.
- Apply fabric-compatible interfacing or backing according to its instructions. Finish the edges with a narrow hem or pinking shears; pinked edges may still fray with handling.
- Attach a small hook-and-loop tab to the outside of one end and its matching tab to the inside of the other end. Sew them securely, or use an adhesive specifically suitable for both materials.
- Close the first strip into a ring. Thread the next strip through it before fastening, and repeat.
Keep the chain loose and support a longer run at several points. What Kimberley Makes’ reusable fabric-chain guide offers another backing and fastening approach.
Pack away: Open each ring, pair its fasteners to keep them from snagging neighboring fabric, and stack the strips in a pouch. Save a photo of the color order if you want to repeat it.
4. Flat Felt Tree Bunting
Felt bunting brings a soft, handmade texture to a kitchen wall or the front of a bookcase. The trees stay flat, so you can skip the stuffing, beads, and bulky embellishments that make small decorations surprisingly difficult to pack.
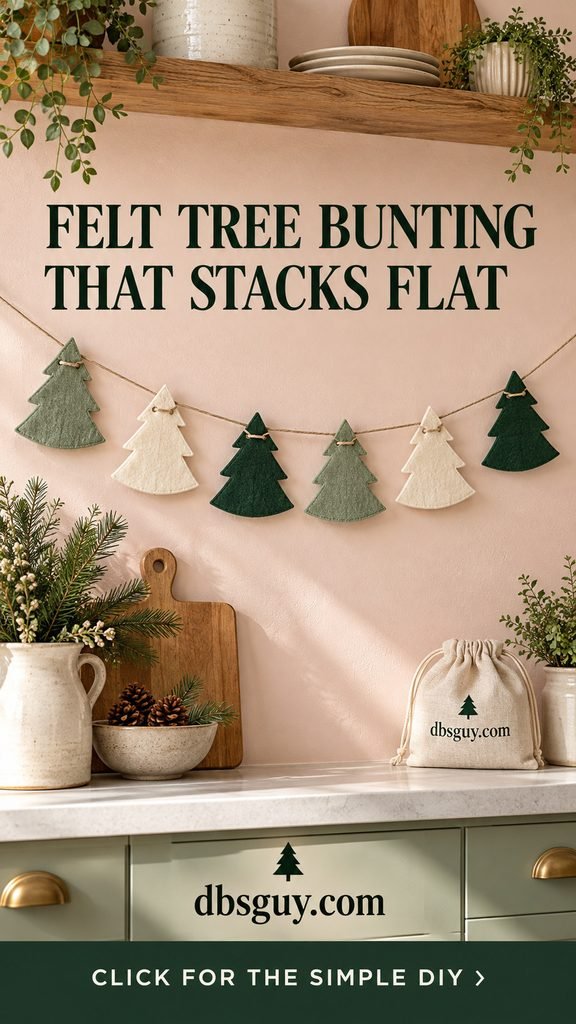
Draw one simple tiered tree on scrap paper, about 4 inches tall and 3 inches across its widest branches. Use that pattern to cut six trees from medium-weight felt. Sage, forest green, and ivory give the strand variety without a busy mix of prints.
Make two small holes near the upper branches of each tree, leaving enough felt around them to resist tearing. Thread a thin cord through the holes with a blunt tapestry needle. Two attachment points help each tree face forward. Leave space between the shapes rather than bunching them together.
If a tree droops, shorten its widest branches or choose firmer felt. A single flat layer is the point of this project; adding thick backing to rescue a floppy shape increases the storage bulk.
Pack away: Slide the trees together without folding their tips. Stack them in a small pouch and loosely coil the remaining cord beside them. Keep the hanging strand out of reach of young children and pets.
5. Slot-Together Cardstock Tabletop Trees
These little trees stand on a narrow shelf during December, then separate into flat panels. They give a small display some height without requiring a ceramic village or permanent wooden bases.

Materials: Stiff cardstock, scrap paper, a ruler, pencil, and scissors. Try heights of 6, 8, and 10 inches, with bases wide enough to stand steadily.
- Draw a symmetrical tree silhouette with a level bottom edge. Cut two identical cardstock copies for each tree.
- Mark the halfway point on the vertical centerline. On the first piece, cut from the top down to that point. On the second, cut from the bottom up to the same point.
- Slide the two pieces together at right angles. Both bottom edges should touch the shelf.
- If the fit is too tight, widen the slots a tiny amount. If it is loose, remake the affected panel rather than gluing the whole tree together.
Start with a scrap-paper version to check the silhouette. A broad lower tier and plain matte colors make the finished trees easier to read from across the room. Heavy ornaments can pull them out of balance.
Pack away: Separate each pair, mark matching pieces lightly on the back, and place them between cardboard sheets. Choose a folder large enough for your tallest panel before making a whole forest.
6. A Hoop Wreath With Detachable Greenery
A mostly bare hoop gives you the suggestion of a wreath without the thickness of a full evergreen ring. The blue bow in this concept makes a useful change from the usual red-and-green palette.

Use one thin 8- or 10-inch wooden embroidery-hoop ring, a few short faux evergreen sprigs, cotton ties, and soft ribbon. Arrange the sprigs along the lower-left portion of the hoop, overlapping their stems.
Tie the stems to the ring at two or three points, then cover the joins with a bow. Keep the greenery light enough that the bare circle remains the main shape. Use a hanging loop and a support rated for the finished weight.
Avoid gluing stems directly to the wood if you want to dismantle the wreath. Use faux sprigs that are already close to your desired size; cutting wire stems requires appropriate cutters and can leave sharp ends.
Pack away: Untie the bow and sprigs. Store the ring flat, roll the ribbon loosely, and protect the greenery in a shallow compartment without crushing it. Measure the ring’s diameter first: thin does not mean small enough for every drawer.
7. Soft Ribbon Bows for Dining Chairs
When a small dining table needs room for plates and serving dishes, move the decoration to the chair backs. One soft bow on each chair adds color without another centerpiece.

Choose unwired ribbon about 2 to 3 inches wide. Velvet gives a rich look, while grosgrain holds a simpler shape. Test one chair with string to estimate the length needed to wrap the back and tie a bow.
Wrap the ribbon around a stable section of the chair back, tie the bow on the outside, and adjust the loops. Trim the tails so they stay above the seat and away from the floor. Sit down and move the chair before cutting ribbon for the rest of the set.
A soft bow is easier to undo and roll than a large wired arrangement. If ribbon slips on a smooth chair, change its position or choose a grippier fabric; do not glue it to the furniture.
Pack away: Untie the bows and roll each length loosely around a clean card or tube. Label them by chair if the lengths differ. Follow the ribbon’s care instructions, and store velvet without pressing its pile under heavy decorations.
8. A No-Sew Holiday Pillow Wrap
You can make a familiar pillow look festive without buying another filled cushion. A wide plaid strip tied around an existing solid pillow creates the change, then disappears into a drawer when you untie it.

For a 16- to 18-inch square pillow, use string to measure around its middle and add enough length for a relaxed bow and short tails. Cut a cotton strip about 4 to 6 inches wide. Test with spare fabric first; a thick pillow needs more length than a flat one.
Fold the long edges inward for a tidy no-sew finish, wrap the strip horizontally around the pillow, and tie a soft bow at the front. Keep the knot loose enough that it does not cinch the cushion into an hourglass. The oatmeal pillow in the image lets the cranberry plaid stand out.
This works best as an accent on a chair or sofa corner. Untie the wrap when you want to lean on that pillow. Use clean fabric, check for color transfer, and follow both fabrics’ care labels.
Pack away: Remove the strip, clean it as directed, let it dry completely, and fold it with your seasonal linens. The original pillow stays in everyday use.
9. A Flat Craft-Stick Snowflake
A white wooden snowflake gives a dark wall a crisp winter accent. Its shape is open and graphic, and its storage thickness is only a few overlapping layers of craft sticks.
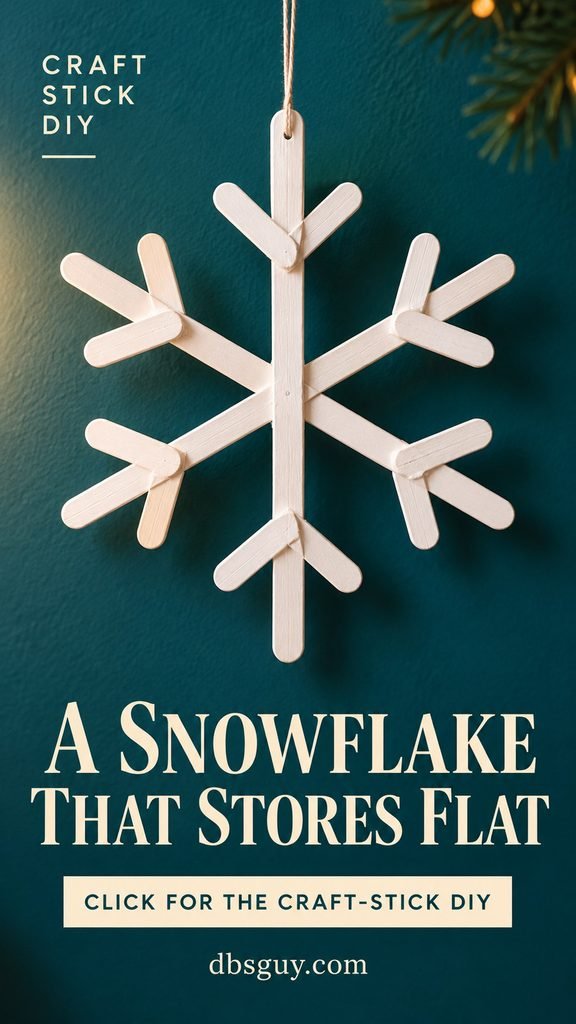
Gather: Three equal-length wooden craft sticks for the center, 12 short offcuts for the branches, wood-compatible craft glue, white paint, and hanging cord. Use pre-cut short pieces if you do not have tools suitable for cutting craft wood.
- Cross the three long sticks at their midpoints, spacing them to make six spokes. Glue the center overlaps and let them set.
- Add two short pieces to each spoke, forming a V whose arms point outward toward the spoke’s tip. Lay everything out before applying glue.
- Let the adhesive cure as directed, then paint the front and back. Allow the paint to dry fully.
- Tie a hanging loop securely around the upper spoke. Check the joints before putting it up.
Thin glue joints and simple branches keep the silhouette tidy. Leave off beads and thick glitter layers if easy packing is your main goal.
Pack away: Lay the snowflake between two cardboard sheets in a shallow box. Protect the branches from bending; store it whole rather than pulling the glued pieces apart.
10. Vellum Sleeves for Compatible LED Candles
Translucent paper with a few gold stars can turn a small shelf into a soft evening display. Make the paper surrounds removable, so the seasonal part stores flat and the LED candles can be reused.

Use battery-powered LED candles only. Choose a model whose instructions allow decorative surrounds, and follow its clearance requirements. Keep the top and bottom open and do not obstruct switches, battery access, or any ventilation. Never use real candles inside paper sleeves. The CPSC recommends flameless candles whenever possible.
- Cut a vellum rectangle to the height you want, with enough length to form a loose cylinder around the compatible light. Allow about 1 inch for the overlapping seam.
- Add a few flat star stickers while the paper is still flat.
- Overlap the ends and hold them with small paper clips at the back. Place the open cylinder around the LED candle, respecting the maker’s required space.
Keep coin-battery compartments secure and lights away from children; see the CPSC’s battery-safety guidance. If your light’s instructions prohibit surrounds, choose another project.
Pack away: Turn off the lights, remove the clips, and flatten the sleeves between smooth sheets of card. Store the lights separately and follow their instructions for long-term battery storage.
11. A Ribbon Display for Holiday Cards
Cards you already receive can become the seasonal artwork. Two ribbons hanging from an existing peg rail turn a narrow piece of wall into a display, without a frame, board, or extra shelf.
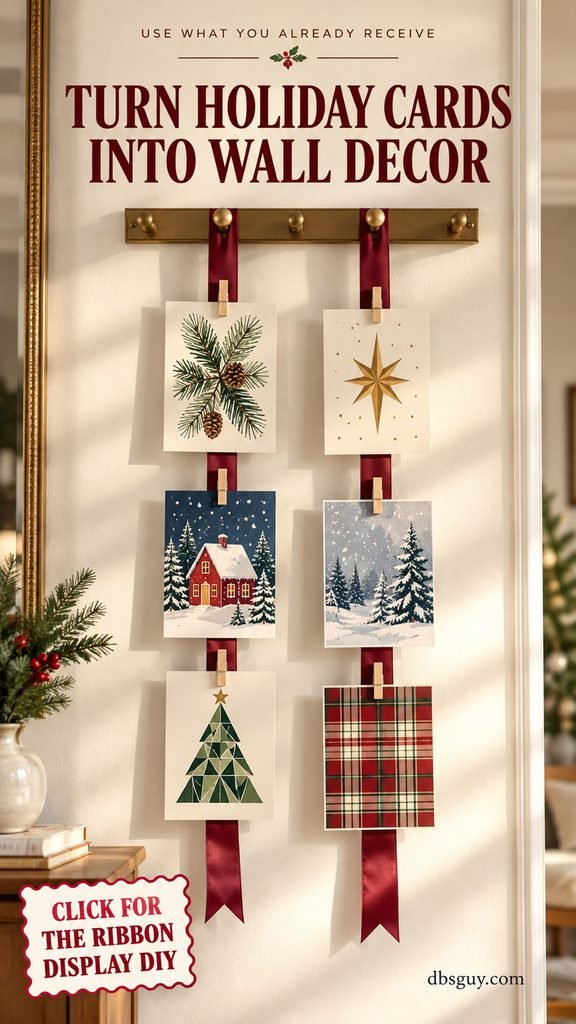
Cut two lengths of ribbon approximately 30 to 36 inches long, adjusting them to your available wall height. Make a tied loop at the top of each and hang them from existing secure pegs. Clip cards to the ribbons with small clothespins.
Leave enough space for each card’s design to show. Three cards per ribbon is a useful starting point, as in the image. Mix horizontal and vertical cards if you like, but check that they do not cover one another or make the ribbon twist.
Use a few favorite cards rather than displaying every envelope that arrives. Keep the lower ends clear of switches, heaters, and busy walkways. If you need a new hook, check its suitability and installation instructions before hanging the display.
Pack away: Remove the cards, keep the meaningful ones in an envelope, roll the ribbons, and put the clips in a small pouch. Next year’s cards provide fresh artwork without another permanent decoration to store.
12. A Roll-Up Felt Holly Table Runner
A narrow runner gives a small table a holiday centerline while leaving space for dinner. Separate felt leaves and berries let you change the pattern, then roll the plain base for storage.
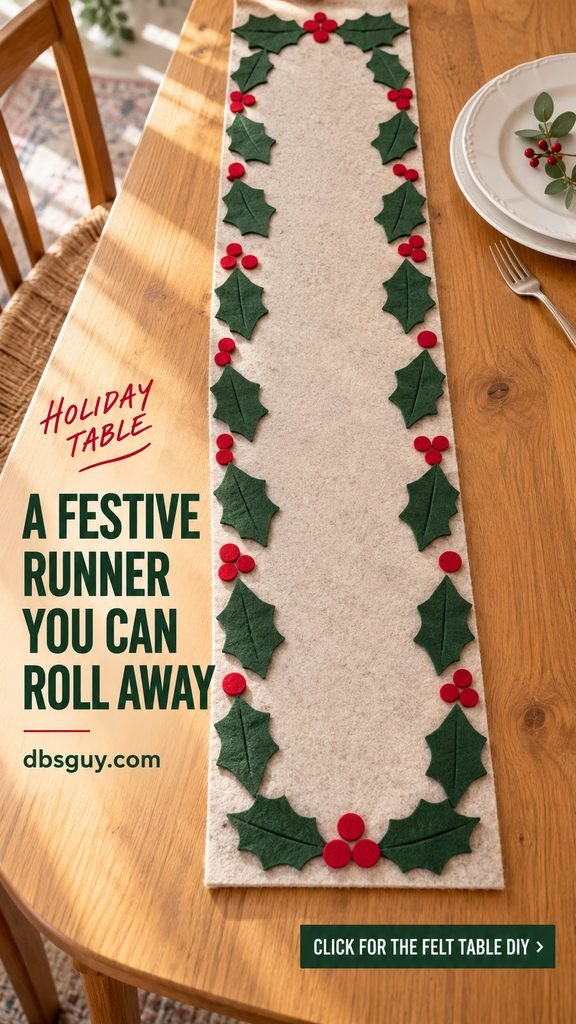
Cut an oatmeal felt strip about 8 inches wide, sized to sit within your tabletop. From green felt, cut simple holly leaves approximately 2 to 3 inches long; add small flat red felt circles for berries.
- Lay the plain strip along the center of the table. Check that plates fit comfortably on both sides.
- Arrange the leaves in small groups along the edges and at the ends. Leave the middle open for serving space.
- Add a few berry circles beside the leaves. Keep the shapes loose so they lift away for cleaning and storage.
This is decorative felt, not a trivet: use proper protection beneath hot dishes. Small loose motifs are unsuitable within reach of children who may put them in their mouths. For a frequently bumped table, use removable fabric fasteners suitable for your felt, testing on a scrap first.
Pack away: Collect the shapes in an envelope or pouch. Clean the runner according to the felt supplier’s directions, let it dry, and roll it loosely around a clean tube. Measure the roll’s width against your storage shelf.
How to Pack Your Decorations Without Crushing Them
A shallow container can work well for a selection of these projects, but its size depends on the stars, hoop, and snowflake you make. Check those rigid pieces first. There is no need to force all 12 into one box.
- Make a protected flat layer: Keep cardstock trees, vellum sleeves, and cards in folders. Cushion the snowflake’s branches between cardboard sheets.
- Keep ribbons and fabric together: Store clean, fully dry wraps and rolls in a pouch, away from snagging fasteners and sharp clips.
- Give greenery its own space: Detachable sprigs still need a shallow compartment that preserves their shape.
- Save the useful details: Label matching tree panels and ribbon lengths. Add a photo of the wall-tree hook layout and a note about replacement adhesive strips.
Choose a dry indoor spot away from direct sunlight and damp floors. Store delicate folds above heavier supplies, and check that every painted or glued piece is fully dry before closing the container.
Frequently Asked Questions
Which ideas need the least storage space?
The ribbon wall tree, chair bows, pillow wrap, and holiday-card display reduce mainly to ribbon or fabric plus a few small accessories. Slotted trees and felt bunting also store flat. The hoop wreath and craft-stick snowflake are thin, but their fixed width still matters.
Can I decorate a rental without making holes?
Start with tabletop trees, a pillow wrap, chair bows, or a runner. For hanging projects, use existing secure pegs or hardware where suitable. Check any removable adhesive against your wall finish and lease rules; installation and removal instructions matter, and a clean removal cannot be promised for every surface.
What should I make if I do not have a Christmas tree?
Try one ribbon wall tree as the main feature, then add either paper stars at a window or a festive pillow wrap nearby. That gives you a clear focal point and a softer accent without filling the floor. Keep the remaining surfaces useful for everyday life.
Do I need a cutting machine or a sewing machine?
No cutting machine is needed for these simple shapes. Paper, felt, and ribbon projects can be cut by hand. The fabric chain may need a few hand stitches to secure its fasteners; pre-cut craft-stick pieces avoid wood cutting. Pick projects that suit the tools you already have.