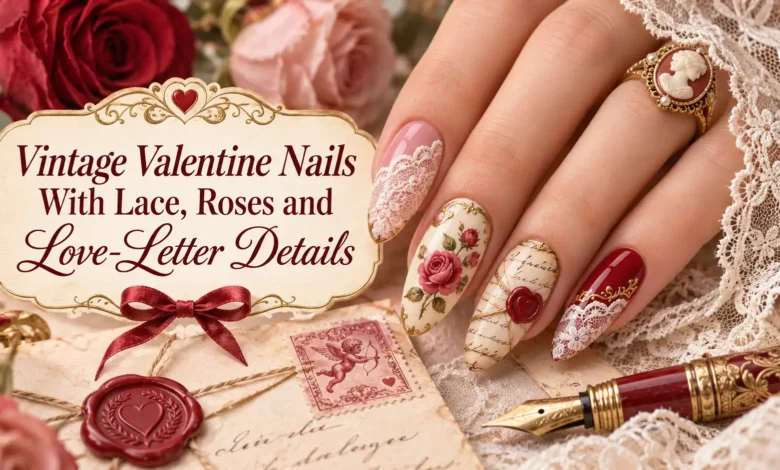
Vintage Valentine nails work best when one detail leads: an ivory lace edge, a little rose that could belong on a china cup, or an envelope sealed with a red heart. Start with the motif you want to notice, then choose a base that gives its fine lines room to show.
The six looks below move from pale, open designs to richer burgundy and parchment tones. Each has a specific placement plan and a simpler adaptation, so you can choose a reference that fits the length you actually wear.
The visuals are AI-generated design concepts for dbsguy.com. They illustrate colors and artwork placement, rather than completed salon services or tested results.
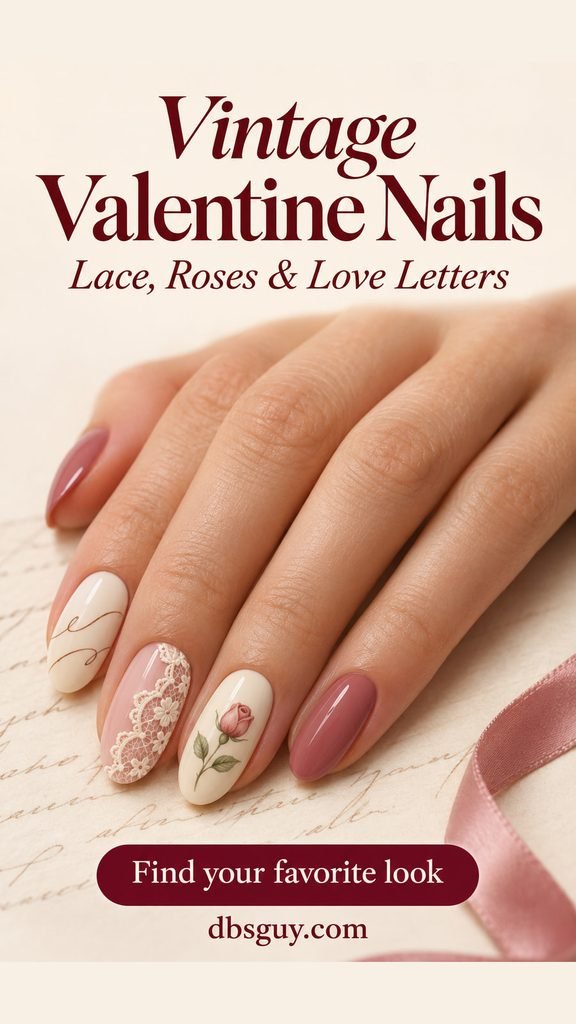
Choose Your Vintage Detail First
For this look, think of old stationery, embroidered handkerchiefs, and small floral prints. Warm ivory, dusty pink, muted sage, and wine red create that mood; you do not need an aged yellow base or a decoration on every finger.
- For the lightest effect: choose ivory lace panels over a sheer rosy base.
- For a dark accent without solid black nails: try the black lace mesh.
- For short nails: start with the porcelain rosebuds or the envelope.
- For a statement accent: compare the framed rose with the parchment-and-script set.
Pick your comfortable length before settling the detail. If the reference has more space than your nails do, remove a flower, a border, or a line of script instead of squeezing everything smaller.
1. Ivory Lace Panels Over Sheer Rose
A narrow lace panel along one side of the middle and ring nails leaves most of the rosy base visible. The little loops and separated dots suggest embroidery, while the plain neighboring nails keep the set airy. This version suits someone who likes a soft manicure but wants more detail than a standard French tip.
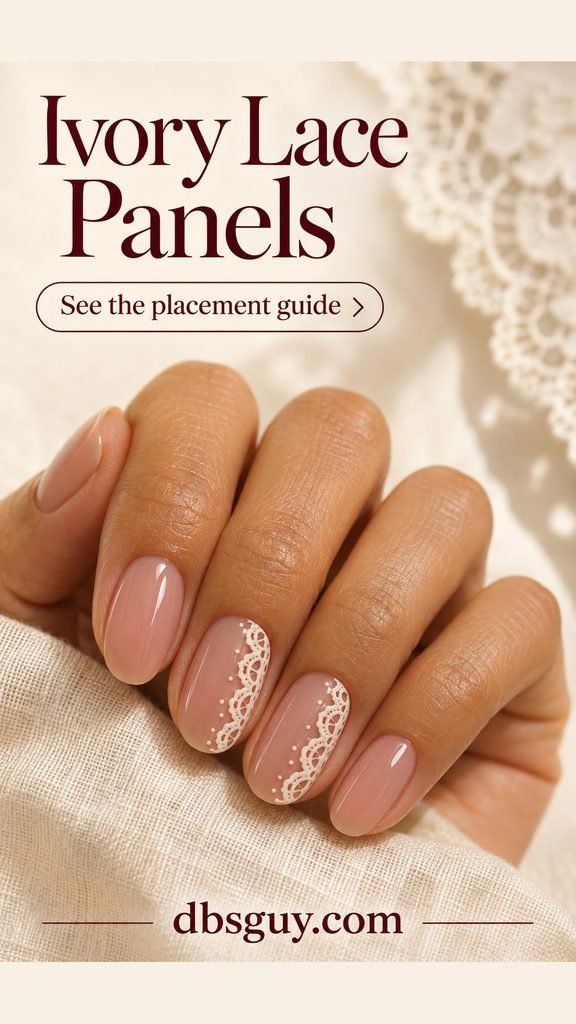
Ask for a fine ivory pattern with an open scalloped edge, keeping the opposite side of each accent nail clear. Check the ivory over your chosen base before committing: if the two shades nearly disappear into each other, deepen the rose slightly rather than making the lace thick and opaque.
On very short nails, use one side panel on the ring finger and omit some of the dots. A flat nail sticker with a suitable lace edge can supply the pattern at home. Choose the portion that fits your nail; the entire printed motif does not have to appear.
Also Read: 25 Valentine Nail Ideas to Help You Pick Your February Manicure.
2. Black Floral Lace on Blush
Black lace changes the mood without changing the soft base. Here, a fine mesh and outlined flowers cover the middle and ring nails, with blush showing through the openings. Glossy plain blush on the remaining nails gives the detailed pair a clear frame.
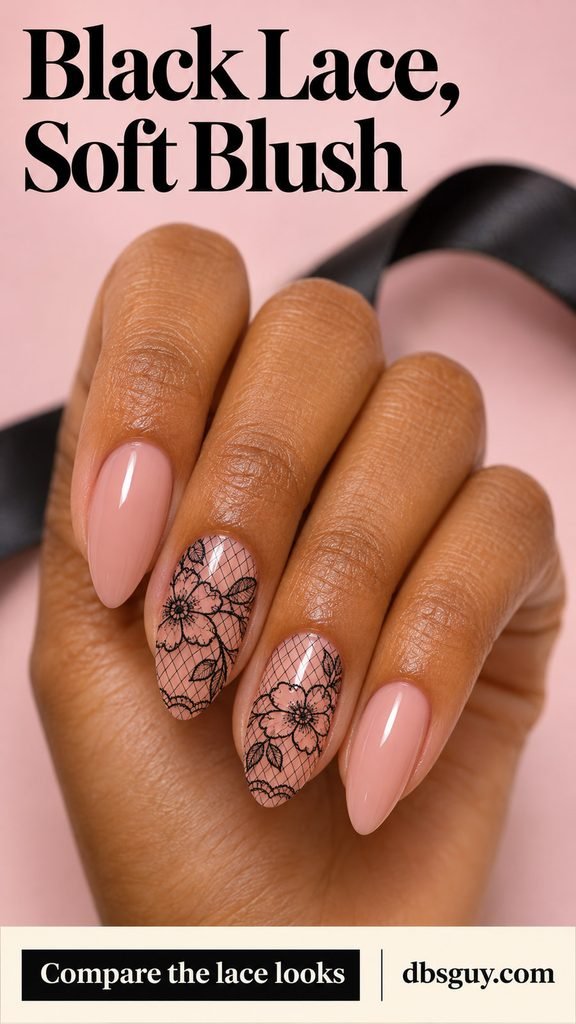
The useful distinction is between a fine black pattern and a mostly black nail. Show your artist the spaces inside the flowers and between the mesh lines; those open areas are the part to preserve. Ask for the lace to be painted or applied as a flat nail decal, with a smooth finish.
Medium almond nails give the floral mesh room, but you can adapt it to a short rounded shape. Reduce the artwork to a single flower and a small patch of mesh on one accent. Keep the same blush on every nail so the simplified version still feels connected.
3. Porcelain Ivory With Tiny Rosebud Sprigs
This design borrows its arrangement from a small floral china print: two spaced pink rosebuds on each of two ivory accent nails, with tiny sage leaves. The warm ivory is opaque, giving the flowers a different backdrop from the sheer lace looks. Short rounded-square nails keep the floral print compact.

Choose dusty pink for the petals, with a slightly deeper rose color defining their folds. Leave ivory between the sprigs rather than connecting them into a vine. The separated flowers are what make the pattern look like a delicate repeat instead of a miniature bouquet.
For a smaller nail bed, use one bud per accent and shorten the stems. If you are choosing floral stickers, compare the printed flower’s size with your nail before applying your base color. A design that needs its petals cut off to fit will give a different result from the little complete sprigs shown here.
Also Read: 17 Oval Acrylic Nails for February With Soft Edges and Romantic Details.
4. A Rose Cameo Against Glossy Burgundy
A framed rose gives this set its jewelry-like focus. The ring nail holds an ivory oval with a dusty-pink flower inside, surrounded by a fine antique-gold outline and a few small flourishes. The rest of the manicure stays glossy burgundy. The frame supplies the ornament, so it does not need a second embellished nail.
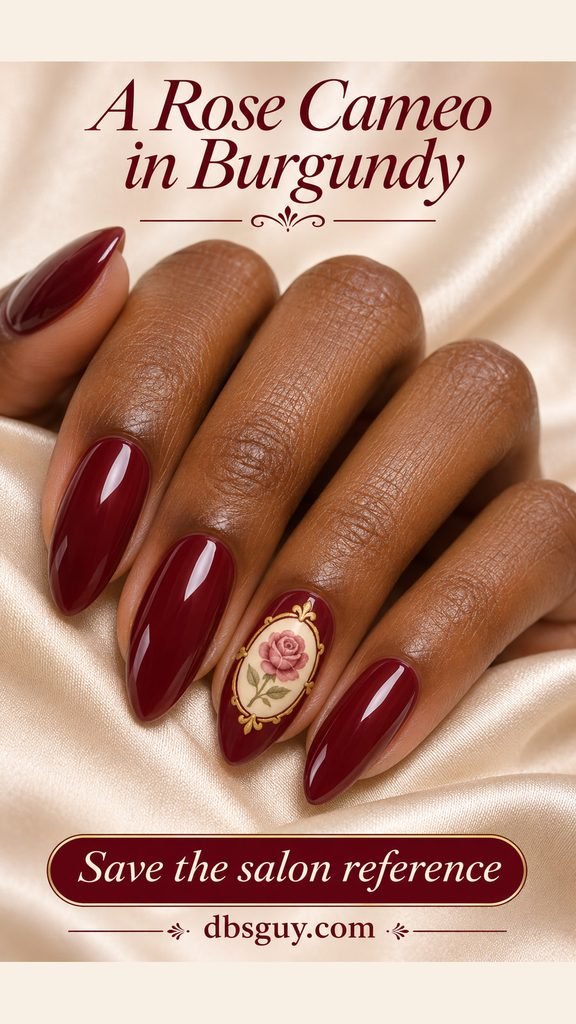
Keep a visible burgundy margin around the whole medallion. If the ivory oval reaches the nail’s edges, the accent loses the impression of a little framed picture. A medium-to-long almond offers space for the oval and its border; on a shorter nail, keep the rose and a plain oval outline, leaving off the flourishes.
Specify a flat painted interpretation when booking. A raised metal frame or resin flower would change how the manicure feels. A useful request is: “Burgundy almonds, one ivory rose medallion on each ring nail, a fine gold outline, and no raised charms.” Ask the salon to confirm that it offers this level of detailed artwork.
Also Read: 15 Elegant January Nail Art Ideas to Pair With Your Winter Jewelry.
5. Tea-Rose Nails With an Envelope Accent
A cream ring nail becomes the envelope itself, outlined in fine cocoa lines and sealed with a tiny red heart. The surrounding nails are muted tea-rose pink. Compared with the floral designs, this has fewer moving parts: a rectangular border, a downward-pointing flap, and one clear seal.
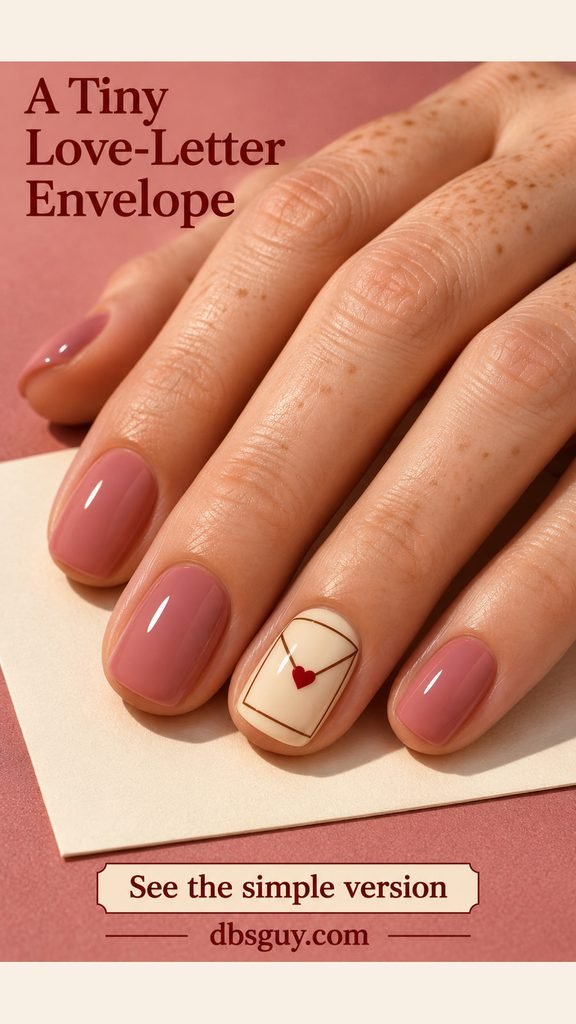
Short squoval nails suit the little envelope because their softly squared ends echo its shape. Keep the border inside the nail’s edges and let the two flap lines meet near the center. The heart should be small enough that you can still follow the flap lines toward it.
For the simple version, omit the rectangular border and keep just the V-shaped flap and heart over ivory. That is also a useful adjustment for a narrow nail. If you would rather use a sticker, choose an envelope motif intended for nails and leave the other fingers plain; extra postmarks and script would make this much busier.
6. Parchment Nails With Sepia Script and a Love Seal
Warm parchment beige makes this the most letter-like option. The index and middle nails carry a few fine, curved sepia strokes, while the ring nail has a burgundy circle with a small ivory heart. The circle suggests a wax seal through color and shape, with no actual wax or bulky ornament.
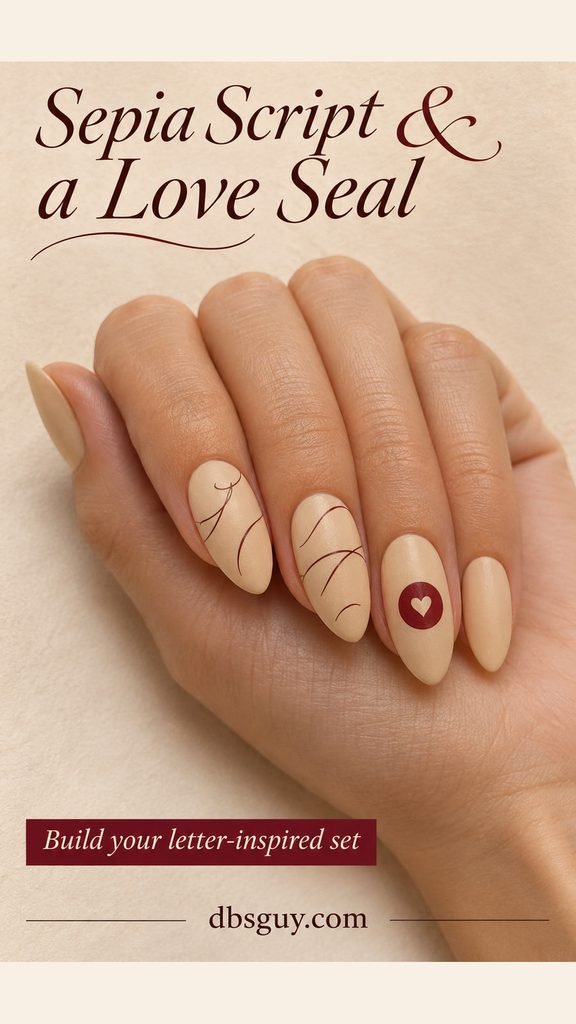
Use decorative penmanship marks rather than trying to fit a complete message across the nail. In the reference, the open beige spaces matter as much as the strokes. If a readable word matters to you, agree on one short word and its orientation with your artist, and check a sample before repeating it.
A soft satin finish keeps the parchment color understated. On shorter nails, limit the script to one accent and keep the seal on another. Ask for the circle and heart to be painted flat; if you add a thick dimensional seal, you are choosing a different surface from the one shown.
Keep a Mixed Set From Looking Crowded
If you like all three themes, use the cover as a guide: one script accent, one lace accent, and one rose, with the remaining nails plain dusty pink. Repeat warm ivory across the decorated nails so they share a background, and leave off the gold cameo frame and extra seals.
Bring one main reference to the appointment and name the detail you want to borrow from another. Decide which fingers carry the artwork, whether the base is sheer or opaque, and whether the finish is glossy or satin. Confirm the artwork charge before the service; these concept images do not establish a price or appointment length.
A Practical Route With Regular Polish
For a home version, start with one decorated ring nail per hand and keep the rest a single color. Small adhesive nail stickers can provide lace, roses, or an envelope without requiring you to paint the same fine detail with your nondominant hand.
Check that the sticker is intended for your chosen polish system, and follow its instructions. For adhesive stickers used with lacquer, OPI’s placement guide advises applying them to color that is dry to the touch, positioning with tweezers, smoothing from the center outward, and sealing around the edges with top coat.
Keep the sticker entirely on the nail with a little space at the sides and cuticle. Water-slide decals and transfer foils use different application methods, so do not treat every decorative sheet as a peel-and-stick product. Choose a nail-specific product and use its own directions for application and removal.
Questions to Settle Before You Choose
Do vintage Valentine nails have to be long?
No. The rosebud and envelope references use short nails. On a very small nail, keep one complete flower or a simple flap-and-heart accent. The elaborate cameo frame needs more room, so simplify its border if you want to keep your usual length.
Does lace nail art require actual fabric?
The lace looks here are intended as flat painted or decal interpretations. Show the artist the loops, mesh, and open spaces you want to preserve. You can get the visual idea of lace without adding a fabric layer.
Which look is a sensible first DIY attempt?
Choose a small rosebud sticker or an envelope sticker on one ivory ring nail, with plain color elsewhere. Check the motif’s size first. Dense mesh and the framed rose involve more fine detail, so they are better references to discuss with an artist if you are still learning placement.
How do I make the manicure feel less tied to February 14?
Choose lace or rosebuds and leave out the heart seal. Dusty pink, ivory, sage, and burgundy still give the set its vintage mood. If the little letter is your favorite detail, keep it on one accent rather than repeating it across the hand.