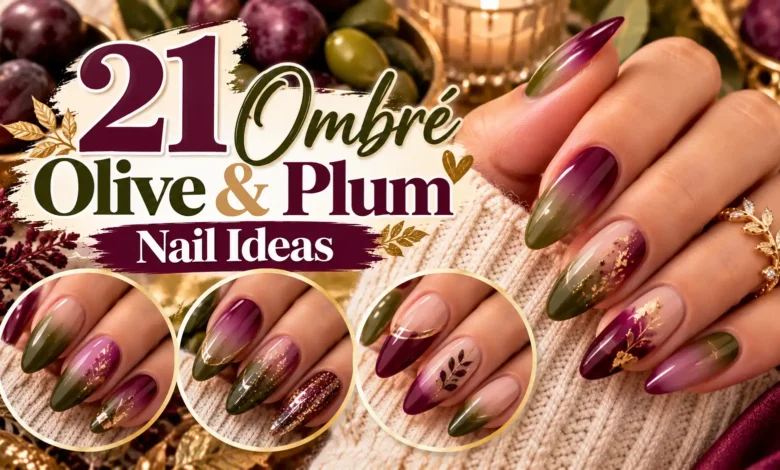
Olive and plum nails look especially interesting when the two colors meet in a soft fade. The green keeps the palette earthy, while the purple adds depth. Start with the classic cuticle-to-tip blend below, or choose a sideways fade, a blurred aura, or just two ombré accent nails if you want a different balance.
These 21 ideas show exactly where each color goes, which details to keep when adapting the design, and what to ask your nail artist. For a quick shortlist, look at 2 or 14 for short nails, 8 for a sheer finish, and 17 or 18 for a little evening sparkle.
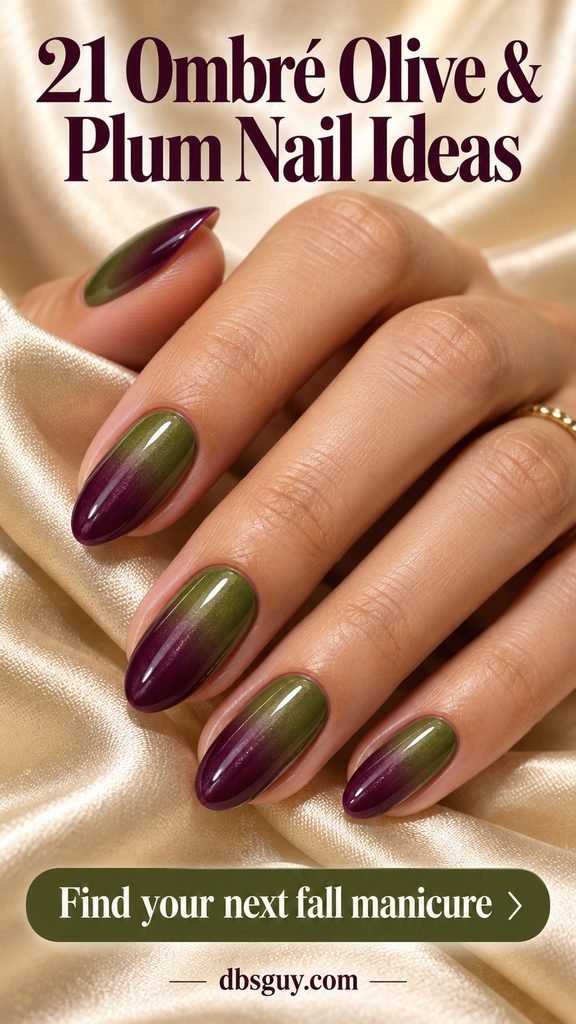
The visuals are AI-generated nail-art concepts for inspiration, rather than photographs of completed salon work. Your artist can adapt the colors, proportions, and details to your nails.
Choose the Colors Before the Fade
Ask to see the olive and plum together on a sample tip. A very dark pair can lose its contrast, while a sharply yellow olive beside a cool purple may create a stronger division than you expected. For the references here, start with a muted green and a plum that still looks purple in daylight.
Decide which color deserves more space. An equal split shows both clearly; a small plum corner feels lighter; a plum-centered aura puts the emphasis somewhere else entirely. Keep the shape and length you actually want, then adjust the design to fit.
If your saved folder is full of burgundy and green nails, compare a red-leaning wine swatch with a purple-leaning plum before booking. Both can work with olive, but they give the finished manicure a different mood.
1. The Classic Olive-to-Plum Fade
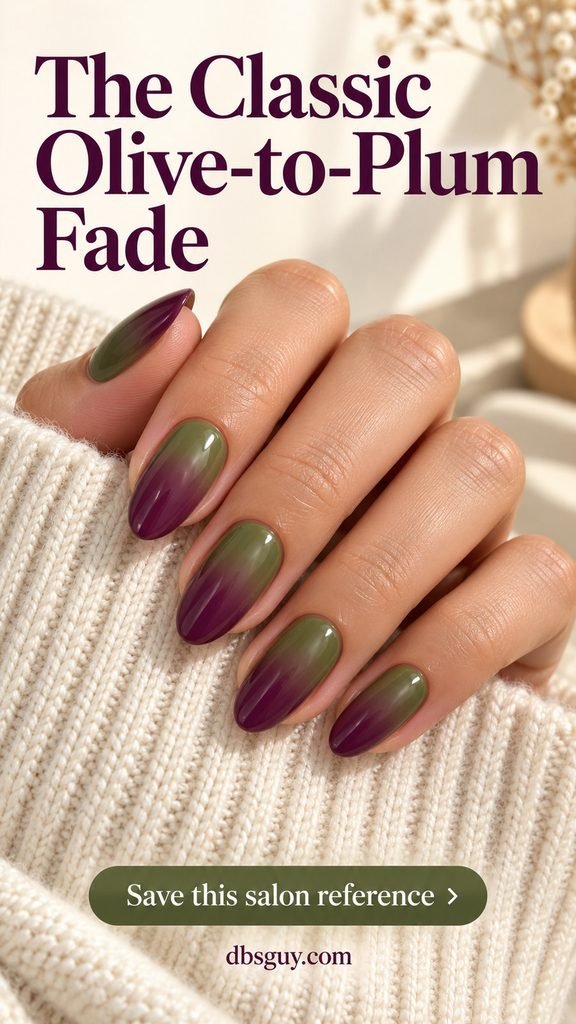
This is the clearest starting point: muted olive sits near the cuticle, deep plum finishes the free edge, and the middle is softly blended. Medium almond nails give the transition room without needing any extra decoration. A glossy finish makes the green and purple easy to see.
Keep a recognizable patch of each color at either end. If the plum spreads over most of the nail, the manicure can read as purple with a green shadow. Ask to approve one sample before the artist repeats the balance across the set.
Salon brief: Medium almond nails with olive at the cuticles, plum at the tips, a broad soft blend, and a glossy finish.
2. Reverse Ombré on Short Squoval Nails
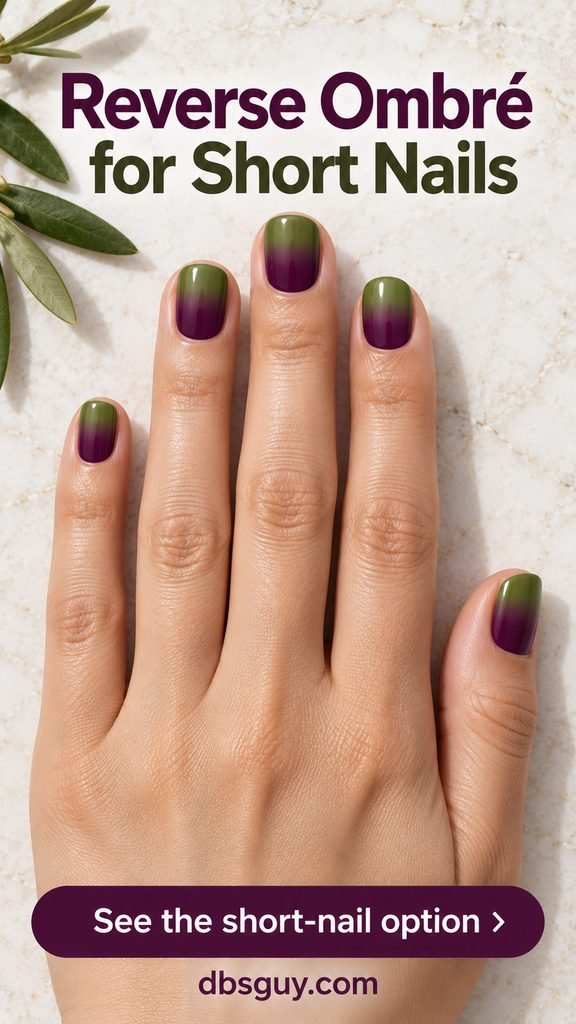
Putting plum near the cuticle and olive at the tip changes where the lightest color sits. It is a useful option when you like dark polish but want a more noticeable green edge. The short squoval shape keeps the design compact.
On a small nail, use two clear color zones with a narrow soft transition between them. Trying to squeeze in several intermediate shades can make the fade harder to read. Keep the plum away from the surrounding skin so the darker base has a clean outline.
Salon brief: Short squoval nails, plum at the cuticle fading into olive at the free edge, with no extra pattern.
3. A Side-to-Side Gradient
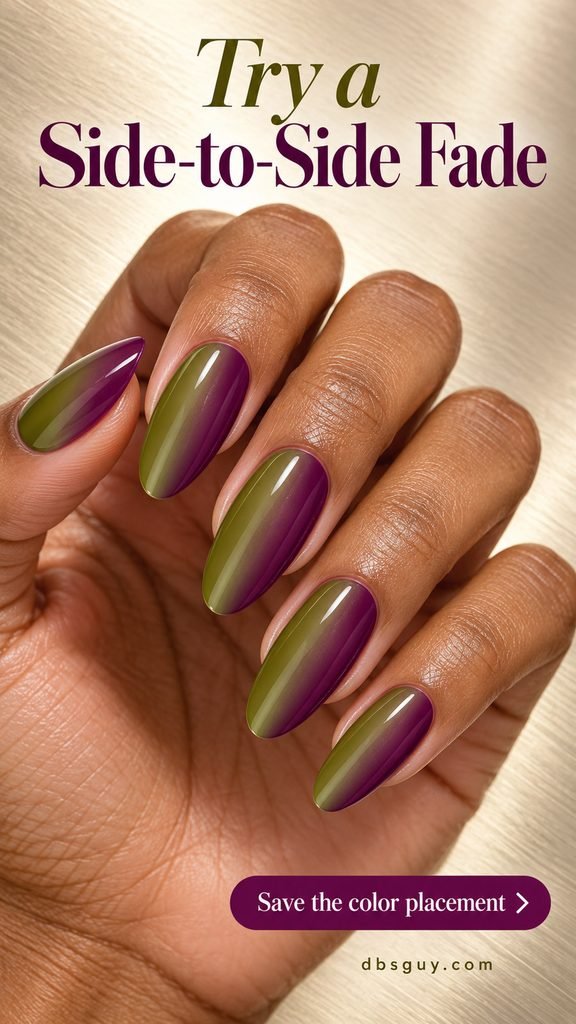
Here, olive runs along one side of the nail and plum along the other. The blend crosses the width, leaving both colors visible from cuticle to tip. It is a good reference if you love the palette but want something less familiar than a darkened free edge.
Choose the direction while looking at your hand, because left and right can become confusing in a mirrored reference. The useful instruction is to keep the same arrangement on each nail. Long ovals give the two color columns a flowing shape.
Salon brief: Long oval nails with olive along one sidewall and plum along the other, softly blended across the width.
4. A Diagonal Olive-and-Plum Fade
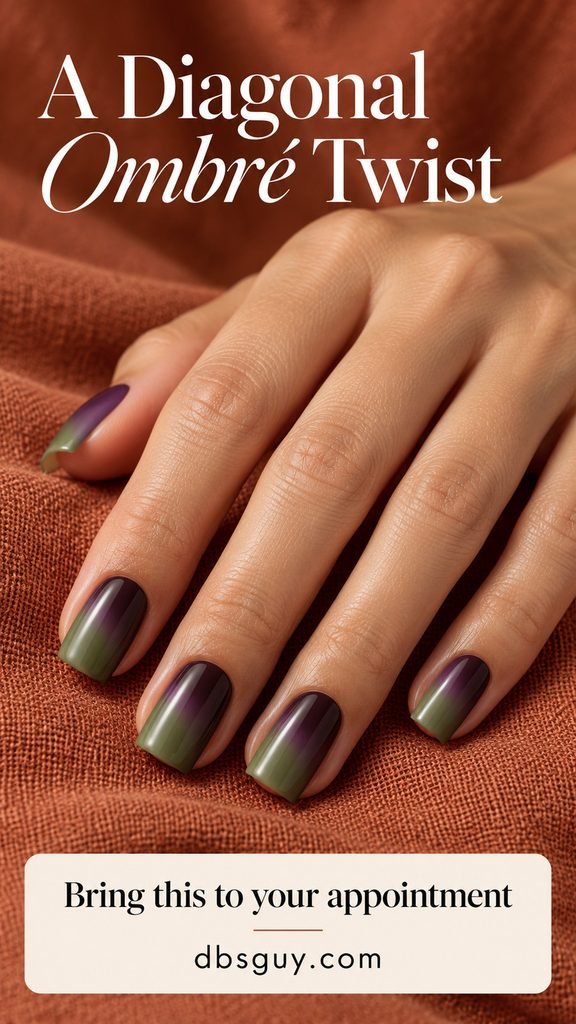
A diagonal blend sweeps from olive along one side and free-edge corner toward plum on the opposite side. The slant adds movement, especially on a square shape where the straight free edge makes the direction easy to notice. Keep the transition blurred so it remains ombré.
Ask for a broad sweep rather than a thin stripe crossing the nail. If you prefer more green, shrink the plum corner while leaving enough purple to recognize it. This is a practical way to change the color ratio without adding a third shade.
Salon brief: Medium square nails with olive sweeping across one side and free-edge corner, fading diagonally into plum on the opposite side.
5. Plum Aura Centers With Olive Edges
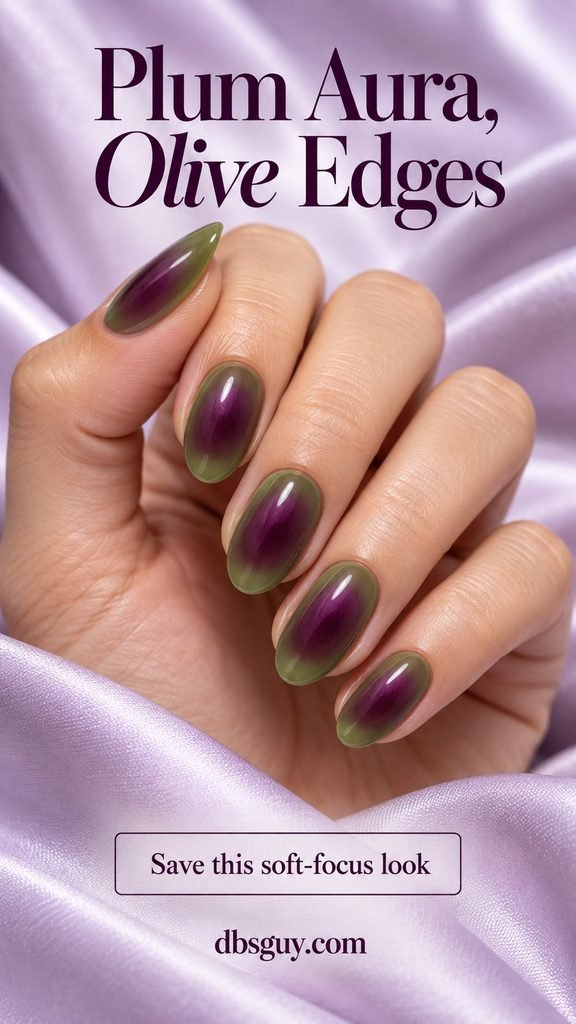
A soft plum oval sits in the center of each nail, surrounded by an olive border. Instead of traveling in one direction, the color diffuses outward. The result has a small focal point on every finger while keeping the green part of the whole set.
The edge of the plum should look hazy. A crisp oval would turn it into a different design. Before committing, check that the olive border remains visible along the sides as well as near the cuticle and tip; otherwise the center can swallow the frame.
Salon brief: Oval nails with a softly diffused plum center and olive surrounding the entire perimeter.
6. A Nude-to-Olive-to-Plum Fade
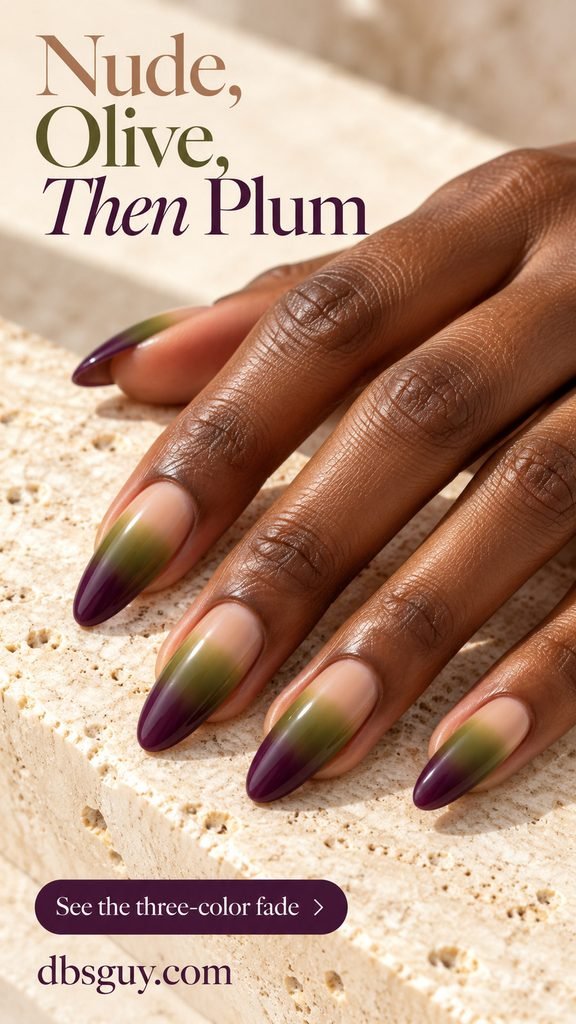
A neutral beginning gives this three-color gradient more breathing room. The cuticle area stays nude, olive fills the middle, and plum finishes the tip. It suits someone who wants the earthy pairing with a lighter-looking base.
Give the olive its own visible section. If the two transitions meet too closely, the green can disappear between nude and purple. A longer almond shape offers more room for all three stages. Choose the nude beside your hand rather than treating one beige as a universal match.
Salon brief: Long almond nails with a nude cuticle area, a visible olive middle, and plum tips, all softly blended.
7. Plum at Both Ends, Olive in the Middle
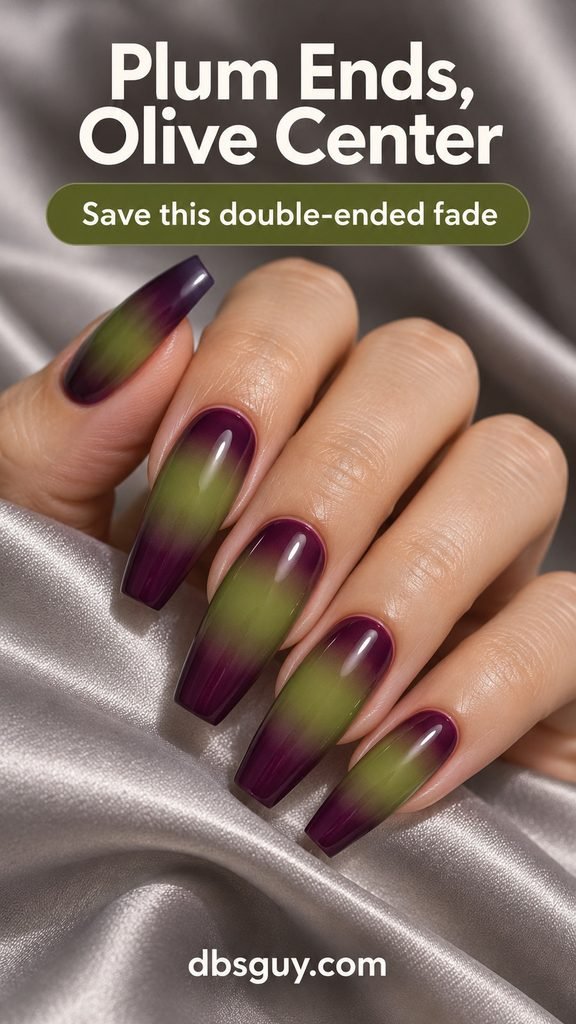
This double-ended ombré puts an olive band between plum at the cuticle and plum at the tip. The lighter middle becomes the feature, almost like a soft beam across each nail. A longer coffin shape gives the two transitions enough space.
Ask for a substantial olive center and feathered boundaries. Thin, sharply separated bands would look striped. You can soften the overall contrast by choosing a dusty plum, but keep the middle lighter enough to stand out under ordinary indoor light.
Salon brief: Long tapered coffin nails with plum at the cuticle and tip, framing a broad softly blended olive center.
8. A Sheer Watercolor Ombré
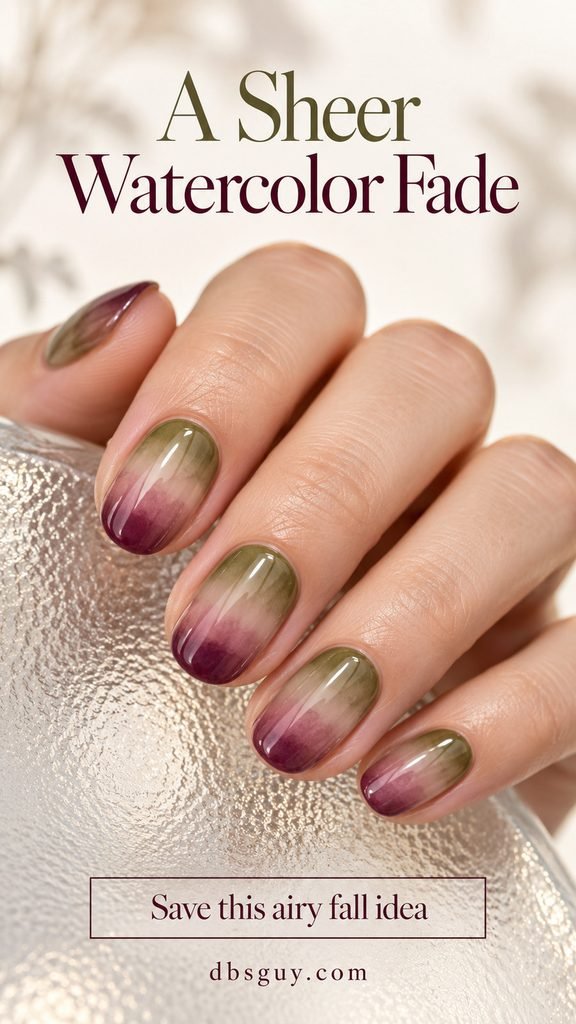
Translucent washes make olive and plum feel lighter than an opaque set. Olive is concentrated near the base, plum drifts in at the tips, and a sheer middle lets the natural nail remain part of the look. Short ovals suit its gentle proportions.
Bring a reference showing the transparency you want. The finish depends on the products and application, so ask your artist to show a sample rather than requesting a fixed number of coats. If you want complete coverage of the nail underneath, choose one of the opaque designs instead.
Salon brief: Short oval nails with translucent olive near the base, a sheer middle, and a softly washed plum tip.
9. A Dusty Mauve Bridge
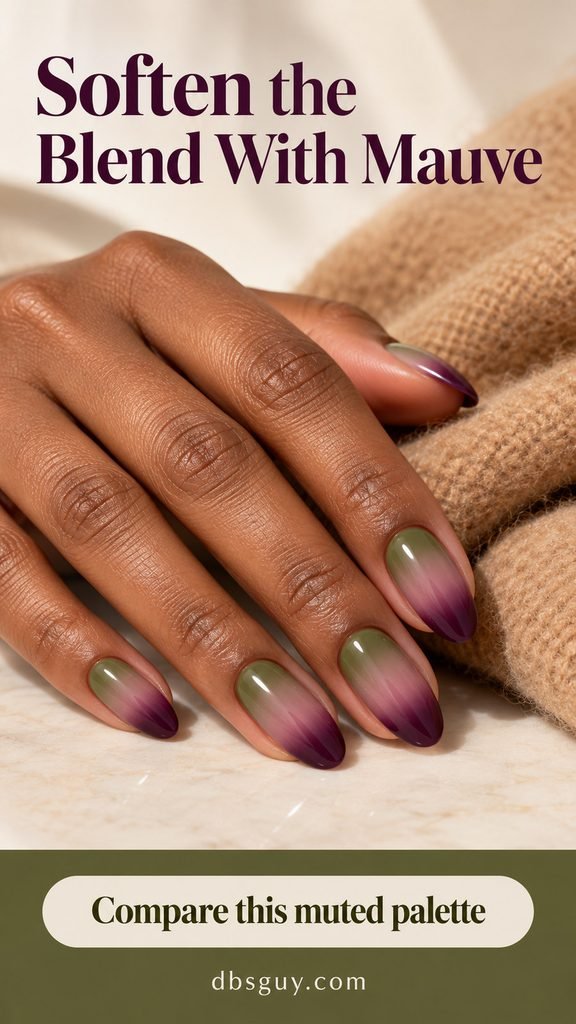
Mauve adds a quieter step between olive and plum. The green begins at the cuticle, a dusty mauve sits through the middle, and plum remains clear at the tip. Choose this when you like the two main shades but want a more muted transition.
Compare the three swatches together. A pale pink middle can make a stronger contrast than intended, while a very gray mauve may flatten the palette. Keep it as a visible bridge, then let the artist adjust its width to the available nail length.
Salon brief: Medium almond nails with olive bases, a dusty mauve transition, and clearly purple plum tips.
10. Two Ombré Accents With Solid Neighbors
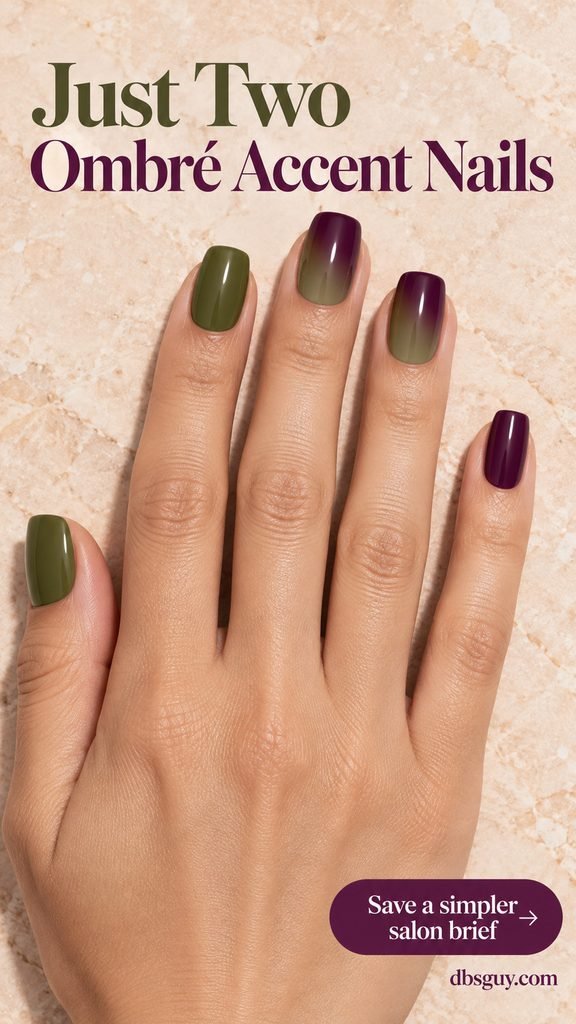
You do not need a gradient on every finger. Keep the thumb and index olive, blend olive into plum on the middle and ring fingers, and finish with a solid plum pinky. The surrounding solids make the two blended nails easier to notice.
This is a useful choice when you want to try the combination without repeating detailed artwork across the whole hand. Match the solid polishes to the ends of the fade. Using a different green on the plain nails can make the set feel less connected.
Salon brief: Olive thumb and index, olive-to-plum middle and ring fingers, solid plum pinky, and a consistent glossy finish.
11. Alternating Fade Directions
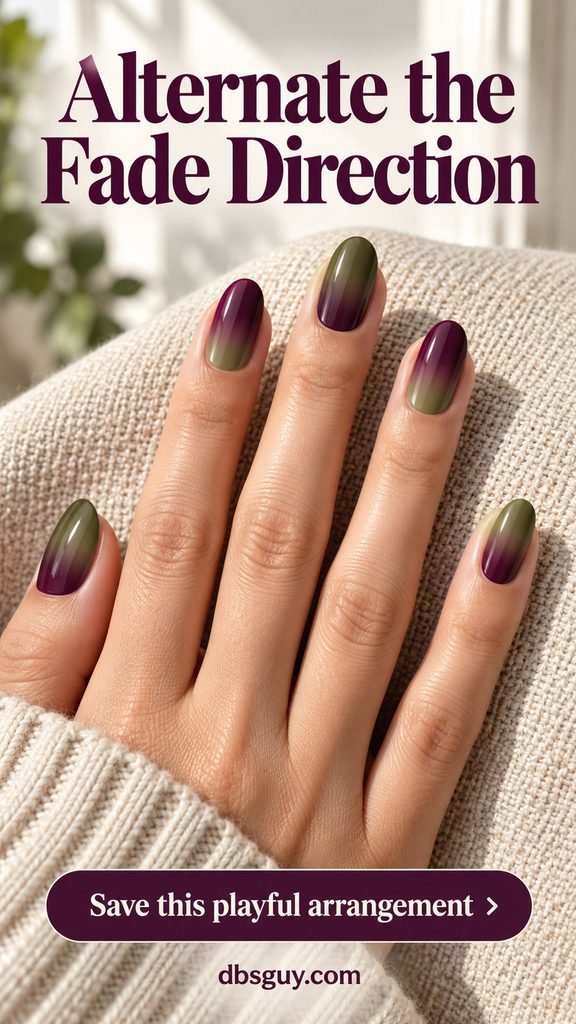
Switching direction creates a pattern without adding line art. Plum starts at the cuticle on the thumb, middle, and pinky; olive starts at the cuticle on the index and ring fingers. Every nail still carries both colors.
Write down the finger arrangement before the appointment, or show the full-hand reference. A random mix can look different from the alternating rhythm shown here. Keep the same polish pair and finish throughout so the direction change remains the main detail.
Salon brief: Alternate plum-to-olive and olive-to-plum gradients across the hand, starting with plum at the thumb cuticle.
12. Olive-to-Plum Ombré French Tips
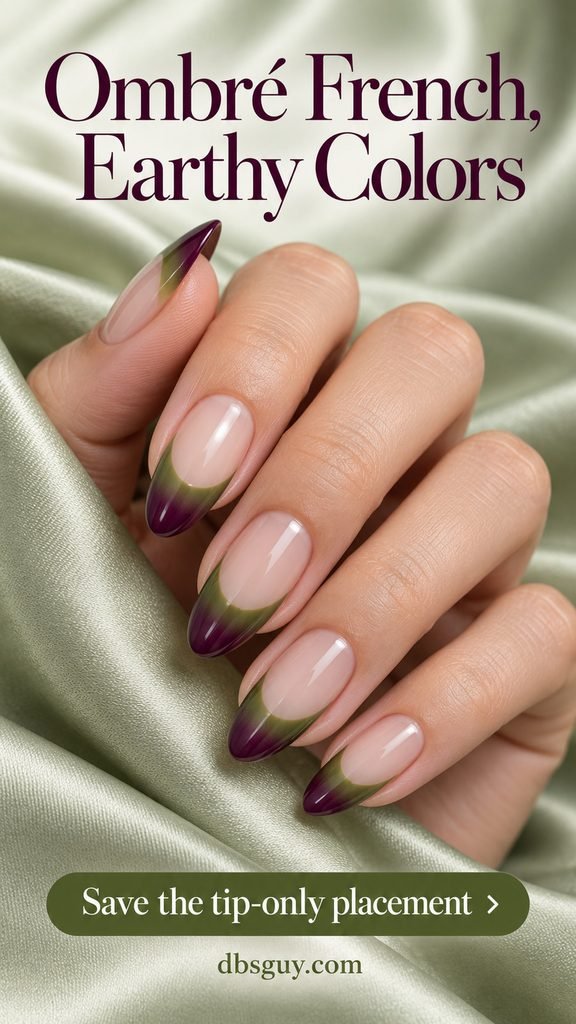
Leave the nail bed sheer and place the blend inside a broad French tip. Olive sits just above the curved smile line, then deepens into plum at the free edge. This keeps most of the nail neutral while giving the tip a small two-color story.
The tip needs enough depth for both colors to show. On shorter nails, use this on one or two accents rather than stretching the French farther down than you like. For other tip placements, explore 25 November nail ideas that give classic French tips an unexpected fall twist.
Salon brief: Sheer nude almond nails with broad curved French tips that fade from olive at the smile line to plum at the edge.
13. A Floating Ombré Ribbon
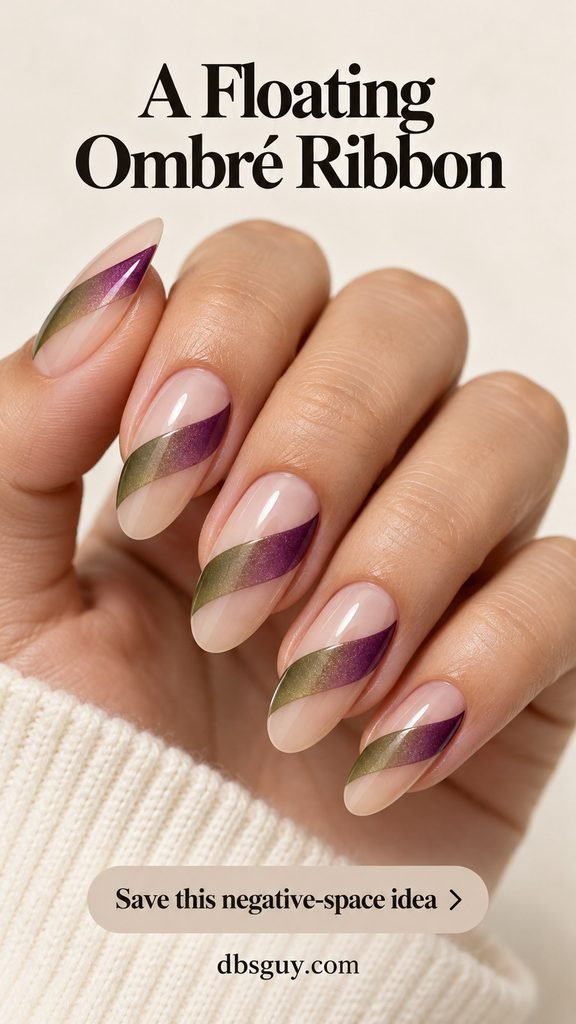
A broad diagonal ribbon carries the olive-to-plum blend across a sheer nude nail. Clear-looking space above and below separates it from an all-over gradient. The ribbon can curve gently so the placement feels fluid rather than like a rigid sash.
Make the colored band wide enough to contain a visible fade. Several narrow ribbons would leave less room for the two shades and change the design. Longer oval nails suit the full version; a shorter adaptation can use one simpler sweep across an accent nail.
Salon brief: Sheer nude oval nails with one broad curved diagonal ribbon per nail, fading from olive at one end to plum at the other.
14. An Off-Center Plum Corner
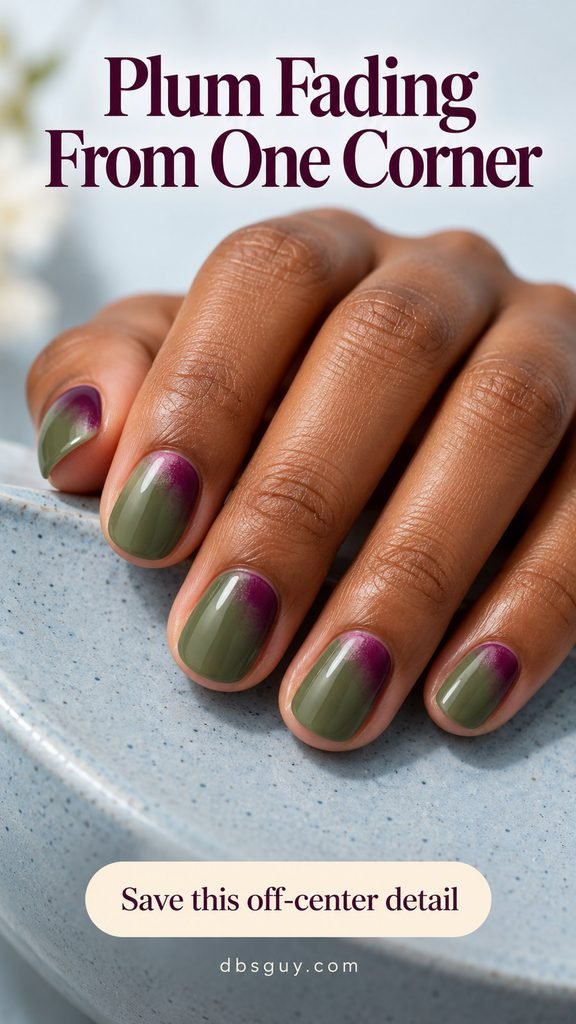
Mostly olive nails get a soft cloud of plum in one cuticle-side corner. The purple occupies a smaller area, making this a good option when green is the color you want to see first. Short round nails keep the small corner detail easy to follow.
Ask for the plum to dissolve into olive with no hard diagonal boundary. Keep its placement consistent across the fingers, but let the size adjust slightly for narrower nails. The key is a recognizable purple corner with plenty of uninterrupted green around it.
Salon brief: Short round olive nails with a softly diffused plum cloud in one cuticle-side corner on each nail.
15. Matte Ombré With a Glossy Edge
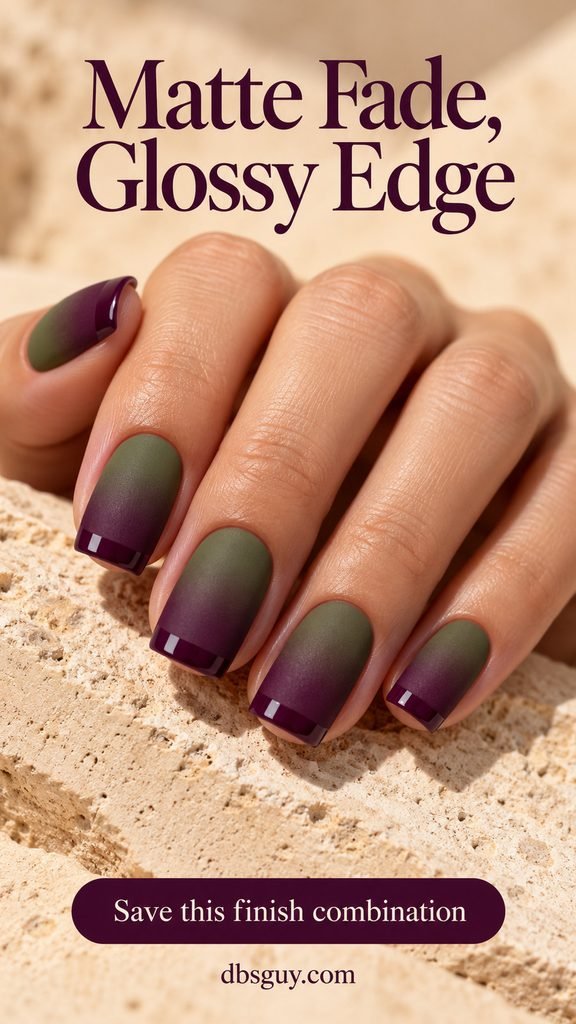
The olive-to-plum gradient stays matte, while a narrow glossy strip follows the plum free edge. The colors remain the same; the difference appears in the reflections. Square nails give that glossy edge a clear, tidy shape.
Check a sample from a slight angle as well as straight on. If the glossy section grows too deep, it can take over the matte finish you chose. Ask your artist to keep the final surface smooth and the shiny edge narrow enough that the finish contrast remains deliberate.
Salon brief: Matte olive-to-plum square nails with a thin clear glossy strip over the plum free edge only.
16. A Soft Pearlescent Veil
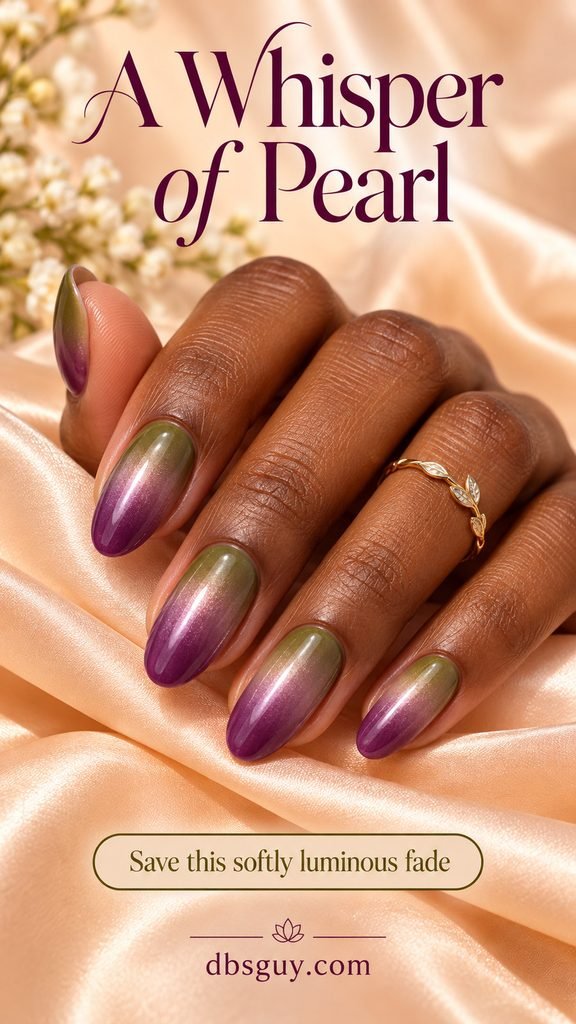
A sheer pearl finish adds a diffuse glow over the two-color fade. You should still be able to identify olive near the base and plum at the tip. The appeal is a soft sheen that moves with the light.
Ask to see the topper over both colors before applying it to the full set. Some pearl finishes can make the underlying shades look lighter or cooler. If the green disappears, use a subtler veil or keep the pearl on two accent nails. Skip extra foil so the gentle glow stays easy to see.
Salon brief: An olive-to-plum almond gradient with a very sheer pearlescent sheen that leaves both colors visible.
17. A Microglitter Fade at the Tips
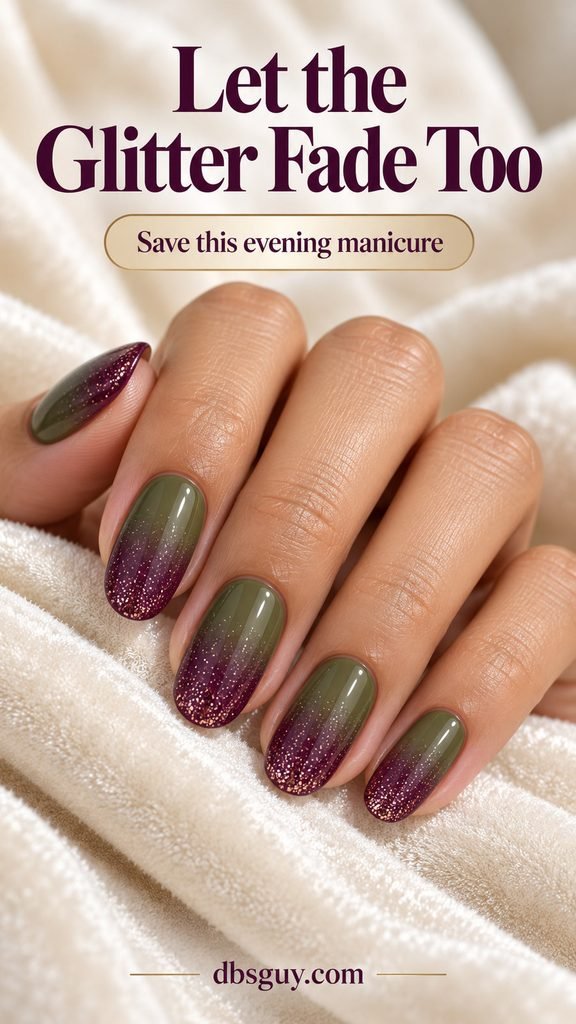
Fine champagne sparkle collects at the plum tips and thins out toward the middle. Olive remains clear near the cuticle. This gives the manicure an evening detail while preserving the original fade underneath.
Look for small, scattered particles in the reference rather than large sequins. An opaque glitter patch would cover the purple you selected. Keep the sparkle sparse at the transition and discuss a smooth final finish if you prefer a manicure without noticeable texture.
Salon brief: Glossy olive-to-plum oval nails with fine champagne glitter concentrated at the tips and gradually scattered toward the middle.
18. Gold Foil at One Transition
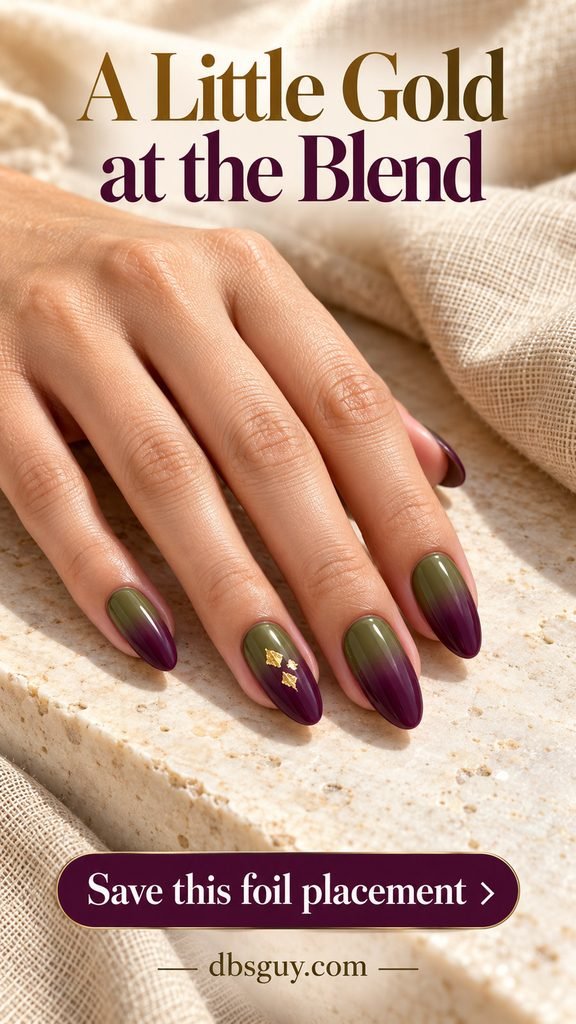
A few tiny gold fragments sit where olive meets plum on the ring finger. The remaining nails stay plain ombré, giving the foil one clear place to catch the light. It is a restrained option for a dinner or a dressed-up fall outfit.
Leave visible color between the flecks. The aim is a few irregular highlights, not a metallic band hiding the blend. For more ways to place those fragments, see 19 November nail designs with gold foil details that catch every little glimmer.
Salon brief: Olive-to-plum almond nails, with a few small flat gold foil pieces at the ring-finger transition only.
19. A Fine Gold Outline
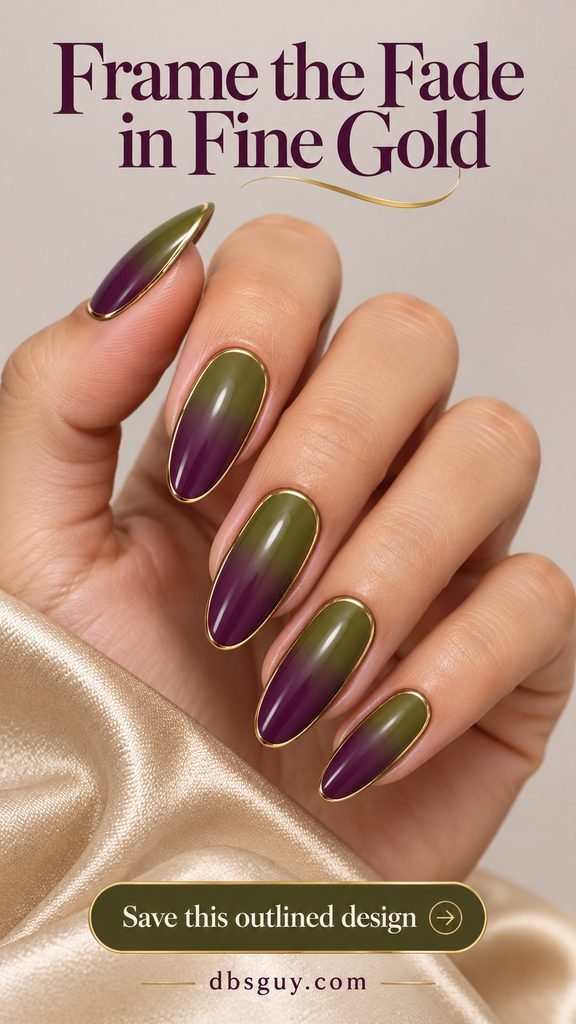
A hairline gold contour frames the olive-to-plum gradient. It follows the cuticle curve, sidewalls, and free edge, giving the soft colors a more defined perimeter. A longer oval leaves room for the frame and the blend inside it.
Keep the outline delicate. A thick border can crowd the color, especially near a narrow tip. If your nails are short, ask to try the contour on one accent first and check whether enough olive and plum remain visible before repeating it.
Salon brief: Long oval olive-to-plum nails with a very thin painted gold outline just inside each nail perimeter.
20. One Ivory Botanical Sprig
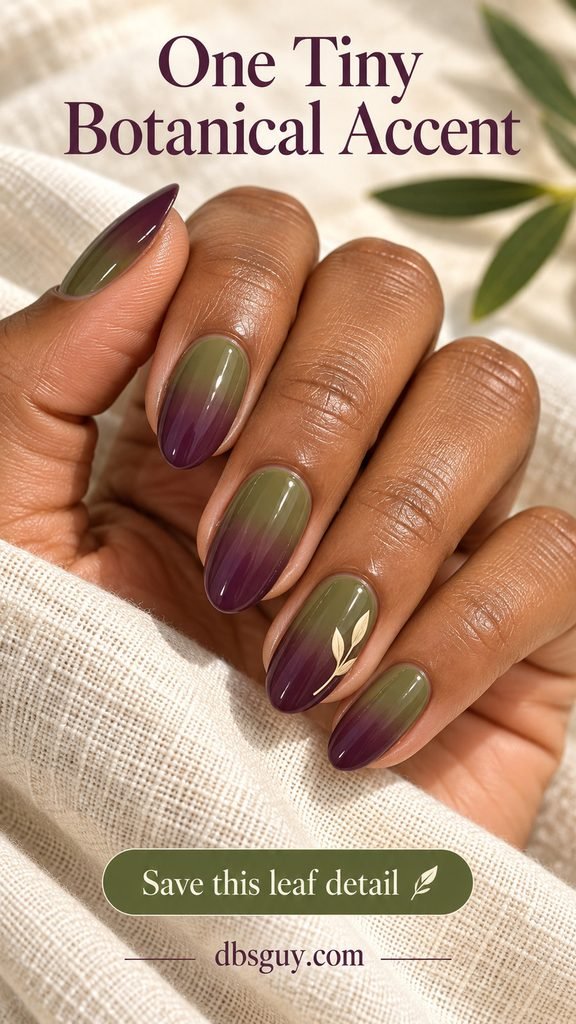
A slender ivory sprig on one ring-finger nail adds a small illustrated detail over the blend. Place it toward a sidewall so the center of the gradient stays open. The pale line gives the leaf shape enough contrast against the earthy colors.
Choose a simple stem with only a few leaves. A dense branch can turn into a pale patch at nail size. If the design is being shortened, reduce the leaf count rather than making every mark tiny. Keep the other nails plain so the botanical detail has room to stand out.
Salon brief: Olive-to-plum almond nails with one small fine ivory sprig near the ring-finger sidewall; leave the other nails plain.
21. A Fine Plaid Accent Over Ombré
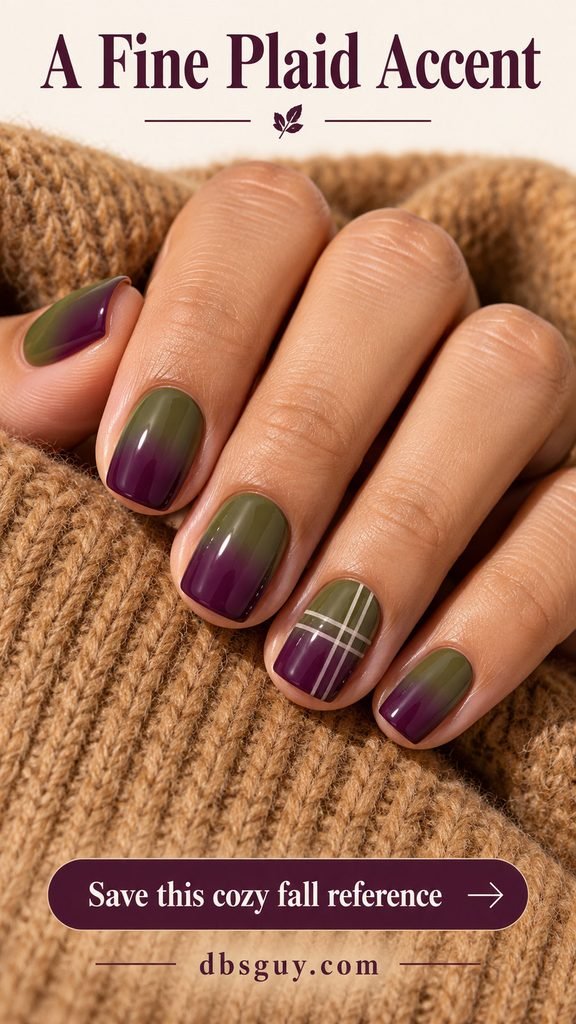
Two thin ivory vertical lines crossed by two horizontal lines add a small plaid grid to the ring finger. The olive-to-plum blend remains visible through the open spaces. Short squoval nails give the pattern a compact, sweater-friendly shape.
Agree on line weight before adding the grid. Broad lines can hide the gradient, while too many intersections compete with it. Keep the rest of the set plain. If the pattern is the part you love most, browse 21 plaid November nail ideas that look like miniature fall outfits for a more pattern-focused manicure.
Salon brief: Short squoval olive-to-plum nails with one ring-finger accent of two fine ivory vertical lines crossed by two horizontal lines.
What to Send Your Nail Artist
Save one full-hand image and name the feature you want to keep: the fade direction, the amount of green, the sheer base, or the accent placement. Add your preferred shape and actual length. A short request such as “mostly olive, a soft plum corner, short round nails, no extra art” is more useful than sending several conflicting references.
Ask whether the artist can create the effect with the service you plan to book. Share detailed designs in advance so they can discuss the method and appointment needs. These are color and placement references, not promises of an identical result or a particular wear time.
Olive and Plum Ombré Nail FAQs
Can olive and plum ombré work on short nails?
Yes. Start with the reverse fade in idea 2, the sheer wash in idea 8, or the small corner fade in idea 14. Keep the transitions simple and the main colors easy to distinguish. You can also put the gradient on two accents, as in idea 10.
Can I create an ombré with regular nail polish?
Yes. OPI’s regular-polish ombré tutorial uses overlapping colors on a cosmetic sponge, then dabs them onto the nail and finishes with top coat. That supports the basic method; it does not test this particular olive-and-plum pairing. Try your colors on a sample tip first and follow the instructions for the products you use.
Why does my olive-and-plum blend look muddy?
The selected shades may be too close in depth, or the mixed middle may have spread over too much of the design. Compare the colors separately, then check a sample blend. Ask for a clear olive area and a clear plum area with the transition between them. The mauve bridge in idea 9 is another visual option to discuss.
Is plum the same as burgundy?
The names overlap across polish brands, so use the swatch as your guide. For this collection, plum means a noticeably purple shade, while burgundy is the red-wine direction. If you want the look shown here, point to the purple in your reference rather than relying on the bottle name alone.
Which design should I choose for a simple fall manicure?
Choose the classic fade if you want both colors on every nail, two ombré accents if you want more solid polish, or the corner fade if olive is your favorite. Those three choices make a useful starting point for earthy nail inspo without adding foil, glitter, or line art.
For your fall nails 2026 board, save the reference with the color balance you would enjoy wearing most. Then decide whether one small finishing detail would make it feel more like you.