21 Sparkly New Year’s Eve Nail Designs With Glitter Gradients and Crystal Accents


For a glitter manicure with a clear design, choose where the sparkle starts: one corner, the nail base, a side edge, or the center. For crystal accents, choose one focal point first. A small crescent, a single teardrop, and a fully jeweled accent nail give very different results.
These 21 sparkly New Year’s Eve nail designs show those choices up close, with ways to scale them to your nail length and explain them at your appointment. Start with the placement you like, then choose the color.

The images are AI-generated nail-design concepts created for dbsguy.com. They illustrate color, shape, and placement, rather than completed salon work or tested product results. Real finishes vary with products, application, and lighting.
Choose Your Sparkle Before Your Shade
- For an approachable regular-polish project: look at the champagne corner fade, reverse silver fade, rose-gold side fade, or confetti tips. You can build the density without drawing a precise motif.
- For very short nails: compare the reverse fade, silver micro tips with one crystal, or bronze half-moons. Keep the open polish areas visible.
- For a salon statement: choose the crystal crown, teardrop, full crystal accent, or disco mosaic. Bring the reference and discuss stone size, texture, and removal before application.
A glitter gradient changes the density of particles across the nail. It does not have to blend two polish colors. Fine shimmer creates a softer glow; larger glitter pieces give separate flashes. Crystals add a raised detail. You can choose one of those effects without adding all three.
1. Champagne Glitter Across One Corner
A diagonal fade puts the brightest champagne glitter at one outer tip, with the peach-beige base still visible across the opposite side. It has the lightness of a sheer manicure but a more deliberate direction than an all-over topper.
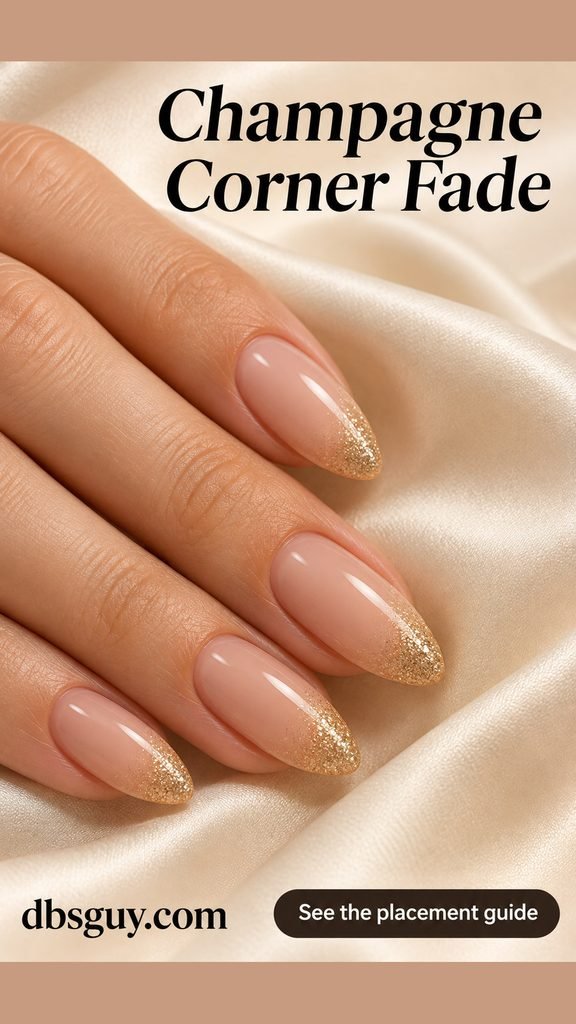
On medium almond nails, ask for a dense corner that loosens into individual particles toward the center. For a regular-polish version, start over a dry base, dab a little nail glitter polish into the corner, then add coverage only at the outer edge. Stop before the diagonal becomes a solid French tip.
2. A Reverse Silver Fade on Short Nails
Move the glitter to the other end of the nail. Silver gathers near the base and becomes sparse before the rounded tips, leaving most of the rosy polish plain. That open tip is what makes this a reverse gradient.
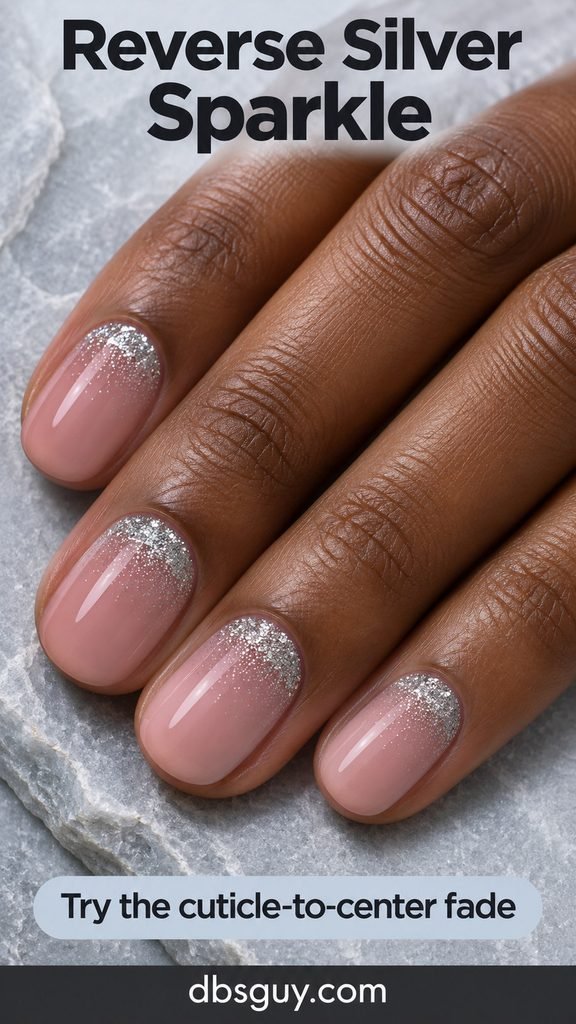
Keep a clean gap between the glitter and skin. A small detail brush helps control the curved starting area; a broad bottle brush can spread sparkle farther than intended. This is a useful short-nail option because you can adjust the fade without drawing a tiny French line. For more compact placement ideas, browse these short December nail designs.
3. A Silver Glitter Sweep Over Black
A diagonal silver sweep gives glossy black nails movement without covering them completely. The glitter is brightest through the middle of the band and softer along its edges, so the black remains visible on both sides.
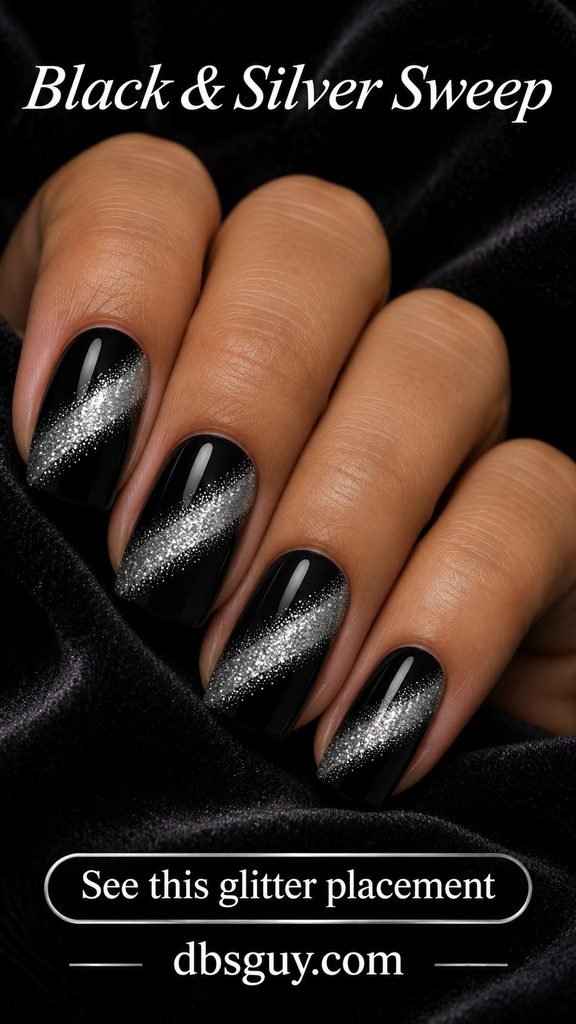
Bring this to a salon if you want the same angle across the whole set. Ask for a feathered glitter band, rather than a crisp painted stripe or opaque silver foil. A squoval tip gives the sweep a clear endpoint. On shorter nails, narrow the band instead of adding extra length just for the artwork.
4. Navy With a Crystal-Centered Starburst
One crystal at the center of a fine silver starburst turns a navy accent nail into a little piece of evening jewelry. Leave the neighboring nails plain navy so the tiny radiating lines remain readable.

Ask the artist to place the burst slightly off center on the ring fingernail, with the stone entirely inside the nail surface. The painted rays should be thin and separated, not a dense silver patch. A small flat-backed nail crystal keeps the center in proportion. If your nail is narrow, use fewer rays instead of squeezing them against the sidewalls.
5. Burgundy French Tips With a Glitter Halo
Here, the sparkle follows the inner curve of a burgundy French tip. A soft champagne haze sits just behind that boundary on the sheer pink base, creating a halo rather than a second hard line.
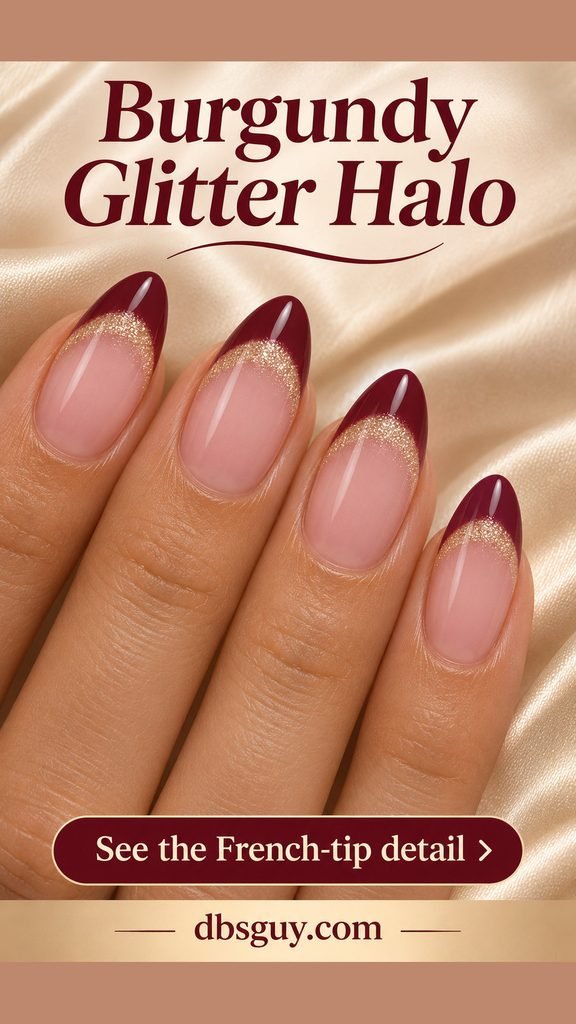
Keep the burgundy tip clearly visible and the glitter narrowest near the sides. At the salon, check the French shape before the sparkle goes on. For a home version, try the halo on one accent nail and use plain burgundy on the others; matching several delicate curved fades is the fiddly part.
6. Emerald Nails With One Crystal Crescent
A small crescent of clear crystals sits near the base of one emerald nail. The green center stays open, which lets you see the curved arrangement instead of a crowded cluster of stones.

Choose low-profile flat-backed nail crystals in a graduated curve, with smaller stones at the ends. Keep the crescent inside the nail margin, away from the skin. This is a salon reference if you are unfamiliar with crystal adhesives. You can reduce it to three tiny stones while keeping the same curved placement on a short nail.
7. Rose-Gold Glitter Fading In From the Side
Instead of starting at the tip, this glitter fade begins along one side of each rosy nail. Rose-gold particles form a narrow bright edge, then become scattered as they reach the middle. The opposite side stays mostly clear.
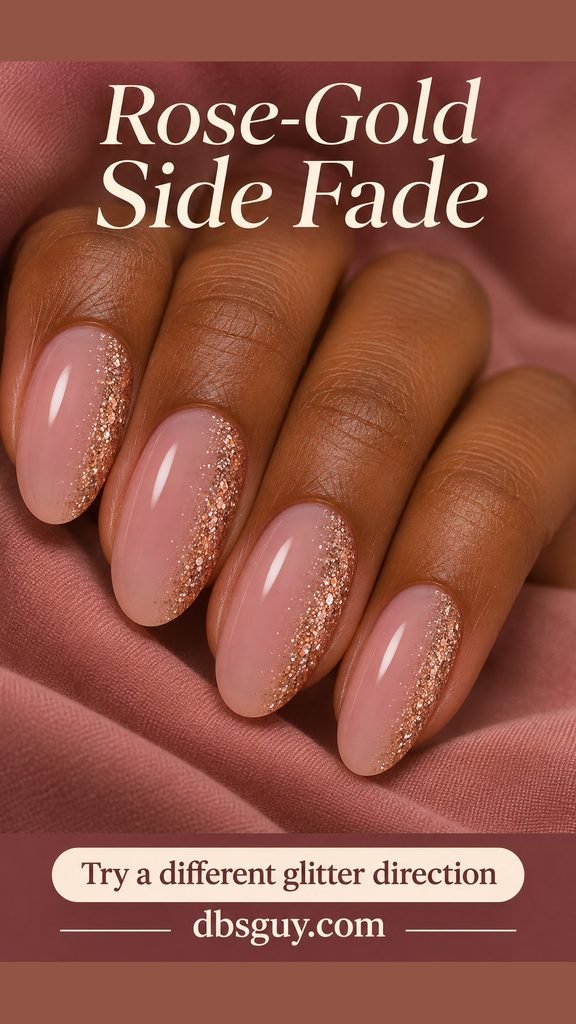
Tell your technician which side you want emphasized and keep that choice consistent across the hand. A medium oval gives enough width to see the change in density. If the glitter reaches both sidewalls, the side-fade effect gets lost. Build the brightest strip in small amounts rather than brushing another coat over the entire nail.
8. A Lilac Glitter Glow in the Center
A concentrated silver-lilac sparkle sits in the center of each pale lilac nail, thinning outward toward the edges. It reverses the usual bright-tip arrangement and creates a soft, oval pool of glitter.

Ask for visible lilac around the whole perimeter. This is a glitter-density effect, so you do not need a magnetic polish or airbrushed color aura to describe it. On short rounded nails, make the central patch smaller and keep the glitter fine; large pieces can turn the gentle glow into an obvious confetti spot.
9. Silver Micro Tips With a Single Crystal
Very short nails can carry both glitter and a crystal if each detail stays small. A thin silver glitter edge outlines the tips, while one clear stone near the base of the ring fingernail creates a second, separate point of light.
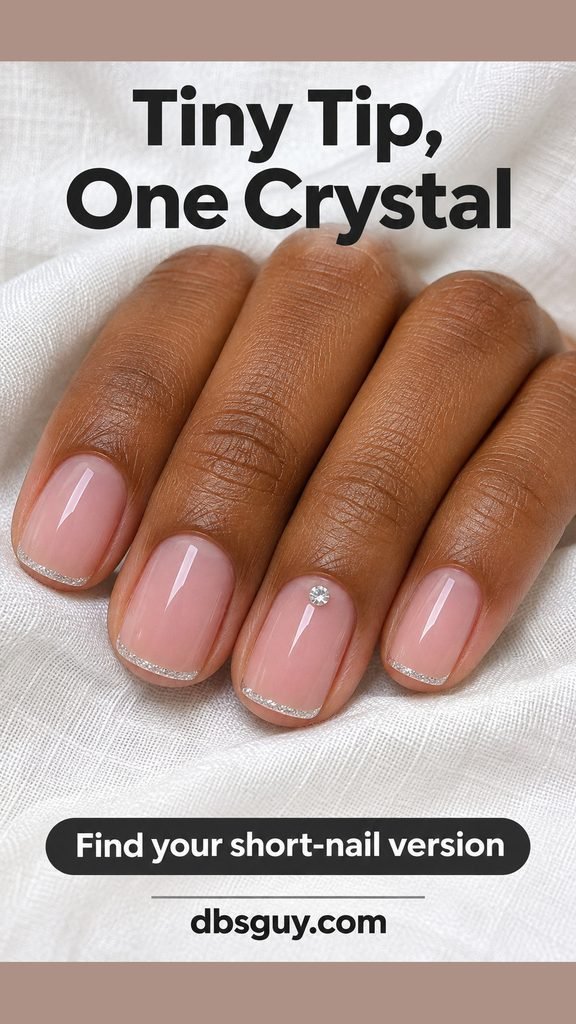
Use the smallest stone that still reads as a crystal on your nail, leaving bare polish around it. Keep all the other nails free of gems. This works especially well when you want a manicure that echoes silver earrings without becoming another large accessory. Ask to see the tip width and stone placement on one nail before repeating the silver edge.
10. Confetti That Builds Toward the Tips
Different-size holographic pieces gather at the tips and become fewer toward the base. Unlike a uniform glitter coat, this layout has visible spaces between the pieces, especially around the center of the nail.
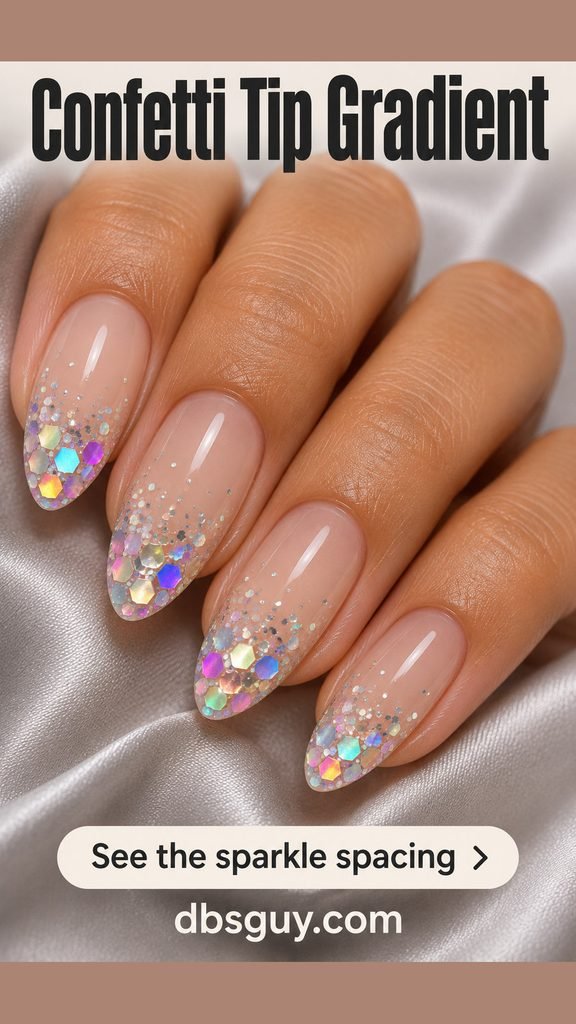
Choose a nail-art glitter topper with pieces small enough to sit inside your nail edges. Over a sheer beige base, a few larger pieces can sit near the free edge while fine glitter makes the transition. Do not keep adding chunky pieces to fill every gap; the open areas make the gradient visible. Let regular-polish layers dry as their instructions require.
11. Graphite V Tips With a Crystal Point
Two smoky silver glitter panels meet in a V at the tip of a sheer nail. One small clear crystal marks the point where the panels meet on the ring finger. The angular shape gives the set a different rhythm from a curved French.
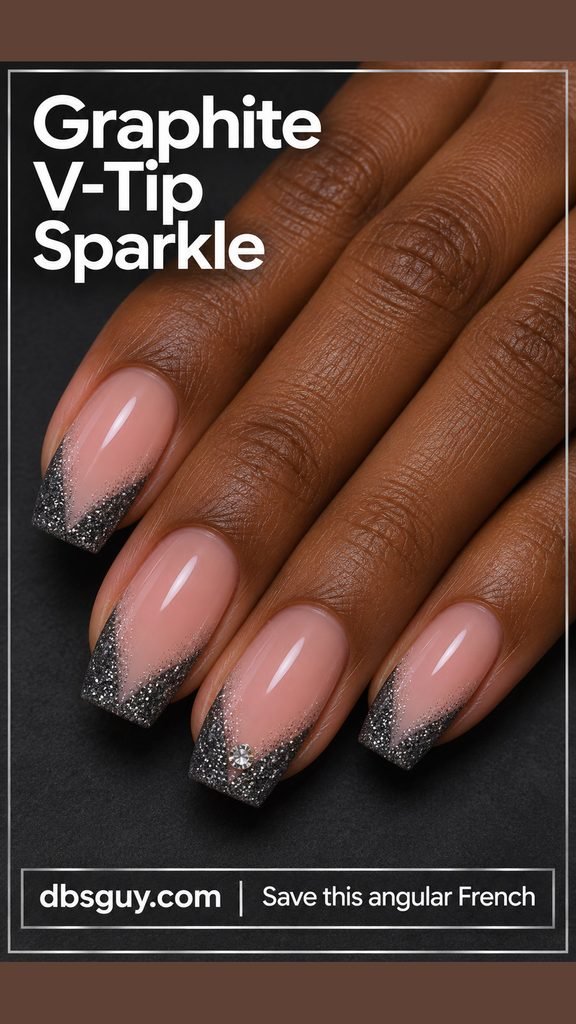
A medium tapered-square nail gives each panel enough room. Ask for a narrow V with some transparency near its inner edges, rather than a thick opaque triangle. Keep the crystal on the nail surface where the lines meet, not hanging beyond the tip. For shorter nails, use the V on one accent nail and leave the others sheer.
12. Rose Gold Meeting Silver Across the Nail
Rose-gold glitter along one side blends into silver along the other. Both finishes share a fine particle size, so the transition reads as a change of metal rather than two unrelated textures.

Keep the blend soft through the middle and let the sheer pink base show beneath it. This is a good reference if your outfit already mixes warm and cool metallic details. Request a side-to-side fade on every nail; simply alternating silver and rose-gold nails would give you a different design. A sample nail helps settle how strongly each metal should show.
13. A Glitter Ribbon With Crystal Endpoints
A slender gold glitter ribbon curves across one sheer accent nail, with a tiny crystal near each end. The surrounding nails stay plain and glossy. The empty space is part of the design: it gives the curved ribbon room to show.
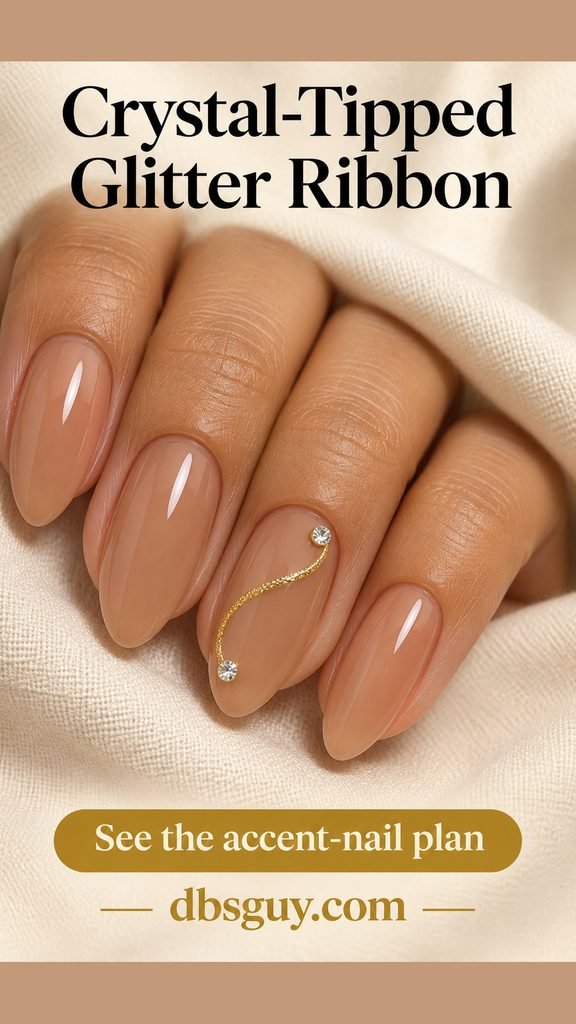
Ask for the endpoints to finish inside the nail perimeter, so the stones are fully supported. One smooth curve is enough on a short oval; a longer almond can hold a gentle S. Avoid adding a crystal border along the whole ribbon, which would hide the fine glitter line and make the surface much busier.
14. A Champagne Crystal Crown
Three pointed clear crystals fan outward above a tiny row of round stones, forming a compact crown on one champagne nail. The center point is the tallest, so the shape reads differently from a curved crystal crescent.
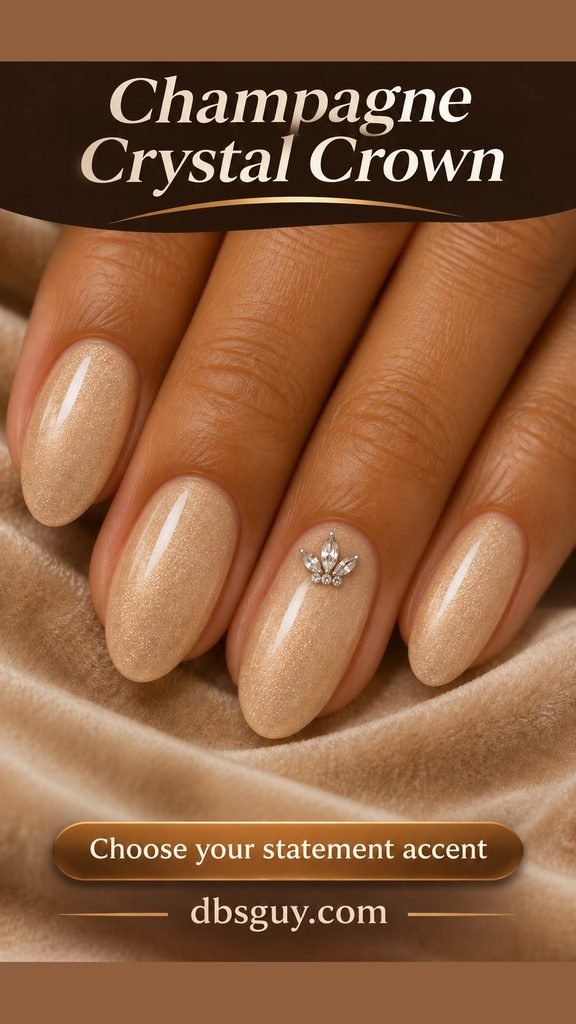
Choose this when the crystal arrangement, rather than glitter density, is the detail you want to notice. Keep the champagne base softly shimmering and the neighboring nails free of stones. Ask your artist to check the cluster’s width against the nail before fixing it in place. For a smaller version, keep the three pointed stones and omit the extra round accents.
15. A Vertical Crystal Line on Smoky Taupe
A short vertical line of tiny crystals runs down the center of one smoky taupe nail. A faint silver glitter haze around it ties the stones into the polish, while the other nails stay taupe.
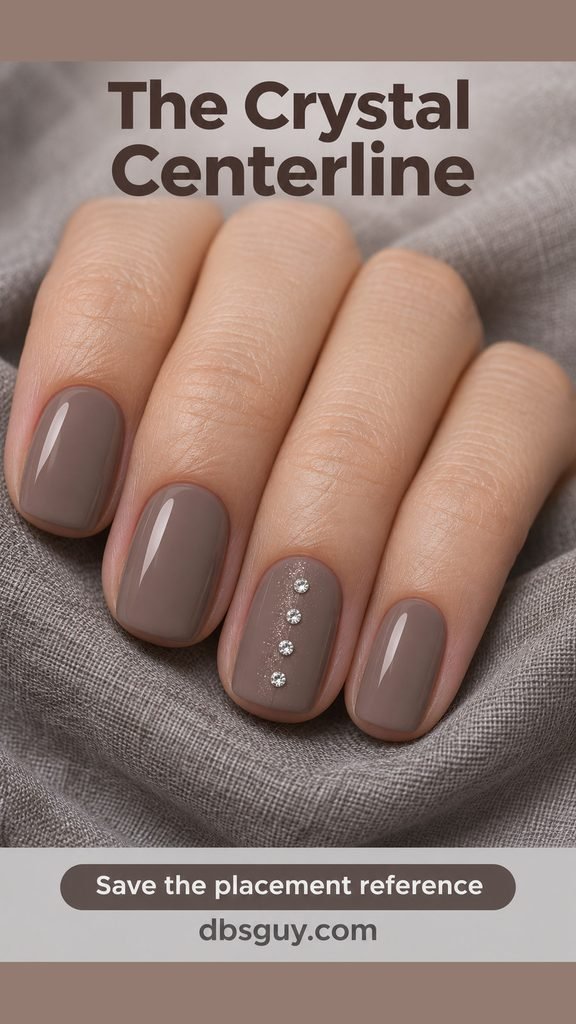
Leave space at both ends of the line and along both sides. You want a centered detail, not a ridge that covers the whole nail. Ask for separate small stones with visible gaps, especially on a narrow nail. This straight arrangement is a useful alternative when curved crystal crescents feel too ornamental for your style.
16. One Teardrop Crystal Above a Silver Fade
A single teardrop crystal sits lengthwise on a sheer blush accent nail, above a soft silver tip fade. The other nails repeat only the glitter, so the shaped stone stays the focal point.

Bring the reference to a technician and compare a few crystal sizes directly against your nail. Keep a margin around the teardrop, with its point aimed toward the tip. If you dislike raised embellishments, ask whether a smaller flat-backed stone can keep the outline you like. Do not add a surrounding ring of rhinestones unless you want a noticeably larger cluster.
17. One Crystal-Covered Accent With Quiet Tips
Give the ring fingernail a close arrangement of small clear crystals, then keep the other nails in a restrained silver tip fade over sheer beige. The contrast makes the full accent look deliberate rather than unfinished.

This is the most textured option in the guide and a better salon reference than a first crystal project. Request a clear margin around the accent nail’s perimeter and choose small flat-backed stones. Consider whether you will be handling delicate fabric or pulling on tights after your appointment; if that sounds inconvenient, use a smaller crystal patch instead of the full arrangement.
18. A Crystal Constellation on Midnight Blue
Three tiny crystals, joined by fine silver lines, create a small constellation on one midnight-blue nail. Sparse glitter dots sit nearby, while the rest of the set remains plain navy.

Choose an asymmetric arrangement with one stone slightly higher than the others. A compact triangle is easier to read on a short nail than an elaborate sky map. Ask for the connecting lines to remain much finer than the stones. This gives you a night-sky reference without a painted moon, year numerals, or several competing motifs.
19. Icy White With Crystal-Ended Glitter Trails
Fine silver glitter trails extend from the nail bases toward the tips over a milky white background. On one accent nail, tiny clear crystals finish two of the trails. The unequal lengths make the detail feel like falling sparkle rather than a regular striped pattern.

Keep the trails narrow and leave white visible between them. A medium almond gives them room to taper, but you can use fewer, shorter trails on an oval. Tell your artist you want irregular fine glitter lines beginning near the base and stopping at different points down the nail, not raised sculpted icicles. Keep the lines and stones inside the nail margins.
20. A Bronze Fade Around a Bare Half-Moon
Bronze glitter fills most of the nail but softens as it approaches a sheer half-moon at the base. That open curved window gives this warm sparkle a defined shape without needing a crystal or painted motif.

Pick a translucent base that gives you the contrast you want beside the bronze; it can lean peach, caramel, or brown. Ask for a diffused border around the half-moon rather than a hard outlined semicircle. Keep the window shallow on short squoval nails. If the glitter covers it, adding more sparkle will not restore the shape—show the desired opening before application.
21. Disco Mosaic Tips With a Glitter Transition
Small silver square pieces gather at the tips like a miniature mirror mosaic. Fine silver glitter thins toward the sheer pink base, softening the transition from the tiled edge into the rest of the nail.
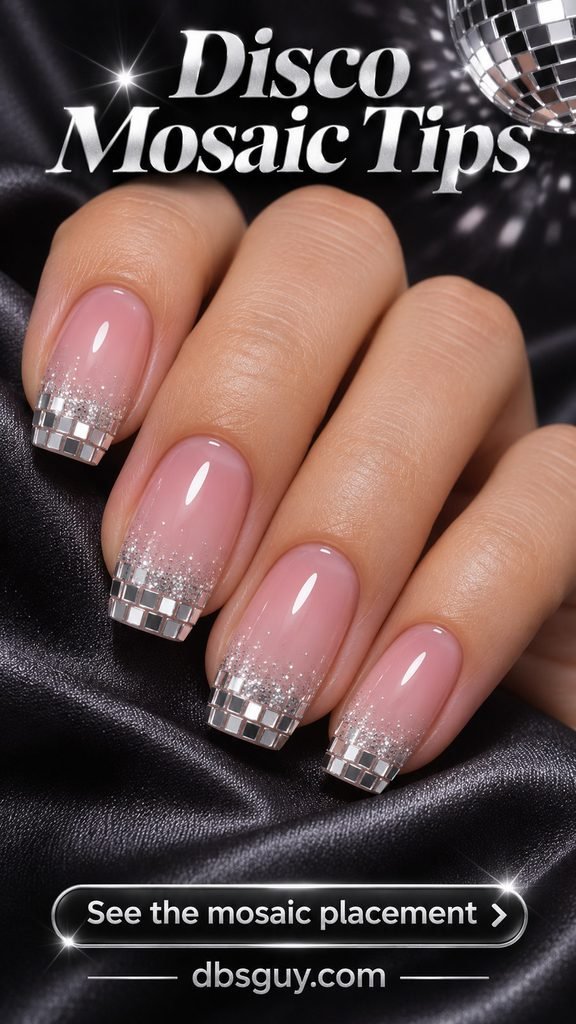
Use nail-art pieces that fit the curve and stay entirely inside the nail edge. This is a precise salon reference: the squares should read separately, not as a thick pile of foil. Keep the mosaic to the tip section and skip crystals on this set. The shape of the reflective pieces already supplies the detail that makes it different from a classic glitter fade.
Make the Reference Work on Your Own Nails
Show your technician the full image, then point to the detail you want to keep: the direction of the fade, the open base, or the crystal arrangement. Choose the shape and length you already find comfortable. A shorter version usually needs a smaller decorated area or fewer stones, rather than every detail squeezed into less space.
For the base shade, compare rose, beige, caramel, or brown samples beside your hand. Decide whether you want a close-to-skin background or a visible pale contrast. Neither effect depends on copying the skin tone in the reference.
For a home glitter fade, use nail polish or glitter products intended for nails. Start over a dry regular-polish base with a light, sparse layer across the planned transition. Add more glitter only where you want the brightest area. Dabbing gives more control over larger pieces than repeatedly brushing the whole nail. Let layers dry according to the formula’s directions before adding a compatible top coat.
For crystals, use flat-backed nail embellishments and an adhesive intended for the chosen nail system. Follow that system’s placement, setting, and removal instructions; regular top coat, nail adhesive, and crystal gel are not interchangeable methods. A technician can choose the attachment method for a raised arrangement. Leave a clean margin from the skin, and keep finishing product around the stone’s base rather than burying its faceted face.
Gel cure times depend on the product and its specified compatible lamp, so a timing from a different tutorial is not a universal instruction. For gel appointments, the American Academy of Dermatology’s gel-manicure guidance recommends broad-spectrum, water-resistant SPF 30 or higher on the hands, or dark opaque gloves with the fingertips exposed. It also advises against picking or peeling gel off.
Questions to Settle Before Your Appointment
Can I have sparkly New Year’s Eve nails without extensions?
Yes. The reverse fade, corner glitter, and micro-tip placements can be scaled to natural short nails. A design image does not require you to copy its length. For a large crystal shape or a mosaic, ask to see how much room remains around the detail on your own nail.
Which design is simplest if I am new to glitter?
Start with the champagne corner fade on one accent nail. A soft boundary allows more freedom than a French curve, V tip, or painted starburst. Check how densely your glitter polish applies on a spare practice tip first, then build the corner a little at a time.
Can I use regular polish instead of gel?
The glitter-placement ideas can be adapted with regular nail lacquer and compatible nail-art products. Crystal attachment is a separate decision: use an adhesive and removal method intended for your chosen system. If you want a raised cluster, ask a technician how it will be attached and taken off.
How long will the crystals stay on?
There is no reliable wear time from an image. Stone size, attachment method, nail surface, and daily handling all affect the result. Ask your technician what to do if a stone loosens. Avoid pulling at it or prying it off; follow the adhesive or nail system’s removal directions.
How do I keep the design from looking too busy?
Choose one main detail and repeat it deliberately. If a crystal-covered nail is the feature, keep the surrounding glitter light. If the glitter direction is the feature, leave the crystals off. The clearest reference is the one where you can point to the detail you want in a single sentence.