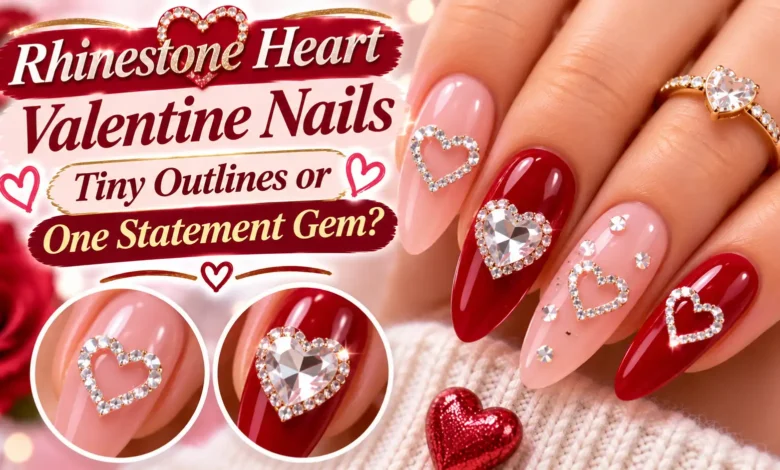
Choose a tiny rhinestone heart outline if you want the pink polish to show through the center. Choose one heart-shaped gem if you want a single, jewelry-like focal point. The outline gives you sparkle around a shape; the solid gem makes the shape itself sparkle.
Neither choice automatically means less upkeep. An outline has several small stones to position and check. One larger heart has fewer pieces, but its height and fit matter more. Start by choosing how much raised decoration you want on your hands, then choose the heart.
The images below are AI-generated manicure concepts for dbsguy.com. They illustrate color, scale, and placement, rather than completed salon work or wear-tested results.

Tiny outline or statement gem: which fits your manicure?
- For a soft, mostly pink manicure: choose a clear crystal outline on one blush accent nail. The empty center keeps the base color visible.
- For a more noticeable Valentine detail: choose a rose-colored heart jewel against cherry red. The contrast makes the accent easy to see.
- For a small nail surface: compare the actual pieces before deciding. One small heart gem may fit better than a complete outline made from stones that are too large.
- If raised edges bother you: ask to see the profile of the proposed decoration. Tiny stones can still catch, and a single gem can sit higher than you expect.
For either look, start with one decorated ring nail per hand and plain color on the other four, including the thumb. That gives the heart a clear place in the manicure without making every finger a separate project.
Tiny crystal outline: blush pink with an open center

This version uses glossy, sheer blush polish on medium oval nails. A single row of small clear round crystals forms a heart on the ring nail. There is no filled-in heart underneath: the same pink continues inside and outside the outline.
The important detail is the dip between the two upper curves. If those curves become one rounded arch, the shape can read as a teardrop. Keep the lobes balanced, leave the notch visible, and point the bottom of the heart toward the nail’s free edge.
Ask your nail artist to map the heart inside the widest usable part of the nail before attaching the stones. A visible border of polish should remain between the crystals and the nail’s sides, cuticle, and tip. If the border disappears, reduce the heart or use smaller stones.
Shop by the stone’s diameter rather than relying on the word “mini.” For example, Daily Charme lists a round SS3 crystal at 1.5 mm. Even that size may be too large for the outline you want on a narrow nail. The complete arrangement needs to fit, not just each individual crystal.
Salon brief: “Sheer blush on all ten nails, with one open heart made from small clear round crystals on each ring nail. Keep the center empty and leave pink polish around the whole outline.”
If you are keeping your current length, choose the outline after checking the available space. For other ways to use that space, see Valentine Nails on Natural Nails: Simple Ideas Without Extensions.
One statement gem: cherry red with a rose crystal

A faceted pale-rose heart gives glossy cherry-red nails one distinct focal point. In this concept, the ring nail carries the jewel and the other nails stay plain. The contrast between the red polish and the lighter crystal does the work, so the heart does not need a border of extra stones.
Choose a flatback heart made for nail decoration and compare it with the accent nail from above and from the side. From above, both lobes and the lower point should sit within the nail’s outline. From the side, check how far it rises and whether the base fits the nail’s curve.
If the gem rocks during a dry fit, ask for another size or shape. A larger heart is not a better statement if its sides overhang the nail. The pictured jewel is noticeable, but a smaller version can keep the same red-and-rose contrast on a shorter nail.
This is the simpler layout to explain at an appointment: one heart, one position, one accent nail. It still needs a suitable attachment system. Fewer pieces do not establish how long it will stay in place.
Salon brief: “Glossy cherry red on all ten nails, with one pale-rose faceted heart on each ring nail. Keep the other nails plain, leave a red margin around the gem, and show me its height before attaching it.”
If you decide you want crystals across the entire set, XXL Valentine Nails for a Full Set of Oversized Hearts and Bling explores that more elaborate direction.
Plan the fit before attaching anything

Use a loose practice tip to compare the two arrangements without committing your manicure. The planning image shows the same blush base under both options so you can concentrate on their different footprints.
- Match the practice tip to your accent nail’s size. A design that fits a wide display tip may need to shrink on your hand. Put the rounded cuticle end at the top and the free edge at the bottom.
- Dry-fit the decoration without adhesive. For an outline, use a wax picker to arrange the bottom point, the two upper lobes, and the notch, then fill the curves. For a single gem, place the whole heart and check its edges and profile. Do not force the same stone count onto different nail sizes.
- Check the design from normal viewing distance. You should still recognize the heart without bringing it close to your face. If the outline looks crowded, change the stone size or arrangement before adding adhesive.
- Follow the attachment product’s own sequence. Use a nail-art adhesive intended for your embellishment and manicure system. Air-setting glue and lamp-cured jewelry gel are different products; do not borrow the cure time or removal method from another one.
Keep adhesive off surrounding skin. If the product calls for sealing around the stones, keep the sealing material at their bases and off the visible crystal facets. Covering the faceted faces can reduce their sparkle. Leave products labeled for professional use to a nail professional.
For a gel system, use the lamp and curing instructions specified for that product. Do not assume extra lamp time solves an incompatible product or a poorly fitting charm. Confirm that the adhesive is suitable for the particular gem, especially if it has an opaque backing.
Wear and removal: what to ask before your appointment ends
Before leaving, ask your nail artist to check for raised edges and explain what to do if a stone loosens. If a crystal starts catching on hair or clothing, avoid tugging at it and arrange a repair or removal. Neither style comes with a reliable wear-time promise; stone size, attachment, and how you use your hands all matter.
Get the removal plan for the entire manicure, including the adhesive and any overlay or extension underneath. Do not pry a heart off with another nail or peel away gel polish. A soak-off product and a file-off product may need different handling.
The American Academy of Dermatology’s gel manicure guidance recommends avoiding picking, moisturizing nails between manicures, and protecting your hands from curing-lamp UV with broad-spectrum, water-resistant SPF 30 or higher, or dark, opaque fingerless gloves. Stop using a product if irritation occurs; seek a dermatologist’s advice for persistent nail problems.
Questions to settle before choosing your heart
Can I wear rhinestone hearts on short natural nails?
Yes, if the decoration fits completely on the nail. Check a small single heart alongside a miniature outline before choosing. A full outline needs room for both the stones and an open center. You do not need extensions just to try this detail.
Can I use regular polish instead of gel?
Yes. Choose an embellishment adhesive that its manufacturer says is compatible with regular polish, and follow the directions for preparation and drying. Do not assume wet polish alone will securely attach a raised gem. The finished look does not have to determine the manicure system.
Which version is easier to arrange at home?
One heart gem requires fewer placement decisions than a symmetrical outline. That makes the layout simpler, although the gem still needs to fit and the adhesive still needs to be used correctly. Practice the outline on a loose tip first if you want the open-center look.
Will top coat make either design smooth?
Do not expect it to. These are raised decorations, and coating over the crystal faces can change their appearance. If a smooth surface is your priority, a painted heart may suit you better than either rhinestone option. Choose that before committing to the raised design.
Also Read
Valentine Gel Nails With Glossy Color, Fine Lines and Heart Art has more color and line-art options if you want the Valentine detail without a large jewel.