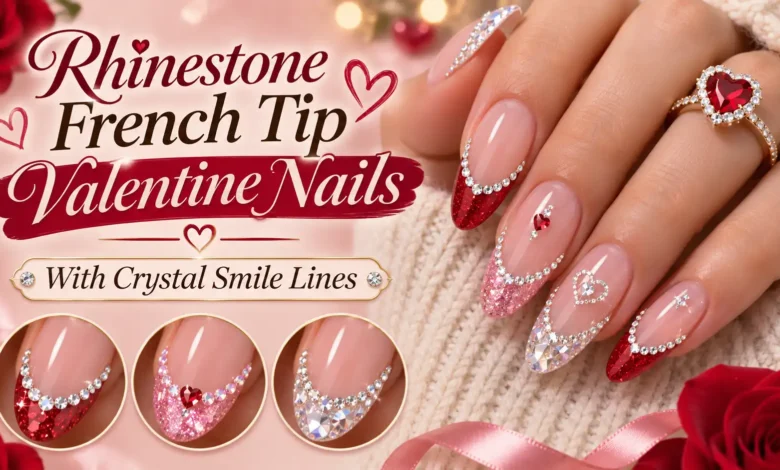
For rhinestone French tip Valentine nails, place the crystals along the smile line: the curved border where the colored tip meets the base. A sheer rosy base, red or pink tips, and one fine row of clear stones make that placement easy to see. Keep the colored edge visible beyond the crystals so the manicure still reads as a French.
You do not need a crystal border on every finger. Choose the cherry-red almond set for an all-over outline, the short pink set for two small accents, or the white French if you want one tiny painted heart. Below, each look includes the details to take to your nail artist.
The visuals are AI-generated manicure concepts for dbsguy.com. They illustrate design and placement, rather than completed salon work or tested wear results.
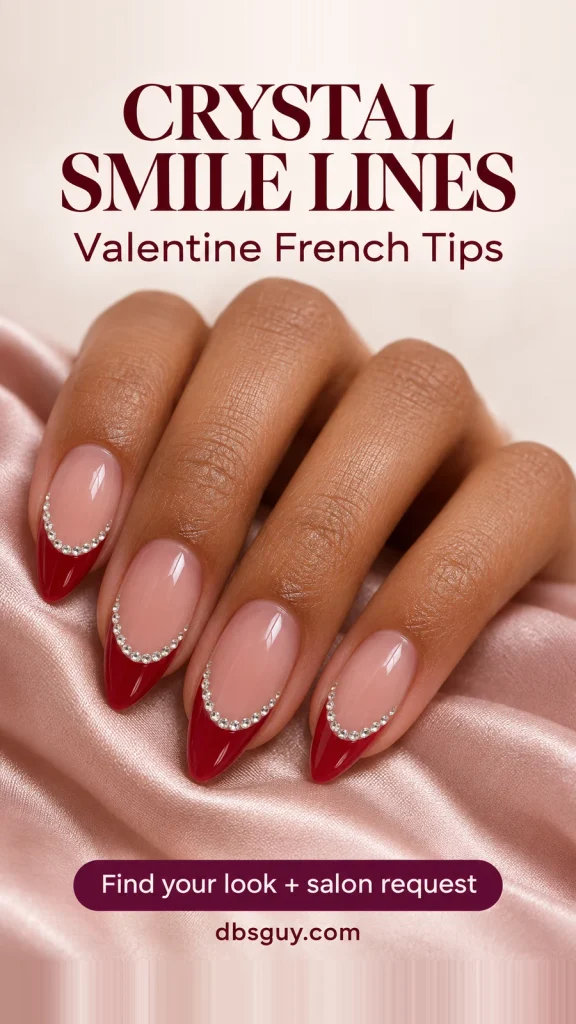
Get the Crystal Smile Line in the Right Place
Find the meeting point between the tip color and the sheer base. That is the path the stones should follow. A row near the skin at the base of your nail creates a cuticle accent; a row around the very end frames the free edge. Both look different from the crystal smile lines shown here.
Look at the first painted tip before the crystals go on. You should like its curve on its own. A thick row of gems can hide a wobbly border, but it can also cover most of the color you chose. Ask your artist to keep the stones within the nail surface, with no pieces projecting past the sides.
For scale, compare the actual stone width with your smallest accent nail. Daily Charme lists its SS3 round crystals at 1.5 mm; other suppliers may label sizes differently. Even a small stone can look substantial on a narrow nail. If a full curve feels crowded, shorten the crystal arc or reduce the number of decorated fingers.
1. Cherry-Red Almond Tips With a Continuous Crystal Curve
This is the clearest choice when the sparkling outline is the part you want people to notice. Medium almond nails give the red tip a tapered finish, while a peachy rose base leaves a calm area behind the crystal row. There are no hearts, bows, or extra stones competing with the border.

Ask for a single row of small clear stones following the whole painted curve, with the red still showing toward the tip. Keep the row delicate at the sides rather than ending it with a large gem. On the thumb, repeat the same red French and curved border, adjusting the stone count to its width.
The base does not have to be the pale shade in the reference. Try a sheer rose, peach, or neutral brown against your own hand before choosing; the useful part is the contrast between that base and the cherry edge. For a less decorated version, keep the same painted tips and put the crystal curves on the middle and ring fingers only.
Salon request: “Medium almond nails with a sheer rosy nude base and cherry-red French tips. Please trace the inner smile line with one fine row of clear crystals, keep the red visible beyond it, and leave the cuticles undecorated.”
Also Read: Baddie Valentine Nails for a Bold Set With Deep French Tips and Bling.
2. Short Pink Micro French With Two Crystal Accents
On a short soft-square nail, a slim bubblegum-pink edge leaves room for the base to show. The middle and ring nails carry short crystal arcs; the outer nails stay plain. That gives you the pink-and-sparkle combination without fitting a full jeweled outline onto every small tip.

The reference uses graduated stones in partial curves near the pink borders. Ask for smaller, more evenly sized crystals if you want a finer line. The arcs can stop before the corners: they do not need to cross the whole nail to connect visually with the French edge.
Have your artist paint the pink band on the shortest nail first. If that band already fills most of the visible tip, keep the crystals to a short central arc on one or two wider nails. Adding more length is optional; simplifying the decoration may be all you need.
Salon request: “Short soft-square nails, a sheer rosy base, and very narrow pink French tips. Add a small crystal arc along part of the tip border on the middle and ring nails. Keep the other nails plain, and show me the stone size before attaching them.”
Also Read: 17 Short Valentine Nail Ideas With Details Scaled to a Smaller Canvas.
3. White French, Crystal Borders, and One Tiny Red Heart
If you like a classic white French but want a clear Valentine detail, add one small painted red heart to the ring nail. Here, the medium soft-square shape gives the white tips a broad, clean edge. Crystal curves sit on the middle and ring nails, and the heart stays on the sheer base above the ring-finger curve.
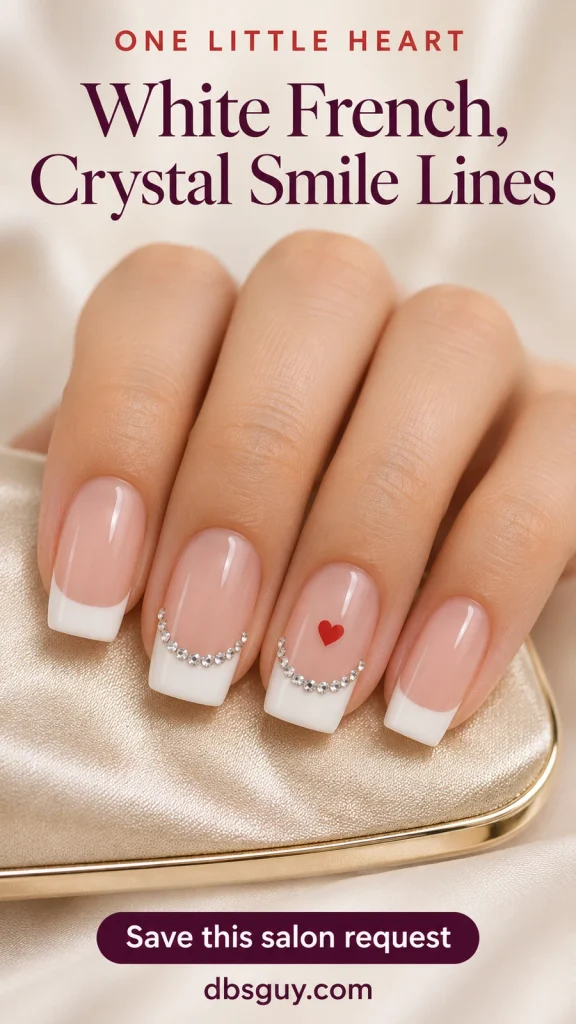
Leave a visible gap between the heart and the stones. When the two touch, the heart can become hard to distinguish from the shine. A flat painted heart also lets you keep the crystal row as the only raised decoration.
Choose the white on a swatch next to your base color. The creamy white in this concept gives a softer contrast than a bright paper white would. Keep the index, pinky, and thumb as plain French tips so the two decorated nails remain the focus.
Salon request: “Medium soft-square nails with a translucent blush base and creamy white French tips. Put a fine clear-crystal smile line on the middle and ring nails, plus one tiny flat red heart above the ring-finger curve. Leave space around the heart and keep the other nails plain.”
What to Confirm Before Your Artist Starts
Send the reference when booking and say how many nails need crystal work. Ask whether that detail requires extra appointment time or changes the quote. There is no useful universal price for this design: your nail length, base service, stone choice, and salon all affect the job.
At the appointment, settle these three details before the stones are attached:
- The painted curve: check that you like the tip depth on your own nail, with enough base and tip color still visible.
- The crystal scale: ask to see a few stones held over the intended curve, especially on a short or narrow nail.
- The finish and removal plan: confirm which attachment system your artist uses and how that system should be removed.
For its round crystals, Daily Charme describes placing stones into jewelry gel, curing, and then sealing their edges. That is a manufacturer-specific sequence, not a universal timing chart. Your artist should follow the chosen adhesive’s preparation, compatible lamp, curing, and finishing instructions. Do not assume ordinary top coat is a substitute for an attachment product.
Before leaving, gently check the finished nails against a smooth tissue. If a stone catches, ask the artist to inspect that spot. Adding a thick layer of product over the whole design is not automatically the right fix; the attachment and exposed edges need checking.
Wear and Remove the Crystals Without Picking
A raised crystal row has a texture that painted nail art does not. Think about whether it will catch on your usual knits, lace, or gloves when choosing how many fingers to decorate. Use your fingertips rather than the nail tips to open clasps or packaging, and wear household gloves for cleaning.
If a stone loosens, do not pull it off or glue over irritated skin. Ask your nail artist how to repair or remove it using the products they applied. Wear time depends on the attachment, nail surface, and daily use; a reference image cannot tell you how long your set will last.
For a gel base, the American Academy of Dermatology’s gel manicure guidance recommends protecting your hands from curing-light UV with broad-spectrum, water-resistant SPF 30 or higher sunscreen, or dark opaque gloves with the fingertips cut off. It also advises against picking off gel polish. Do not let anyone cut your cuticles, and arrange removal appropriate to your particular nail system.
If you develop a rash or persistent nail changes, stop covering the problem with more nail products and seek advice from a dermatologist.
Crystal French Tip Questions
Can I wear crystal smile lines on natural nails?
Yes, extensions are not part of the design requirement. Your artist needs enough room for a painted edge and the stones you choose. On a short natural nail, use the partial pink arcs in look 2 as your starting point and keep the decoration on the widest accent nails.
Can I do this with regular polish?
The French colors can be painted with regular polish. For the stones, use a nail-art adhesive whose instructions specifically allow your polish finish, including its drying and removal requirements. Do not treat wet polish as a guaranteed crystal attachment. A partial arc is a smaller placement task than an entire set of full borders.
Does every nail need the same number of rhinestones?
No. Nail widths vary, so copying the same stone count can make one curve look crowded and another look sparse. Match the apparent thickness and spacing of the line, then let the count change to fit each nail.
Should top coat cover the crystals?
Follow the instructions for the specific stones and attachment system. Some systems call for sealing around the edges while leaving the crystal faces exposed. Ask before applying another coat at home; you want to preserve both the attachment and the faceted appearance.
Can these feel completely smooth?
Not if the crystals sit above the nail surface as shown. Smaller stones and fewer decorated nails reduce the amount of raised detail, but they do not make it flat. If a smooth finish is essential for your work or comfort, tell your artist before choosing a crystal set.
Choose the look by deciding how much of the curve you want outlined: every cherry tip, two short pink accents, or two white tips with one red heart. Then show your artist the placement you want, rather than asking for “rhinestone nails” alone.
Also Read: Y2K Valentine Nails With Airbrushed Hearts and Silver Chrome.