
January blue nail designs get more interesting when you change where the color sits: outline an icy tip in navy, leave a sheer half-moon at the base, or break up denim blue with fine white stripes. You can keep the palette small and still get a manicure with a clear design.
The seven ideas below range from quiet linework to one detailed winter accent. Each includes the placement that makes it work, a way to scale it down, and guidance for recreating it with regular polish or explaining it at the salon.

The images are AI-generated manicure concepts for dbsguy.com. They illustrate color, placement, and finish; they do not document completed salon work or product tests.
Pick the Detail You Want to Notice
- A little blue over a sheer base: choose the outlined French tips or cobalt corner.
- A dark manicure with some open space: try the navy half-moons.
- A straightforward first painting project: put the denim pinstripes on one accent nail.
- Texture without an extra color: use the matte-and-gloss panels.
- A more detailed reference for your nail artist: compare the blue marble and single snowflake.
You do not need a new nail shape for these ideas. Keep a comfortable length and reduce the amount of artwork to suit it. On a small nail, preserving the gap around a detail usually matters more than copying every mark.
1. Icy French Tips With a Fine Navy Border
Give a pale-blue French manicure a sharper edge by adding a narrow navy line where the blue meets the sheer base. The pale blue fills the tip; the navy follows its inner curve. That arrangement looks different from two separate outline tips because there is no empty strip between the blue and navy.

Choose a translucent base against your own hand, then compare the two blues side by side. The light tip should remain visibly blue, and the navy should be dark enough to outline it. Short oval or squoval nails suit a shallow smile line; a deeper band needs more nail space.
For a regular-polish version, paint the pale-blue tip first and let it dry as directed. Trace its inner border with a lightly loaded detail brush, checking the curve with the finger facing you. If the dark line becomes as wide as the tip, repaint that nail rather than adding more pale blue over a thick ridge.
Ask your artist for “a filled ice-blue French tip with a hairline navy border, keeping most of the nail sheer.” For other edge treatments, browse 17 January French Tip Nail Ideas Beyond the Classic White Edge.
2. Midnight Blue With Sheer Half-Moons
This design moves the opening to the base. Most of each nail is midnight blue, with a small, rounded half-moon left translucent just above the cuticle. The contrast gives dark polish a defined shape without adding glitter or a second opaque color.

The half-moon is a painted design choice; it does not have to match the size of your natural lunula. Keep the opening shallow on short nails so the blue remains the main feature. Across the hand, aim for balanced proportions rather than identical measured crescents on differently sized nails.
A curved nail-art stencil can help with the boundary. Over your prepared, dry sheer base, position the guide to protect the half-moon, press its edge flat, and apply a thin layer of navy to the exposed area. Remove the guide carefully while the detail polish is still slightly wet. Follow the stencil and polish instructions before sealing.
If every curve feels like too much work, make the half-moon on the ring finger and leave the other nails solid navy. You still get the contrast that defines the look.
3. Denim Blue With Twin White Pinstripes
A muted denim-blue cream and two fine white stripes create a graphic set without a winter motif. Keep the stripes on one ring-finger accent, running lengthwise with a narrow blue gap between them. The other nails stay plain denim blue.

The spacing matters more than making the stripes perfectly centered. Place the pair slightly off-center so there is a generous blue area beside it. On a very short nail, a single stripe communicates the same idea with less crowding.
Use opaque white detail polish and a fine striping brush over a dry blue base. Try the line on a practice tip before painting your nail; a lightly loaded brush should leave a narrow mark rather than a raised bead. If freehand lines frustrate you, use nail-art striping decals suitable for regular polish and seal them according to their directions.
Keep the finish glossy if you want clear contrast between the white lines and blue. This is a useful option when you want January nail art that works just as well after the snowflake mood has passed.
4. Cobalt Corners Edged in Silver
For a brighter blue, put cobalt in one diagonal corner of each tip and leave the rest of the nail sheer. A fine silver line follows the diagonal boundary. The shape supplies the drama, so there is no need to cover the remaining base with stones or glitter.
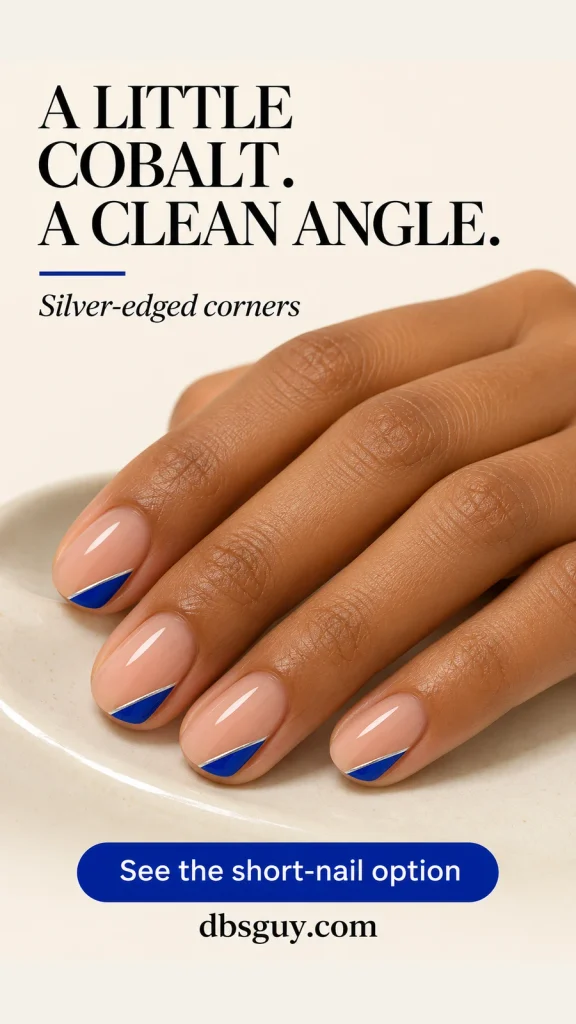
Choose whether you want a small triangular corner or a deeper diagonal tip before painting. On short nails, the small corner leaves enough sheer space for the angle to register. Keep the diagonal leaning consistently across the set, and compare the fingers straight on before making any wedge larger.
Paint the cobalt shape first. Once it is dry as directed, trace its inner diagonal with silver metallic nail polish. Metallic lacquer gives a painted silver line; it will not necessarily have the mirror reflection of a chrome-powder service. Ask to see a swatch if that difference matters to you.
For a quieter version, use this treatment on the thumb and ring finger only, with a sheer base on the others. Keep the silver border fine enough that cobalt remains the main color.
5. Dusty Blue in Matte-and-Gloss Panels
Use the same dusty blue across the whole nail, then divide the finish vertically: one side matte, one side glossy. The dividing line appears through reflection rather than another pigment. It is an understated choice if you like blue polish but want something more deliberate than an all-over cream.

Try the split on one accent nail first. A glossy section that looks obvious under a bright lamp can be quieter in ordinary room light. Check the finished nail from several angles before repeating it across both hands.
For an air-drying version, use matte and glossy top coats that are suitable for your polish. Check their directions for whether one finish can be layered over the other; test the combination on a practice tip before painting your hand. Follow their layering directions, finishing the two areas separately. One approach is a matte finish over the dry blue, followed by a controlled glossy panel once the matte layer is ready for overpainting.
Keep the final border free of a raised ridge, and resist adding an all-over glossy coat afterward: that would remove the contrast. On very small nails, make the ring nail entirely matte and the others glossy instead of squeezing two panels onto each nail.
6. Blue-and-White Marble on Two Accent Nails
Choose this version when you want movement rather than straight lines. Use milky white on the middle and ring nails, with irregular powder-blue wisps and a few fine navy branches. Keep the thumb, index, and pinky a coordinating powder blue so the marble has a calm background.

The white needs to remain visible between the veins. A dense mesh of dark lines reads more like a crackle pattern; broad blue bands can start to look striped. Ask your nail artist for uneven, airy veining with only a little navy, and point out the amount of white space you want to preserve.
This is a good design to discuss at a salon because “blue marble” can mean several different patterns and techniques. You do not need water marbling specifically. Your artist can choose a method suited to the products they use.
For a home interpretation, consider nail decals with a blue-and-white marble pattern, following their application instructions. On short nails, use a single accent so the veining does not have to compete across the whole hand.
7. Ice Blue With One White Snowflake
A single white snowflake makes the winter reference clear while keeping blue as the focus. Paint the set a light ice blue, then place the motif on the ring finger. Leave enough space around it to see the blue background rather than filling the nail with tiny branches.

For a simplified painted version, start with three fine white strokes crossing at one center point to make six arms. On a practice tip, test whether there is room to add short branches near the ends. If those branches merge, keep the simpler winter-star version or choose a small snowflake nail decal.
The white should be opaque enough to remain visible against pale blue. A slightly grayer blue can give the motif more contrast than a nearly white pastel. Keep the other nails plain; the isolated accent is what makes this set easy to read.
At the salon, ask for “one flat white snowflake on the ring finger, with glossy ice blue elsewhere and no raised embellishments.” If you want more variations within the pale palette, see 17 Light Blue January Nail Ideas for a Frosty, Airy Finish.
Before You Paint: Keep the Layers Manageable
The home painting suggestions here use regular, air-drying nail polish. Gather the colors for one chosen design, a suitable base coat and top coat, a fine detail brush, and a spare practice tip. A curved stencil is optional for the half-moons; marble or snowflake decals are alternatives to freehand art. You do not need supplies for all seven designs.
Prepare the nails according to your polish instructions and let the base color dry before adding detail. Thin, controlled layers give you more room to correct the design than a heavy patch of polish. Keep the product on the nail surface and follow its label for application, drying, and removal.
When using guides, the edge needs to sit flat to prevent color bleeding underneath. OPI’s sticker-stencil tutorial distinguishes between a dry lacquer base and detail color that is still slightly wet when the stencil is removed. That sequence is useful for the navy half-moons above; it is not a universal timing rule for every polish.
After the art has dried as directed, apply the appropriate final finish with a light touch. Keep the separate finishes in idea 5 intact. If you choose a gel service instead, let your nail artist follow the chosen system’s instructions; air-drying steps do not supply gel-curing guidance.
Questions Before You Choose Your Set
Which January blue nail designs work on very short nails?
Start with one denim stripe, a small cobalt corner, or a shallow navy half-moon. Each has a recognizable feature you can keep small. If your nail has almost no free edge, place the detail on the visible nail surface instead of trying to force a deep French band. For more small-scale options, see Easy Short Nail Designs for January: Tiny Dots, Fine Tips and Soft Shimmer.
Can I do blue nail art without gel or extensions?
Yes. Painted lines, colored corners, half-moons, and suitable decals can be used with regular nail lacquer on natural nails. Choose products intended to work together and allow the layers to dry as directed. Extensions change the available length and shape; they are not required simply because the manicure includes artwork.
How do I make blue winter nails feel less like Christmas?
Choose the denim stripes, cobalt corners, or matte-and-gloss panels. Those designs get their interest from geometry and finish. You can leave out snowflakes entirely and still use icy blue, navy, and silver for a winter palette.
What should I tell my nail artist?
Name the base color, where the artwork goes, how much open space you want, and the final finish. For example: “Keep my current length, use denim blue, and put two thin white vertical stripes on the ring finger only. Leave a blue gap between them and finish glossy.” That gives your artist specific details to adapt to your nails.