
Black January nails can be as simple as a glossy short set or as detailed as a silver-traced marble accent. Start with the finish you want to see most: shine, a flat matte surface, or a small metallic detail. Then choose where that detail belongs.
These 15 ideas keep black at the center of the manicure. There are options for barely-there tips, short everyday nails, and a more noticeable winter set, with specific placement notes to help you explain the design at your appointment.

The visuals are AI-generated manicure concepts, including artificial nail samples. They illustrate colors, shapes, finishes, and placement rather than document completed salon work or wear testing. Your nail artist can adapt the details to your own nails.
Choose Your Black January Set
- For a straightforward home manicure: start with glossy black in idea 1 or all-over matte in idea 2.
- For detail without another color: compare the glossy French edge, diagonal split, and wave in ideas 3–5.
- For a small silver accent: choose a cuticle arc, a pinstripe, or a few foil fragments in ideas 7–9.
- For a more noticeable finish: look at the glitter fade, mirror accent, or smoky marble in ideas 10, 11, and 15.
Keep the length you already find comfortable. If you are still choosing the service and shape, the guide to your first January manicure can help you settle those decisions before adding art.
1. Glossy Jet Black on Short Squoval Nails
A short squoval shape gives solid black a clear outline: a gently squared tip with softened corners. Choose an opaque jet black and a glossy finish, leaving the color uninterrupted by glitter or artwork.

This is a useful starting point if you want to wear black for the first time without also changing your length. Compare the polish swatch in daylight; a shade that looks black under salon lights may reveal a burgundy or navy cast beside a window.
For a regular-polish version, use the base and top coats recommended for your lacquer and follow its drying directions. Aim for even coverage rather than trying to hide streaks under one heavy coat. Dark color makes an uneven border easy to notice, so leave a clean margin around the nail instead of painting onto the skin.
2. Soft Oval Nails With an All-Over Matte Finish
Matte black changes the surface rather than the color. A short oval outline keeps the silhouette rounded while the finish softens the bright reflections of a glossy set. Ask for a smooth, flat result with no shimmer.

You do not necessarily need a separate matte-black color. A compatible matte top coat can change the finish of black lacquer. Follow the directions for that specific polish system; regular lacquer dries, while gel products require the specified curing process. A matte top coat is not a substitute for the correct gel lamp or curing instructions.
If you are unsure about the finish, compare one matte and one glossy sample beside your hand. Choose matte because you like its softer reflection, rather than expecting it to disguise uneven application or last longer.
3. Matte Black With Glossy French Tips
Keep the entire nail black, then let a glossy curved edge stand out against a matte base. The border appears through reflected light, so this set offers a French shape without a second color.

Ask for a narrow glossy band that follows the free edge. On medium almond nails, it can curve around the taper; on short rounded nails, make the arc shallower. Leave enough matte surface for the contrast to remain obvious.
OPI’s matte top-coat guide demonstrates this matte-and-gloss French approach. The important finishing detail is preserving the two surfaces: an all-over glossy coat would make the matte area shiny too. Have your artist confirm a compatible product sequence.
4. A Diagonal Matte-and-Gloss Split
For a more graphic black-on-black design, divide each nail diagonally between matte and glossy finishes. Unlike a French tip, the boundary travels across the main surface, creating two substantial areas of the same black.
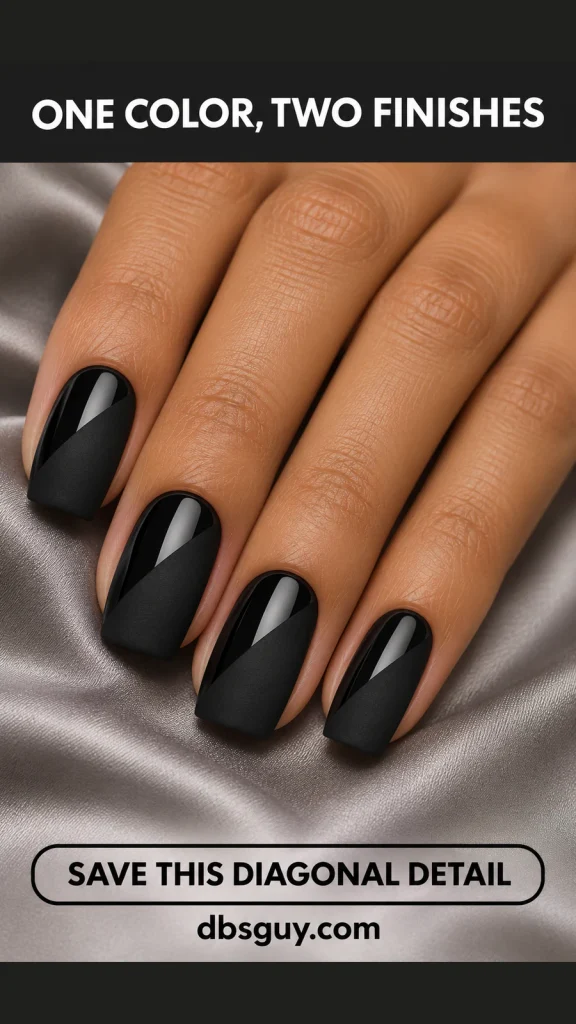
Pick one direction for the diagonal on each hand and show your artist which corner should be glossy. Repeating that direction makes the set feel intentional. A soft-square shape gives the diagonal a clear starting and ending point.
Keep the border crisp and leave out an extra metallic stripe. If your nails are tiny, put the split on the middle and ring fingers and keep the others glossy black; the larger uninterrupted areas will make the finish change easier to see.
5. One Glossy Wave Over Matte Black
A single glossy S-curve adds movement to a flat black nail. Let it begin near one lower side and travel toward the opposite part of the tip, leaving matte black visible on both sides.

Request a smooth painted ribbon rather than raised gel droplets. The curve should be wide enough to catch a reflection, but narrow enough that it does not turn most of the nail glossy. Check a sample at an angle, where the two finishes are easier to compare.
On a short nail, simplify the S into one gentle bend. A tight loop is harder to distinguish in one color and can make the center look like an accidental shiny patch.
6. Black Micro French Tips Over a Sheer Base
If a full black nail feels like more color than you want, keep the base translucent and put black only along the free edge. A fine curved rim gives short, softly rounded nails definition while leaving most of the nail bed visible.
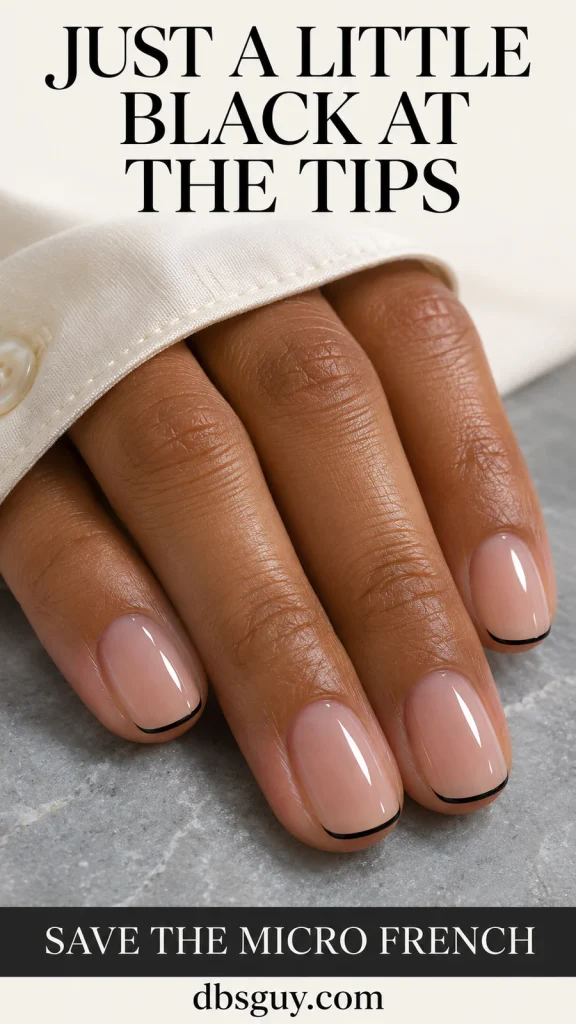
Choose the sheer base on your own hand. A rosy beige, peach, or caramel tint can all work; the useful test is whether you like the contrast between that base and the black.
Ask to see one completed tip before the full set. If the band covers a large portion of the nail, make it finer. For other ways to adapt the edge, see January French tip nail ideas.
7. Glossy Black With Fine Silver Cuticle Arcs
Move the metallic detail to the base of the nail. A narrow silver arc follows the cuticle curve inside the painted surface, while the rest stays glossy black. Think of a fine metallic border, with space between the polish and skin.
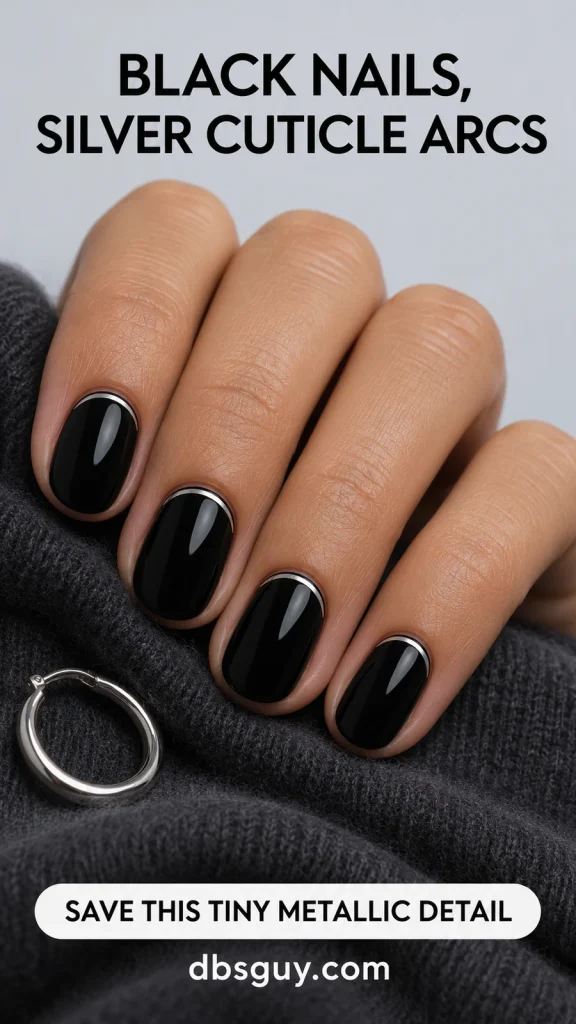
This placement suits someone who wants a visible silver detail without decorating the tips. Ask for a flat painted arc rather than a row of stones. The curve should follow each nail’s own base, which may be flatter on one finger than another.
Begin with an arc on each ring finger if a full set feels busy. As the nail grows, a gap will appear below the border, so choose this for its placement rather than expecting it to conceal regrowth.
8. A Single Silver Pinstripe on Black
One fine silver line can give black nails a precise, graphic detail. Run it lengthwise from near the base toward the tip, slightly off center, with black visible on either side.
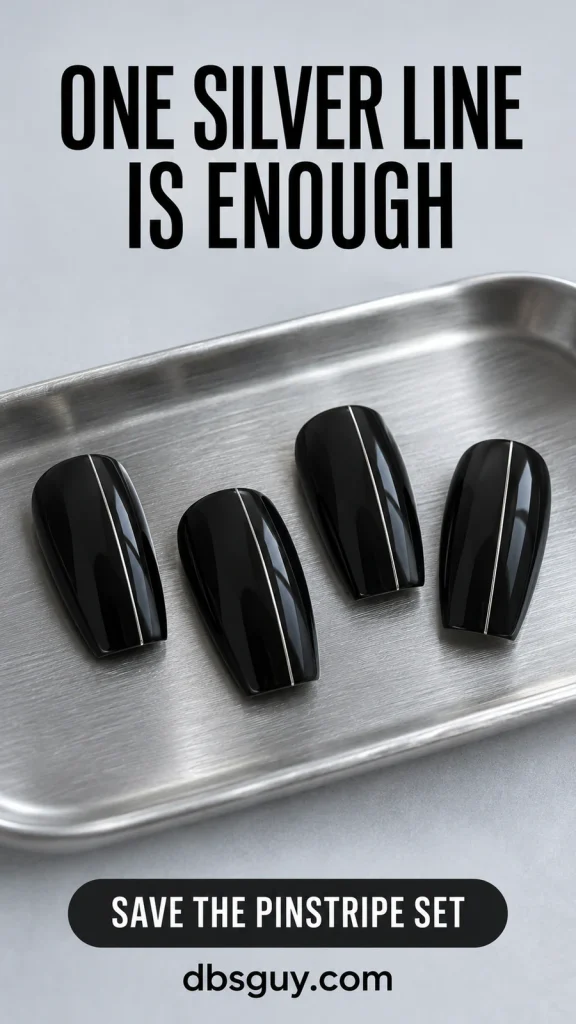
On a soft-square nail, keep the line straight rather than making it follow the rounded sidewall. Decide whether it belongs on every nail or just two accents before the artist begins; those choices create quite different levels of detail.
A metallic silver lacquer can communicate the idea without a mirror-chrome service. If using nail-art tape instead, confirm how it will be trimmed and sealed so no loose ends extend beyond the nail. The line should read as a fine accent, not a wide silver panel.
9. A Small Silver Foil Cluster on One Nail
Silver foil gives an irregular flash rather than the exact geometry of a stripe. Keep the nails glossy black and place a few small foil fragments near one outer corner of the ring-finger tip.
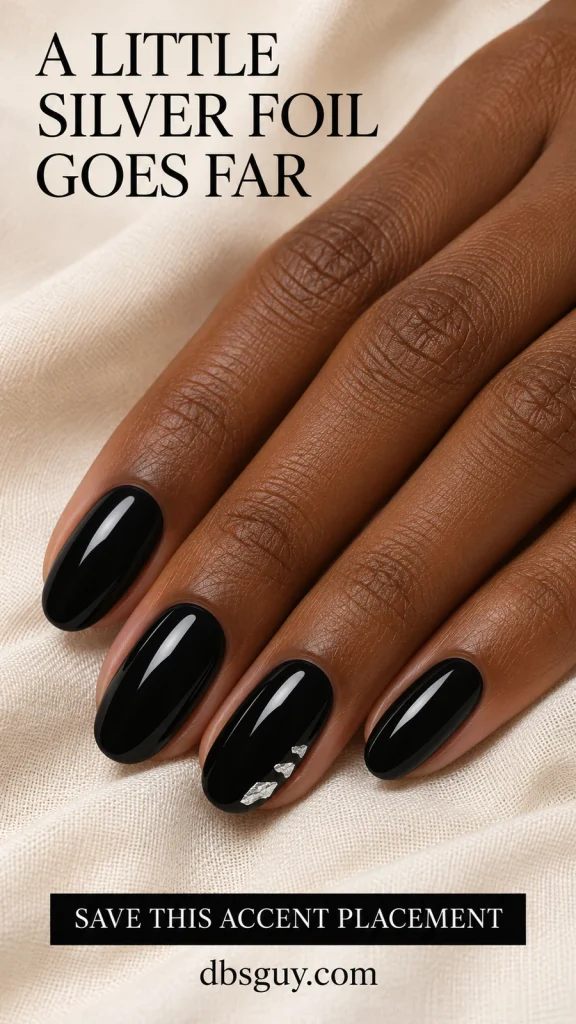
The spacing matters. Leave black between the pieces and around the cluster so it looks deliberate. Covering the whole accent nail with fragments creates a much denser, more reflective result.
Show your artist the corner you want decorated and ask for flat nail-art foil, with the edges sealed using its compatible system. For a smaller nail, two tiny fragments can be enough. Keep the other fingers plain so the placement remains easy to notice.
10. Fine Silver Glitter Fading Back From the Tips
This design has a soft boundary: silver microglitter gathers at the free edge and becomes sparse toward the middle. The area near the cuticle stays solid black, keeping the manicure dark even when the tips catch the light.

Choose fine particles if you want a dusted effect. Large reflective pieces will look more like confetti, and a thick, even band will read as a glitter French tip rather than a fade.
For a regular-polish attempt, practice with a clear-base silver glitter topper on a spare nail tip. Build a little more density at the edge while leaving only a few particles farther back, following the formula’s drying instructions. Stop before the silver becomes an opaque cap.
11. One Mirror-Silver Accent With Four Black Nails
Keep the thumb, index, middle, and pinky glossy black, then make the ring nail entirely mirror silver. This is the strongest metallic contrast in the list: one reflective surface surrounded by four solid dark nails.

Ask to compare an actual chrome sample with a silver shimmer polish. A mirror finish reflects larger shapes in the room; shimmer shows individual sparkling particles. Either can be attractive, but they do not give the same result.
Confirm whether the salon’s chosen chrome technique requires a gel service and how that service will be removed. If you prefer regular polish, ask for a metallic-silver alternative and judge that sample on its own appearance.
12. Tiny Silver Stars on a Glossy Black Base
A few small four-point stars give black nails a night-sky detail that works beyond New Year’s Eve. Put one star on the middle nail and one on the ring nail, with a couple of tiny dots around each. Leave the other fingers plain black.

Keep the stars separated from the dots so their shapes remain clear. Flat painted details or appropriately sized nail decals suit this sparse design; large charms would change both its appearance and surface.
On very short nails, use a single star on each ring finger and skip the surrounding dots. If you want to practice small marks before attempting linework, start with the January nail-art guide for beginners.
13. One White Snowflake Against Black
For a clearly winter-themed manicure, use one small white snowflake on a glossy black ring nail. Keep every other nail solid black so the snowflake has room to stand out.

Request a fine six-armed design with only a little branching. On a short soft-square nail, the outer points should stay comfortably inside the sidewalls and free edge. A thick, oversized decal can overwhelm the available space.
If a detailed snowflake will not fit, ask for a smaller, simpler version with fewer branches. You can also move the accent slightly off center to suit the nail’s outline; there is no need to add length just to accommodate the artwork.
14. Black Nails With Sheer Half-Moon Windows
Leave a small semicircle of sheer base visible at the bottom of each nail, then paint the remaining surface black. This half-moon design opens up the cuticle area while keeping most of the manicure dark.
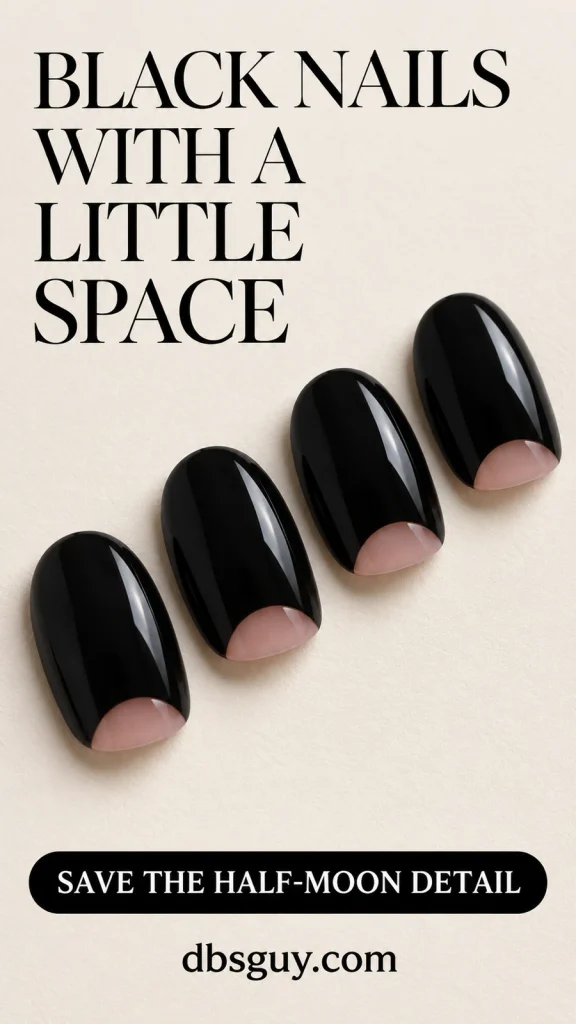
Specify a translucent rose or beige window rather than an opaque white crescent. Keep its curved border clean and leave out an additional silver outline if you want the simplest version.
The window should occupy only a small part of the nail. On short ovals, making it too tall can leave a compressed-looking black tip. Start with a shallow curve and compare it on one nail before repeating it across the hand.
15. Smoky Marble With One Fine Silver Vein
Keep most nails glossy jet black and use charcoal-and-gray marble on the ring finger. Soft pale-gray veining and one fine silver trace add detail without turning the accent into a bright white nail.

Ask for irregular, softly branching marbling rather than evenly spaced stripes. The silver should follow just one part of the pattern, with dark space around it. That keeps the metallic element secondary to the smoky background.
This is a useful choice when you want more artwork than a foil cluster but prefer one decorated nail. On a shorter shape, reduce the number of veins rather than squeezing the same pattern into a smaller area.
Turn Your Favorite Idea Into a Clear Salon Request
Name the design, the fingers receiving art, and the finish separately. “Black with silver” leaves a lot open; “short oval, glossy black, with three small foil fragments near the outer tip of each ring nail” gives your artist a much clearer brief.
Send a message such as: “I’d like idea 9 at my current short length, with a glossy finish and foil only on the ring fingers. I currently have [bare nails / regular polish / gel / an enhancement]. Can you confirm the service, removal arrangements, appointment length, and total price?”
For matte-and-gloss designs, ask for one finished sample under ordinary light. For silver details, confirm whether you mean metallic paint, foil, glitter, or mirror chrome. Each reflects light differently, and the word “silver” alone does not identify the finish.
Questions About Black January Nails
Which of these designs works on very short nails?
Start with solid glossy black, all-over matte, a tiny foil corner, or one small star. Micro French tips can work when there is enough edge to paint a clear line. Scale down the artwork first; you do not need to copy the length of a reference set.
Can I get these looks without gel?
Solid black, a matte finish, painted lines, and fine glitter can be created with suitable regular-polish products. Ask about the specific technique for chrome, foil, or decals. The look does not determine the product system, and a lacquer alternative may have a different reflection.
Should the final top coat be matte or glossy?
Match it to the design. Solid glossy black and most silver accents use a shiny surface; all-over matte needs a matte finish. Designs 3–5 need the artist to preserve separate matte and glossy areas. Follow the product system’s finishing directions rather than adding one final coat over everything automatically.
How do I keep black nails from looking too busy?
Choose one kind of detail and decide its location. A foil corner, a single stripe, or one decorated ring nail gives you a clear stopping point. If you want both a finish contrast and metallic art, try them together on a sample before committing to all ten nails.
Will these designs last all month?
No design can promise that. Wear depends on the products, application, your nails, and what your hands do. Choose the service with its maintenance and removal needs in mind, and follow the instructions for the products used.