19 Plaid December Nail Ideas Inspired by Cozy Scarves and Holiday Pajamas


Plaid nails have the same appeal as a favorite winter scarf: a few colors cross over each other, and suddenly the whole combination feels cozy. December gives that pattern plenty of room to play. You can borrow the red-and-black checks of holiday pajamas, the quiet camel tones of a wool scarf, or a little silver detail for an evening out.
These 19 plaid December nail ideas include scarf-style linework, bold buffalo checks, tiny gingham, and airy windowpane patterns. Some use a single accent nail; others move the print into a French tip or a slim side panel. Each look comes with a clear salon request and an adjustment for smaller nails, so you can choose the version that fits your hands.
The detail to decide first is pattern size. A short nail can look lovely with one clear intersection or a few larger checks, while a longer nail gives fine stripes more space. Keep the number of colors, the placement, and the finish in mind together. Those choices matter much more than squeezing every line from a full-size scarf onto a nail.
1. Red-and-Black Buffalo Check on Short Nails
Red-and-black buffalo check brings that familiar holiday-pajama feeling to a small manicure. Keep the print on the ring nail and use plain red on the neighbors. The broad checks give the accent enough contrast to stand out, even when the nails are short and softly squared.

The useful detail: Choose a pattern with a visible red area, darker crossing bands, and dark intersections. That little change in depth gives the check a flannel-like feeling. A glossy finish keeps the set crisp; a matte accent can make the patterned nail feel softer.
Ask for: “Short squoval red nails with one red-and-black buffalo-check ring nail. Keep the squares large enough to read, with plain red on the other fingers.” Show the artist how bold you want the black to be.
For very short nails: Use fewer checks. A small number of clean, evenly spaced squares will give you a clearer result than an extremely dense grid. If the accent feels too dark, let a little more red show between the bands.
2. Cream and Camel Scarf Plaid
Cream and camel make a scarf-inspired manicure feel warm and easy to wear. Add a few fine brown lines and one muted cranberry detail, and the palette gains a little December color without becoming a full red-and-green holiday set. Plain cream neighbors let the patterned accent do the work.
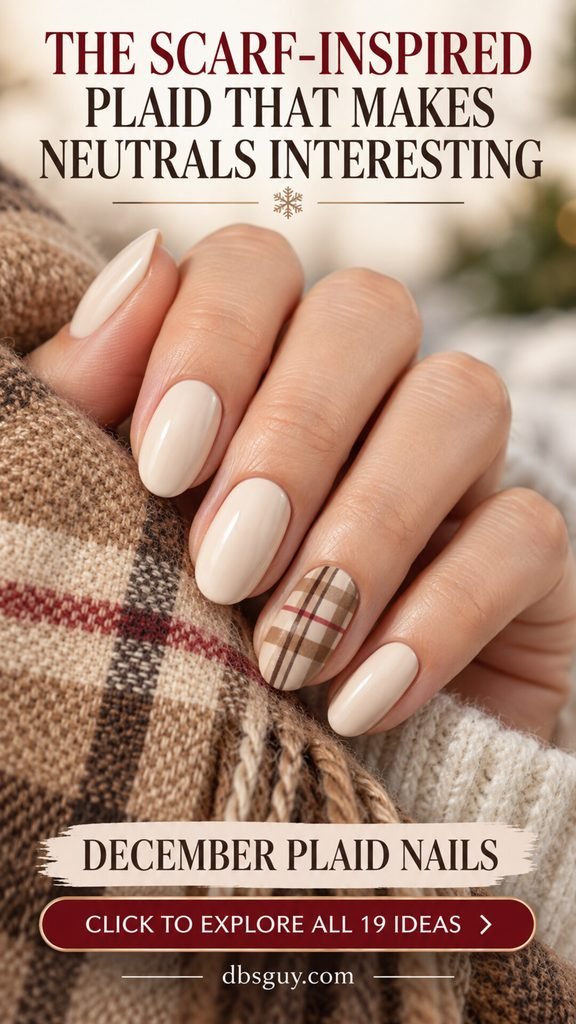
Build the design around the camel bands, then treat the darker lines as small finishing details. When every stripe is equally bold, the nail can start to look crowded. A cream base with some open space keeps the pattern light, especially on an oval shape.
Ask for: “Cream oval nails with one camel scarf-plaid accent, fine brown linework, and a subtle cranberry pinstripe.” Bring a scarf photo if you have a particular arrangement in mind; color names alone will not communicate the spacing.
For short nails: Use one wider camel crossing and a small number of brown lines. Choose the base against your hand so the cream feels soft rather than chalky, and keep any cranberry detail thin.
3. Forest Green Tartan With Fine Gold Lines
Forest green makes plaid feel ready for a holiday dinner. Darker crossing bands add depth, while a few fine gold lines give the pattern a little light. With plain green on the neighboring fingers, the set feels coordinated even when two nails carry the print.

Keep the gold delicate and smooth. It should read like a small thread through the pattern, with enough green still visible around it. A dense gold grid will create a much brighter manicure, so decide whether you want a subtle metallic accent or a full statement.
Ask for: “Forest-green almond nails, one or two tartan-inspired accents with darker bands, fine cream lines, and a few very thin gold pinstripes.” Ask the artist to keep the metallic detail flat within the finished surface.
For shorter nails: Use just one patterned finger and a single gold crossing. If you prefer a quieter set, remove the cream lines and let the gold sit against the green and navy tones.
4. Burgundy Plaid on a Soft Blush Base
Blush and burgundy give plaid a softer holiday mood. The pale base keeps the linework visible, while a solid burgundy neighbor ties the pattern back into the rest of the manicure. It is a useful combination when you like a deep winter shade but want some lighter space on your hands.

Vary the stripe widths so the print has a clear structure. A wider burgundy band can anchor the accent, with thinner wine-colored lines adding detail. Leave some blush between them; that open area is what keeps the design from becoming a solid dark block.
Ask for: “Short blush-pink oval nails, one burgundy plaid ring accent, and a glossy burgundy middle nail.” Choose a blush shade with enough coverage to show the print while still keeping the soft pink effect.
For very short nails: Use one wider vertical band and one thinner horizontal detail. You can make the burgundy neighbor the only dark nail, or keep every plain nail blush for an even gentler set.
5. Navy and White Pajama Checks
Navy-and-white checks have a cozy bedtime-pajama mood with a crisp finish. Put the pattern on a white ring nail and keep the others navy. The light accent becomes an easy focal point, while the darker plain nails give the manicure a tidy frame.
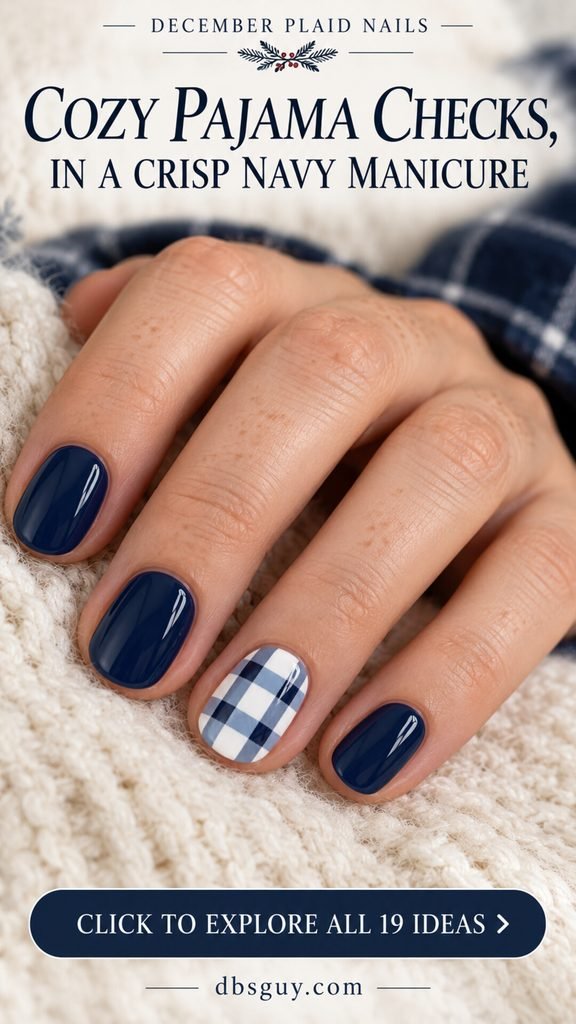
For a gingham-inspired effect, include a middle blue tone and darker intersections, with some white squares left visible. That makes the print feel softer than a stark alternating checkerboard. On short rounded nails, a moderate check size is easier to appreciate than lots of tiny squares.
Ask for: “Short navy nails with a white-and-blue gingham ring accent. Keep the crossing bands even and leave visible white space.” Choose the finished sheen too; gloss looks crisp, while a matte accent feels more fabric-like.
For very short nails: Ask for a larger-scale check on just one finger. If navy feels too dark, use a softer denim blue on the neighboring nails and keep the patterned accent in the same blue family.
6. Icy Blue Plaid With Silver Pinstripes
Icy blue and silver give plaid a frosty December feeling. Slightly deeper blue bands create the main pattern, and a few thin silver lines add a small flash when the hand moves. The plain pale-blue fingers keep the manicure light and let the metallic detail stay subtle.

The useful detail: Make sure the two blues are different enough to show after the top coat is applied. A pale band on an equally pale base can disappear in bright light. Ask to see the combination on a sample tip if the shades are close.
Ask for: “Pale icy-blue oval nails with one deeper-blue plaid accent and very fine silver pinstripes.” Specify whether you want metallic silver polish or another flat metallic finish; the photo is a color and placement reference.
For short nails: Use fewer crossings and one or two silver lines. A whole shimmer nail would change the balance, so start with the small metallic detail if you want to keep the plaid as the main feature.
7. Pink and Cranberry Holiday Plaid
Warm pink and cranberry bring a cheerful holiday palette to plaid. The berry bands are enough to give the design a December mood, and thin cream lines add a soft finishing touch. You can place the pattern on two neighboring nails and keep the remaining fingers plain pink.

Choose one pink for the base and one deeper berry shade for the main crossing bands. Too many near-identical pinks can make the pattern harder to read. A little visible cream linework helps separate the darker stripes, provided it stays fine.
Ask for: “Pink almond nails with cranberry plaid on the middle and ring fingers, plus a few thin cream lines.” Confirm the finger layout before the artwork starts, especially if you want the same arrangement on both hands.
For shorter nails: Keep the print on one finger and enlarge the spaces between bands. If you like a quieter pink manicure, use narrower cranberry stripes and leave more of the pink base showing.
8. Black-and-White Micro-Gingham
A tiny monochrome check makes a simple white manicure feel more considered. One gingham accent is plenty when the pattern is small and high contrast. Plain white on the neighboring nails gives your eye somewhere to rest and keeps the set easy to coordinate with winter outfits.

Micro-patterns need careful spacing. For this version, fine gray crossing bands with darker intersections give the print a gingham-like depth. Ask your artist whether hand painting, stamping, or a suitable decal will produce the cleanest result at the size you want.
Ask for: “Short white square nails with one neat black-and-gray micro-gingham ring accent.” Show a close view of the desired scale; “small checks” can mean very different things to different people.
For very short nails: Move up a check size rather than making every square microscopic. A slightly larger repeating print can still look delicate. If pure black feels too sharp, use charcoal for the darkest intersections and keep the rest of the palette soft white and gray.
9. Brown and Oatmeal Tonal Plaid
Brown and oatmeal make plaid feel like part of a cozy neutral wardrobe. Use soft taupe bands over an oatmeal base, then add thinner chocolate lines to define the pattern. The colors stay close enough to feel calm, with just enough depth to make the accent interesting.

Keep some of the lighter oatmeal visible. If all the bands are opaque and heavy, the accent will look darker than the neighboring nails. A satin finish can make the tonal palette feel especially soft, while gloss will make the darker linework a little crisper.
Ask for: “Short oatmeal squoval nails with one tonal taupe-and-chocolate plaid accent.” Ask to compare the base and stripe colors against your hand; a pink-beige and a yellow-beige can change the warmth of the set.
For very short nails: Use one broad taupe crossing with a few thin chocolate lines. You can also leave one side of the accent mostly plain if you prefer more open space around the print.
10. Red Plaid French Tips
Plaid French tips turn a familiar manicure into a small flannel-inspired detail. A pink base keeps the shape recognizable, and the red tip becomes the space for fine black crossings and a little cream linework. Patterning only the middle and ring tips gives the set a clear focus.

The red tip needs enough depth for the print to show. On medium almond nails, a small crossing can sit neatly inside the colored area. Keep the pink base clear of the pattern so the French shape remains easy to see.
Ask for: “Pink bases with red French tips, and plaid linework inside two accent tips.” Point out where the print should stop. A deeper patterned French and a very slim micro-French have different amounts of room for detail.
For short nails: Use a single crossing inside one red tip, or choose a full red plaid ring nail with plain French tips around it. That keeps the flannel reference without making a tiny tip carry too much artwork.
11. Emerald Plaid Side Panels on Neutral Nails
A plaid side panel gives you pattern and plain space on the same nail. Emerald runs along one side of a neutral-pink base, with the small navy-and-cream crossings contained inside that colored strip. The rest of the nail stays quiet, so the accent feels light despite the deep green.

Make the panel wide enough for the print to read. A very thin stripe may have room for linework but little room for a recognizable crossing. On an oval nail, a neatly placed panel can follow the side without covering the whole surface.
Ask for: “Neutral-pink oval nails with emerald plaid side panels on one or two fingers.” Show which side gets the panel and whether you want the placement mirrored on the other hand.
For short nails: Use one side panel with a simple cream crossing and fewer navy lines. If the available space is narrow, a small green plaid corner can give you a similar effect while leaving more pink visible.
12. Lavender and Gray Windowpane Plaid
Lavender and gray are a gentle way to bring plaid into a December manicure. A sparse windowpane grid leaves plenty of lavender visible between the lines. It is a good starting point if you like the idea of a winter print but prefer simple artwork.
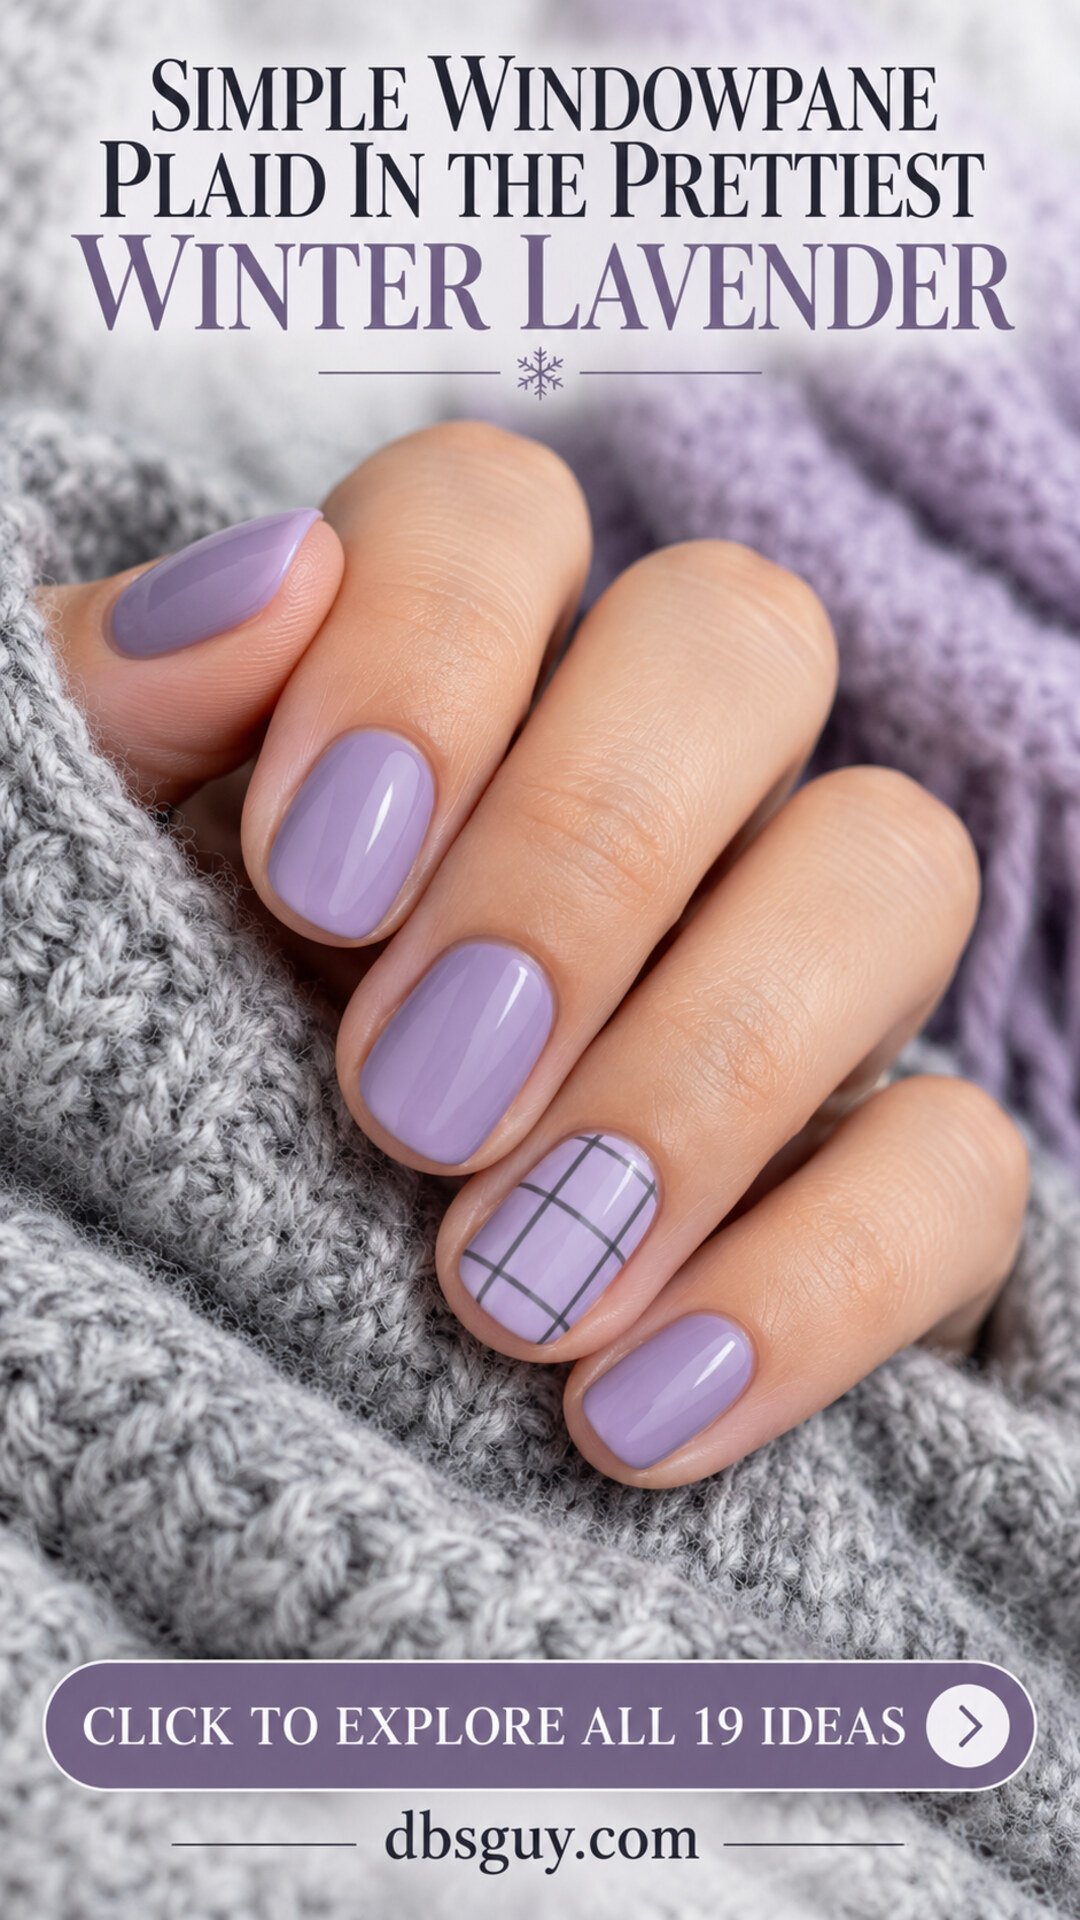
Choose a soft charcoal line rather than a heavy black band. The larger open rectangles make this design feel airy, and a small number of crossings keeps it tidy. You can use a glossy or matte finish, depending on whether you want a crisp or softer mood.
Ask for: “Short muted-lavender nails with one fine gray windowpane accent.” Agree on the spacing before the artist adds more lines; a sparse grid and a dense plaid create different visual weight.
For very short nails: One or two vertical lines with a couple of horizontal crossings can be enough. A slightly deeper lavender base will also help the gray show clearly if your chosen pastel is extremely light.
13. Cream Plaid With a Tiny Painted Bow
A small bow adds a festive detail to cream scarf-plaid nails. Keep the print on the ring finger and place a tiny cranberry bow on a plain neighboring nail. The two accents feel related through their colors, with enough space for each one to be appreciated.

Use the same cranberry tone for the bow and the plaid pinstripe. That little color match makes the set feel coordinated. A flat painted bow is useful here because the manicure already has plenty of visual detail without a raised charm.
Ask for: “Cream oval nails with one camel-and-cranberry plaid ring accent and a tiny painted cranberry bow on the middle nail.” Specify the bow’s size and position; a large centered bow will give a much bolder result.
For short nails: Keep the bow petite and reduce the plaid to its clearest crossing bands. If two detailed nails feel busy, remove the bow and use a small cranberry dot on the plain neighbor instead.
14. Sheer Pink Nails With White Windowpane Lines
White windowpane lines over sheer pink give plaid a quiet, almost barely-there version. The pink base shows between the crossings, so the design can feel light even when two nails are patterned. Plain clear-pink neighbors keep the whole manicure soft.

The important detail: Ask about the pink’s transparency before choosing the print. A sheer base lets the natural nail show, while a more covered pink gives the white grid a different backdrop. Both can work; the choice should match the finish you actually want.
Ask for: “Short sheer-pink oval nails with fine white windowpane lines on the middle and ring fingers.” Keep the grid open and the lines slim so there is plenty of pink visible.
For very short nails: Use one patterned accent and fewer crossings. If you want the design to show more clearly in photos, choose a slightly stronger white line or a more covered pink base rather than adding lots of extra stripes.
15. Red-and-Green Holiday Pajama Plaid
Red-and-green plaid is a cheerful choice when you want your manicure to feel like Christmas pajamas. A patterned ring nail can bring the two shades together, with plain red on some fingers and a smooth forest-green neighbor. The colors make the holiday connection immediately clear.

Keep the green dark enough to create a visible crossing against the red. Fine cream lines can break up the darker bands and add a little light. If you put the print on every nail, use a carefully planned pattern scale so the set still feels coordinated.
Ask for: “Short red squoval nails with one red-and-dark-green plaid accent, thin cream lines, and a plain green middle nail.” Confirm the red shade too; bright cherry and deeper cranberry give very different moods.
For a simpler set: Keep all the neighboring nails red. On very short nails, one clear green crossing with a little cream detail will carry the pajama reference without needing a dense tartan-inspired arrangement.
16. Charcoal Plaid With Silver Thread Lines
Charcoal and silver make plaid feel a little more evening-ready. Darker bands create a subtle pattern, while fine silver lines give it a small flash. The combination looks especially coordinated with gray knitwear, black clothing, or silver jewelry.

Let the silver be a thread-like detail rather than a thick border. A deep charcoal base with black bands can be quiet in flat light, so ask to see a sample from more than one angle. That helps you decide whether you want a subtle tonal print or stronger contrast.
Ask for: “Charcoal oval nails with one darker plaid ring accent and a few very fine silver lines.” Choose a satin or glossy finish and ask how the metallic linework will be kept smooth.
For short nails: Use one dark crossing and one slim silver crossing. If the pattern is too subtle for your taste, choose a slightly lighter gray base while keeping the darker bands and metallic detail the same.
17. Peachy Beige Half-Plaid Nails With Copper Detail
Half-plaid nails give a familiar print a different composition. One side of the ring nail stays peachy beige, while the other carries warm-brown linework. A thin copper line between the two halves makes the division feel intentional and adds a small glow.

Keep the copper narrow and the plaid inside its own half. The plain area is an important part of the design, especially on an almond nail. A full copper strip or a crowded brown pattern will create a much heavier accent.
Ask for: “Peachy-beige almond nails with one lengthwise half-plaid ring accent and a fine copper dividing line.” Show whether you want the patterned half on the left or right, and agree on the arrangement for the opposite hand.
For shorter nails: Use a smaller plaid section with one clear crossing. You can shift the division slightly off-center to give the pattern a little more room, while still leaving a visible plain area beside it.
18. Diagonal Berry Plaid on Almond Nails
Turning plaid on a diagonal changes how the print sits on a nail. In berry and lavender tones, the tilted crossing bands make a diamond-like arrangement instead of an upright grid. One patterned ring nail is enough to give the whole set a slightly unexpected winter detail.

The useful detail: Show the artist the angle relative to the nail itself. A hand photographed at a diagonal can make an ordinary straight grid look tilted, so the brief should explain that the painted pattern is rotated across the nail. Keep the surrounding fingers plain berry.
Ask for: “Berry almond nails with one lavender-and-deeper-berry plaid accent, rotated diagonally across the nail.” Leave some base color visible between the bands so the crossing pattern remains clear.
For short nails: Use one broad diagonal crossing and a few finer lines. If you prefer a softer palette, choose dusty mauve for the base and keep the lavender bands slightly lighter.
19. Champagne Shimmer With Fine Black Plaid
Champagne shimmer gives plaid a dressed-up finish for December dinners and parties. Fine black lines on one accent nail create a crisp pattern over the soft glow, while the neighboring nails stay plain shimmer. The palette feels festive without needing extra ornaments or charms.

Use one slightly wider black band to give the grid structure, then keep the remaining lines fine. Too much opaque black will cover the shimmer that makes this design special. Choose a smooth, fine shimmer so the painted lines can stay clear.
Ask for: “Champagne-shimmer oval nails with one fine black plaid ring accent and plain shimmer neighbors.” Ask to see the champagne color under the salon light and in daylight if possible; some shades lean gold, while others look closer to pale beige.
For short nails: A single bold band with a few narrow crossings is enough. If you want a gentler contrast, replace black with dark brown and keep plenty of the champagne base showing.
How to Make Plaid Look Clear on Your Nail Length
A good plaid manicure starts with a pattern that fits. Ask your artist to test the spacing on one nail or a sample tip before repeating it across the set. You should be able to see the main crossing bands, the small detail lines, and some base color between them.
For short nails: Try larger checks, a sparse windowpane, or one clear scarf-style crossing. Fewer lines can give the design more definition. The red buffalo check, lavender windowpane, and brown tonal plaid are useful starting points.
For longer oval or almond nails: A French tip, half-plaid section, or side panel can make good use of the extra space. Decide where the pattern belongs first, then choose how many lines will fit inside that area.
For a subtle set: Keep the palette close, with a small difference between the base and the stripes. Oatmeal and brown, blush and burgundy, or lavender and gray give you different levels of softness. A finished sample will show the contrast more accurately than bottles sitting beside each other.
Choose the Finish Along With the Pattern
Gloss gives plaid a crisp, polished appearance and can make metallic lines catch the light. A matte or satin finish brings a softer mood to scarf and pajama prints. You can also ask for a matte patterned accent surrounded by glossy plain nails if you like the contrast.
The sheen can change how close colors look together. Before choosing a very subtle tonal plaid, ask to see it with the proposed top coat. For ordinary lacquer, OPI’s application guide explains using a matte top coat to create the finish.
Metallic pinstripes add detail without needing a raised embellishment. Tell your artist that you want a smooth finished surface, and let them choose a compatible technique. Gold, silver, and copper are separate styling choices here; you can swap them to suit the jewelry or clothing you plan to wear.
A Simple Plaid Nail Art Plan With Regular Polish
Start with one accent nail and two or three colors: a base, a main stripe color, and an optional finer detail color. A sparse grid or large check is a more manageable first project than a tiny multicolor print. Practice the spacing on a spare nail tip before working on your hand.
Prepare and paint the base according to your lacquer system’s directions, using thin, even color layers and allowing them to dry between coats. OPI’s regular-polish guide covers that foundation. Let the base dry before starting the small linework so you are less likely to drag it around.
A fine striping brush can help you place the crossing lines. Essie’s Party Plaid tutorial builds a grid with vertical and horizontal lines after the color dries, then adds color within selected sections. For a small December accent, adapt the idea with fewer lines and a palette from one of the looks above.
Decide which bands will be wider before you start. Place the main crossing first, leave some base color visible, and add a small number of finer lines only if there is room. Let the artwork dry as directed before using a compatible top coat. Keep the other nails plain while you practice.
Gel linework follows a different product process. 14 Day Manicure’s plaid tutorial demonstrates a liner-brush grid built in stages, with curing between parts of the design. If you choose gel, follow the instructions for your exact products and compatible lamp rather than borrowing timings from another system.
Small Adjustments That Make the Print Easier to Wear
If the pattern feels crowded: Remove a detail color, reduce the number of crossings, or keep the print on one finger. A plain neighbor can give a busy accent a clearer place in the set.
If the plaid disappears in photos: Increase the contrast slightly or make the main band a little wider. Adding more tiny lines may make the pattern even harder to see. Ask to view the sample in ordinary light as well as under the salon lamp.
If the lines feel difficult to paint: Choose a larger repeat and a smaller accent area. A stamping plate or a suitable decal is another option to discuss with your artist. Check the motif size first so the part you like will actually fit on the nail.
If a tip or side panel looks too busy: Keep just one crossing inside the colored section. The shape of the panel can do some of the visual work, so every small area does not need a full scarf pattern.
What to Tell Your Nail Artist Before the Appointment
Bring one main reference, choose the base and stripe shades, and decide which fingers receive the pattern. Specify the nail length, shape, check size, and final sheen. Confirm the nail-art price and appointment time before adding another patterned finger, bow, or metallic detail.
A useful brief might be: “I would like short cream oval nails, one camel plaid ring accent, fine brown lines, a small cranberry detail, and glossy plain neighbors. Can we check the stripe spacing on a sample first?” That explains the result while leaving the artist room to use the technique that suits their products.
If you want to coordinate with a scarf or holiday pajamas, bring a clear close-up of the fabric. Choose the part of the print you most want to carry onto the nail, such as a particular color pairing or crossing. A simplified version can keep that connection while fitting the smaller surface.
Plaid December Nail Questions, Answered
Can plaid look good on short natural nails?
Yes. Broad checks, a small scarf-style accent, or a sparse windowpane can work well on a short nail. Choose a repeat that fits the available space and discuss the appropriate product service with your artist. Long extensions are a styling choice rather than a requirement for the print.
Which plaid design is a useful starting point for a beginner?
Try one accent nail with a large, simple windowpane grid. Two colors and a small number of crossings give you fewer details to manage. Practice the line spacing first, and keep the surrounding nails plain while you get comfortable with the brush.
Are plaid, gingham, and windowpane the same look?
They create different visual effects in this guide. The scarf-style ideas use overlapping bands and finer lines, the gingham ideas use regular check repeats, and the windowpane ideas leave large open areas inside a sparse grid. Show your artist the exact image rather than relying only on the pattern name.
Can you make plaid nails with regular polish?
Yes. Crossing lines and checks can be painted with air-drying lacquer and a fine nail-art brush. Use drying time appropriate to your products and finish with a compatible top coat. Gel is another option, with its own application and curing process.
Should every nail have the plaid print?
It is a styling choice. One accent per hand gives you a clear starting point, while two patterned neighbors can create a coordinated set. A full patterned manicure needs a planned color palette and repeat size. Agree on the layout and price before the artwork begins.
Do plaid nails need a matte top coat?
No. Gloss, satin, and matte can all suit the pattern. Choose the sheen with the colors and the look you want. Matte can soften a fabric-inspired print; gloss can make a metallic stripe or high-contrast grid feel crisp.
How should you care for the finished manicure?
Follow the care and removal directions for the products used. A lacquer plaid, gel design, and press-on set have different instructions. Matte can also change during wear: Essie’s FAQ notes that natural oils can make its matte finish look less matte. Ask your salon how to refresh your specific finish.
Choose the Print You Already Love
A familiar scarf or pair of holiday pajamas is a useful place to start. Pick the colors you enjoy wearing, choose one clear crossing or check repeat, and decide how much of the nail should carry the pattern. Whether that becomes a bold red flannel accent or a quiet cream plaid, the small details will give the manicure its own December mood.
Images are AI-generated design inspiration, not photographs of tested salon sets. Use them to discuss color, spacing, placement, and finish with your nail artist; the result depends on the products and technique used.