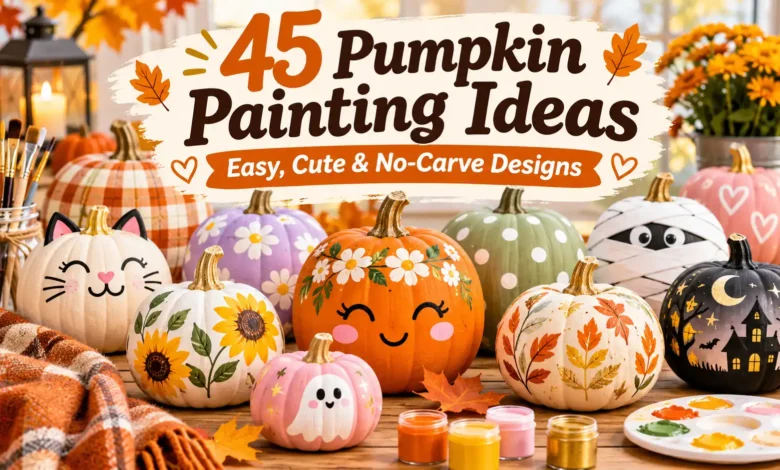
Start with confetti dots, rib-following stripes, or a painted jack-o’‑lantern if you want an easy first project. Choose a leafy vine or gold-dipped finish for decor that can stay out beyond Halloween. All 45 pumpkin painting ideas below keep the pumpkin whole: no carving, drilled holes, or pinned-on parts.
Pick one design that suits your pumpkin’s shape, then gather only its colors. Each idea includes the painting order and a way to handle its trickiest detail, so you can do more than save a pretty picture.

The visuals are AI-generated design concepts, not photographs of tested projects. The instructions are research-informed painting suggestions; simplify the details to suit your experience.
Choose a Design That Fits Your Time and Pumpkin
- Least drawing: confetti dots (1), rib stripes (2), gold-dipped paint (8), or candy-corn bands (30).
- Cute faces: sleepy face (13), one-eyed monster (15), fox (33), or panda (35).
- For fall table decor: leaf vine (23), blue-and-white floral (25), or initial medallion (43).
- For a longer craft session: checkerboard (5), layered blue flowers (25), and patchwork (42) reward careful spacing and drying between details.
Broad, relatively smooth pumpkins are easier for faces and lettering. Deep ribs help with vertical stripes but interrupt fine lines. A faux craft pumpkin makes sense for a design you want to store and reuse; check whether it is foam, plastic, or another material before choosing paint. For a real pumpkin, start with firm, undamaged skin and no soft or moldy spots.
What to Gather Before You Paint
- One real or faux pumpkin with a stable base.
- Brush-on craft acrylic paint compatible with your surface, in the colors named in your chosen idea.
- A soft flat brush for broad areas and a small round or detail brush for outlines.
- A pencil for light guides; a small sponge or compatible acrylic paint pen only if the design needs it.
- A palette, water container, paper towels, scrap paper, and a protective table covering.
For children, choose age-appropriate paint and supervise the activity. Washable paint can suit a short indoor craft session, but do not expect the same finish or resistance to handling as a compatible craft acrylic. These designs do not require spray paint, hot glue, resin, or sharp tools.
A Simple Painting Order That Avoids Smears
- Clean and dry. Wipe away dirt and residue, then let the surface dry completely. Follow the maker’s cleaning directions for faux pumpkins. Support a real pumpkin underneath rather than carrying it by the stem.
- Test the paint. Try a small area at the back. If it beads or rubs away after the recommended cure, check surface preparation and compatibility before covering the whole pumpkin. Use primer only when your chosen product and surface call for it.
- Paint the background. Use thin coats and keep paint out of deep puddles along the ribs. Let each coat dry as its label directs. Do not assume every brand has the same drying time.
- Map the main shapes. Make light pencil guides on a dry base. Check the design from the angle where the pumpkin will be displayed.
- Add details last. Paint one facing area at a time. Let it dry before turning the pumpkin, then add pupils, veins, sprinkles, or lettering accents. Set it aside for the label’s full curing time before handling or packing it.
A sealer is not automatically necessary and does not make a real pumpkin rot-proof. Match any finish to the paint, substrate, and display conditions. DecoArt’s paint FAQ, for example, distinguishes outdoor formulations from other paints and explains that drying depends on conditions. Follow the directions for the product you actually use.
Easy Patterns and Painted Finishes
1. Confetti Dots
Press a small round sponge lightly into paint, dab off the excess, then stamp spaced dots onto an ivory base. Let one color dry before adding another. Turn the pumpkin only after the side facing you is dry so your palm does not leave a print.

Use three colors and leave room between dots; a crowded surface reads as speckles rather than confetti.
2. Rib-Following Stripes
Let the pumpkin do the measuring. Paint every other raised rib cream, leaving orange between the stripes. Start near the stem with a narrow brush, widen the stroke through the middle, and taper it toward the base.

Choose a deeply ribbed pumpkin for a built-in guide. You do not need tape or perfectly straight lines.
3. Diagonal Color Block
Lightly sketch a diagonal boundary across the front and continue it around the sides. Fill the lower area sage green with a flat brush, using a small brush along the edge. Keep the stem natural. For the optional leafy border shown, add a thin olive stem along the boundary, paired teardrop leaves, and a few mustard dots after the color block dries.
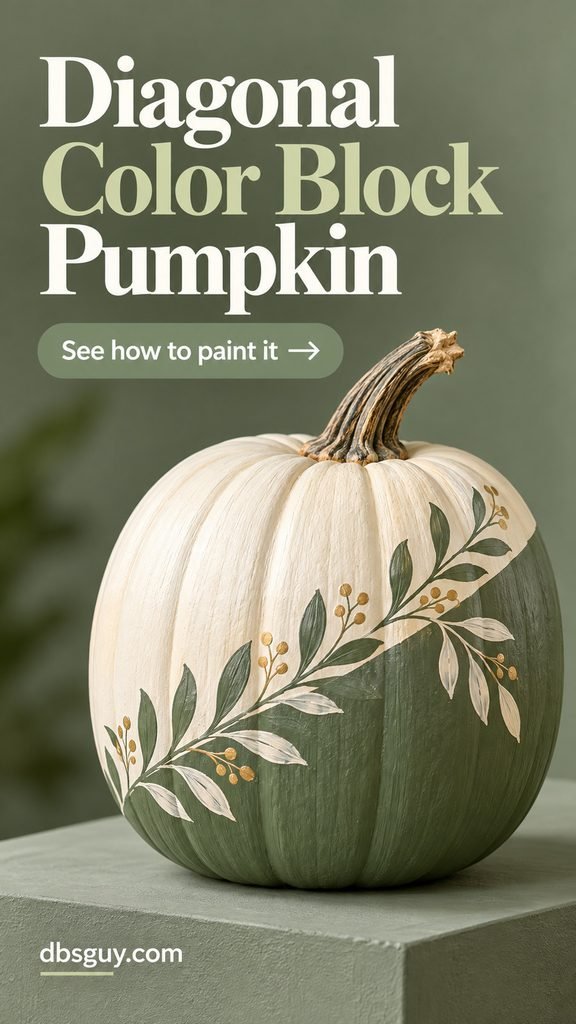
A front-facing display makes this especially forgiving: refine the visible boundary first instead of chasing a mathematically perfect band.
4. Scalloped Collar
Paint a cream band around the pumpkin’s shoulders. Add connected downward semicircles along its lower edge, following the curve rather than making them all identical. A small round brush helps round off each lobe. To echo the pictured collar, add four tiny orange petal marks inside each cream scallop and short cream teardrops below it.

Keep the collar above the widest point so the orange body remains the main feature.
5. Loose Checkerboard
Draw a loose grid over the broad front face, then fill alternate cells lavender. Work outward from the center. Allow the squares to narrow toward the sides rather than forcing a flat-paper grid onto a rounded shape.
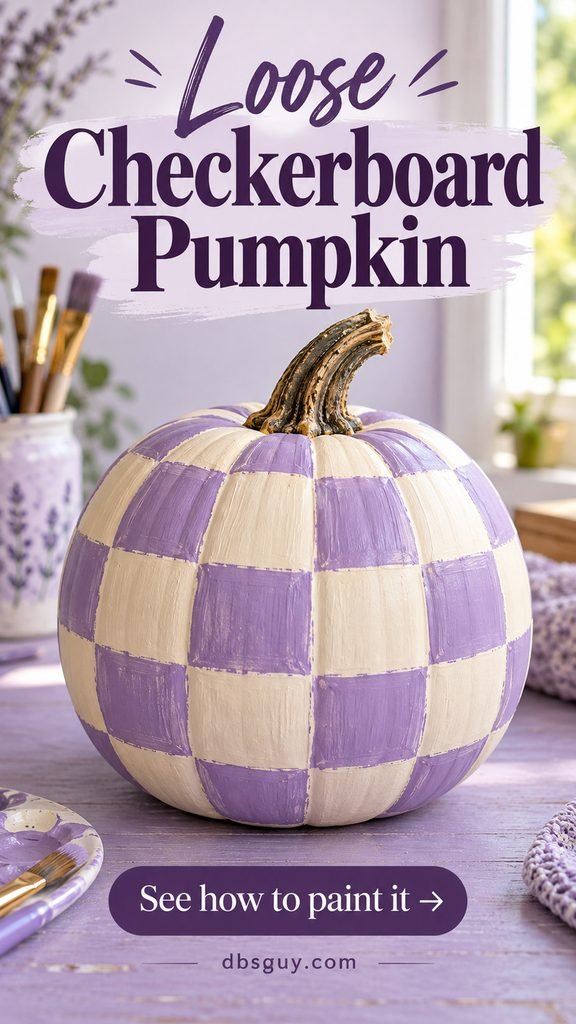
This takes more patience than dots. Restrict the checkerboard to the front if you want a simpler version.
6. Windowpane Plaid
Use a fine brush or compatible acrylic paint pen to draw widely spaced vertical lines. Add horizontal lines once the first set dries, then a second narrow line beside selected stripes. Keep most of the cream base visible.

Turn the pumpkin in small increments and rest your painting hand on the table; a single long stroke is harder to control.
7. Sunset Ombre
Lay down peach, coral, and rust in broad horizontal zones. While adjoining edges are still workable, use a clean, slightly damp brush to soften the joins. Work on one section at a time rather than coating the entire pumpkin before blending.

Practice on scrap first. If the paint dries too quickly, keep three soft-edged bands instead of scrubbing a sticky surface.
8. Gold-Dipped Look
Brush metallic gold around the bottom third of an ivory pumpkin, using short upward strokes for the softly uneven edge shown. Apply thin coats as directed by the paint label rather than one thick coat. Leave the upper body and stem simple.
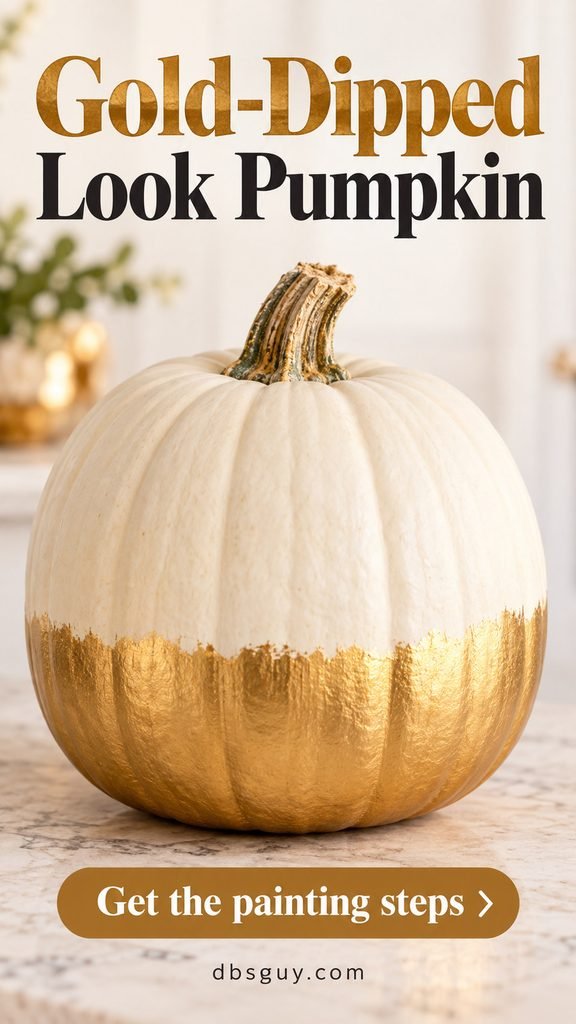
This is a painted dipped effect, so there is no container of paint to balance or pumpkin to immerse.
9. Speckled Stone
Basecoat a pumpkin warm gray. Use a small stippling brush with very little charcoal paint, testing on paper before touching the surface. Add a few cream flecks after the dark layer dries.

Keep the marks tiny and irregular. Stippling gives more control than flicking paint across a room.
10. Terrazzo Chips
Paint separated, angular fragments in navy, mustard, and cream over a blush base. Vary the size and direction; a small flat brush can make short triangles and uneven quadrilaterals.
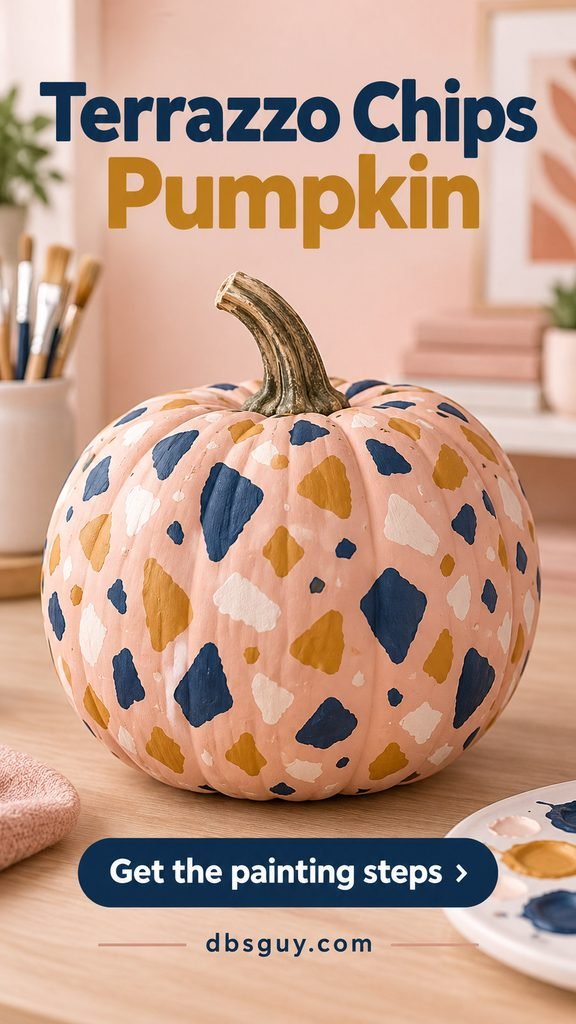
Leave more background than pattern. If the pieces touch, paint a little blush between them once dry.
Also Read: 15 Neutral White Simple Fall Tablescape Ideas
Cute and Spooky Halloween Designs
11. Friendly Ghosts
Sketch rounded ghost heads with wavy hems on an ivory base, then fill them black. When dry, add white eyes and tiny smiles. Face the ghosts in different directions and keep a few empty spaces.

The reversed black-on-ivory palette keeps the shapes readable without a full dark base coat.
12. Classic Painted Jack-o’-Lantern
Draw two triangle eyes, a smaller triangle nose, and a wide smile on the broadest side of an orange pumpkin. Fill the shapes black while leaving orange gaps for teeth. The skin stays completely intact.

Look at it from several feet away before adding details. Bigger eyes and a simple mouth read better on a porch.
13. Sleepy Face
Paint two shallow downward curves for closed eyes, then add three short lashes along each curve. Place soft coral cheek circles underneath and a small curved mouth between them.

Sketch the eyes at the same height first. Keep the face low enough that the stem does not compete with the expression.
14. Black Cat Portrait
Paint a large black cat-head shape on the front of a cream pumpkin, including two triangular ears within the silhouette. Add green eyes after the black dries, then a pink nose and fine white whiskers. Add black slit pupils and tiny white eye highlights. The pictured ears have gray inner strokes; a few short gray marks at the edges suggest fur without outlining every hair.

All the ears are painted on the surface. There are no foam attachments or pieces to glue into place.
15. One-Eyed Monster
Paint one generous white circle on a green base. Add the black pupil after it dries. Give the monster a purple crescent mouth and two uneven white teeth.

Center the eye above the widest part of the pumpkin. An oversized eye makes the design work without tiny details.
16. Mummy Wraps
On a charcoal base, sketch overlapping diagonal bands. Fill the bands ivory, leaving narrow dark seams and one wider gap across the front for two yellow eyes. A little gray along selected edges suggests overlap. Finish each yellow eye with a black pupil and a tiny white highlight.
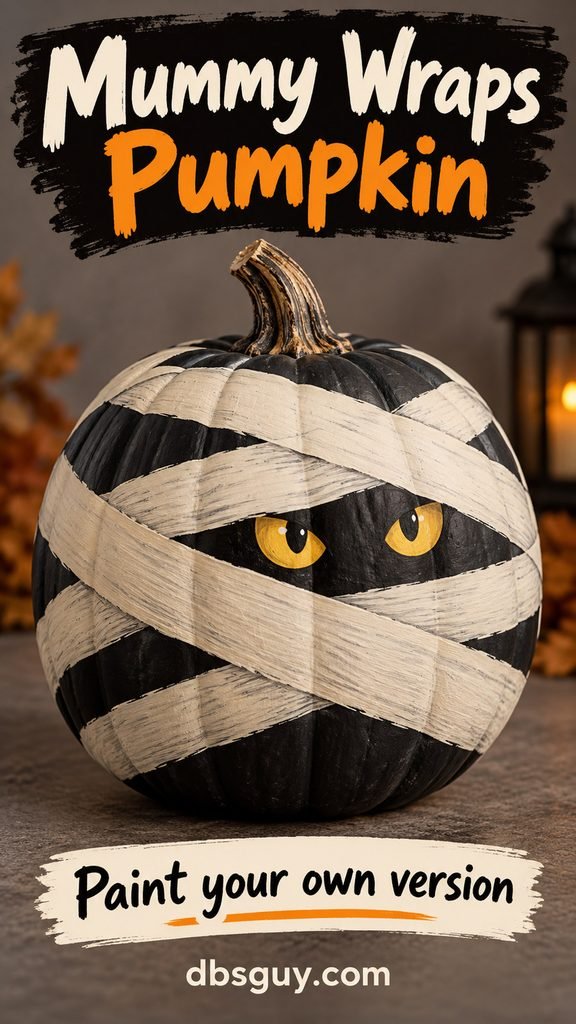
Map the eye gap before painting the bandages so you do not accidentally cover the face.
17. Spiderweb Corner
Choose a point near one upper shoulder and draw several thin white spokes outward. Connect neighboring spokes with short curved lines, building the web one row at a time. Add a small oval spider with eight short legs beneath it.

You only need one partial web on the front. Trying to wrap it around the whole pumpkin makes spacing much harder.
18. Bats at Dusk
Sketch three simple bats across a peach base: a small body, pointed ears, and two scalloped wings for each. Vary their sizes and arrange them along a diagonal, from a large bat at the upper left to a small one at the lower right.

Paint the largest bat first, then use the remaining space for the smaller two. Avoid making all three the same stamp-like size.
19. Moon and Stars
Paint a navy base and let it dry. Draw a large crescent using two overlapping curves, fill it gold, and scatter small four-point stars and dots around it. For the longer starbursts pictured, cross two thin strokes, then add shorter diagonal strokes through the same center.

Keep one clear patch around the crescent. Too many stars can make the main shape disappear.
20. Boo Lettering
Mark three light center points across the front for B, o, and o. Sketch broad letters around them and fill burgundy. Once dry, sharpen the inside openings with the cream base color. Add one small four-point star on either side if there is room.

The image uses a curved capital B and lowercase o letters. Practice that shape on paper, or use plain block letters for an easier version.
Also Read: Fall Porch Decorations Ideas for a Cozy Autumn Look
Flowers, Leaves, and a Little Garden
21. Daisy Field
Place a few yellow centers across the orange skin. When dry, paint short white petals around each, leaving room for the flower beside it. Add small olive leaf pairs only where the gaps need them.

Begin with three large daisies on the front. Smaller flowers can fill awkward spaces without turning the whole surface into a dense floral print.
22. Sunflower Medallion
Paint a brown circle on the front of a sage pumpkin, then build pointed golden petals around it. Add a second, shorter ring of petals where gaps remain and stipple the center with a lighter brown. A few ochre strokes near the petal bases and cream strokes near their tips create the layered effect pictured; let the main petal shapes dry first.
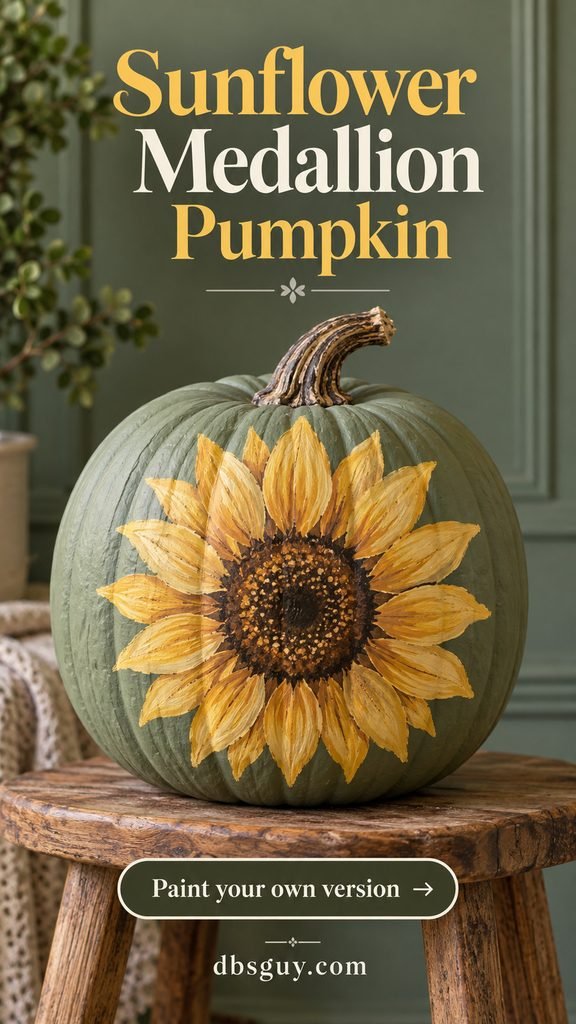
One large flower is easier to compose than many tiny ones. Keep its center on a raised rib rather than buried in a deep groove.
23. Trailing Leaf Vine
Draw one loose curving stem diagonally across the front. Paint pairs of teardrop leaves along it, alternating their size. Use olive for the stem and sage for most leaves. Add a few thin curling tendrils if you want the more detailed illustrated version.

Leave the ends fine and open. A vine that stops before it meets itself feels lighter than a thick belt around the pumpkin.
24. Autumn Leaf Scatter
Sketch several broad leaf shapes on a cream base. Fill them rust, ochre, and burgundy, changing their direction. After drying, add a single darker center vein to each rather than a network of tiny lines. For maple-shaped leaves like those pictured, sketch five pointed lobes around a central stem before filling them. Smaller oval leaves make useful spacers.
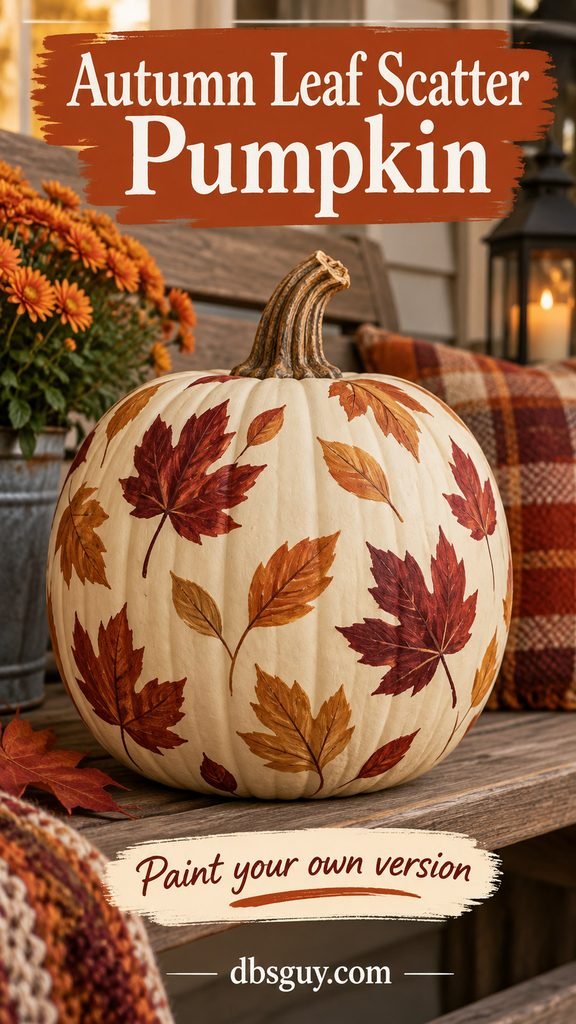
Use rounded oval leaves with pointed tips if maple outlines feel fiddly. The autumn palette carries the idea.
25. Blue-and-White Floral
On a white pumpkin, mark two or three flower centers. Mix a pale blue and paint broad, curved petals around each center, working from the outer petals inward. Let them dry, then add shorter cobalt strokes at the petal bases and small dark dots in the centers. Connect the blooms with thin stems and pairs of pointed leaves; finish with a few oval buds.
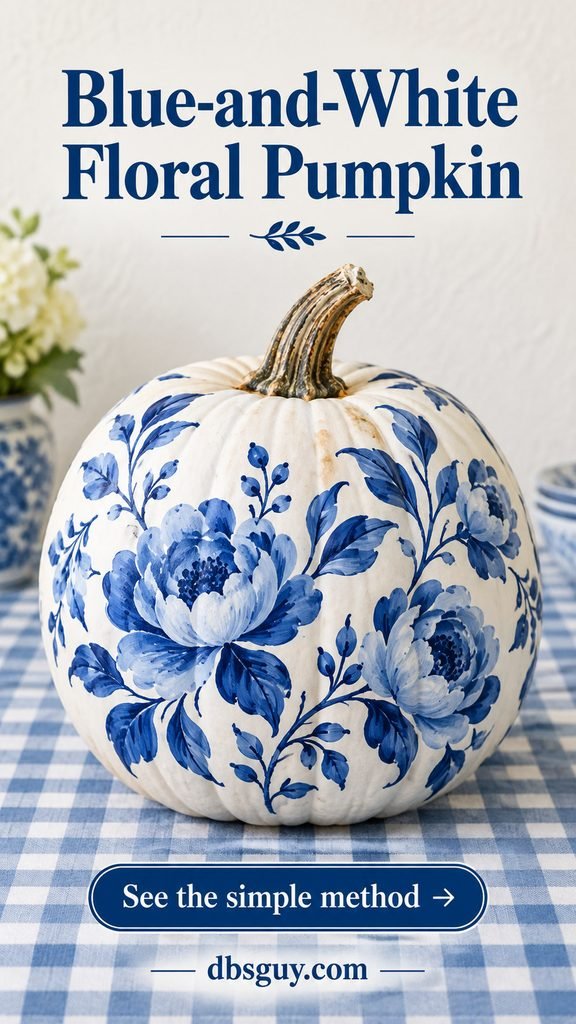
The pictured layered flowers are one of the more detailed options. For a beginner version, use five simple petals per flower and skip the shading. Either version keeps the blue-and-white porcelain-inspired palette.
26. Tiny Mushroom Garden
Paint three or four cream stalks outlined in tan along the lower front, then give each a red domed cap. Once dry, add white dots and a few short sage grass strokes. Add tan lines beneath the caps for gills and taller sage leaf stems between mushrooms if you want the fuller garden shown.

Vary the mushroom heights and keep the upper half quiet. That empty space makes the little scene easier to see.
Also Read: How to Style Your Fall Decorations Entry Table Perfectly
Fruit and Sweet-Treat Designs
27. Strawberry Pumpkin
Paint the body red, then add a scalloped green leaf crown around the stem. Place pale yellow seed-shaped dashes in loose staggered rows after the base dries.

Use a tall or tapered pumpkin if you have one. Keep the stem attached; the painted crown does the styling.
28. Watermelon Slice
On a pale green pumpkin, sketch one broad wedge across the front. Paint the center pink, outline it with a cream strip and a darker green rind, then add black teardrop seeds. Finish the surrounding pale green area with loose darker green rib stripes, stopping them at the painted rind.
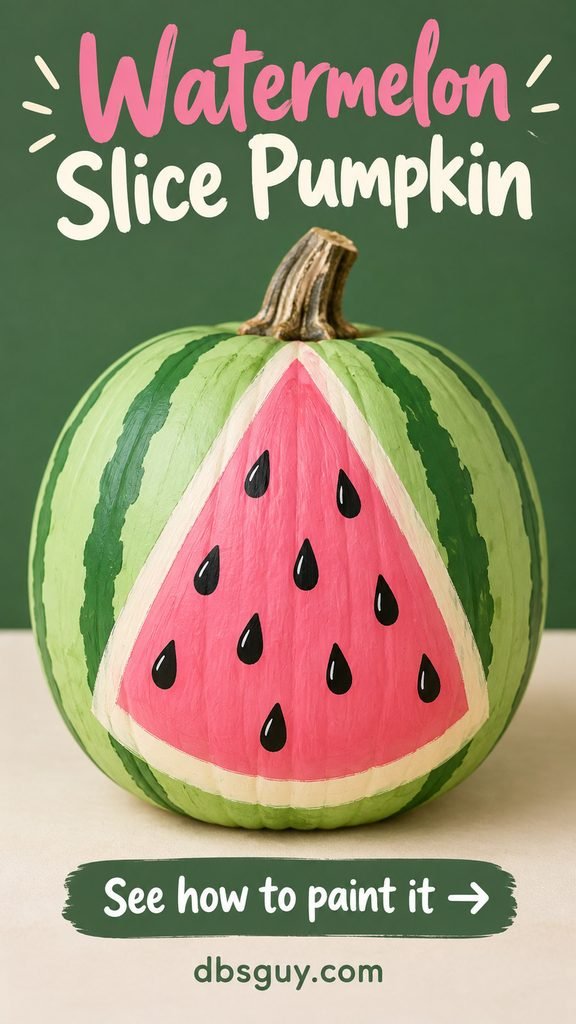
Keep every part painted on the intact surface. This is an illustration of a slice, not a cut pumpkin.
29. Sprinkle Doughnut
Paint a tan base, then a pink icing area over the upper shoulders with a wavy lower edge. Add short sprinkle strokes in white, yellow, blue, and a little purple once the pink is dry.

Leave the stem and pumpkin intact. The icing shape and sprinkles suggest a doughnut without cutting a real hole; this is a decorative interpretation, not a doughnut-shaped object.
30. Candy Corn Bands
Divide the visible height into three zones: white at the top, orange in the middle, and yellow at the bottom. Follow light pencil guides with a narrow brush before filling the larger areas.

A taller pumpkin gives each band room. Keep the orange band broad so the familiar candy-corn order reads clearly.
31. Caramel Apple Look
Paint the body apple green, then brush a caramel-brown cap around the top. Extend a few rounded drips down the front, using different lengths. Add small cream highlight strokes after drying. For a mottled green base like the image, lightly sponge darker green over the first coat before adding the caramel color. A compatible gloss craft paint gives the cap its shine without needing a thick pour.

Paint the drips deliberately instead of pouring paint. You control their position and avoid heavy runs collecting at the base.
32. Citrus Slice Medallion
Paint an orange circle on the front of a cream pumpkin. Add a narrow white ring inside its edge, a small white center, and spoke-like white divisions to make citrus segments.

Draw the outer circle first and check it from the front. The round medallion works best on a broad, shallow-ribbed face.
Animal Faces and Friendly Bugs
33. Fox Face
Use the orange skin as the fox’s coat. Paint two sweeping white cheek shapes that meet near a small black nose. Add black eyes above and two flat ear triangles painted on the upper front.

Keep the cheeks symmetrical enough to read as a face, but let the pumpkin’s ribs shape the outer curves.
34. Owl Eyes
Paint two large cream circles side by side on a brown base. Add black pupils and a small ochre triangle between them. Use short cream scallops lower down to suggest chest feathers. Add a few ochre scallops among the cream ones for the two-color chest shown.

Leave a small space between the eyes. If they merge into one cream patch, the owl loses its distinctive expression.
35. Panda Face
Paint two rounded black ear shapes high on the front of a white pumpkin. Add tilted oval eye patches, then tiny white eyes and a black nose below. A short double curve beneath the nose finishes the mouth.

The ears stay within the pumpkin outline. Use a naturally pale pumpkin to reduce the base-coating work.
36. Bumblebee
Paint the body yellow, then add two broad black bands around it. Reserve a clear yellow area on the front for two eyes and a smile. Paint a small white wing motif on each side.

You are making a stylized bee, so skip attached antennae. A round pumpkin and bold bands do most of the work.
37. Ladybug
On a red base, paint a narrow black seam down the center of the front and a rounded black head area above it. Add three or four black spots on either side, then tiny white eyes.

Place the large spots first. Leave a little red visible around the center seam so the wings do not become one black patch.
Playful Patterns and Personal Details
38. Rainbow Arch
Lightly draw the outside arch, then paint curved bands inward in terracotta, mustard, sage, and dusty pink. Leave thin cream gaps between bands if you want cleaner separation.

Make a broad arch with short sides. Very tall, narrow rainbows are harder to follow over pumpkin ribs.
39. Fluffy Clouds
Dab overlapping white circles onto a blue base with a small sponge or rounded brush. Join their lower edges into short, slightly uneven bases. Leave patches of blue between cloud clusters.

Use almost-dry white paint for softer edges, or a small brush for crisp cartoon clouds. Choose one finish and repeat it.
40. Wavy Retro Lines
Draw three or four loose waves from the upper shoulder toward the base. Follow each with a contrasting parallel line, leaving peach visible between colors.
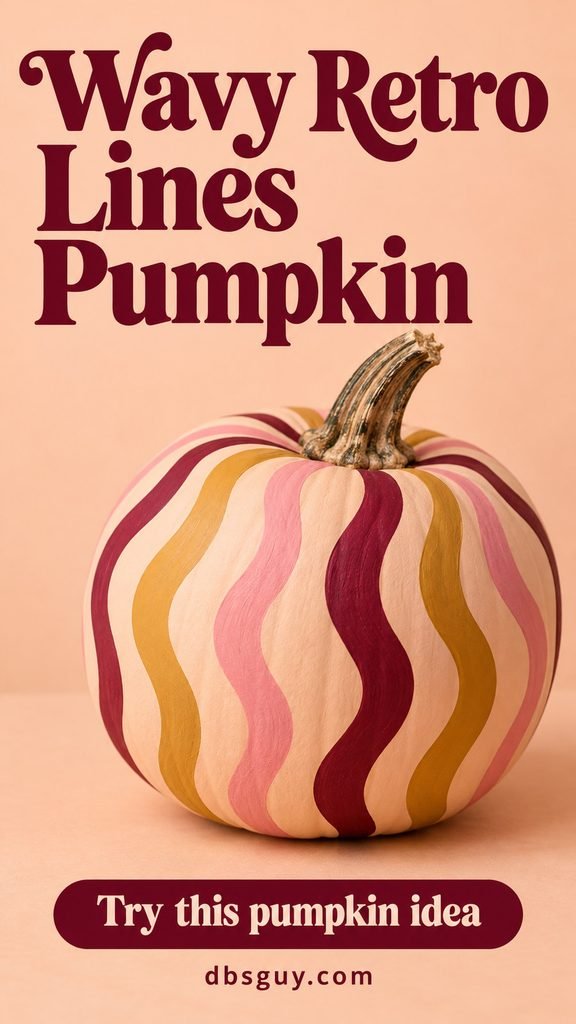
Start on the front and let the lines disappear around the sides. Matching every wave perfectly is unnecessary for this relaxed pattern.
41. Burgundy Bows
Paint a tiny knot, two sideways teardrop loops, and two trailing strokes for each bow. Arrange several burgundy bows across a dry blush base, changing their angle slightly.
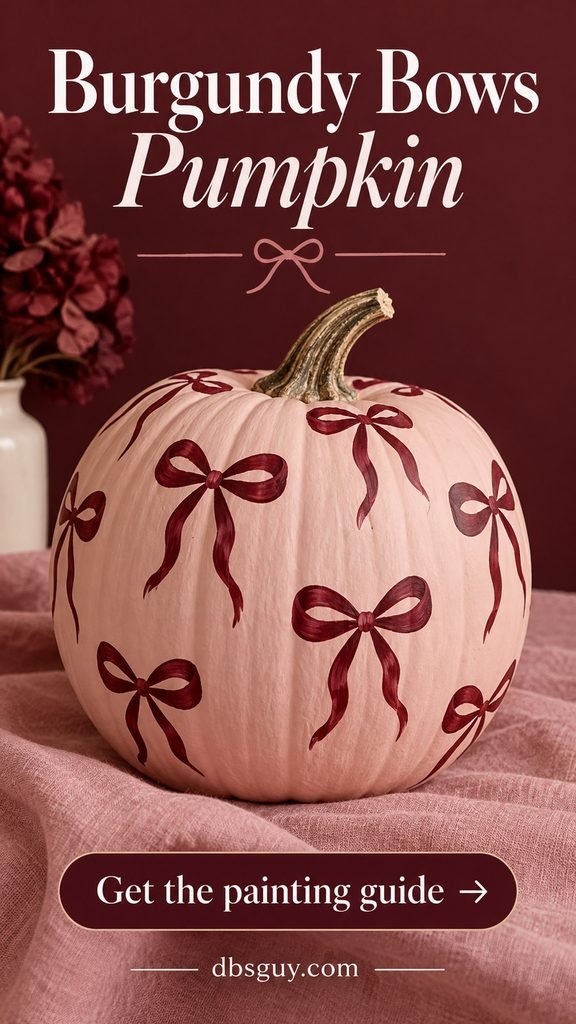
Practice a bow on paper first. Keep the loop interiors open so the motif does not turn into a solid butterfly shape.
42. Patchwork Quilt
Map a loose patchwork grid across the front and, if desired, around the sides. Fill separate cells rust, sage, mustard, and cream. After drying, add cream dots to some colored cells, narrow stripes to others, and small five-petal flowers on the cream cells. Touch up the boundaries with a fine brush rather than trying to mask every square.

The image shows a full wrap of many patches. For a simpler version, keep the panel to six or nine cells on the front. Both versions need dry layers before the small patterns go on.
43. Initial Medallion
Paint a cream oval centered on the front of a sage pumpkin. When dry, lightly sketch one large initial and fill it burgundy with a detail brush. A narrow burgundy outline just inside the oval edge gives the framed effect shown.

Use the pictured M as an example and substitute your own letter. A wide block initial is easier to paint than delicate script.
44. Welcome Pumpkin
Write WELCOME on scrap paper first to judge the spacing. Transfer a light guide to the broad front of an ivory pumpkin, then paint dark olive block letters and two curved leafy sprigs, one above and one below the word.

If your pumpkin is narrow, split the word into two lines. The goal is readable lettering from the doorway, not squeezing everything into one thin line.
45. Little Fall Landscape
Paint a pale blue base, then add overlapping curved bands of ochre, terracotta, and deep rust across the lower front, letting each layer dry before the next. Place a mustard sun above the hills. Paint three slender olive trees with small trunks and tapering foliage made from short upward dabs.

Keep the sky open and the trees at different heights. A broad pumpkin gives this little landscape room without wrapping the main scene out of sight.
Fix Small Painting Problems Before Adding More Detail
- The orange shows through a pale base: let the coat dry, then add another thin coat. Repeatedly brushing wet paint usually makes coverage less even.
- A line wanders over a rib: let it dry and tidy its edge with the background color. Short strokes are easier to control than one uninterrupted line.
- Details smear: stop and let the underlying layer dry according to its label. Do not add a darker outline to hide wet, muddy paint.
- A stencil leaks: use less paint and dab straight down with an almost-dry brush. A small flexible stencil fits the curve better than a large rigid sheet.
- The pumpkin looks too busy: repaint a small area in the base color after drying. A little open space can rescue a crowded design.
Display and Care
Set painted pumpkins on a stable, protective tray or surface. For an outdoor display, choose paint labeled for the relevant surface and exposure, follow its curing directions, and favor a sheltered spot. Bring the pumpkins in during harsh weather rather than treating a clear coat as a waterproof guarantee. Real pumpkins need checking underneath as well as on top; remove one that becomes soft, leaks, or develops mold.
Keep painted pumpkins decorative. Non-toxic labeling does not mean paint is food-safe, and a painted pumpkin should not become pet food or a wildlife treat. If you plan to compost a real pumpkin, ask your local program whether it accepts painted ones; requirements vary, and some require paint and other non-organic material to be removed. A reusable faux pumpkin avoids that particular disposal decision.
Pumpkin Painting Questions
What paint should I use on pumpkins?
Brush-on craft acrylic is a practical starting point, provided it is compatible with your pumpkin’s surface. Smooth plastic, foam, and natural skin can behave differently. Check the label and test a small area; do not assume a product suitable for wood will adhere to every faux pumpkin.
Do I have to paint the whole pumpkin first?
No. The orange skin works as the background for the striped, daisy, jack-o’‑lantern, and fox designs. A naturally pale pumpkin can also reduce the work for ivory or white designs. Basecoat when you need a different color or an even background.
Can I use a paint pen instead of a brush?
A compatible acrylic paint pen can help with thin lines, lettering, and small details. Test its flow on paper first and use it on a dry surface. A fine nib will still follow the pumpkin’s grooves, so work slowly across ribs.
How long will a painted pumpkin last?
There is no reliable one-size-fits-all lifespan for a real pumpkin. Its condition, weather, and display environment matter, and paint does not stop decay. Use faux pumpkins for designs you want to keep from year to year, and store them only after the finish has fully cured.
Which ideas work well for a pumpkin-painting party?
Offer a short menu: dots, stripes, clouds, a sleepy face, and a one-eyed monster. Put the example images near the shared paint colors, cover the tables, and give everyone a labeled drying space. Let children simplify the shapes instead of expecting a perfect match to an image.
For one pumpkin, choose the motif you most want to paint. For a group, repeat two or three colors and vary the shapes: a striped pumpkin can sit beside a floral one without every surface competing for attention.