21 Winter Nails Ideas That Bring Icy Blues, Soft Whites and a Little Sparkle Together


If you want winter nails in icy blue and soft white, decide where you want the sparkle first. A silver line at the tip looks crisp; a fine shimmer over milky white feels softer. You can also leave most of the manicure plain and give one nail the reflective finish.
These 21 winter nails ideas stay within that cool palette while changing the shape, placement, and finish. Start with the designs that suit your usual nail length, then save the image and its notes together. The notes explain what to keep when your nail artist adapts the reference to your hands.

The images are AI-generated manicure concepts, not photographs of completed or tested salon work. Use them as a starting point for discussing color and placement; real finishes vary with the products, application, and lighting.
Choose Your Color, Then Your Sparkle
- For a mostly sheer manicure: start with the blue micro French in idea 1 or the ribbon swirls in idea 12.
- For soft white with a little shine: compare the fine shimmer in idea 2, the silver half moons in idea 6, and the small stars in idea 16.
- For blue without painted motifs: look at the ombré in idea 3, pearl glaze in idea 7, velvet finish in idea 9, or matte-and-gloss contrast in idea 15.
- For a simple coordinated set: choose the five-shade progression in idea 20 or the two-color accent plan in idea 21.
Choose your comfortable length before the artwork. A longer reference can supply the palette for short nails, but tiny lines may need simplifying. For more compact placements, browse our short December nail ideas.
1. Icy Blue Micro French on Short Squoval Nails
A narrow blue edge gives you the winter color without committing to an opaque blue manicure. The sheer center is doing useful work here: it keeps the little tip distinct, especially when the nails are short. Choose a pink, peach, or beige base you like against your skin rather than trying to match someone else’s exact nude.

Ask for a thin icy-blue curve following the free edge, with the same visual weight across the hand. If a reference has much longer nails than yours, keep its color and reduce the width of the tip. A broad band would turn this into a different, more graphic French manicure.
2. Milky White With Fine Silver Dust
This is the quietest sparkle in the collection. A translucent white base and very fine silver shimmer give the nails a frosty glow without separate pieces of decoration. The softly squared shape in the reference gives the pale finish a defined edge; choose round or oval if you prefer a softer outline.
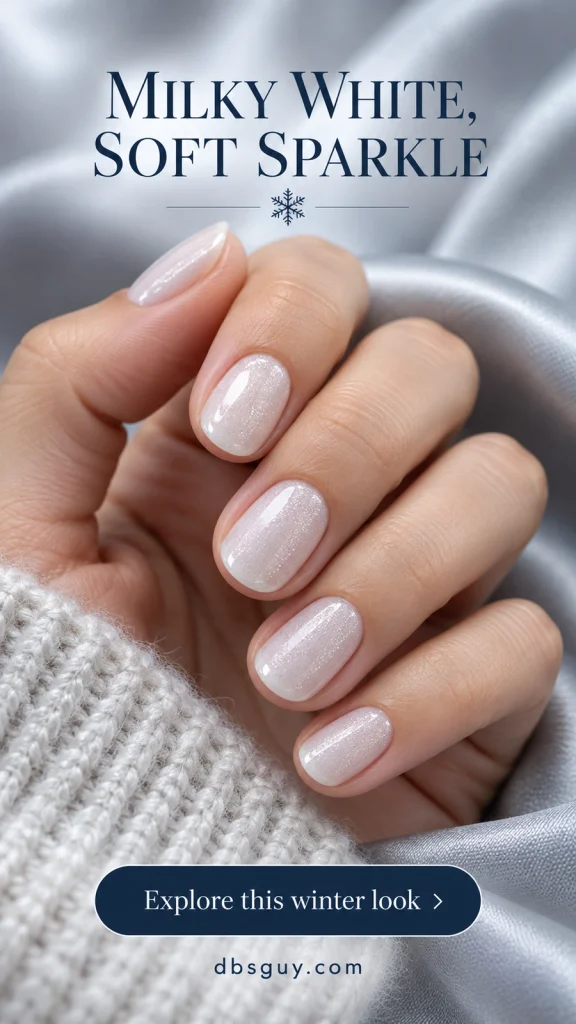
Look at a painted sample in both direct and diffused light before choosing the shimmer. You want a gentle reflection rather than scattered, clearly visible glitter pieces. For a regular-polish version, try a sheer silver-shimmer topper over milky white on one sample nail first; a dense topper can hide the base color.
3. Icy Blue Blending Into Snowy White Tips
Here, the blue starts near the base and gradually gives way to white at the ends. That direction matters: reversing the colors produces a different look. A medium almond shape leaves enough length for the transition to read as a blend rather than two pale stripes.

Show your artist where you want the white to begin and ask for a soft transition with no obvious dividing line. On shorter nails, reduce the white area rather than squeezing a large fade into a tiny space. If the blend is the feature you love, skip extra artwork so it stays easy to see.
4. Tiny Snowfall Dots on a Blue Base
Small white dots suggest falling snow without the fine brushwork of a snowflake. Keep them on two accent nails and leave the others blue. The irregular spacing makes the pattern feel light; identical rows would look closer to a polka-dot print.

For a home manicure with regular polish, use a small dotting tool and practice the dot size on a spare tip before touching your finished base. Add a few dots, pause, and check the open blue space before adding more. The smallest nails may only need a sparse scattering to communicate the same idea.
5. A Cropped Snowflake Beside Milky White Nails
A snowflake entering from a corner feels different from a full motif placed in the middle. Give the artwork an icy-blue background and surround those accents with plain milky white. The color contrast helps the fine white branches remain visible.
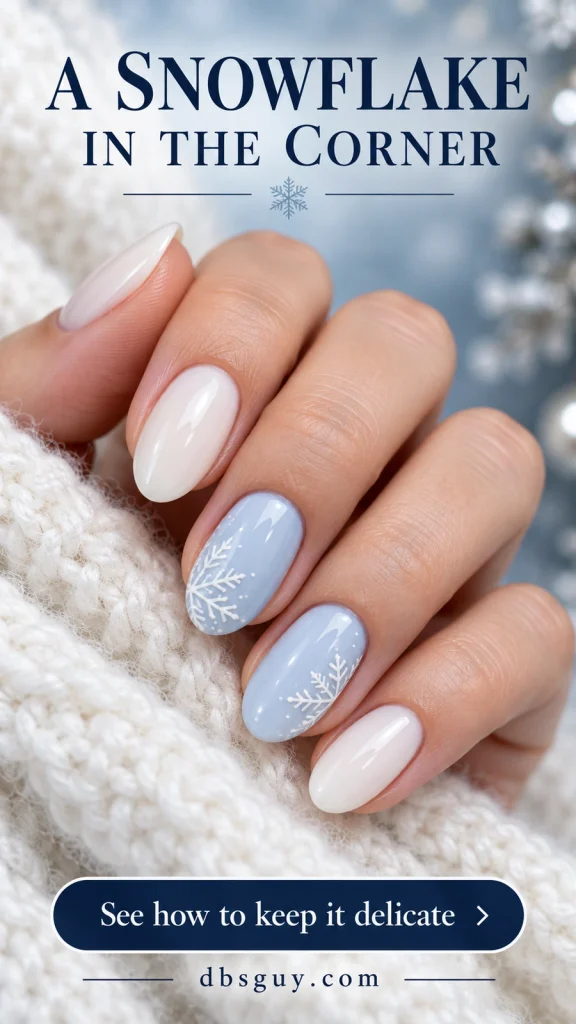
Ask for only part of the snowflake to be visible, with the branches contained on the nail plate. On a narrow nail, simplify the offshoots instead of shrinking every detail. If the snowflake is your favorite part, our delicate snowflake nail ideas offer more ways to vary its size and placement.
6. Slim Silver Half Moons on Soft White
Move the shine to the base of the nail for a change from French tips. A narrow silver crescent against milky white gives this manicure a small, jewelry-like detail while leaving the center plain. The curved accent contrasts with the softly squared edges in the reference; the same placement can follow an oval outline.
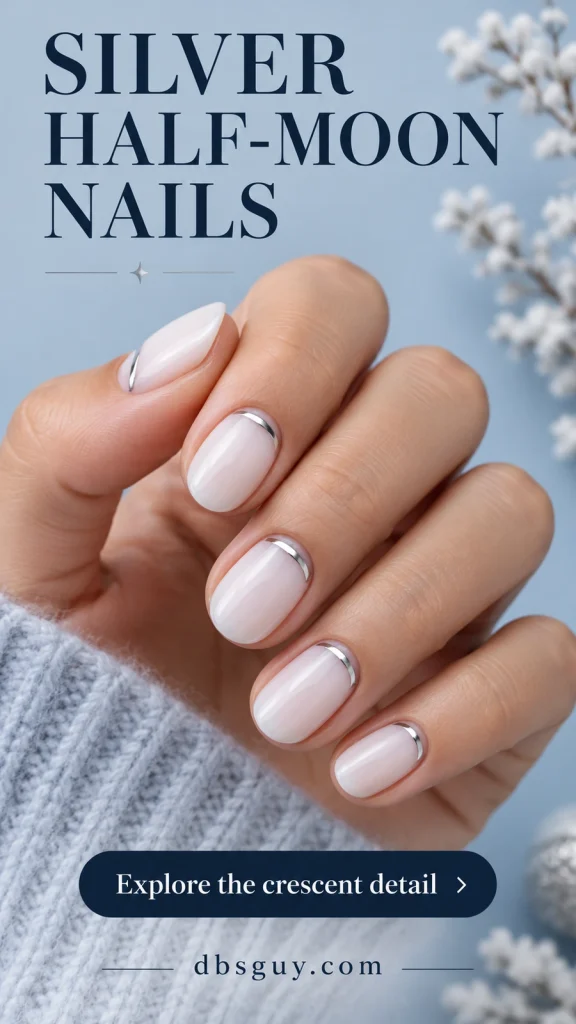
Request a flat metallic crescent that stays inside the nail plate, with a visible gap from the skin. Decide whether you want a thin arc or a filled half moon before the service begins; the reference is deliberately restrained. If repeating curves across every nail feels too decorative, keep them on two accents.
7. Icy Blue With a Translucent Pearl Glaze
Choose this when you want blue to remain the color you notice first, with a pearly reflection appearing as the hand moves. The finish should look softly luminous rather than fully mirrored. It gives a plain manicure enough interest without adding a drawing or separate accent nail.
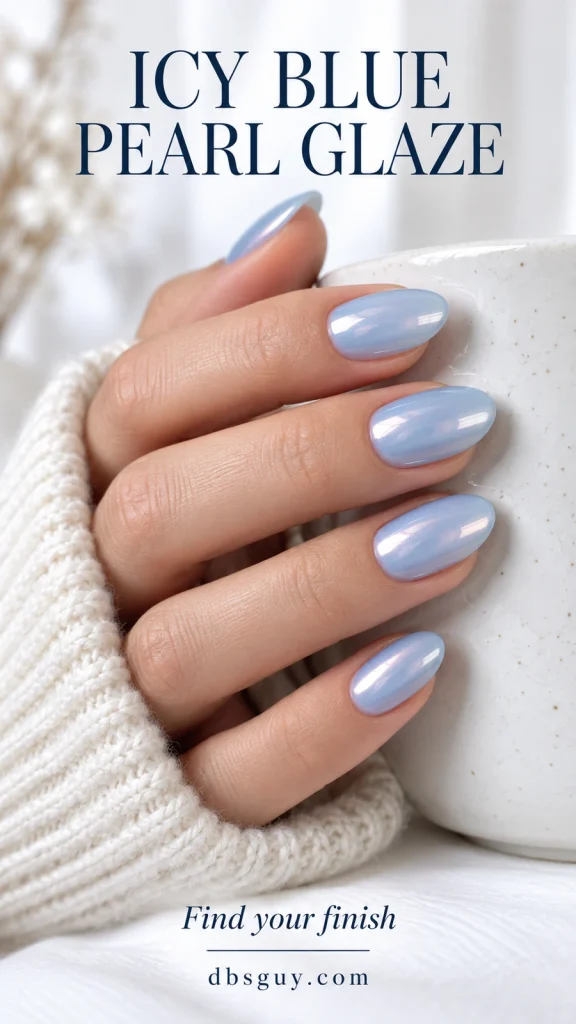
Bring a reference and describe both parts of the result: a visible pale-blue base and a light pearl sheen. Salon finish names can be imprecise, so a sample is more useful than the word glaze alone. A sheer pearl topper over blue is a regular-polish alternative, although it may not reproduce a particular salon powder finish.
8. White French Tips With a Silver Smile Line
A fine silver line turns a familiar white French into a winter manicure without changing its basic structure. The line belongs where the white tip meets the sheer base. That small boundary detail supplies the sparkle, so the rest of the nail can stay simple.
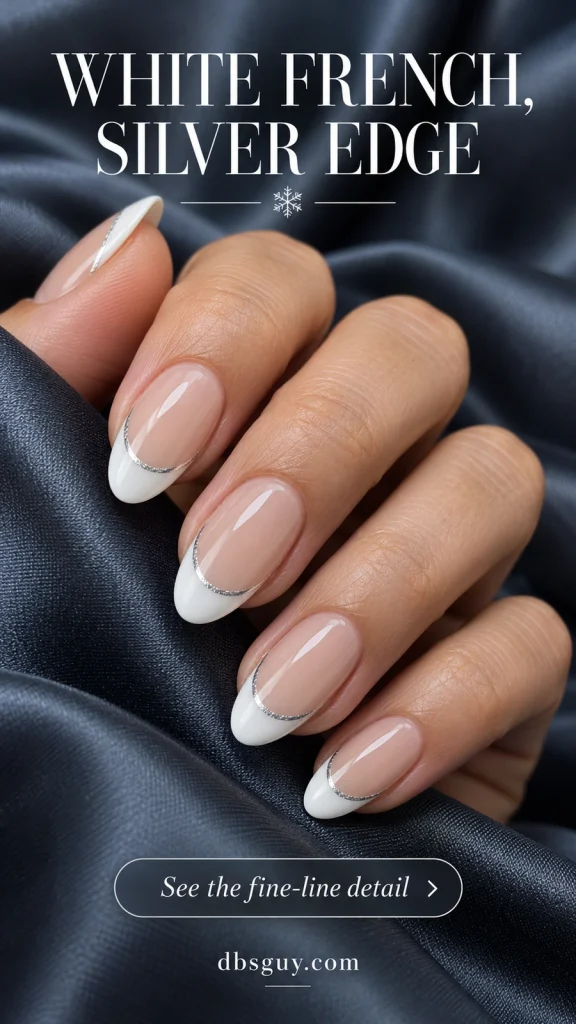
Ask for the silver to trace the inner curve of the white tip, rather than outlining the entire nail. On a short shape, narrow both the white band and its silver border. If you want just a hint of the effect, put the metallic outline on the ring fingers and leave the other French tips plain.
9. Frosted Blue Velvet With a Soft Glow
Velvet nails are about the reflection, not a fuzzy surface. Magnetic polish can create that shifting glow; for this version, ask for a broad, diffused silver-blue effect instead of a sharply defined cat-eye stripe. The reference has a smoky blue base and a brighter silver-blue glow, with no added gems. Ask for a paler base if you want less depth.
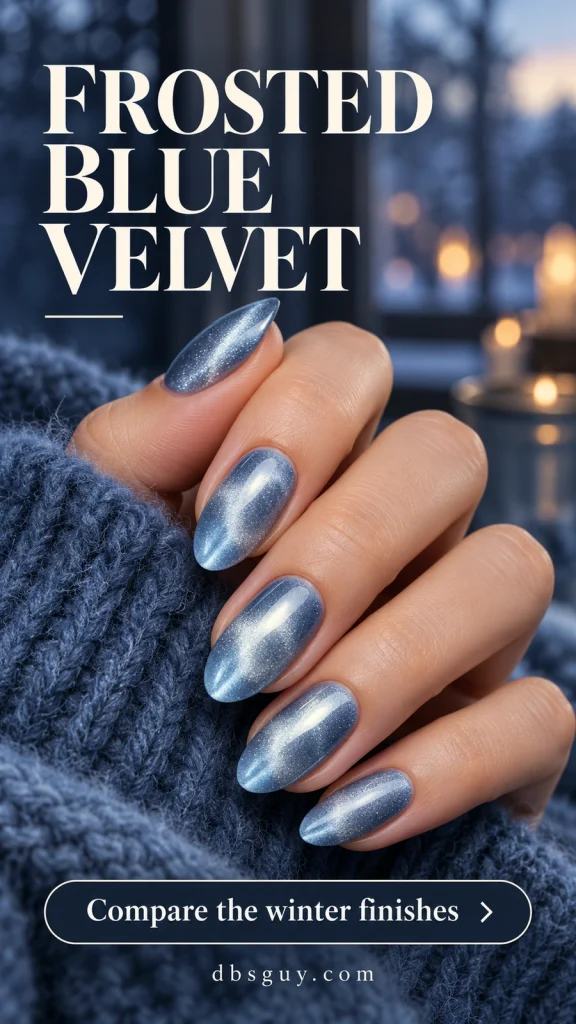
A still image only shows one lighting angle. Ask to see a sample move before deciding whether you like the finished effect. If you prefer ordinary lacquer, a fine blue shimmer gives a related palette but will not reproduce the magnetic reflection. For more finish comparisons, explore these December velvet cat-eye nail ideas.
10. Silver Glitter Fading From the Base
Instead of concentrating glitter at the tips, place it near the base and let it thin out toward the middle. Soft white ends stay mostly clear of sparkle. This direction makes the design distinct from a glitter French and leaves the nail’s outline easy to see.

Specify the fade direction when showing the reference: denser at the base, sparse in the center, plain toward the tip. All product should remain on the nail, with a clean gap from the skin. For a smoother-looking finish, choose fine glitter rather than large flakes, then check the completed surface with your technician.
11. Airy Ice Marble With Fine Silver Veins
Wisps of pale blue running through milky white give this set a marble effect. Keeping the marbling on two nails lets you enjoy the pattern without filling the whole manicure with detail. A few thin silver veins add reflection along the movement of the color.

Ask for translucent, irregular blue wisps rather than strong navy stripes. The silver should follow a small part of the marbling, not outline every vein. This is a useful salon reference if layered nail art is what you want; for a simpler adaptation, choose one marble accent and leave the surrounding nails soft white.
12. Blue and White Ribbon Swirls Over a Sheer Base
These ribbons are painted curves, not bow motifs. A slender blue sweep and a separate white sweep cross a sheer base, leaving open space between them. Fine silver accents can follow the curves without becoming a broad third ribbon.

Choose the base color before discussing the linework because much of it will remain visible. On a shorter nail, one blue curve and one small white curve are enough; they do not need to travel from edge to edge. Ask your artist to preserve clear gaps where the lines approach each other so the colors stay readable.
13. Frosted Glass Tips With Iridescent Flecks
Sheer white tips with a few reflective flecks suggest frosted glass rather than a crisp opaque French. The underlying nail edge remains part of the look. This is a softer choice if you enjoy a pale manicure but find a solid white band too defined.

Ask for a translucent finish and a gentle fade, with the small flakes concentrated toward the ends. A thick white layer would hide the quality that makes this concept different. The see-through effect will vary with your natural free edge or any extensions used, so compare a sample with your own nails before committing.
14. Diagonal Blue-and-White Color Blocks
If you prefer clean shapes to blended finishes, split two accent nails diagonally into icy blue and soft white. A hairline silver boundary makes the division deliberate. Plain blue and white nails around the accents keep the whole set from looking like a busy geometric print.
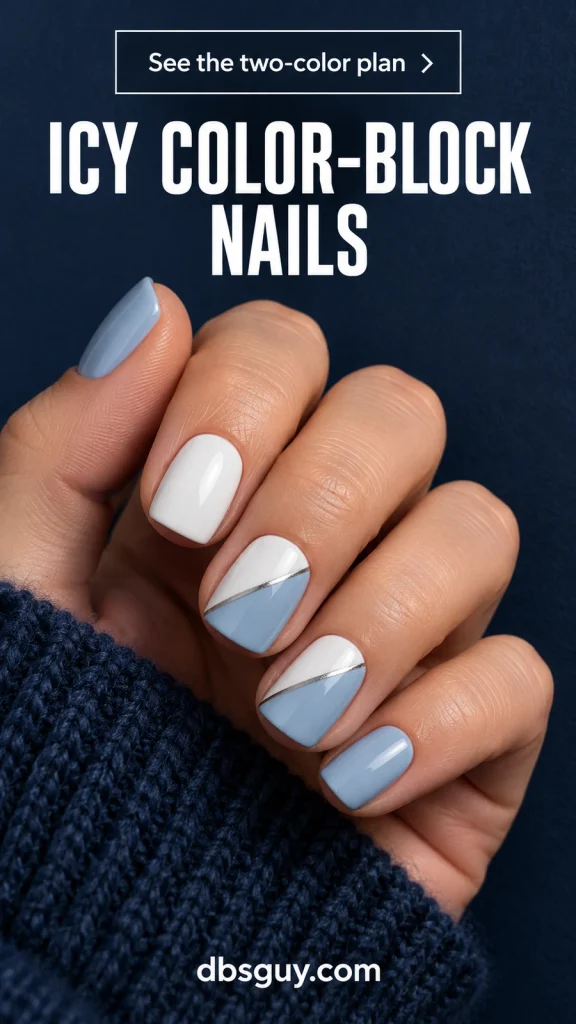
Pick the direction of the diagonal on the first accent nail and use it as the reference for the other. On a compact nail bed, skip the silver if it makes the boundary look heavy. The two solid color areas can carry the idea by themselves; crisp placement matters more than adding another detail.
15. Matte Icy Blue With Glossy Blue Tips
The color stays the same from base to tip; only the finish changes. A matte body beside a glossy blue edge gives a French-inspired result that becomes clearer as the light moves. There is no white stripe and no glitter competing with that subtle contrast.

Ask to see the finish difference at the length you plan to wear. A very narrow glossy edge may be barely noticeable on a tiny free edge, so one full glossy accent nail is another option. If using compatible regular-polish top coats, follow their instructions and keep the gloss confined to the intended area; an all-over gloss coat would erase the matte contrast.
16. Soft White With Tiny Silver Twinkles
Two small four-point stars are enough to give milky white nails a winter-evening detail. Keep the stars flat and leave the remaining nails undecorated. This makes the sparkle a little focal point rather than a full celestial pattern.

Choose a metallic nail decal or painted star that leaves white visible on every side. On very short nails, move the star slightly off-center instead of adding more tiny symbols to fill the space. If the decal has a raised edge, ask about a suitable smooth finish rather than assuming every sticker will sit the same way.
17. A Sparse White Windowpane on Icy Blue
A few crossing white lines borrow the feeling of a winter scarf without using a dense plaid. Keep the grid on two blue accent nails, with a fine silver line beside part of the pattern. The surrounding plain blue gives the eye somewhere to rest.

Ask for a sparse windowpane, not a miniature tartan with lots of overlapping colors. Two vertical and two horizontal lines are a useful starting point on a medium nail; reduce the grid further on a shorter one. A clear sketch of the line placement helps more than asking for plaid and hoping the artist imagines the same pattern.
18. Icy Blue With a Silver Side Sweep
A silver trail along one side gives blue nails a reflective edge while leaving most of the color uncovered. It has a different direction from both a French tip and the base fade in idea 10. This works especially well if you want sparkle but still want the manicure to read as blue.
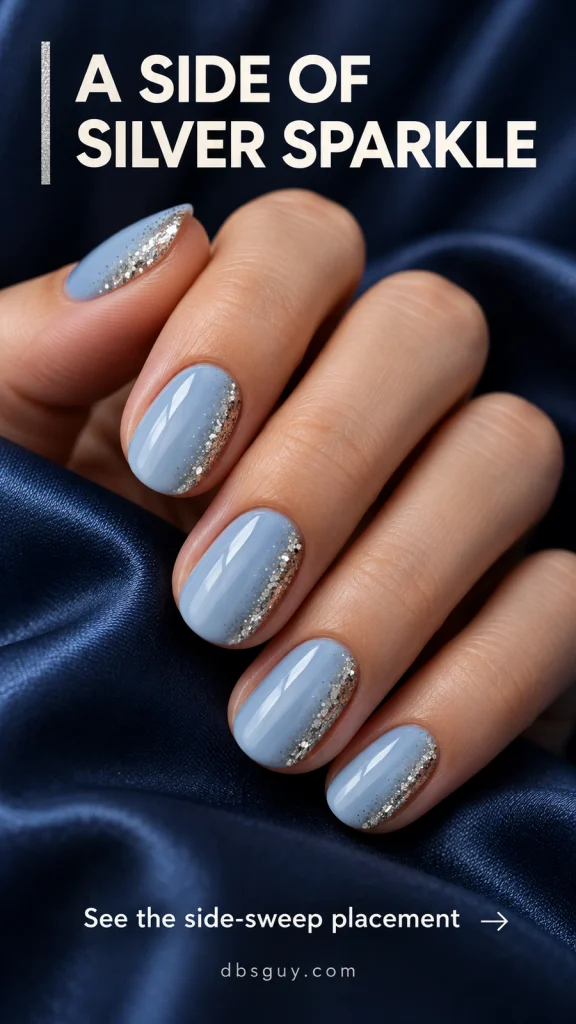
Specify a slim glitter strip that softens inward rather than a solid silver side panel. Keep the glitter on the nail and away from the skin along the sidewall. For a quieter version, use the sweep on two nails only, keeping the rest in the same blue so the set still feels connected.
19. Tone-on-Tone White Waves With a Silver Dot
A brighter white line over milky white is intentionally low contrast. Soft lengthwise waves add detail you notice close up, while a tiny silver accent near the base of each decorated nail supplies a clearer point of shine. The reference gives the white waves a little raised relief and uses small stud-like dots, so texture is part of its appeal.

Compare the two whites on a sample: if both are equally opaque, the waves may disappear. Keep the base translucent and the lines more defined. If you prefer a smooth surface, ask for flat painted white waves and metallic dots instead of the dimensional details shown here. Use only a few waves on two accent nails so the gentle pattern remains visible.
20. A Five-Shade Blue-to-White Manicure
Let the palette do the work instead of adding nail art. Move from a muted pale denim blue through powder blue and a very light ice blue, then finish with milky white and white-silver shimmer. Each nail stays a single shade, so the progression happens across the hand rather than within each nail.

Arrange five painted samples side by side before choosing the final colors. Two pale bottles can look nearly identical once applied, while a blue with a green cast can interrupt the progression. Decide whether to repeat the order on both hands or mirror it. Short nails with gently rounded corners keep this version simple and easy to read.
21. Blue, White, and One Silver Accent Nail
For the most direct way to combine the title’s three elements, give each finish a clear job. Use icy blue on the thumb and pinky, milky white on the index and middle fingers, and silver shimmer on the ring finger. The result feels coordinated without requiring a different illustration on every nail.

Show your artist the finger-by-finger plan and choose a silver fine enough to sit comfortably beside the soft colors. You can keep your usual length; no small artwork depends on a large nail surface here. If your outfit already has plenty of sparkle, replace the silver accent with white carrying a lighter shimmer rather than changing the whole palette.
What to Bring to Your Nail Appointment
Save one main reference rather than asking your artist to combine every detail you like. Point out the feature that matters most: the blue shade, the opacity of the white, the direction of the glitter, or the reflective finish. Then explain your usual length and whether you want a smooth surface.
Ask which parts of the design the artist can reproduce with the service you are booking. Painted details, magnetic effects, and certain powder finishes can involve different products or techniques. Confirm the service and quoted price directly with the salon; a concept image cannot establish either.
Keep basic nail care part of the appointment. The American Academy of Dermatology’s manicure guidance recommends moisturizing nails, especially after polish removal, and avoiding cutting or forcefully pushing back cuticles. If you have a nail concern, ask a dermatologist rather than covering it with another decorative set.
Winter Nail FAQs
Which ideas are easiest to adapt to very short nails?
Start with the fine shimmer in idea 2, the snowfall dots in idea 4, or one-color-per-nail palette in idea 20. They do not rely on a long free edge. A micro French can also work if the blue border remains narrow; choose according to the space on your actual nails.
What is the difference between milky white and opaque white?
Milky white lets some of the underlying nail or base show through; opaque white covers it more completely. That difference changes the look of the designs here. Milky white keeps the shimmer soft, while a brighter, more opaque white helps the waves and tiny snowfall dots show up.
Can I create these winter looks with regular nail polish?
Many color combinations and flat details can be adapted with regular polish: a blue-and-white palette, dots, simple tips, metallic lines, and glitter placement are useful starting points. A particular magnetic velvet effect requires magnetic polish, while a pearl topper may only approximate a salon glaze. Follow the instructions for the products you choose rather than using one timing rule for every system.
How can I add sparkle without raised decorations?
Choose fine shimmer, a painted metallic line, or a small flat decal instead of separate gems. If a completely smooth surface matters to you, say so before booking and ask to feel a sample. Large glitter pieces and layered decals can have a different texture from the same design painted with fine metallic polish.
Do icy blue and white nails work after Christmas?
Yes, as a styling choice: this collection uses winter colors and abstract details rather than Christmas-specific motifs. The pearl blue, white French, and side-sparkle designs are easy options for January or a winter trip. Choose the finish you enjoy wearing, even if you leave out snowflakes altogether.
Once you choose a design, keep its placement notes with the saved image. That gives your artist a clearer starting point than a picture alone, especially when your preferred nail length differs from the reference.