There is something about a tiny gingerbread cookie on a nail that makes a December manicure feel instantly cozy. The warm brown, the little icing lines, the button-size dots: it is festive nail art with room for personality. And you do not need a full set of complicated characters to get the effect.
These 15 gingerbread nail ideas for December range from one simple cookie accent to icing French tips, a miniature house, and a velvet-brown set with a star cookie. You will find a practical salon request and a short-nail adjustment with every look, so you can choose a design that fits the nails you actually wear.
Start with the first look if you want a classic gingerbread character, the scalloped matte design if you prefer a cookie-inspired pattern, or the diagonal icing ribbons if you would rather skip tiny faces. For a holiday dinner, the copper and velvet finishes add a little extra glow. The best choice is the one whose smallest detail you still love when you picture it on your own hand.
1. Short Caramel Nails With One Gingerbread Cookie
A caramel manicure with one gingerbread accent is a lovely starting point. Four nails carry the warm brown color, while an ivory ring nail gives the little cookie a clear place to stand out. The contrast does most of the work; you do not need glitter, lettering, or a different pattern on every finger.
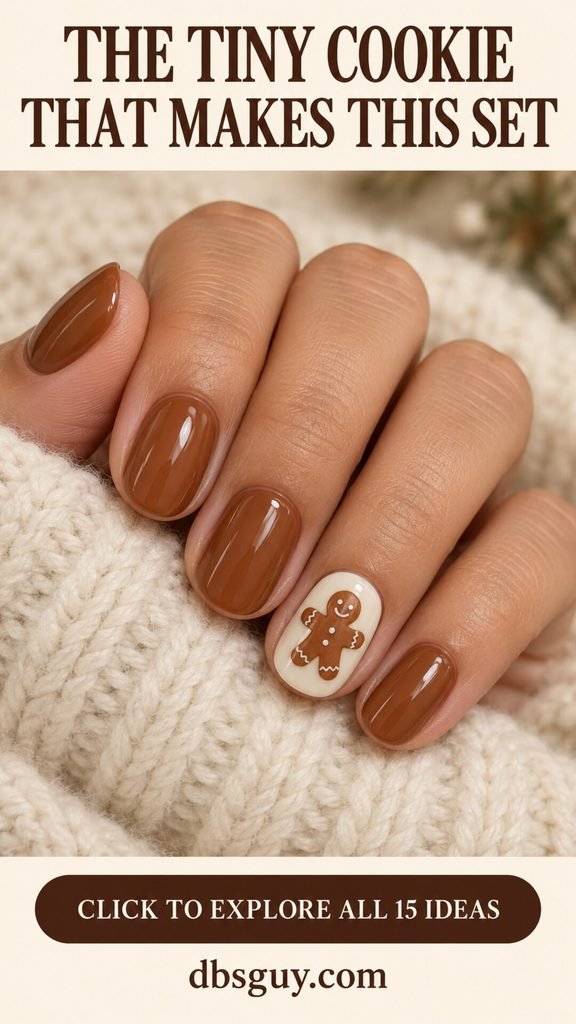
Choose a cookie brown with enough depth to show against the ivory. The character needs a recognizable head, arms, and legs before it needs a detailed face. A couple of white buttons and short icing cuffs are enough to make it feel finished. Keeping the other nails plain gives the miniature drawing breathing room and makes this an easy look to describe at an appointment.
Ask for: “Short rounded caramel nails, one ivory ring-finger accent, and a small flat-painted gingerbread person with simple white icing. Please keep the surrounding nails solid and glossy.”
For short nails: Use one medium-size figure rather than shrinking a detailed character into a crowded corner. Leave a visible margin around the head and feet. If the nail is especially small, skip the smile and let the silhouette and buttons carry the theme.
2. Iced Gingerbread French Tips
Brown French tips already have a soft, wintery feel. Add a thin scalloped white line at the smile line and they become iced-cookie tips. The sheer base keeps the design light, while the darker tip supplies that familiar gingerbread color. This is a good option when you like the theme but want to avoid a character manicure.

The placement of the white line matters more than the number of scallops. It should follow the boundary of the brown tip, with enough space for the brown to remain visible. A thick white band can hide the French shape; a finer line preserves it. Soft almond nails give the curved edge room to flow, but a rounded short shape can use the same idea.
Ask for: “A sheer beige-pink French manicure with warm cookie-brown tips and a delicate white scalloped icing line along each smile line. Keep the icing flat and fine.”
For short nails: Request shallow brown tips and a few wider scallops instead of lots of tiny loops. If the nail has very little free edge, the French curve can be painted higher on the plate rather than relying on the natural white tip.
3. Sheer Pink Nails With Tiny Gingerbread Friends
If you love a barely-there pink manicure, you can keep that soft look and still add a December detail. Two little gingerbread figures on separate nails bring the holiday mood without covering the sheer base. The empty space is part of the design, so resist the urge to fill it with snow, stars, and extra dots.
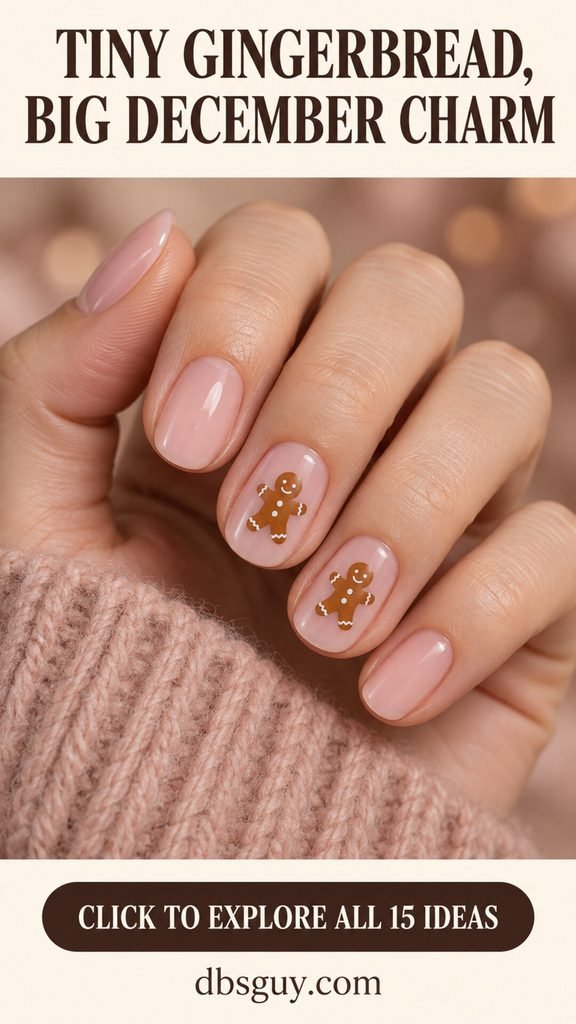
A warm caramel figure sits nicely against pale pink because the colors stay gentle while remaining distinct. Put each cookie near the middle of its nail, where the full shape can be seen. Match the approximate size of the two figures, but do not insist on microscopic identical faces. Simple icing edges and buttons will be easier to recognize than an overloaded miniature portrait.
Ask for: “Glossy sheer pink nails with one tiny brown gingerbread person on the middle nail and one on the ring nail. Leave the remaining nails plain, with plenty of pink visible around both figures.”
For short nails: Have your artist reduce the detail before reducing the silhouette. Two tiny dots and an icing edge can suggest the cookie just as clearly as a face. You can also keep only the ring-finger figure for a quieter version.
4. Cocoa Nails With White Cookie Outlines
Here, the brown nail becomes the cookie itself. Thin white icing outlines draw a gingerbread figure on one nail and a heart on another, so there is no separate brown shape layered over a pale base. The effect is graphic, cozy, and especially pretty if you prefer darker December nails.
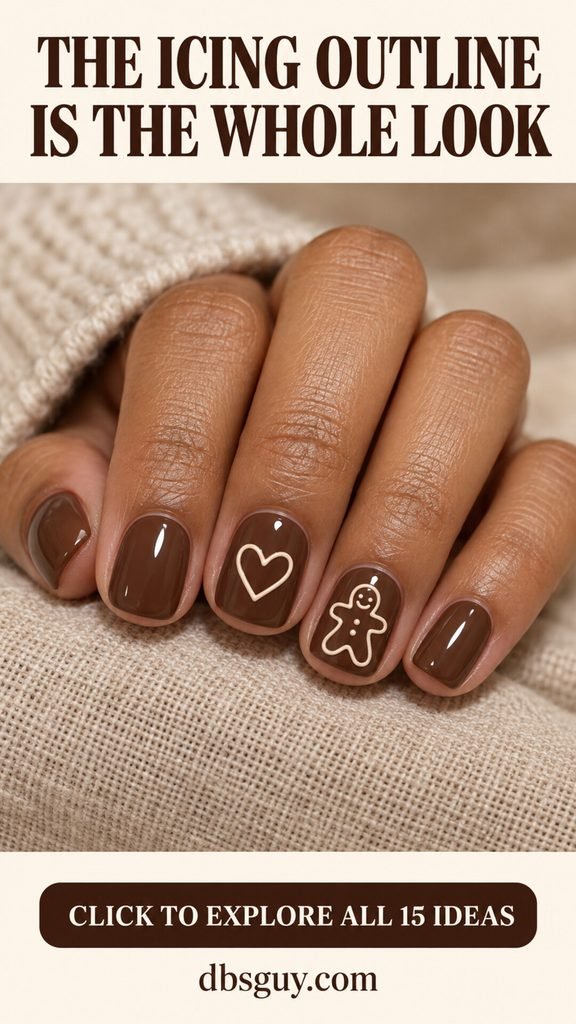
Use an opaque cocoa shade rather than a near-black brown if you want the overall feeling to stay warm. The person outline should have rounded limbs and a clearly separate head. The heart can be larger and simpler, balancing the more detailed character. Two solid cocoa nails between the accents would work well on the other hand if you want a less symmetrical arrangement.
Ask for: “Glossy cocoa-brown nails with a thin white gingerbread-person outline on the ring nail and a white heart-cookie outline on the middle nail. Keep the interiors brown and the other nails plain.”
For short nails: Make the heart the main accent and use an uncomplicated character outline on the widest nail. White buttons are optional. The outlines should sit inside the nail edge, with a little brown margin that makes them easier to read.
5. Blush Gingerbread Nails With a Red Bow
A tiny red bow is the detail that gives this set its personality. Muted blush nails frame an ivory gingerbread accent, and that one red mark adds a festive focal point. If bright red nails feel too bold for your everyday style, this is a sweet way to use the color in a much smaller dose.

Keep the bow painted just below the cookie’s head, like a little bow tie. Two red teardrops joined by a small center dot can suggest the shape without needing an elaborate knot. The surrounding blush should be soft enough that the red still looks intentional. White icing and buttons connect the character to the cookie theme, while the rest of the set stays uncomplicated.
Ask for: “Muted blush-pink nails, an ivory ring-finger accent, and one gingerbread person with white icing and a tiny flat-painted cherry-red bow. I want a smooth surface with no raised bow charm.”
For short nails: Let the bow be the only red detail and omit extra dots around the figure. A slightly larger bow is easier to appreciate than an intricate one that disappears at normal viewing distance.
6. One Gingerbread House Accent
A miniature gingerbread house brings a different kind of charm: more storybook cottage than cookie character. One ivory accent nail holds the house, while plain cinnamon-brown nails keep the set coordinated. This is the look to choose when the tiny architectural details are what catch your eye.

A simple house is easier to understand than a whole village. A brown wall, a triangular roof, a white icing roofline, a small window, and a red door create a complete scene without squeezing in a fence or a snowy garden. This is a detailed painting request, so send the reference before your appointment and ask whether your artist can allow time for the accent.
Ask for: “Four plain cinnamon-caramel nails and one ivory ring nail with a small flat-painted gingerbread house. Please keep it to a brown house, a white iced roof, one window, and a red door.”
For short nails: Use a compact house with one larger window, or choose only an iced roof and doorway. The roofline and red door should remain recognizable even if the artist removes the smallest decoration.
7. Matte Brown Nails With Scalloped Icing
This design borrows the look of an iced cookie without drawing a cookie shape at all. Warm matte brown covers each nail, and a delicate white scalloped border sits just inside the edge. A few center dots finish the pattern. It feels cozy because the finish and the piping-style line tell the same story.
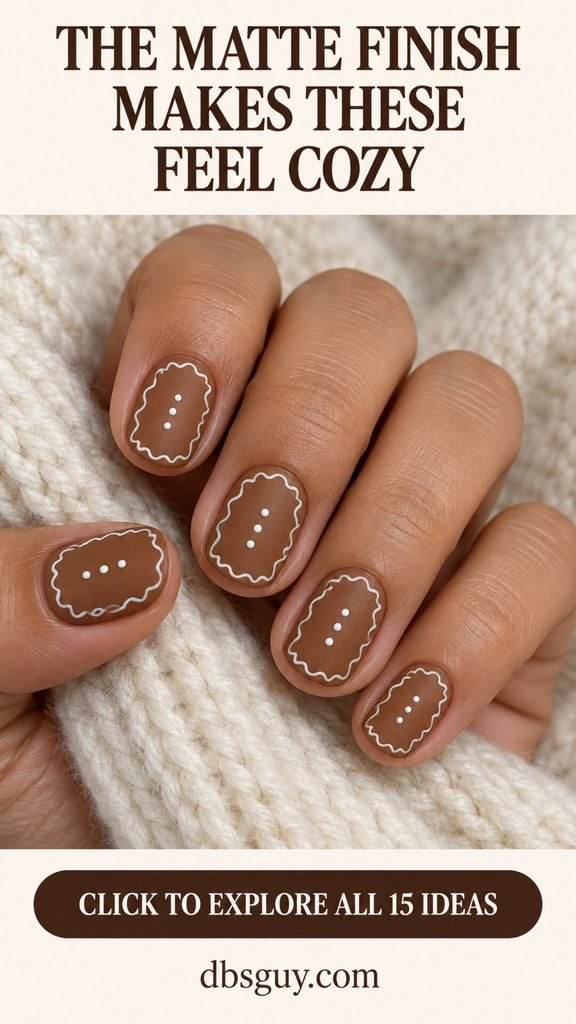
The border needs a small brown margin outside it. If the white line runs directly against the cuticle or nail edge, its shape becomes harder to see. Keep the center sparse so the perimeter stays the main detail. A matte top coat changes the final appearance, so ask your artist to show you the brown with that finish rather than judging only a glossy swatch.
Ask for: “Short cookie-brown nails with a matte finish, a fine white wavy icing border inside each nail, and a few small white center dots. Keep everything smooth and flat.”
For short nails: Reduce the number of scallops and use broader curves. If a full border feels cramped, use icing along the tip and sides only. You will keep the cookie effect while giving the middle of the nail more open space.
8. Mint and Caramel Gingerbread Nails
Mint gives the gingerbread palette a fresh little lift. Here, caramel brown, muted mint, and an ivory cookie accent work as one set, rather than competing patterns. The gingerbread figure keeps the theme clear, and the pastel green makes the manicure feel a little different from the usual red-and-brown holiday combination.
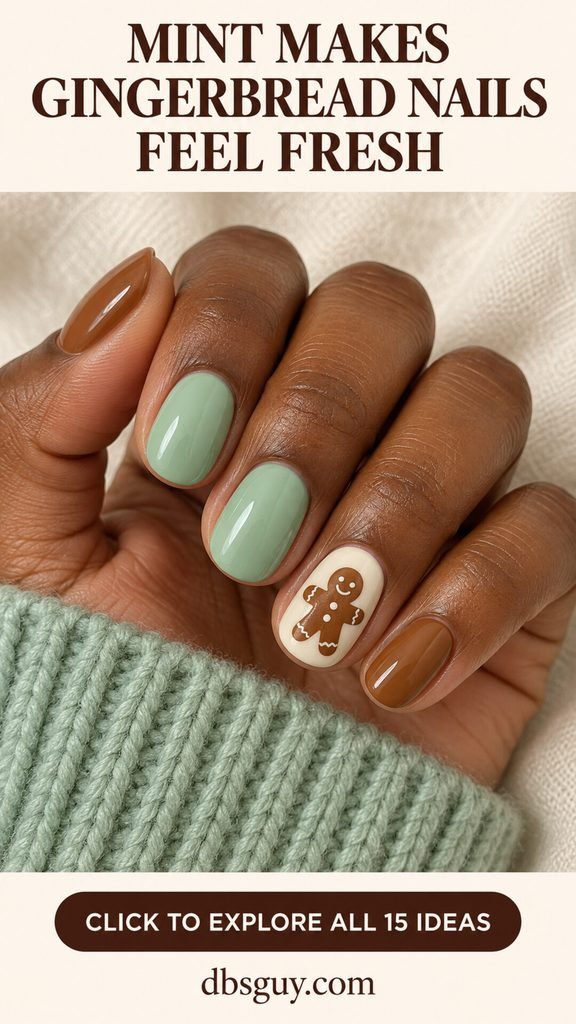
Choose a soft mint rather than a vivid neon green if you want the colors to stay gentle. Repeat the caramel on two nails and the mint on two nails, then give the fifth nail the character. That simple distribution helps the colors feel planned. You can switch their positions on your other hand without adding extra motifs or making every nail identical.
Ask for: “Short oval nails in a mix of muted mint and caramel, with one ivory ring-finger nail featuring a small gingerbread person and simple white icing. Please keep the mint and caramel nails solid.”
For short nails: Keep the cookie centered on the ivory accent and leave the pastel nails completely plain. The color blocking is already part of the design, so you do not need miniature mint candies or extra snowflakes around the character.
9. Gingerbread Cookie Hearts
Heart-shaped gingerbread cookies are a lovely alternative to little people. The shapes are easy to recognize, and a thin white icing edge makes them feel like decorated cookies rather than ordinary brown hearts. Use them on ivory middle and ring nails, with caramel on the surrounding fingers.

Give the hearts a warm toasted-brown center and a clean icing border. A tiny dot in the middle is enough extra detail; writing a message across the heart would make this a much more demanding manicure. This look also adapts easily to a softer palette. You can replace the caramel companion nails with sheer beige if you want the cookie hearts to become the main attraction.
Ask for: “Caramel nails with two ivory accents, each holding one brown heart-shaped gingerbread cookie outlined in fine white icing. Keep the hearts flat-painted and the surrounding nails solid.”
For short nails: One centered heart can fill the accent nail comfortably without becoming crowded. Ask for rounded lobes and a clear point. If two accents feel busy on a small hand, use one heart nail and keep the other ivory nail plain.
10. Copper Shimmer With One Iced Cookie
A copper-brown shimmer turns the gingerbread theme into a holiday-dinner manicure. The warm sparkle makes the solid nails interesting, while one ivory cookie accent gives the set a playful center. You get a dressier finish without covering the little figure in glitter.
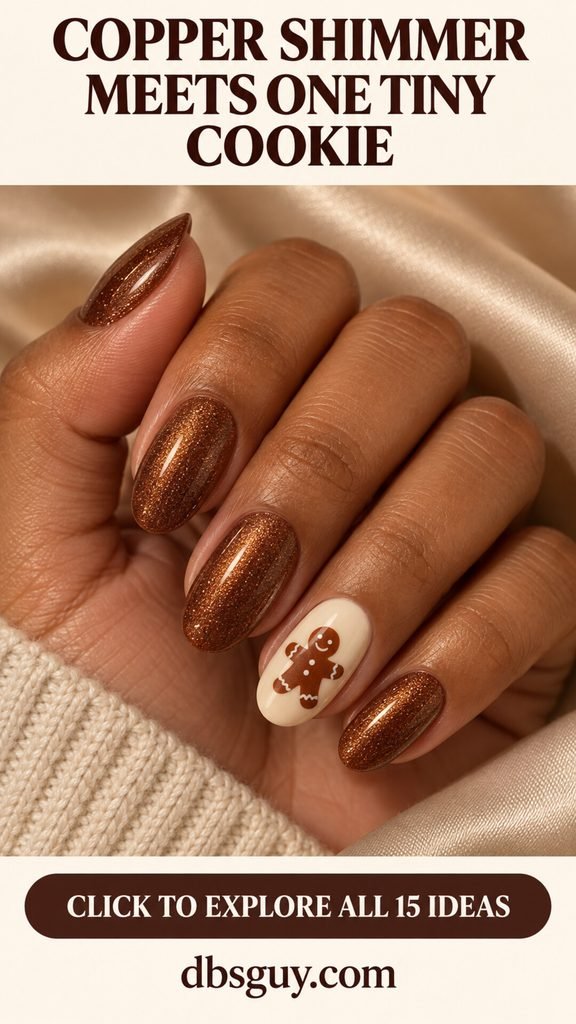
Look for fine shimmer rather than large glitter pieces if you want the brown to read as smooth, glowing color. The ivory accent should remain relatively quiet so the gingerbread shape stays clear. This set works well when your outfit already has texture, such as velvet, satin, or a cozy knit, and you want the nails to add warmth without introducing several competing colors.
Ask for: “Fine copper-brown shimmer on four nails, plus one ivory accent with a small brown gingerbread person and white icing. Keep the cookie nail simple and the shimmer smooth, without gems.”
For short nails: The shimmer does not need extra length to be noticeable. Use one clear, simplified cookie on the widest accent nail and leave all sparkle on the surrounding fingers. That separation helps both parts of the manicure stand out.
11. Gingerbread and Snowflake Accent Nails
A gingerbread cookie and a snowflake are a natural December pairing, but they do not have to share the same nail. Place the cookie on an ivory ring nail and a white snowflake on a cocoa middle nail. Plain caramel nails connect the two accents through color.

The two backgrounds create useful contrast: the brown figure shows against ivory, and the white snowflake shows against cocoa. Keep the snowflake to one clean central design rather than filling the nail with tiny crystals and dots. A simple six-arm version gives the eye a clear shape, while the gingerbread character supplies the softer, playful detail.
Ask for: “Warm caramel nails with an ivory gingerbread accent on the ring finger and one thin white snowflake on a cocoa middle nail. Please separate the motifs and leave the other nails plain.”
For short nails: Skip the smaller branches on the snowflake and simplify the cookie’s face. If both accents feel too intricate for the available space, keep the full gingerbread figure and turn the snowflake into a small starburst. It still gives the set a wintery companion.
12. White Icing Drip Tips on Toasted Brown
These nails take their inspiration from white icing flowing over the edge of a cookie. The base is fully painted toasted brown, and a white cap at the tip ends in a few rounded drip curves. It is a more playful alternative to the precise smile line of a French manicure.

Keep most of the brown visible. If the white portion reaches too far toward the cuticle, the toasted-cookie color stops being the main impression. Two or three gently rounded drips are easier to follow than a row of tiny spikes. The effect is painted onto a smooth nail surface; you do not need thick, raised gel to suggest frosting.
Ask for: “Glossy toasted-brown nails with white icing caps at the free edge and a few soft rounded drip curves. Please leave most of each nail brown and keep the design completely flat.”
For short nails: Use a narrow white tip with one or two shallow drips. A deep, elaborate drip shape can take over a small nail. The simpler version gives you the same frosted-cookie idea with better space for the brown base.
13. Cinnamon Nails With Diagonal Icing Ribbons
If tiny faces make you hesitate, diagonal icing ribbons offer an approachable way into the theme. Cinnamon-brown nails carry a few thin, gently curved white lines, with plenty of brown showing between them. The contrast suggests decorated gingerbread without asking you to draw a character.
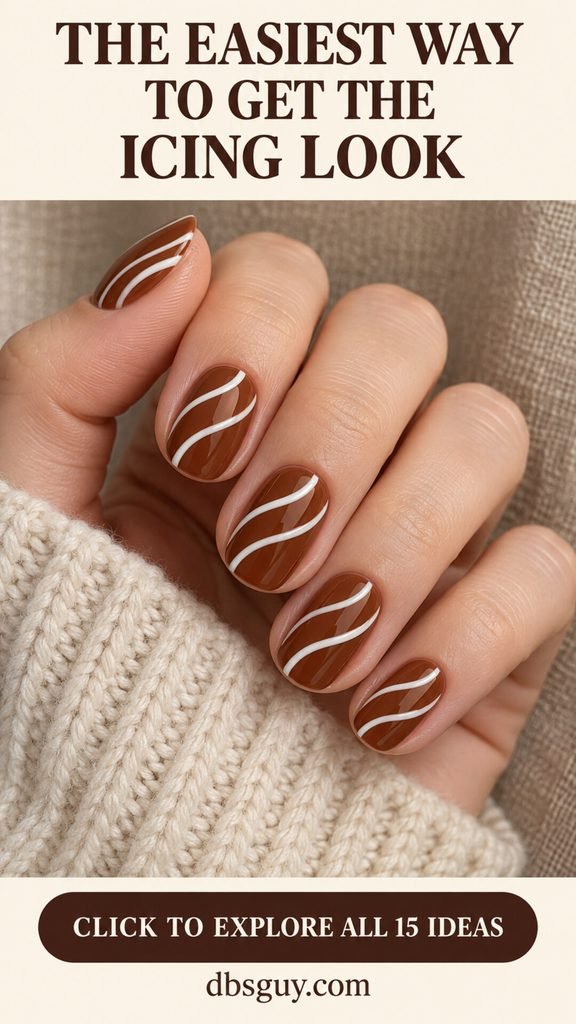
The lines do not need to match perfectly from nail to nail. What makes the set feel cohesive is their similar thickness, direction, and spacing. Start with two ribbons on a practice tip before deciding whether the design needs a third. Too many close lines can look like a dense stripe pattern, while fewer curves make the icing idea easier to appreciate.
Ask for: “Glossy cinnamon-brown nails with two or three thin curved white diagonal icing ribbons on each nail. Keep open space between the lines and leave out other motifs.”
For short nails: Use two ribbons, or put them on just the middle and ring nails. For a DIY version, this is a more manageable starting point than a gingerbread house, although a steady brush and a dry brown base still matter.
14. Gingerbread Cookie Confetti
A miniature cookie assortment makes this set feel playful without requiring a different full-size drawing on every finger. Two ivory accents carry the details: a tiny gingerbread person with a heart on one nail, and a pair of star cookies on the other. Caramel companion nails keep the palette grounded.
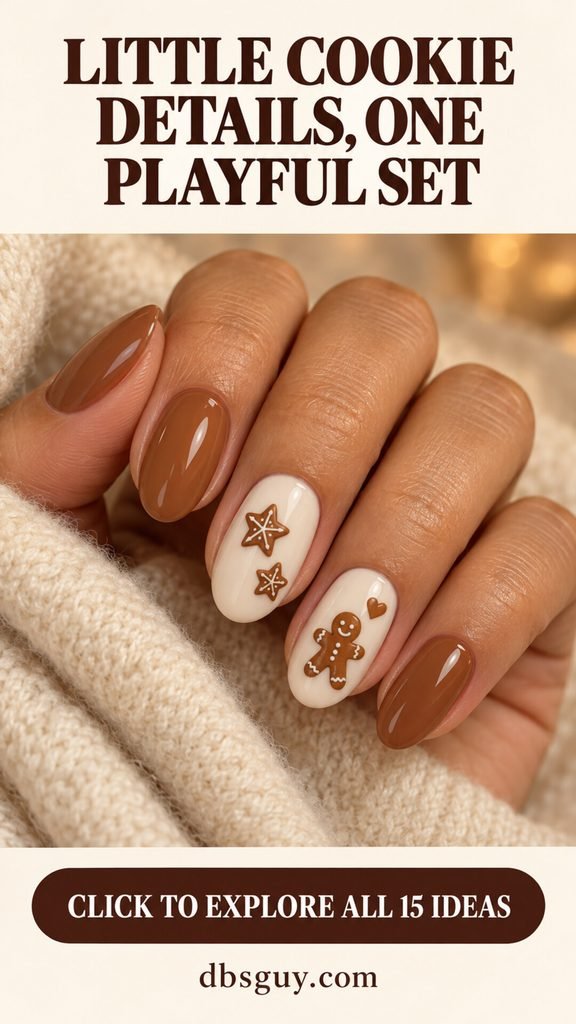
The trick is to treat the open ivory space as part of the pattern. The cookie shapes should feel scattered, with gaps between them and room at the nail edges. If you crowd the accents with extra sprinkles, it becomes harder to identify the little shapes. Restrained white icing ties the different cookies together without adding another color.
Ask for: “Caramel nails with two ivory accents: one with a miniature gingerbread person and a small heart, the other with two small brown star cookies. Add simple white icing and leave clear space between the shapes.”
For short nails: Use one shape per accent nail instead of squeezing in the whole assortment. A gingerbread person on one nail and a star cookie on another still tell the same cookie-box story with much less visual crowding.
15. Velvet Brown Nails With an Iced Star Accent
This set pairs a soft magnetic glow with one iced star cookie. The brown nails have a luminous, velvet-like shimmer, while the ivory accent holds a flat brown star with a fine white edge. It is a lovely choice if you want a festive manicure that feels a little more dressed up.

The “velvet” effect comes from the polish’s reflective appearance, not a fuzzy or raised surface. Ask your artist for a warm brown result and a soft, curved glow rather than assuming any cat-eye polish will create the same color. The star provides a clean focal point, so it does not need gems, extra stars, or a gingerbread character beside it.
Ask for: “Warm brown magnetic velvet nails with a soft glow, plus one ivory ring nail with a flat-painted brown star cookie outlined in fine white icing. Keep the star accent simple.”
For short nails: Use one broad star with a clear outline and fewer interior details. If you prefer regular nail polish, a fine brown shimmer can offer a warm alternative, although it will not reproduce the same magnet-shaped reflection.
How to Choose the Gingerbread Look You Will Actually Enjoy Wearing
Pick the main detail before picking the full color palette. Do you want a gingerbread person, an iced cookie pattern, or a little house? A person feels playful, scalloped icing feels decorative, and a house makes the accent nail the star of the set. Choosing that detail first helps you avoid combining three references that each need their own space.
Then decide how many nails you want decorated. One detailed accent can feel just as festive as a full patterned manicure. For a restrained look, use a warm brown you already enjoy wearing and add one ivory cookie nail. For something more playful, try the mint combination or the two cookie-confetti accents. If you want an evening finish, keep the artwork simple and put the shimmer on the surrounding nails.
Match the palette to your preferred contrast
Caramel and ivory give the cookie shapes an easy-to-see contrast. Cocoa and white create a darker, more graphic version. Sheer pink makes the gingerbread figures feel light and delicate. Blush with a red bow adds a small colorful focal point, while mint changes the mood without changing the cookie theme.
Look at your artist’s brown and ivory swatches together before committing. A brown figure on a nearly identical brown base can disappear, especially when the artwork is tiny. If you love a deep cocoa shade, white outlines are a useful way to keep the design legible. You can also use a warmer cream instead of bright white if you prefer a softer overall palette.
Choose the finish separately from the artwork
A glossy finish gives the brown a polished, reflective look. Matte brown emphasizes the cookie-inspired pattern, and fine copper shimmer adds warmth around a simple accent. For a magnetic velvet effect, check the available polish and ask your artist to demonstrate the reflection you want. Gelish’s cat-eye guidance describes its velvet finish as a reflective effect; a regular brown shimmer is an alternative, but it does not create the same magnet-shaped glow.
What to Send Your Nail Artist Before the Appointment
Send one reference image and identify the detail you most want to keep. A useful message is: “I like the gingerbread house on the ivory nail, but I want short rounded nails and plain caramel on the other fingers.” That tells the artist which part matters and which parts can change.
Confirm your current nail length, preferred shape, the number of detailed accents, and whether you want regular polish or a gel service. Ask about the extra time and cost for the art rather than assuming a tiny drawing will be quick. The house and cookie-confetti designs involve several small shapes, even though they occupy very little space.
Use the reference as a design brief. These images are AI-generated inspiration, so a nail artist may adjust the proportions, colors, or line thickness to suit your nail plate and their products. The written “Ask for” notes explain the important parts of each look and give you a practical way to discuss those adjustments.
A Manageable DIY Gingerbread Manicure With Regular Polish
For your first attempt, choose icing ribbons or one cookie accent with plain companion nails. Gather a warm brown polish, an opaque white, your chosen pale accent color, a base coat, a top coat, a fine nail-art brush, and a small dotting tool. A spare practice tip is useful for testing the size of the figure and the amount of white polish on your brush.
1. Prepare and paint the base. Start with clean nails and follow your polish system’s directions. OPI’s lacquer application guide recommends thin, even color layers, allowing each layer to dry, and applying top coat once the polish is dry. For a cookie accent, paint the companion nails brown and reserve one nail for ivory or sheer pink.
2. Practice the silhouette first. Make a small round head, then a compact body with two arms and two legs. Keep the figure well inside the nail edges. Mii Cosmetics’ gingerbread nail-art tutorial uses a dotting tool for the head and a brush to build the limbs. Try that basic approach on a practice tip before adding it to your manicure.
3. Add only the icing you can place clearly. Once the brown shape is dry, add a couple of white button dots and short icing marks. A face is optional. For the ribbon design, skip the figure and use the fine brush to paint two spaced curves across the dry brown base.
4. Let the artwork dry before finishing. Follow your top coat’s directions and avoid repeatedly dragging the brush over the tiny details. For the matte look, use a compatible matte top coat as the finishing layer. If your first figure looks crowded, simplify the next one; adding more dots rarely gives a small drawing more clarity.
This sequence is for air-drying regular polish. Gel products have their own application, lamp, and curing requirements. Follow the specific system’s instructions, or ask your nail artist to handle that version; do not use a lacquer drying step as a gel curing instruction.
Small Details That Make Gingerbread Nail Art Easier to Read
Leave a margin. A little plain polish around a cookie helps separate its arms, feet, and icing from the nail edge. The same idea applies to the scalloped border: place it inside the perimeter rather than directly against it.
Prioritize the outline. A recognizable person, heart, or star can work with very few interior dots. If the shape is unclear, a more detailed face will not fix it. Ask your artist to simplify the drawing before making it smaller.
Use one clear white. An opaque white is a straightforward choice for icing that needs to stand out against brown. A sheer pearly color can be pretty, but it may give a softer result than the crisp piping shown in these references.
Stop before the accent gets crowded. A bow, buttons, snowflakes, candy dots, and a house can all be charming individually. On a tiny nail, choosing one main motif and one supporting detail gives them more room to be appreciated.
Gingerbread Nails: Frequently Asked Questions
What colors make nails look like gingerbread cookies?
Warm caramel, cinnamon, and cocoa browns create the cookie base, while white or ivory suggests icing. Red can supply a tiny bow or door. You do not need an exact branded shade to communicate the theme. Choose a brown that contrasts with the accent background and an icing color that remains visible over it.
Can you do gingerbread nails on very short nails?
Yes, with a simpler design. One centered cookie, a heart outline, or two icing ribbons can fit a short nail more comfortably than a miniature house scene. Keep the main shape clear, reduce the number of interior dots, and let the surrounding nails stay plain. Your artist can size the motif to the actual nail plate.
Which gingerbread nail design is a good beginner choice?
The diagonal icing ribbons are a sensible starting point because they avoid tiny faces and separate limbs. A brown manicure with a few white icing dots is an even simpler adaptation. Practice the lines on a spare tip, let the base dry, and aim for consistent spacing rather than identical curves on every nail.
Can gingerbread nails look subtle?
They can. Choose sheer pink or beige, use just one small cookie accent, and keep the rest of the set plain. Brown French tips with a fine white icing line are another gentle option. The theme can be a detail you notice up close rather than a pattern that covers every nail.
Do gingerbread nail designs need 3D charms?
No. Every look in this collection is intended as flat-painted artwork on a smooth nail surface. Painted icing can suggest cookie decoration through its color and shape. A flat bow or a simple white roofline is enough to convey the detail without adding a raised ornament.
How do you keep white icing details from smearing?
With regular polish, allow the base and artwork to dry before applying the finishing layer, and use your products as directed. Avoid working the top-coat brush back and forth over the same tiny drawing. If you are using a gel service, the artist should follow that system’s curing sequence rather than waiting for it to air-dry.
Can I add snowflakes without making the set too busy?
Put one snowflake and one gingerbread figure on separate accent nails, as in look 11. Keep the other fingers solid. Essie’s snowflake guidance includes a single accent snowflake as a simple option. For very short nails, reduce the branches or use a small starburst so the two motifs each have room.
How long will gingerbread nail art last?
The design alone does not determine wear time. Your polish system, application, nail condition, and daily activities all affect the result. A gingerbread figure does not make a manicure automatically last longer than another pattern. Ask your artist what to expect from the service you choose and follow the product’s care and removal directions.
Choose the Tiny Detail You Want to Keep
The most useful gingerbread reference is the one you can describe clearly: one red bow, a scalloped icing edge, a little house, or a star cookie against a velvet glow. Start with that detail, then choose the length and finish that suit your routine. A simple set with a cookie you love can be every bit as charming as the most elaborate design in the collection.
Editorial note: The manicure images are AI-generated design inspiration. Styling suggestions and salon briefs are original; application guidance is informed by the linked manufacturer resources. Actual nail art will vary with nail size, products, and the artist’s technique.