Soft shimmer, rich color, and little details that reward a closer look.
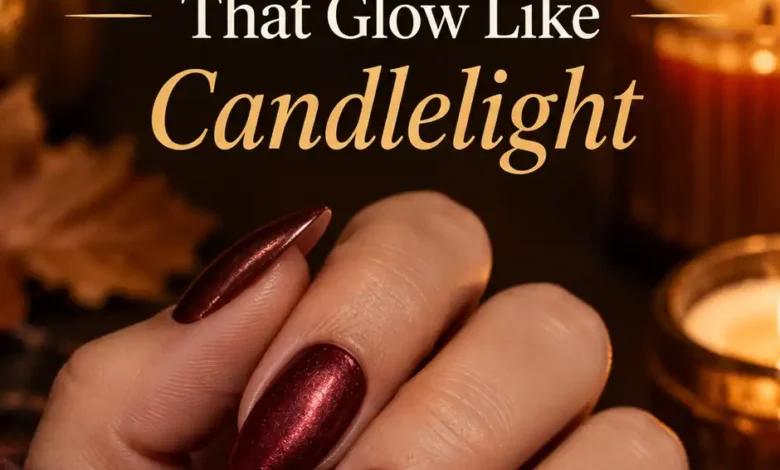
A dark manicure can be beautiful before it does anything at all. Then you turn your hand, a soft band of light opens across the color, and suddenly it has another side. That is the appeal of velvet nails: the finish gives a familiar fall shade a little movement.
These 21 velvet November nail designs explore what you can do with that glow. There are simple all-over colors, quiet cutouts, delicate painted details, and a few bolder combinations for the days you want your manicure to be noticed. Each idea includes a close-up reference, a practical way to adjust it, and a short request you can take to your nail artist.
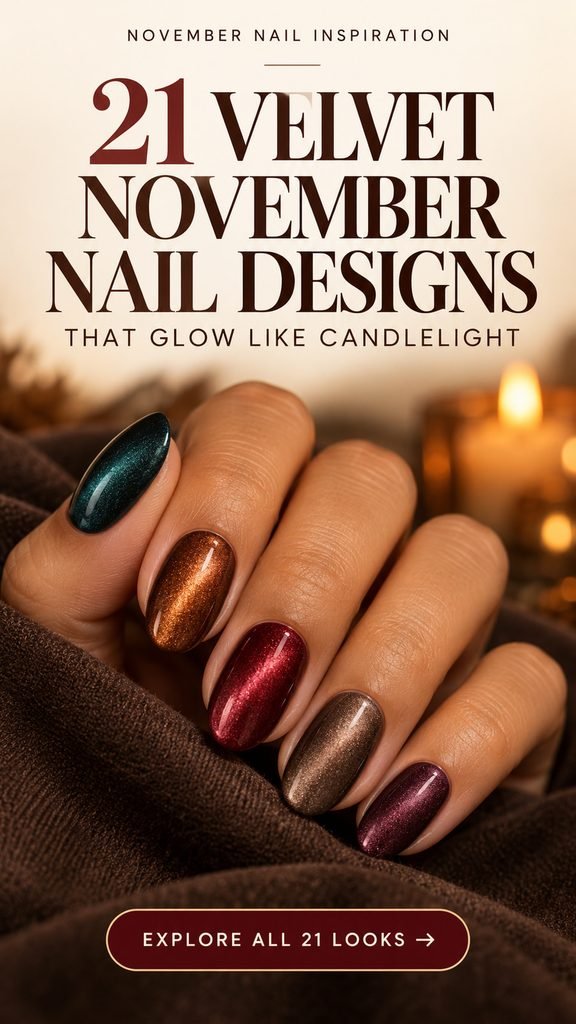
What to Ask for When You Say “Velvet Nails”
In this guide, velvet means a magnetic shimmer effect that resembles the light moving across velvet fabric. The finished surface can be smooth and glossy. Cirque Colors explains that magnetic polish contains particles that respond to a magnet, creating effects including cat-eye and velvet. Bring a visual reference along with the name so your artist can see the kind of reflection you want.
For most of these looks, the goal is a wide, softly glowing area with deeper color around it. A narrow, sharply defined line gives a different cat-eye appearance. Point out the width of the glow, the depth of the base color, and whether you want extra artwork. Those three choices will say more than “something sparkly.”
Technique depends on the products and magnet. ILNP’s U-shaped magnet is designed for a velvet effect, while OPI’s professional velvet lesson demonstrates a figure-eight magnet approach. You do not need to name a particular tool at the salon; showing the finish you like gives the artist a useful starting point.
Keep regular polish and gel instructions separate
Air-dry magnetic polish: Cirque’s application directions work one nail at a time while the magnetic layer is wet and call for magnetizing again after top coat. Follow the coat thickness, magnet position, and timing given for your own formula and chosen effect. A plain, nonmagnetic polish will not respond in the same way.
Magnetic gel: OPI’s professional tutorial shapes the magnetic effect before curing that layer, then continues with the artwork and finishing steps. Use the curing lamp and schedule specified for the gel system. The images below are design references, so an artist may adjust the application method to the products they use.November velvet nail design 01 / 21
1. Smoky Teal Velvet
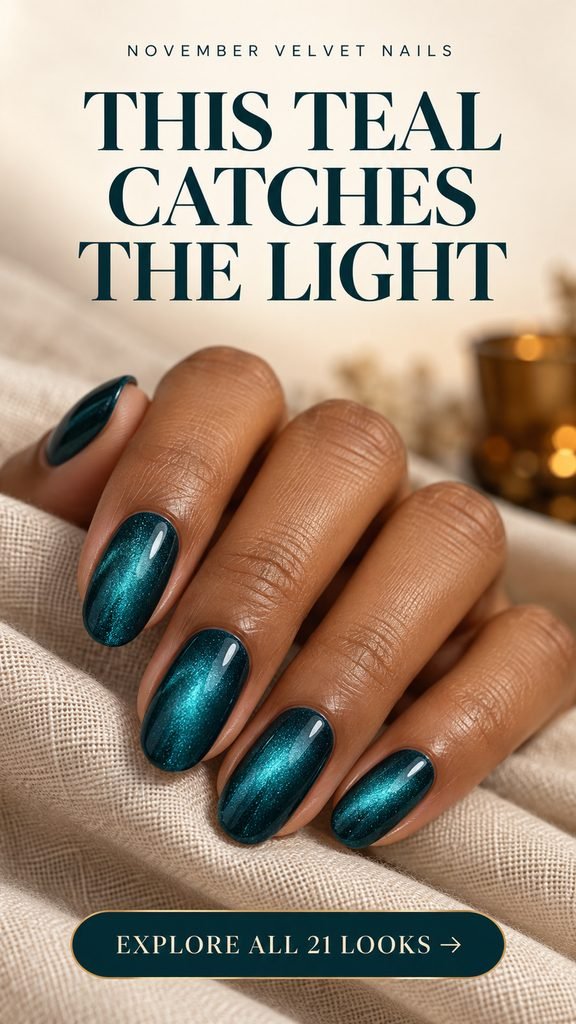
Deep teal gives this collection its quietest kind of drama. The edges stay dark while a turquoise glow opens across the middle, so even a plain set has something to look at. It is a lovely direction if your November wardrobe leans on camel coats, cream knits, or dark denim and you want one richer color beside them.
Make the width of that glow part of your request. A broad, soft reflection creates the velvet mood shown here; a tightly focused streak will read more like a classic cat-eye. Oval nails give the color a generous curved surface, but a short rounded version can keep exactly the same idea. Start with the finish before adding any decoration.
Salon note: Smoky teal on every nail, with a wide turquoise velvet glow and darker edges. Keep the surface glossy and the artwork minimal: the magnetic finish is the whole design.November velvet nail design 02 / 21
2. Burnt Honey Velvet
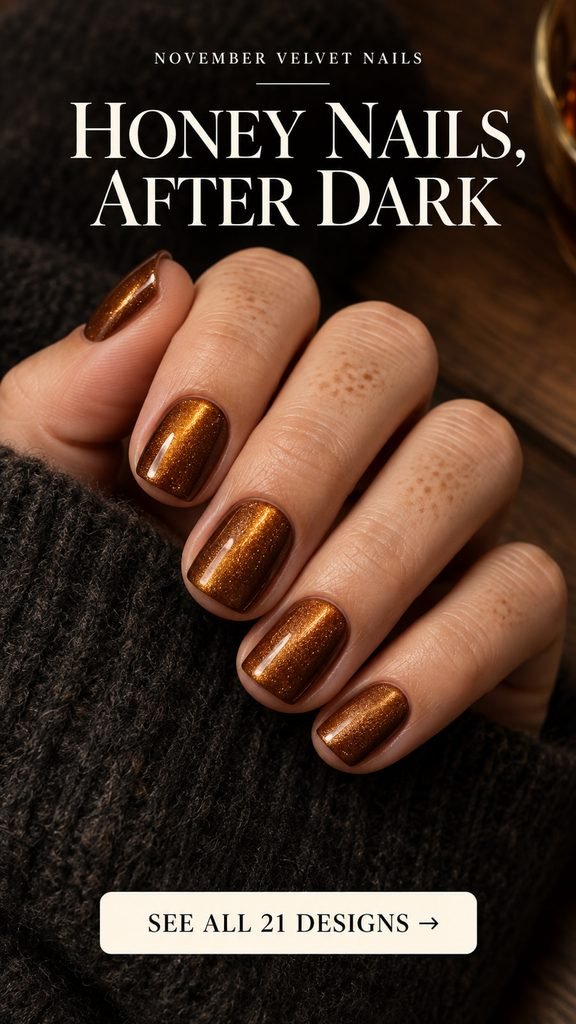
Burnt honey sits in the delicious space between amber, copper, and brown. On short nails, it feels warm and substantial without needing a pattern. The dark knit in the reference makes the golden reflection especially easy to see, which is why this is such a good color to consider alongside charcoal or chocolate clothing.
Before committing, compare the polish in softer room light as well as a brighter spot. You may love its glowing side but want a deeper brown undertone when the light moves away. For this look, keep the corners gently softened and let the shimmer cover the whole nail. A very yellow gold would give the set a different personality.
Salon note: Short soft-square nails in burnt-honey magnetic polish, with a diffuse copper-gold glow. I want a warm amber-brown undertone and a smooth, glossy finish.November velvet nail design 03 / 21
3. Copper Velvet with Crescent Cutouts
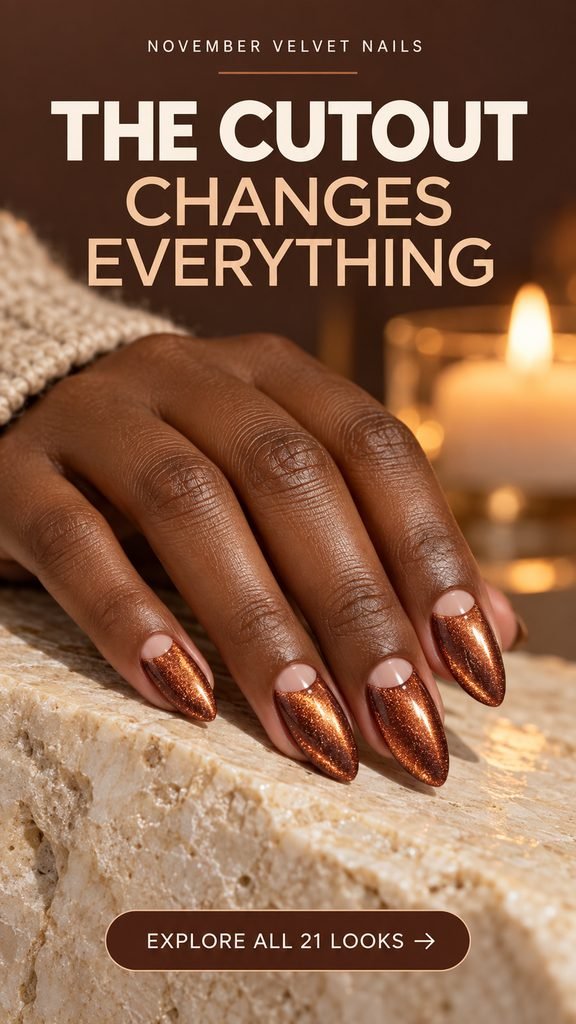
A small crescent of sheer color at the cuticle gives copper velvet a completely different outline. That little pause makes the shimmer look deliberately placed, almost like a curved piece of metal set into the nail. The reference keeps the exposed-looking area soft and pink-beige, so the copper remains the first thing you notice.
Use the size of your nail bed to decide how deep the crescent should be. On shorter nails, a shallow half-moon preserves more room for the copper; on a longer almond, it can be a little bolder. Ask your artist to show you one cutout shape first. A consistent curve matters more here than a perfectly identical measurement on every finger.
Salon note: Copper magnetic velvet with a small sheer nude half-moon at each cuticle. Keep the border neat and the cutouts proportional to each nail, with no white paint filling them.November velvet nail design 04 / 21
4. Aubergine Velvet with a Silver Contour
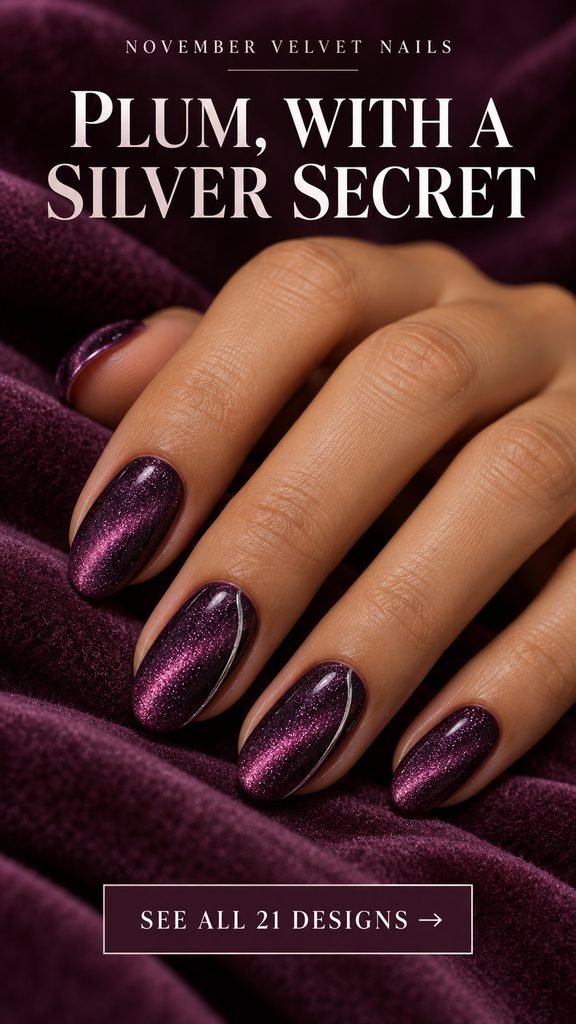
Aubergine and silver make a cooler, more evening-leaning pair than the usual autumn brown and gold. The purple velvet carries the color, while a slender silver contour draws attention to the side of two nails. It is the sort of detail you can miss at first, then keep noticing when your hand turns.
The line needs to stay delicate for that effect to work. A wide metallic stripe would compete with the soft purple center. Keep the contour on two accents, and let the remaining nails repeat the velvet alone. If you prefer a shorter shape, have the line end a little earlier rather than squeezing a thick curve around a small tip.
Salon note: Aubergine velvet on an oval shape, with a very fine painted silver side contour on two accent nails. Leave the other nails plain and keep the silver flat and narrow.November velvet nail design 05 / 21
5. Mushroom Velvet with Ink-Black Tips
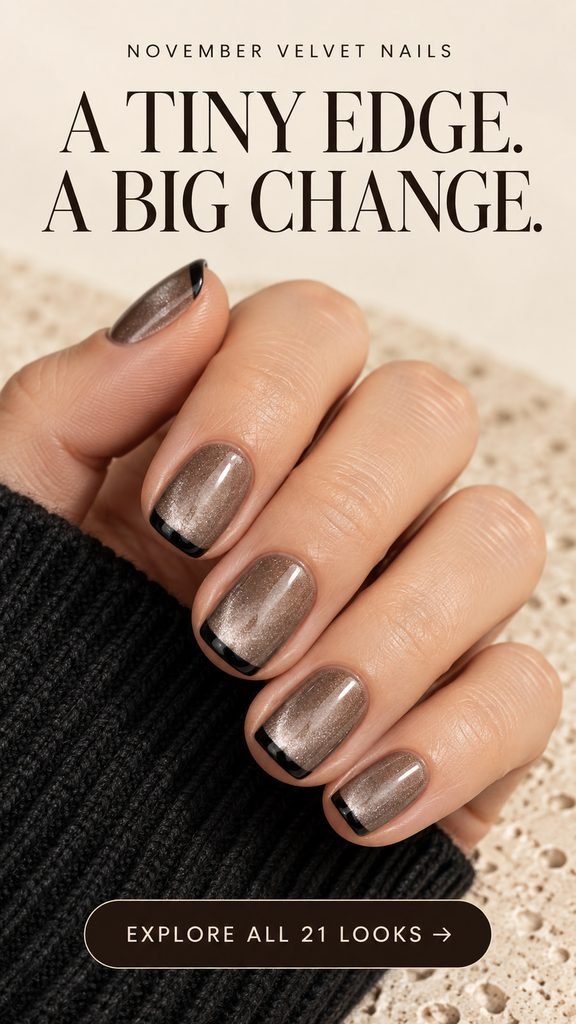
This is the understated option with a surprisingly crisp edge. Mushroom velvet gives the nail bed a soft taupe glow, and a slim ink-black tip adds definition. The contrast feels particularly good on a short rounded square, where a small amount of black can trace the shape without swallowing the neutral color.
Choose the taupe before deciding on the tip width. A silvery mushroom shade feels cool and tailored; a browner one brings more warmth. Then keep the black border narrow enough that most of the nail still reads as velvet. For very short nails, your artist can judge how much painted edge the shape can comfortably hold.
Salon note: Mushroom-taupe velvet with an extremely slim glossy black French edge. Short rounded-square shape, a broad shimmer across the base, and no extra line beneath the tip.November velvet nail design 06 / 21
6. Petrol Velvet with a Floating Gold Oval
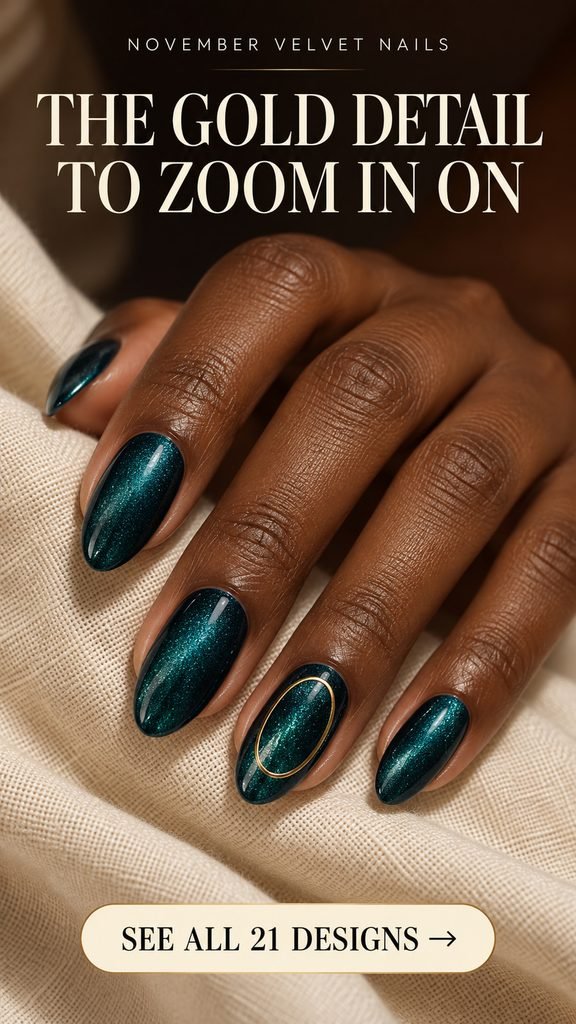
A single gold oval turns petrol velvet into something that feels like a tiny piece of jewelry. The center stays open, so the blue-green shimmer remains visible inside the outline. That open middle is the lovely part: you get the shape of an ornament while keeping the movement of the polish underneath.
One accent nail gives this idea enough space to land. Choose an oval that follows the proportions of the nail, with a comfortable margin around it. On a short shape, a smaller, simpler loop will look cleaner than a crowded frame. A painted metallic outline is the version to request if you want the design to remain visually delicate and flat.
Salon note: Petrol velvet with one fine, flat gold oval outline on the ring nail. Leave the oval center open to the shimmer, and keep all other nails free of decoration.November velvet nail design 07 / 21
7. Rose-to-Copper Velvet Fade
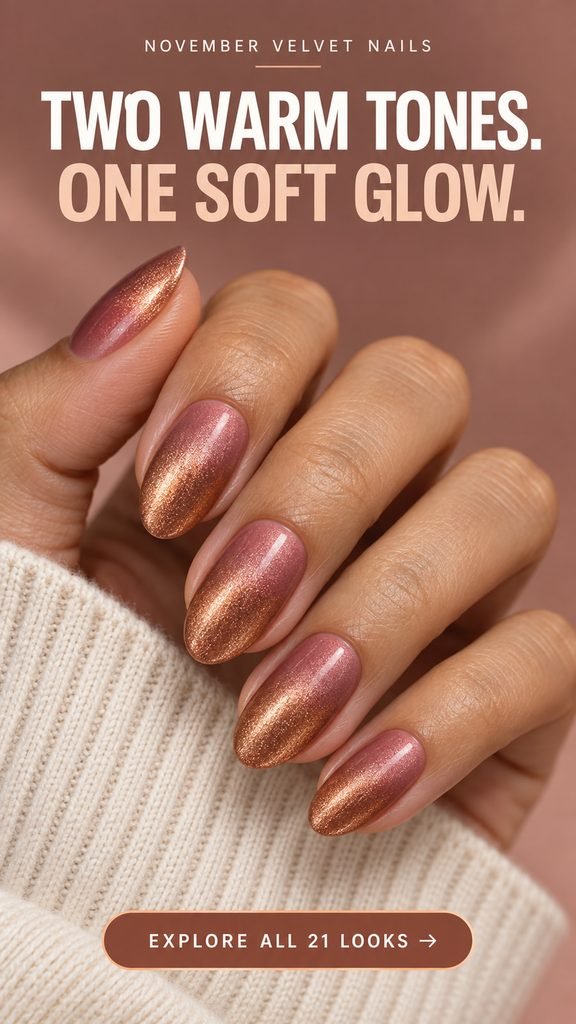
Rose and copper soften each other beautifully. The pink begins near the cuticle, the copper warms the tips, and the magnetic finish ties the transition together. It is a gentle way to wear November color if a full dark manicure feels heavier than you want. There is warmth here without a solid block of orange.
Bring this reference to an artist who is comfortable combining gradients and magnetic effects. Ask for a sample of the transition using their compatible products, because the base shades and magnetic pigment will influence the final color. On shorter nails, keep the transition uncomplicated and let the rose and copper meet softly around the middle.
Salon note: A soft rose-to-copper gradient with a wide velvet shimmer across the nail. Pink near the cuticle, copper toward the tip, and a blended transition with no hard dividing band.November velvet nail design 08 / 21
8. Pewter Velvet with Cranberry Dots
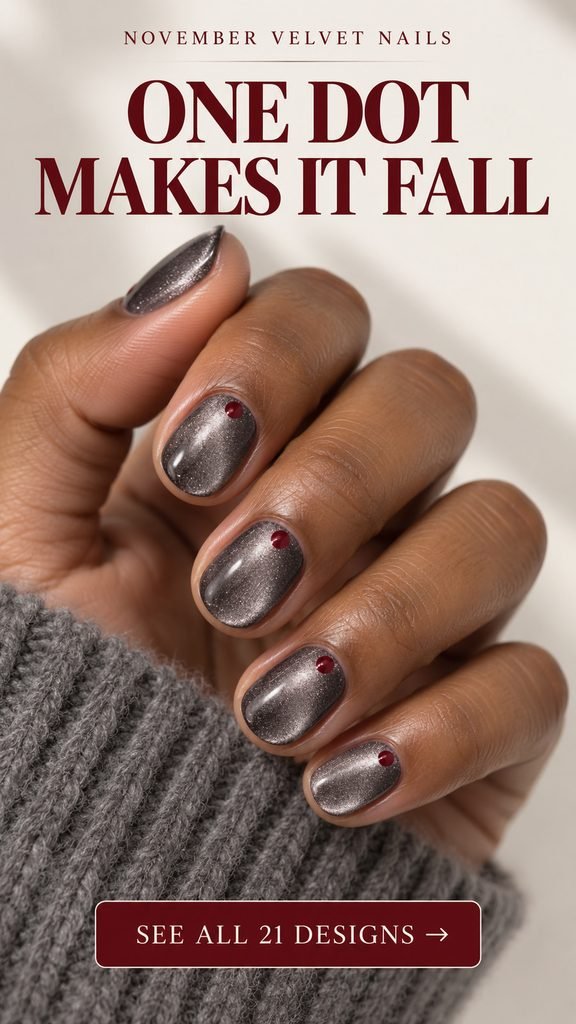
The cranberry dots are tiny, but they change the whole mood of the pewter. Without them, this would be a cool metallic neutral. With one near each cuticle, it picks up a little warmth and a clear point of interest. It is an appealing choice when you like nail art but want to see plenty of the underlying polish.
Keep each dot small and opaque so it reads clearly against the shimmer. Place it just above the cuticle area with a little breathing room, and check the scale on the smallest nail first. Short round nails suit the idea especially well. You can also use the dot on only two fingers if you prefer an even quieter version.
Salon note: Short round pewter velvet nails, with one small cranberry-red painted dot near each cuticle. Keep the dots flat, neat, and much smaller than the width of the nail.November velvet nail design 09 / 21
9. Olive Velvet Side Panels
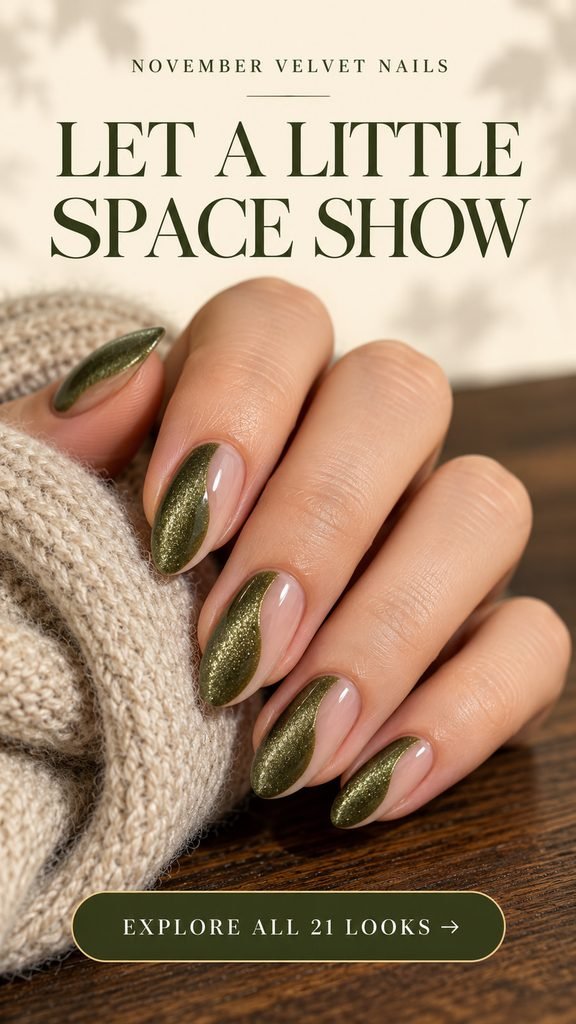
A curved olive panel lets the velvet finish share space with a sheer nude base. The result has more lightness than a full green manicure, and the long boundary line gives the design its shape. Look closely at the reference: the clear-looking area is doing as much work as the magnetic color beside it.
Decide whether you want the olive to sit on the same side of every nail or form a mirrored arrangement across your hands. Either can work; choosing in advance makes the set feel considered. On a short nail, widen the colored panel slightly if a very narrow strip would hide the velvet effect. Keep the curve relaxed rather than adding several competing waves.
Salon note: A sheer nude base with one curved olive velvet panel along the side of each nail. Leave a visible open area beside it and use one clean lengthwise boundary.Technique reference: OPI’s negative-space tutorial demonstrates a magnetic effect inside a painted shape. The olive side-panel layout shown here is an original concept.November velvet nail design 10 / 21
10. Saffron Velvet with Cocoa Half-Moons
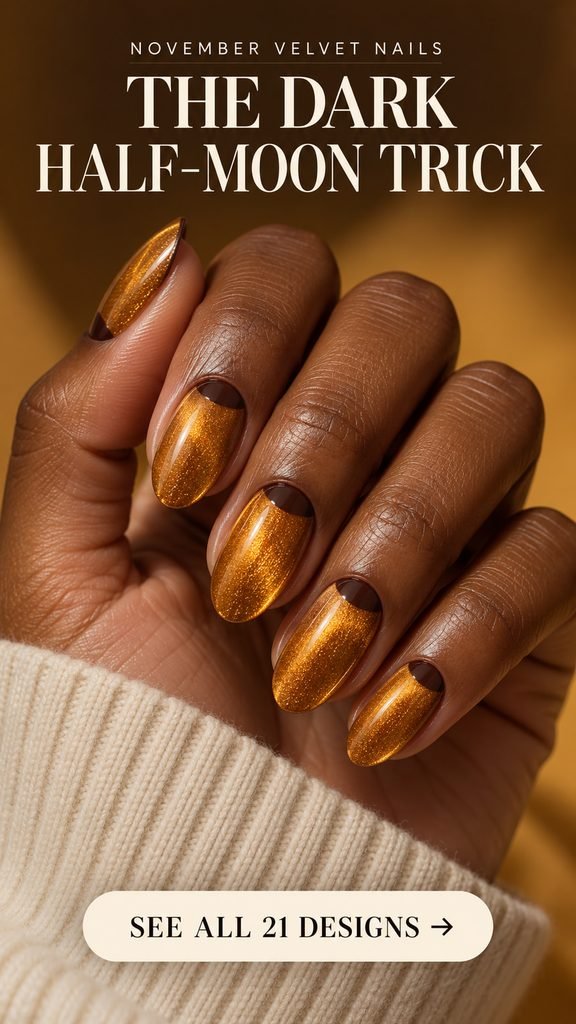
Saffron velvet brings the light; cocoa half-moons give it a darker anchor. The small brown shape sits at the cuticle, drawing attention to the base of the nail instead of the tip. It is a warm, graphic combination with just two colors, so it can feel dressed up even without an intricate pattern.
The proportions are the part to watch. Keep the brown moon shallow enough that the gold still owns most of the nail. A deep cuticle shape can look heavier, especially on a shorter bed. Try this with a muted, almost mustard-toned gold if bright yellow is outside your comfort zone, and keep the cocoa comfortably darker than the surrounding shimmer.
Salon note: Saffron-gold velvet with a small opaque cocoa half-moon at each cuticle. Glossy finish, shallow brown shapes, and plenty of glowing gold left visible.November velvet nail design 11 / 21
11. Blackberry Velvet with a Blush Window
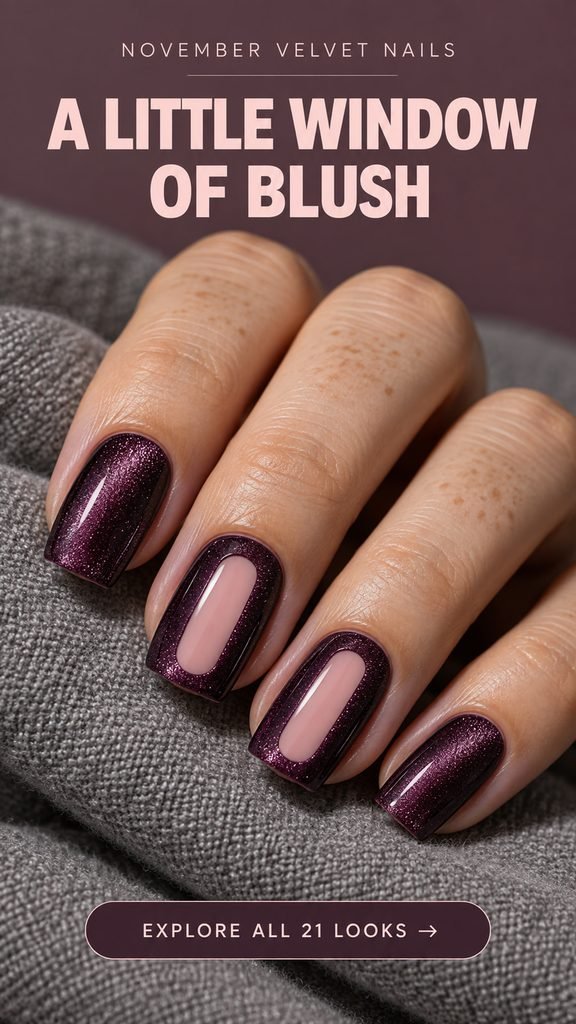
Two blush windows interrupt the blackberry velvet in the nicest way. The soft pink arches sit inside a dark purple border, giving the accent nails a slightly architectural feel. This is a good place to play with negative-space styling even if you prefer a painted, opaque center over a sheer one.
Keep the windows narrow enough to leave a visible blackberry frame on all sides. If the nail is short, reduce the height of the arch before thinning that frame too much. The blush should stay simple and smooth; extra dots or metallic lines would take attention away from the clean shape. Two accents give you the detail while the other nails carry the color.
Salon note: Blackberry velvet on the full set, with a narrow opaque blush arch window on two nails. Leave a clear purple border around each window and keep the remaining nails plain.November velvet nail design 12 / 21
12. Dusty Denim Velvet with Pearl Studs
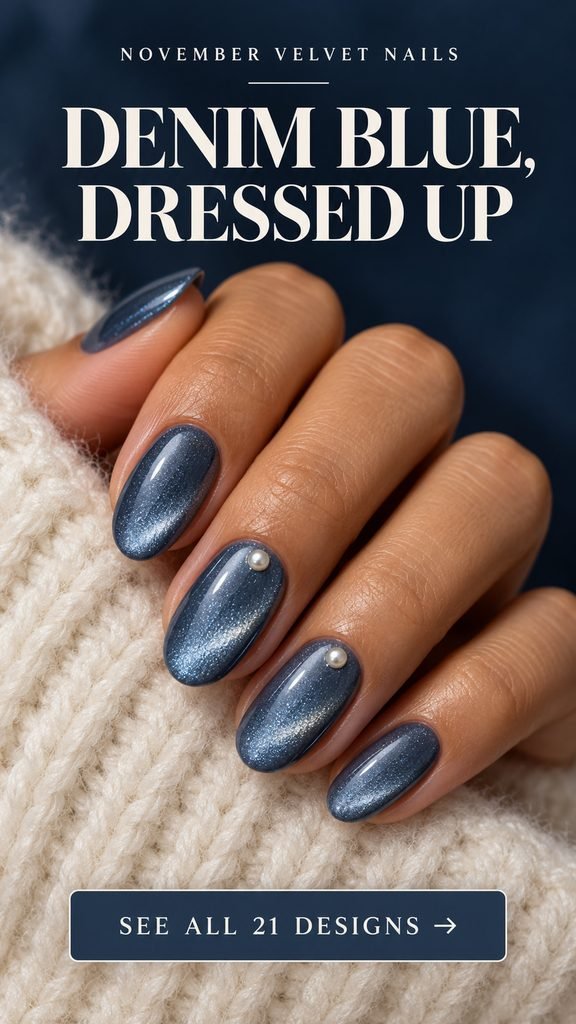
Dusty denim brings a cool, calm note to a season full of warm browns. The velvet reflection keeps the blue from looking flat, and two tiny pearl accents make the set feel a little more dressed up. It would be a lovely companion to a grey sweater, an ivory blouse, or a simple navy outfit.
Choose small pearl studs and place them near the cuticle so the blue still has room to shine. If raised embellishments bother you during daily tasks, ask for painted ivory dots as a flatter interpretation. The same design can work on short oval nails; reduce the pearl size rather than adding length just to accommodate the detail.
Salon note: Dusty denim-blue velvet with one tiny ivory pearl on each of two accent nails, placed near the cuticle. Keep the other nails plain; use painted dots if I choose a flat finish.November velvet nail design 13 / 21
13. Cinnamon Velvet with Cream Ribbons
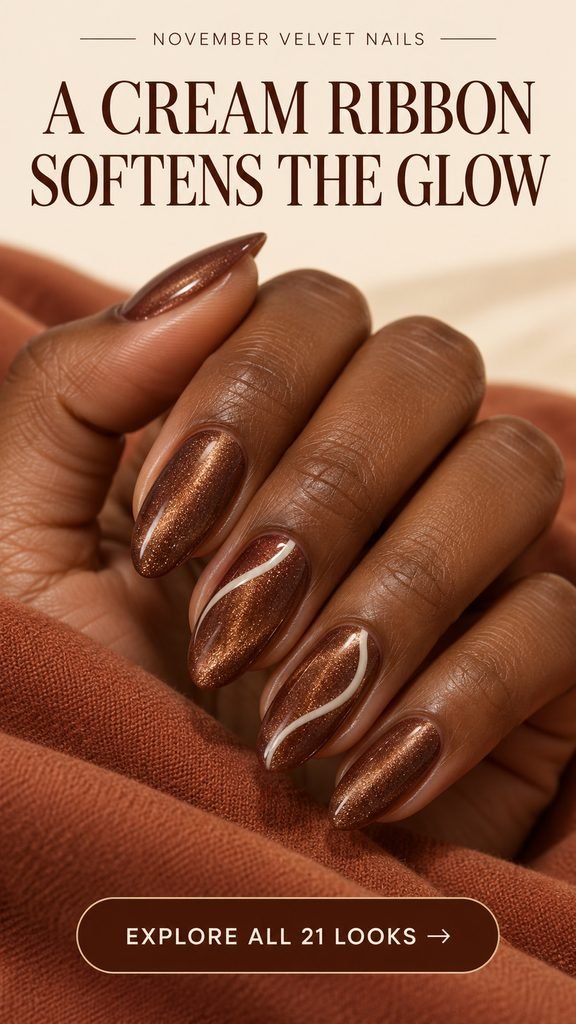
Cinnamon velvet already brings plenty of warmth. A narrow cream ribbon gives it a softer, more playful line to follow. The reference uses two accents, letting the ivory curves move across the shimmer without turning the whole manicure into a busy pattern. It has the coziness of a favorite knit, with a much smoother surface.
Ask for slender ribbons with a gentle bend and room around them. A broad white stripe could hide the part of the velvet you liked in the first place. For short nails, one shallow curve is enough; there is no need to fit a full, looping S onto every small space. An ivory shade feels quieter here than a very bright white.
Salon note: Cinnamon-brown velvet, with one fine ivory ribbon on each of two accent nails. Keep the curves light, the painted lines flat, and most of the magnetic color visible.November velvet nail design 14 / 21
14. Ruby Velvet with a Smoky Border
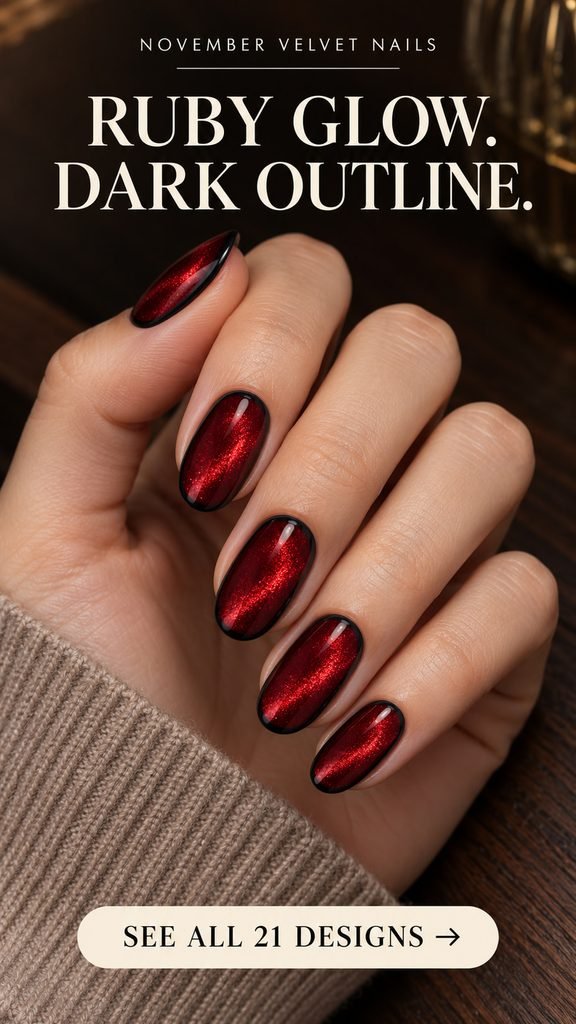
Ruby velvet becomes more graphic when a smoky outline follows the whole nail. The dark border frames the red glow, a little like a setting around a stone. It is a stronger look than a tiny accent dot, but the limited palette keeps it focused. This is a good option if you want red nails with a distinct silhouette.
Make the outline thin enough to leave a generous ruby center. On narrow nail beds, too much dark edging can crowd the color, so ask your artist to adjust the border before repeating it. A shorter oval can carry the idea well. Keep the interior free of extra symbols and let the contrast between the edge and the glow do the work.
Salon note: Ruby-red magnetic velvet with a fine charcoal border around each nail. I want a luminous red center, a smooth oval shape, and an even outline that stays narrow.November velvet nail design 15 / 21
15. Pine Velvet with Bronze Corners
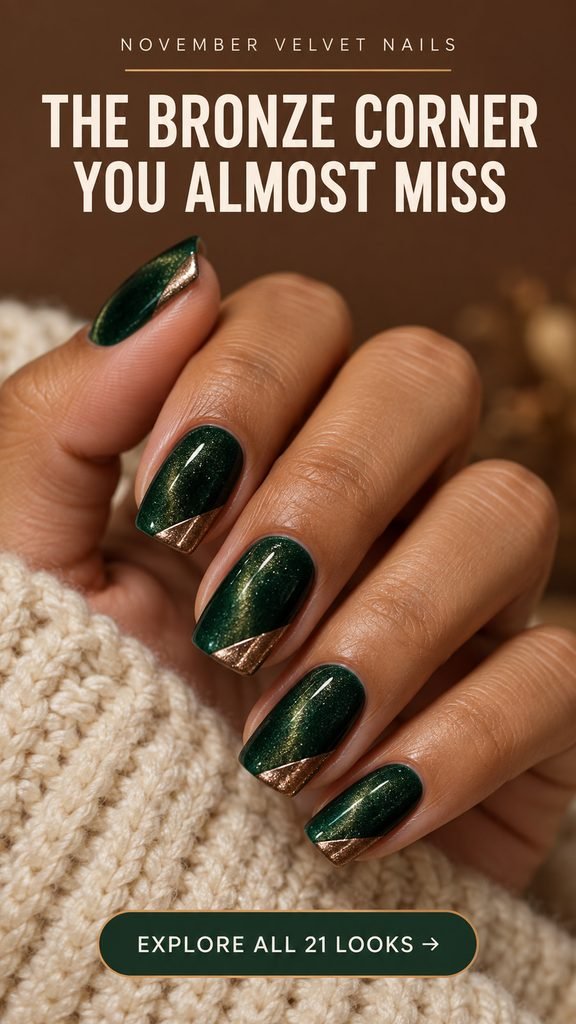
A small bronze corner changes pine velvet without covering much of it. The green supplies the depth, while the clean diagonal gives the tip a sharp little flash. Soft-square nails make that corner particularly easy to read, and the combination feels autumnal without needing a leaf, pumpkin, or other seasonal illustration.
Choose which corner will carry the bronze and keep its size consistent in spirit across the set. On a short nail, a very small triangle may be all you need. Leave a visible green area along the rest of the edge so the design keeps its off-center character. A solid metallic accent will look more defined than a loosely scattered patch of sparkle.
Salon note: Pine-green velvet with one small bronze triangle at a tip corner on each nail. Crisp diagonal borders, a soft-square shape, and most of every nail left green.November velvet nail design 16 / 21
16. Copper Velvet and Tortoiseshell Accents
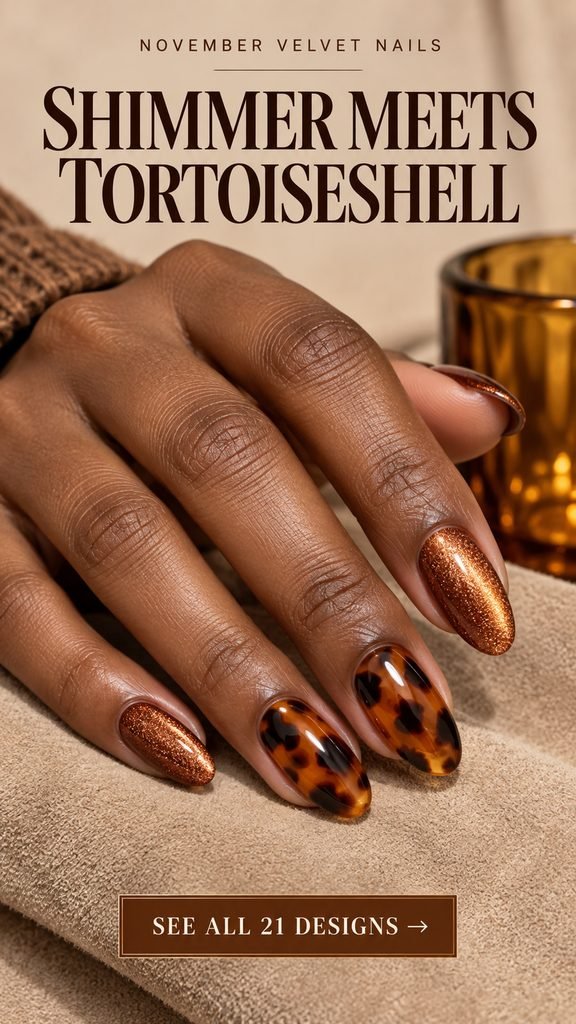
Copper velvet and tortoiseshell give you two kinds of depth in one manicure. The copper has a soft moving reflection; the amber accents have a darker, mottled pattern. Their shared warmth keeps the combination connected. Two tortoiseshell nails are enough to introduce the pattern while leaving the magnetic finish clearly visible elsewhere.
For the accents, look for irregular dark patches with translucent amber space between them. That variation gives the tortoiseshell its character. If your nails are short, ask for fewer, roomier patches rather than a dense miniature pattern. Matching the copper to the warmer parts of the amber is a useful way to keep the two finishes from feeling unrelated.
Salon note: Three copper velvet nails with two amber tortoiseshell accents. Organic dark patches on the tortoiseshell, visible amber between them, and a glossy finish across the set.November velvet nail design 17 / 21
17. Mocha Velvet with Ivory Crescent Moons
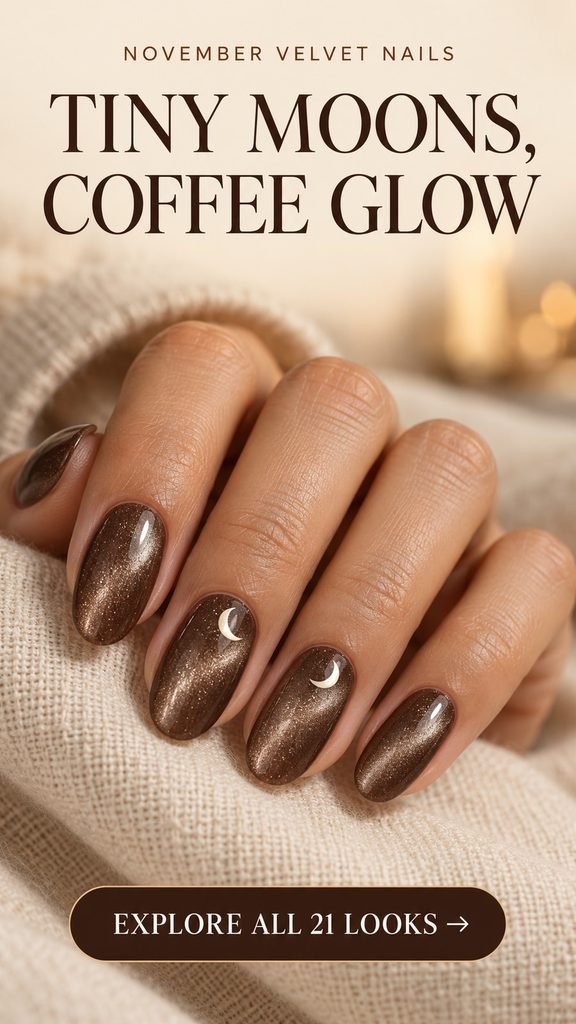
The little ivory moons make mocha velvet feel quietly celestial. They float near the upper part of two nails, leaving the softly glowing brown easy to see underneath and around them. It is a gentler evening manicure than a full starry pattern, and the coffee color keeps it grounded in a November palette.
Keep each crescent small enough that the shape is clear at a glance. On a short nail, use one moon with a simple open curve and skip any extra dots. You can ask for both crescents to face the same direction if you want a tidy repeated motif. Creamy ivory brings a softer contrast than stark white against this muted brown.
Salon note: Mocha velvet with one small ivory crescent moon on each of two accent nails. Place the moons in the upper third, keep them flat, and leave the remaining nails plain.November velvet nail design 18 / 21
18. Silver-Taupe Velvet with an Oxblood Ribbon
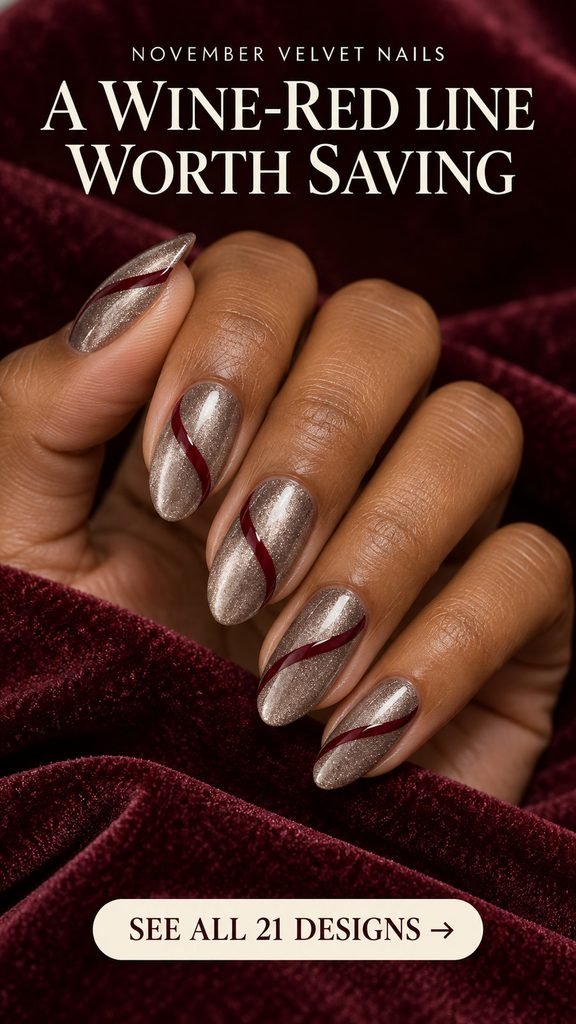
A wine-red ribbon gives silver-taupe velvet a warmer, more deliberate direction. The line travels across the nail on a gentle diagonal, so your eye follows the curve before settling on the shimmer. This is a useful middle ground if you enjoy abstract nail art but prefer a restrained palette and a smooth surface.
The ribbon can be repeated across the hand without matching every curve exactly. Keep its thickness similar, and let the placement respond to each nail shape. A shorter nail only needs a small bend from one side to the other. Make sure the red is opaque enough to remain distinct over the reflective base, then stop before adding a second competing color.
Salon note: Silver-taupe velvet with one thin oxblood ribbon crossing each nail diagonally. A gentle curve, flat painted detail, and plenty of open shimmer on both sides of the line.November velvet nail design 19 / 21
19. Plum Velvet with Matte Checkerboard Accents
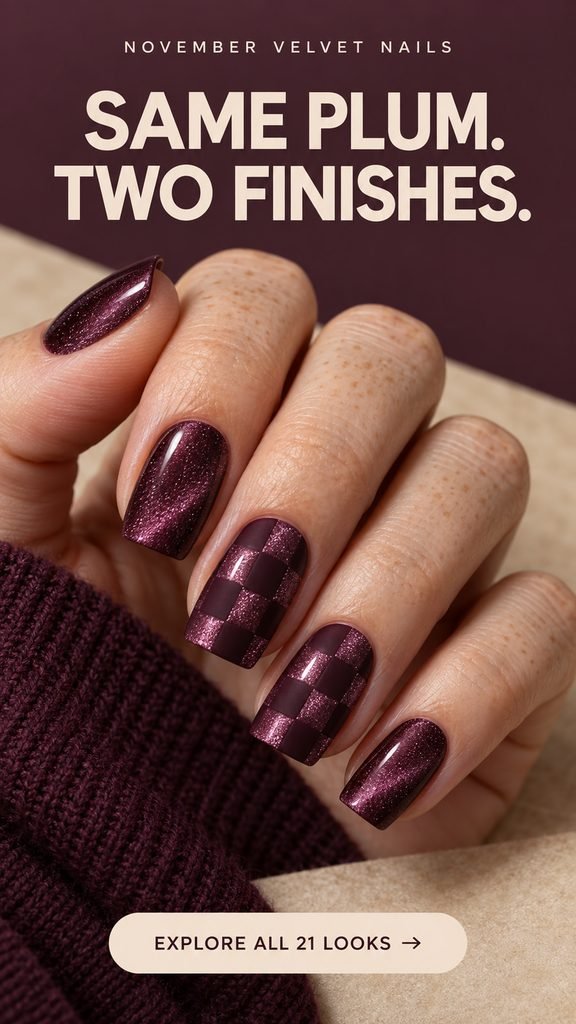
This checkerboard gets its contrast from finish as much as color. Some squares stay luminous with plum velvet; others are matte plum. The result becomes more interesting as the reflections change, because the darker-looking blocks interrupt the shine without introducing a completely new shade. Two accent nails keep the pattern from overpowering the set.
Ask your artist to plan the matte and glossy areas with a compatible finishing system. You want the distinction to survive the final finishing step. Larger checks are easier to appreciate than tiny crowded ones, especially on shorter nails, where two columns may be enough. Keep the other nails in uninterrupted plum velvet so the difference between the finishes stays obvious.
Salon note: Plum velvet with two checkerboard accents made from alternating matte plum and visible velvet squares. Use generously sized checks and preserve the separate matte and reflective finishes.November velvet nail design 20 / 21
20. A Forest-to-Fog Velvet Gradient
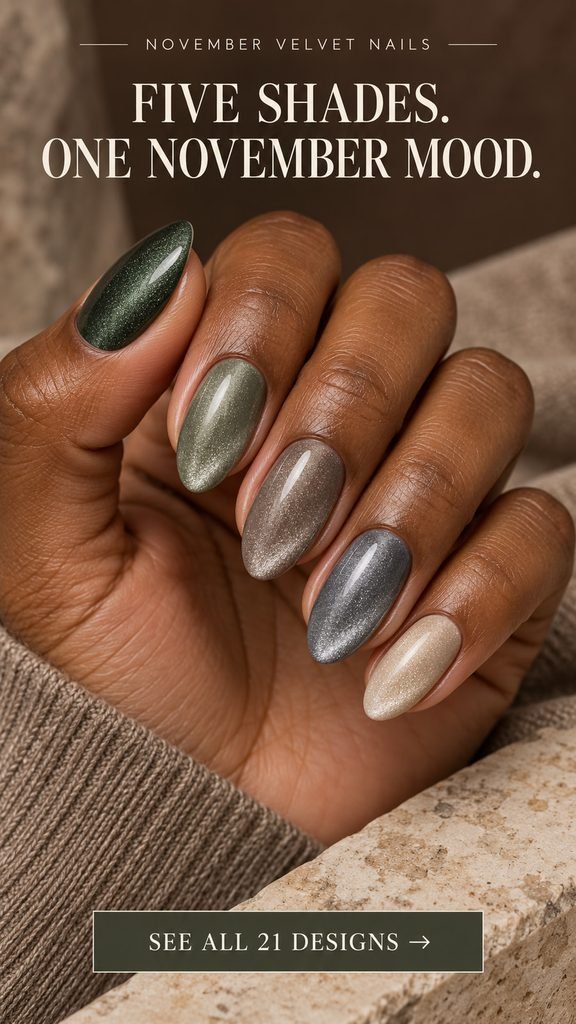
A forest-to-fog palette gives each finger its own shade while the velvet finish holds the set together. Deep pine moves through sage and taupe toward steel grey and oatmeal. It feels like a collection of November textures: evergreen branches, weathered stone, and a pale wool coat, translated into five smooth little surfaces.
Lay out the colors together before the manicure starts. The order should feel pleasing to you, and similar shimmer intensity helps the shades look related. You can also reduce the palette to three colors and repeat them if five feels too busy. Because the interest comes from the color sequence, short nails can keep the idea without needing any miniature artwork.
Salon note: One velvet shade per nail in a muted forest-to-fog sequence: pine, sage, taupe, steel grey, and oatmeal. Keep the shimmer soft and consistent, with no additional pattern.November velvet nail design 21 / 21
21. Copper-and-Petrol Velvet Diagonals
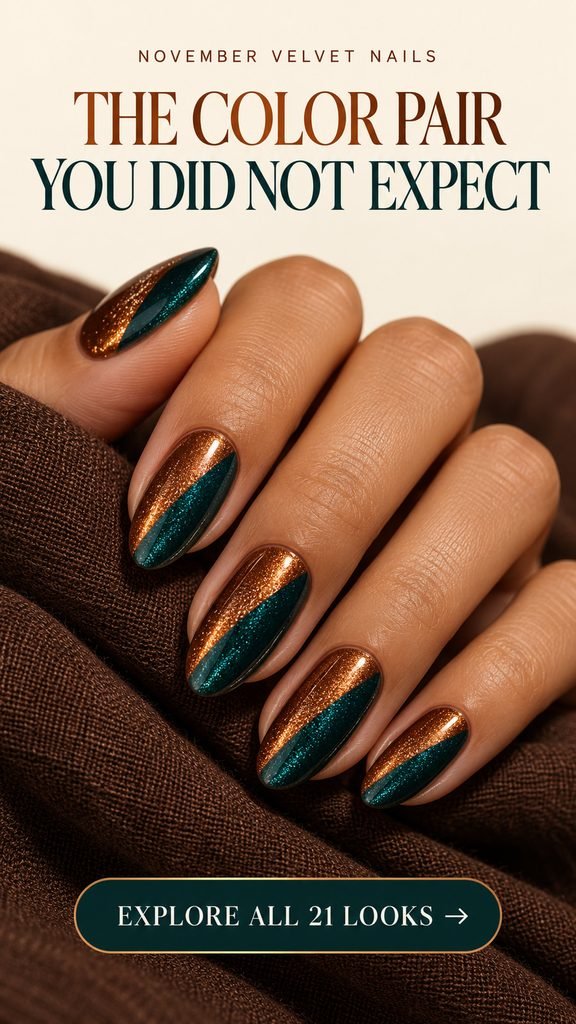
Copper and petrol teal bring the boldest color contrast in this collection. Each nail has two diagonal fields, and both carry a velvet glow. The warm side and cool side make the simple division feel unexpectedly rich. It is a strong final choice if you keep saving both earthy metallics and deep blue-green manicures.
Give this design enough space for both colors to be visible. Your artist can adjust the diagonal to suit a shorter or narrower nail, or use the split on two accents with solid velvet elsewhere. A clean meeting line is the detail to prioritize. Ask to see one finished sample so you can judge the balance of copper, teal, and shimmer before the full set.
Salon note: Copper and petrol velvet divided into two diagonal color fields on each nail. Keep the boundary crisp, both colors clearly visible, and the finish glossy without an added outline.
Choose the Part You Want to Keep Looking At
When you narrow down your saved images, look for the feature they share. You might keep choosing deep colors with an open center of light, or pale velvet with one small, dark detail. That recurring feature is useful: it tells you what to preserve if your artist needs to simplify the design for your nail length.
Bring one main reference and decide on three things before the appointment: your preferred shape, the amount of artwork, and whether any decoration should be raised or flat. For a detailed set, ask for a quote using that exact accent count. Two decorated nails and ten decorated nails can involve very different work.
Finally, take a moment with the chosen swatch. Tilt it, look at it beside your skin, and check it away from the brightest light. You should enjoy its quieter color as well as its shining moment. That is what makes a velvet manicure feel easy to wear after the close-up photo is taken.
Questions Worth Asking Before Your Velvet Manicure
Can velvet nails work on short natural nails?
Yes. A full-color velvet finish does not depend on a long free edge. Burnt honey, pewter with tiny dots, and the forest-to-fog palette are useful references for a shorter shape. If you choose artwork, simplify its scale: one clear line or a small accent often preserves the idea better than several details crowded together.
Do I have to get gel for the magnetic effect?
No. Magnetic air-dry lacquer is another option; Cirque’s magnetic-polish directions describe that application. Gel and lacquer have different setting and finishing instructions, so choose the system first. If you are booking a salon, ask which magnetic options it offers before settling on a specific design.
Why does magnetic polish sometimes look like ordinary shimmer?
Check that the formula is magnetic and that you are using its recommended magnet method while the working layer is still wet or uncured. With air-dry lacquer, the top-coat step can also matter; Cirque’s instructions include another magnet hold at that stage. Practice the brand’s method on one nail or a swatch before repeating it across the set.
Will the nails look this bright in every room?
The reflection changes with the light and viewing angle. Cirque’s color guidance notes that lighting affects how much of an effect is visible. “Candlelight” describes the warm visual mood here; these designs do not emit light. Use a real product swatch to choose your color, since the concept images are not exact polish swatches.
How can I make an intricate design easier to wear?
Keep the most detailed feature on one or two nails and use its main velvet color elsewhere. You can also request a painted interpretation of a pearl or metallic ornament when you prefer a flat surface. Agree on those changes before the set begins, so the finished design still includes the detail that made you save it.
Save the look that makes you want to turn your hand and catch the light again. That is a good place to begin your November manicure.