19 Snowflake Nail Designs for December, From Tiny Accents to Frosted Tips


Snowflake nails can be as quiet as one white detail on a navy manicure or as dressy as a crystal accent over soft pink. That is what makes them useful for December: you can choose the amount of sparkle, keep your favorite nail shape, and still get a clear winter look.
The prettiest result often comes down to spacing. Fine branches need enough background around them to stay readable. A frosted tip needs a little contrast so the flake does not disappear. A glitter base usually looks more balanced when the nail art stays simple.
These 19 snowflake nail designs for December cover tiny accents, frosted French tips, soft neutrals, winter blues, and a few evening-ready finishes. Each idea includes a clear salon request and an adjustment for shorter nails or a simpler manicure. Start with a color you enjoy wearing, then choose the snowflake placement that feels right for your hands.
1. Tiny White Snowflake on Short Navy Nails
Navy nails with one white snowflake are a strong starting point if you want winter nail art without a busy set. The dark background makes the fine branches easy to see, and the plain neighboring nails give the accent room to stand out.

Keep the snowflake compact enough that navy remains visible around its edges. A small, readable shape looks better than a larger flake with so many branches that the center becomes a white patch.
Ask for: Short rounded navy nails with one fine white snowflake on each ring finger. Keep the remaining nails glossy and undecorated.
For very short nails: Use fewer small branches rather than squeezing in every detail from the reference. You can also choose a tiny snowflake decal that fits fully inside the nail. This simple color pairing works with cream knitwear, denim, or a navy coat.
2. Sheer Pink With a Silver Snowflake
Silver snowflakes dress up a pink manicure while keeping the overall palette soft. The metallic linework is the main feature, so you do not need glitter across every nail or extra crystals beside the flake.

Decide how sheer you want the base before the art is added. Pink coverage changes with the formula and the number of coats. The reference has a softly covered pink appearance; a more translucent version will show more of your natural nail.
Ask for: A glossy pink base at your preferred level of coverage, with one delicate silver snowflake on the ring finger. Request flat metallic art or a thin decal if you prefer a smooth surface.
Make it yours: Oval nails leave room for a slightly longer snowflake. On short round nails, reduce the outline and keep the silver branches clean. Choose the pink against your own hand rather than treating one shade as everyone’s neutral.
3. Icy Blue With Floating White Flurries
Icy blue flurries feel like a little winter scene spread across two nails. One larger snowflake and a couple of smaller ones give the design movement, while scattered white dots suggest falling snow.

The different sizes matter. If every flake sits at the same height and has the same width, the set can look more like a repeated stamp. Keep enough blue between the shapes so the art stays airy.
Ask for: Glossy icy-blue nails with white snowflakes at different heights on the middle and ring fingers, plus a few small snowfall dots. Leave the other nails solid blue.
For short nails: Use one flake on each accent nail and reduce the dots. A slightly deeper powder blue can also give white art more contrast if your first color choice is very pale. Keep the snowflakes as the main detail rather than adding another holiday motif.
4. Frosted French Tips With a Side Snowflake
Frosted French tips bring the winter feeling to a familiar manicure. The softly sparkling white edge looks snowy, while a partial snowflake at the side adds detail without covering the entire nail.

The useful placement is where white meets pink. Let part of the flake extend into the pink area so its branches remain visible. Putting all the white linework over an opaque white tip can make it disappear.
Ask for: A pink-neutral base, softly frosted white French tips, and one side snowflake on the ring finger. The reference includes fine sparkle at the tips; specify whether you want that shimmer or a softer white fade.
For shorter nails: Keep the tip narrow and use a small partial flake. You can get the same mood with one crisp white French tip and a tiny side accent if a diffused finish feels too elaborate.
5. Burgundy With a Fine White Snowflake
Burgundy with a fine white snowflake feels festive without needing a whole Christmas scene. The deep red is rich on its own, and one pale accent gives it a clear winter detail.

Choose the flake size after choosing the nail shape. On a short squoval nail, a centered design with a clean margin around it is enough. Long branches that touch every edge can make the accent feel crowded.
Ask for: Glossy burgundy nails with one small white snowflake on the ring finger. Keep the art fine and leave the rest of the set plain.
A simple adjustment: If you already love a solid burgundy manicure, add just the snowflake at your next appointment. A flat decal can recreate the color story without hand-painted branches. Warm cream is another option for the art if bright white feels too sharp against your chosen red.
6. Milky White With Silver Snowflake Outlines
Milky white and silver have a soft, frosty look. The metallic snowflakes are more subtle than white art over a dark base, which makes this set appealing when you want a pale winter manicure with a little detail.

Contrast needs a quick check here. Silver can look bright under one light and blend into an ivory base under another. View a sample while moving your hand before deciding on the exact metal tone.
Ask for: Milky ivory nails with fine silver snowflakes on two accent fingers. Keep the background smooth and the silver outlines clear.
For short nails: Choose one flake per hand if two accents feel like too much. A slightly darker pewter-silver detail can improve visibility while keeping the palette quiet. Flat metallic decals are another route; ask whether the finished art will sit smoothly or have noticeable dimension.
7. Dusty Rose With Soft Snowfall Dots
Dusty rose with snowfall dots has a cozy, softer mood than icy blue. The muted pink stays familiar, while the white flake and little dots make it feel ready for a December afternoon.

Put the detailed snowflake on one nail and the dots on its neighbor. Separating them gives the set a gentle rhythm. A few dots around the flake are fine, but keep some clear space around its branches.
Ask for: Glossy dusty-rose nails, a small white snowflake on the ring finger, and sparse white snowfall dots on the middle finger. Leave the other nails plain.
Try this variation: Vary the dot size slightly and space them loosely. A rigid grid reads differently from falling snow. For a very minimal version, keep only the snowflake. You can recreate this palette with regular polish and suitable nail-art products without adding any raised detail.
8. Midnight Blue Glitter With a Snowflake Accent
Midnight blue glitter creates a dramatic backdrop for a crisp white snowflake. The sparkle gives the manicure its evening mood, and the single accent keeps the design easy to follow.

The base is already doing a lot, so choose a snowflake with readable branches. Ultra-fine white lines may get lost among bright glitter particles. A slightly clearer outline will show up without needing extra crystals or a second pattern.
Ask for: Midnight-blue sparkle nails with one opaque white snowflake on the ring finger. Keep the rest of the nails free of art.
For short nails: Use a compact flake and a fine sparkle base. If you prefer less visual texture, switch to a blue shimmer rather than large glitter. The color story stays the same, but the reflection will be quieter. This is a good reference to pair with a navy party outfit or silver jewelry.
9. Lavender Frost With a White Snowflake
Lavender frost is a lovely alternative when you want a winter color outside blue, white, and red. A pearly or softly shimmering lilac base gives the manicure a gentle glow, and one white snowflake finishes the look.

Pick the lavender before deciding on the white detail. A very pale lilac can make white art subtle; a slightly deeper lavender gives it more definition. Neither is the only right choice—decide how noticeable you want the flake to be.
Ask for: Short square lavender shimmer nails with one fine white snowflake on the ring finger. Keep the other nails simple.
Make it quieter: Choose a lavender cream base instead of shimmer. For a softer shape, round the corners into a squoval. If the snowflake looks too dense on your nail, reduce the number of small branches while keeping the main outline clear.
10. Negative-Space Snowflakes on Short Neutral Nails
Negative-space snowflakes leave most of the nail looking bare. A thin pink or beige tint gives you a quiet background, while the white accents add a small winter surprise.

This look depends on what you leave undecorated. Keep clear space around the flakes and resist filling every gap with dots. The reference uses two accents; one per hand is enough if you want an even simpler set.
Ask for: A barely-there pink-neutral base with small white snowflakes on the index and ring fingers. Use a fine outline and leave the other nails free of art.
For very short nails: Choose a single flake at a size that comfortably fits your nail bed. A sheer base still has polish on it; “negative space” describes the bare-looking areas in the design. Ask to see the coverage before the art is applied so the manicure stays as translucent as you want.
11. Emerald Nails With a Gold Snowflake
Emerald and gold give snowflake nails a warmer holiday palette. The green carries the seasonal color, while a gold flake catches the light like a small metallic ornament.

The reference includes a little green shimmer. You can keep that glow or choose an emerald cream base for a cleaner background. Either way, the gold detail should remain the main accent.
Ask for: Rich emerald nails with one fine gold snowflake on the ring finger. Confirm the green finish and whether the gold will be painted, a decal, or a dimensional embellishment.
For short nails: Use a compact gold flake with fewer tiny branches. Skip extra gold dots if the center starts to look crowded. Compare warm yellow gold with paler champagne gold against your rings or watch; the two will give this same design a different feel.
12. Matte Slate Blue With Glossy Snowflakes
Matte slate blue with glossy snowflakes has a quieter kind of detail. Instead of relying on a bright color change, the design uses the way different finishes catch the light.

The reference flakes reflect a pale, almost silvery highlight. If you want a truly tonal version, ask for glossy slate art over the matte base. If you want more visible contrast, use an icy silver-blue detail instead.
Ask for: Matte slate-blue nails with glossy snowflakes on the index and ring fingers. Decide whether the art should stay tonal or have a pale metallic highlight.
The important detail: The finish sequence needs to preserve the matte background and glossy art. Covering everything with the same final top coat changes that contrast. Check a sample in side lighting, and keep one accent per hand if you want the subtlest interpretation on short nails.
13. Silver Velvet With White Snowflakes
Silver velvet with a white snowflake feels like a dressier winter manicure. The luminous base gives the set dimension, while the pale flake adds a clear seasonal shape.
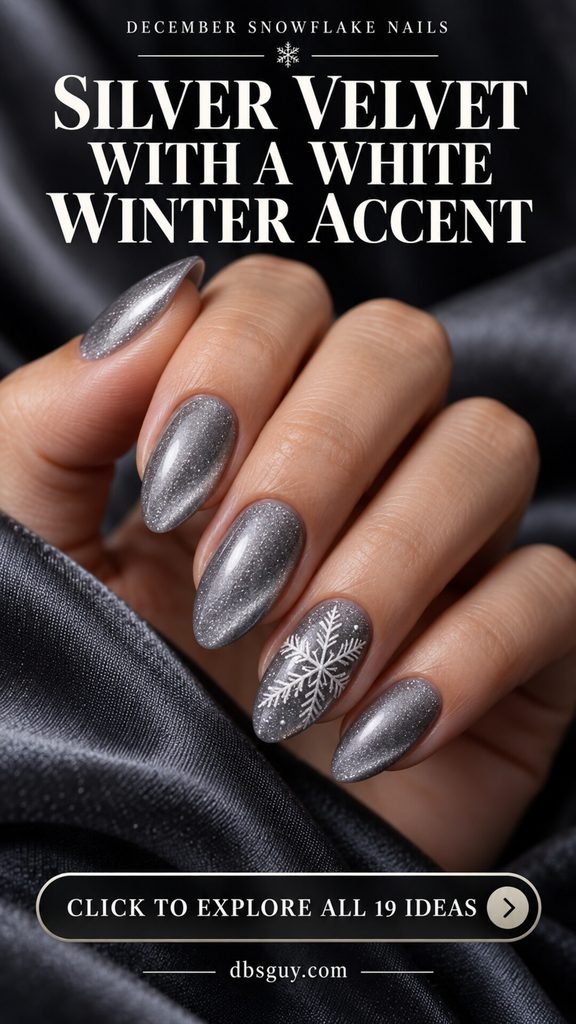
Ask for the finish by name and check a sample. Magnetic velvet is created with magnetic polish and a magnet; ordinary silver glitter or shimmer can sparkle without producing that same changing effect. A still image shows one moment rather than the movement.
Ask for: Silver-gray magnetic velvet nails with one opaque white snowflake on the ring finger. Keep the snowflake readable against the glow and leave the surrounding nails plain.
A regular-polish alternative: Use a silver-gray shimmer with the same white accent. It gives you the palette with a different finish. On short nails, reduce the flake size and keep the branches simple so the base still has room to show.
14. Red French Tips With Tiny Snowflakes
Red French tips with tiny snowflakes are a cheerful December version of a classic manicure. The red stays at the edges, so the overall set feels lighter than an all-red base.

Let the white flakes overlap the red tip and the pink-neutral area slightly. That placement makes the design look connected to the French manicure rather than sitting as a separate symbol in the middle of the nail.
Ask for: Narrow cherry-red French tips with small white snowflakes on the middle and ring fingers. Keep the other nails as plain red French tips.
For short nails: Choose one accent per hand and do not widen the red band just to fit a larger flake. A compact design that crosses the tip line is enough. If you want a darker version, use burgundy for the French edge while keeping the same placement.
15. Chocolate Brown With Cream Snowflakes
Chocolate nails with cream snowflakes have a warm, cozy color story. The dark brown gives the pale art plenty of contrast, while cream makes the detail feel a little softer than bright white.

One snowflake and a few neighboring dots keep the set from becoming a full pattern. You get the winter detail without losing the rich brown manicure underneath.
Ask for: Glossy chocolate or espresso nails, one cream snowflake on the ring finger, and a few tiny cream dots on the middle finger. Leave the remaining nails solid brown.
Make it yours: A deep espresso base creates stronger contrast; a lighter cocoa brown makes the set gentler. Try the color against your hand before deciding. For a simpler short-nail version, remove the dots and keep the single flake. This palette fits easily with oatmeal sweaters and everyday gold jewelry.
16. Pale Blue Ombré With a Snowflake Accent
Pale blue ombré makes the snowflake feel like part of a winter sky. The color moves from pink near the cuticle into blue at the tip, giving the white art a gentle backdrop.

The reference includes fine sparkle through the fade. Choose whether you want that extra shimmer or a plain gradient. A smooth transition matters more here than adding lots of decorations.
Ask for: A pink-to-icy-blue ombré with one white snowflake placed mostly over the blue area on the ring finger. Confirm how high the blue should travel up the nail.
For shorter nails: Keep the fade soft and use a smaller snowflake. The blue can occupy roughly the upper part of the nail without a hard stripe between colors. If you prefer a simpler service, a solid powder-blue base with the same accent gives you the color pairing without the gradient work.
17. Black Nails With a Cropped Snowflake
A cropped snowflake turns black nails into a graphic winter set. Only part of the flake is visible, which gives the accent a different look from a centered, complete design.

Placement is the whole idea. The snowflake sits near the side edge, with its branches continuing visually beyond the nail. The art itself still stays within the nail; it should not spill onto the skin.
Ask for: Glossy black nails with one oversized partial white snowflake on the ring finger. Put its center near a side edge and crop some branches deliberately.
For short nails: This approach can give you larger, clearer linework without trying to fit a whole detailed flake into a tiny space. Leave plenty of black showing on the opposite side. Skip extra snowfall dots so the cropped shape remains the focal point.
18. Champagne Shimmer With a Pearl-Center Snowflake
A tiny pearl at the center of a snowflake gives champagne shimmer a delicate party detail. The pale branches frame the pearl, and the plain neighboring nails let the accent stand out.

Keep the embellishment modest. A large pearl can hide the intersection and make the snowflake harder to recognize. Ask to see the size against your actual nail before it is attached.
Ask for: Champagne shimmer nails with one fine white snowflake on the ring finger and one tiny ivory pearl at its center. Keep the other nails undecorated.
For a flatter version: Replace the pearl with a painted cream dot or a flat pearl-effect decal. You keep the color arrangement with less dimension. On short nails, reduce the flake outline first, then choose a center detail that does not cover the branches. Discuss the attachment and removal method for any raised embellishment.
19. Clear-Pink Nails With a Crystal Snowflake
A crystal snowflake gives a pink manicure a jewelry-like finish. The pale base stays quiet, while the sparkling accent becomes the centerpiece of the set.

The reference combines slender metallic linework with tiny crystal details. That is more intricate than a painted flake, so send the image when booking and ask whether the salon has suitable materials and enough nail-art time.
Ask for: A glossy pink base with one small crystal snowflake on the ring finger. Check the intended width, height, and placement before the embellishment is secured.
For your daily routine: Mention gloves, knits, or anything that regularly brushes against your nails. A flat silver snowflake decal can offer a similar color story if you prefer a smoother surface. For short nails, reduce the overall design rather than letting its arms extend beyond the nail edges.
How to Make a Snowflake Design Look Clear on Your Nails
Choose contrast before complexity. White art over navy, burgundy, or chocolate is easy to see. White over milky ivory is much quieter. If you love a pale base, try silver linework or a slightly deeper base shade. Check the combination on a sample rather than judging only from a brightly lit reference photo.
Fit the branches to the nail. A snowflake can have a simple outline or lots of tiny branching detail. On short or narrow nails, simplify the little branches and keep some background visible between them. Enlarging every detail from a reference can create a dense center. A readable flake is more useful than squeezing in a complicated pattern.
Pick one focal point. One snowflake, a cropped side flake, or a few small flurries each creates a different layout. Choose that arrangement first, then decide whether dots, shimmer, or a frosted tip would help. A glitter base does not automatically need crystals, and a detailed snowflake does not need another holiday motif beside it.
How to Try Snowflake Nails With Regular Polish
Start with one accent nail and a solid background. A thin nail-art brush or a small snowflake decal lets you explore the idea without combining several techniques in the same attempt. Follow the directions for your base, color, art products, and top coat, and allow each layer to be ready for the next step.
For a simple painted flake, Essie’s snowflake tutorial starts with crossing lines, adds short diagonal strokes, and uses small dots at the ends. Extra branches are optional. Practice the spacing on a nail tip first, then keep the shape small enough to fit your accent nail. A simple stylized flake is a useful starting point before attempting dense branching detail.
Use a small amount of art polish and check the center before adding more strokes. If the lines are running together, try fewer branches or a less loaded brush on your next practice attempt. Keep the surrounding dots smaller than the main snowflake so they read as snowfall rather than another competing pattern.
For stickers, follow the decal’s own instructions. In OPI’s lacquer sticker guide, color is dry to the touch before the sticker is placed with tweezers. The sticker is pressed flat from the center outward, then its edges are sealed with top coat. That is guidance for thin stickers; a pearl or crystal embellishment needs the attachment method intended for that product.
What to Confirm With Your Nail Technician
Send the design before your appointment if it involves ombré, magnetic velvet, very fine linework, or raised embellishments. Ask whether it needs extra service time, and get a quote for the number of accent nails you want. The same photo can be adapted in several ways, so be clear about the parts you want to keep.
A useful request is: “I’d like this color pairing and snowflake placement on my usual short oval nails, with flat art on one finger per hand.” For a crystal or pearl version, discuss the size, height, attachment, and removal. For French tips, confirm the width of the band. For a gradient, confirm where the color fade should begin.
Snowflake Nails: Frequently Asked Questions
Can I wear snowflake nail art on very short nails?
Yes. A single compact flake on a plain background is a useful option. Keep the smaller branches simple and leave a clean margin around the design. The navy, burgundy, neutral, and chocolate looks above all work with a short shape. A cropped side snowflake is another way to use larger linework without fitting a whole flake onto the nail.
Which design is easiest to start with at home?
A small white snowflake decal over a solid dark color removes the need to paint matching branches. Choose a decal that fits inside the nail and follow its instructions. If you want to practice painting, begin with one simple flake and leave the rest of the nails plain. Add dots or a gradient only once you are happy with the first design.
Why is my white snowflake hard to see?
The background may be too pale, the lines may be too fine, or the glitter beneath them may be visually busy. Try a deeper base, a clearer white outline, or a simpler snowflake with more space between branches. Over a white French tip, move part of the flake onto the pink-neutral area so the shape has a contrasting background.
What does “frosted” mean in a nail design?
It describes the look rather than one standard product. A frosted manicure might use a softly faded white tip, fine shimmer, a pearl finish, or matte texture. Show the reference and name the part you like. In the French look above, the frost is concentrated at the tips rather than covering the whole nail.
Is silver velvet the same as silver glitter?
No. OPI’s magnetic velvet explanation describes magnetic shimmer that creates an effect changing with the viewing angle. Glitter can sparkle without that magnet-shaped movement. Either finish can carry a white snowflake, but ask to see the actual product’s effect if you want a specific velvet result.
Are snowflake nails only for Christmas?
They can work throughout winter. Navy, icy blue, lavender, silver, and soft neutral versions have a wintry mood without a specifically Christmas symbol. Red French tips or emerald-and-gold flakes make the palette feel more festive. Choose the version that suits the occasions you have planned and the colors you like to wear.
If you are still deciding, begin with a base color you already love and add one snowflake. You can enjoy the winter detail without changing your usual shape, length, or preferred amount of sparkle.
Technique References
Application guidance was checked against Essie’s snowflake nail-art tutorial, OPI’s lacquer sticker tutorial, and OPI’s magnetic velvet explanation. The color pairings, placement suggestions, and salon briefs in this article are original styling ideas.
About the images: These are AI-generated manicure inspiration images, not photographs of tested salon work. Use them to discuss color, finish, placement, and scale; your technician can adapt the design to your nails and the products they use.