Start with the rainbow stripes if you want the simplest stringing, or the checkerboard if you want to practice color changes. These 12 pony bead wall hanging patterns include exact bead counts and top-to-bottom column recipes, so you can make a small tapestry without drawing your own design first.
All 12 use individual strands attached to a wooden dowel. You will make a flexible curtain of adjacent beads, not an interwoven fabric. These are original digital patterns with checked counts; they have not been physically craft-tested. The AI-generated images illustrate the motifs and styling rather than document finished projects. Follow the written sequences for the exact small-panel designs.
Choose Your First Pattern
Rainbow stripes have no color changes within a strand. Checkerboard, chevron, and diamond introduce easy repeats. The heart and block daisy use simple silhouettes; the mushroom, moon, landscape, wave, tulip, and initial need closer attention to individual columns.
The checkerboard uses 240 beads, the rainbow uses 288, and each remaining design uses 360. Those totals include every background bead, but not optional decorations or replacements.
Supplies and Size: Make a Small Panel First
- Matching barrel pony beads: Use one size and shape throughout. Sort the quantities listed under your chosen pattern, plus a few extras in each color.
- Low-stretch cord: Try a soft cotton or braided polyester cord that passes easily through your beads. Test a short piece before cutting the full set; a cord that fits the hole can still make a stop knot too small to hold.
- A smooth wooden dowel: For these small panels, an approximately 8-inch dowel gives room at both ends for a hanging cord. Choose a sturdy, unsplintered piece.
- Scissors, ruler, removable tape, and shallow sorting dishes. A blunt needle is optional if your cord and the needle’s eye fit through the holes together.
- A separate hanging cord and suitable wall hardware. Choose the hardware after weighing the finished hanging, and follow its instructions for your wall surface.
For an estimate, suppose each bead is 9 mm wide and 6 mm tall with its hole vertical. A 15-column × 24-bead panel would measure about 5.3 × 5.7 inches before gaps, knots, and the dowel. The 12-column checkerboard is about 4.3 × 4.7 inches; the rainbow is about 4.3 × 5.7 inches. Measure your actual beads because packages and shapes differ.
To check the estimate, put 10 beads side by side and measure their width. Then thread 10 onto a cord and measure their stacked height. Divide each measurement by 10, then multiply by the pattern’s columns or rows. This also shows why a square pixel chart can look wider and shorter when made with barrel beads.
For more on the basic column approach and bead proportions, see MakeBead’s pony bead pattern guide.
How to String These Wall Hangings
- Make a sample strand. Try one 18-inch cord for a standard-size panel here. Tie one end around the dowel, leaving a short tail beside the attachment knot. Test a round turn secured with two half hitches: wrap around the dowel, then make two successive hitches around the long hanging part. Pull firmly. If it slips on your cord or dowel, change the attachment before continuing.
- Test the bottom stop. Thread several beads onto the long end and form a double-overhand stop knot underneath: make a loop, pass the end through twice, and tighten it. Tug the beads gently against it. If they pass over the knot, use a bulkier knot or a more suitable cord; do not rely on an untested knot hidden in a large hole.
- Cut the remaining strands to match your successful sample. Allow extra length if you use bigger beads, a thicker dowel, longer fringe, or a different attachment. For 15 strands at 18 inches each, set aside 7.5 yards of cord, plus a separate hanging cord.
- Mark the column positions. Use removable tape along the dowel and label positions from left to right. Space cord centers about one bead-width apart, with enough clearance that neighboring beads do not push sideways. Keep the dowel level while working.
- Read one column from top to bottom. Add its beads in the listed order, sliding each toward the dowel. Include every background bead. The first bead you thread is the top bead, not the bottom one.
- Set the top height and secure the bottom. Keep the gap between dowel and first bead the same on all strands. Slide the beads together, then secure the tested stop knot directly under the last bead. Check the count and color order before tightening fully. Leave a tail rather than trimming flush.
- Repeat, then hang and check. Keep strands in their numbered positions. Tie a separate hanger securely near both ends of the dowel. Let the panel hang over a clear work surface, inspect every knot and alignment, and trim the tails evenly only after you are satisfied.
Keep small beads and loose cords away from young children and pets. This is decorative wall art, not a toy or crib decoration. Display it where it cannot be pulled down, and recheck the knots if you move it.
How to Read the Color Recipes
Each letter is a color; the number after it is how many beads to add. For example, I5 → T4 → I15 means 5 ivory beads, then 4 terracotta beads, then 15 ivory beads. That makes one 24-bead strand. The arrows show the order you thread, from the top toward the bottom.
“Columns 1, 15” means make two separate strands with that same recipe and place them at the far left and far right. It does not mean join the strands together. Count columns while facing the front of the finished design. Every letter represents a bead—there are no skipped spaces.
1. Sage Checkerboard
If you want a first project that makes mistakes easy to spot, choose this checkerboard. Each check is three columns wide and five beads tall, giving it a roughly square appearance with standard barrel-shaped beads. Sage and ivory keep the pattern quiet enough for a small gallery wall.
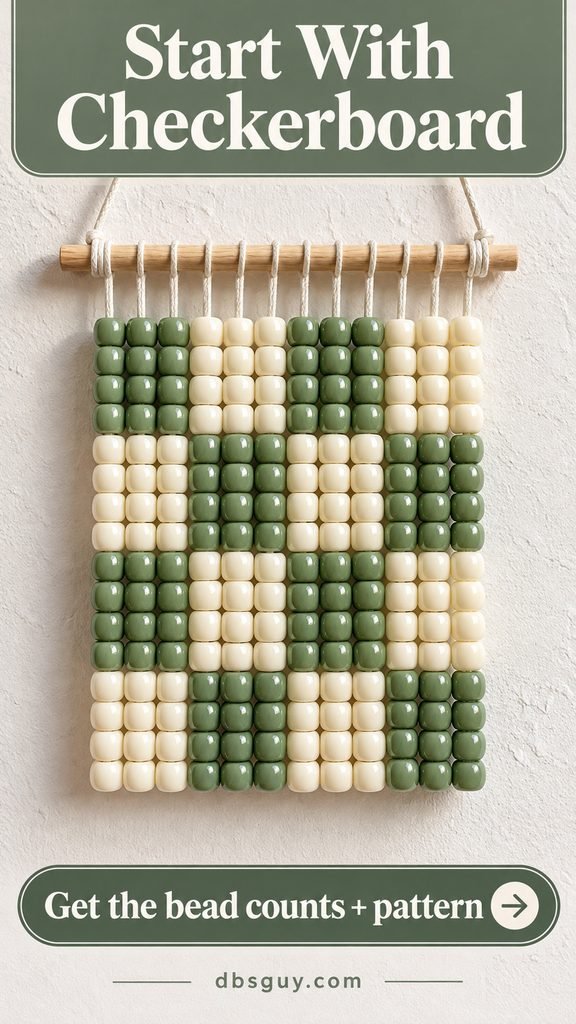
Panel: 12 columns × 20 beads per strand; 240 beads total.
Color key and exact counts: S = sage (120); I = ivory (120).
Thread each listed column from top to bottom:
- Columns 1, 2, 3, 7, 8, 9: S5 → I5 → S5 → I5.
- Columns 4, 5, 6, 10, 11, 12: I5 → S5 → I5 → S5.
Complete columns 1–3 before moving on. Their color changes should sit at exactly the same heights; if they do not, fix the top gaps or bead-size mismatch before repeating the group.
2. Rainbow Stripes
These six vertical stripes are the least fussy pattern in the collection: each strand uses just one color. It is a good choice when you want to practice attaching cords and lining up the bottom edge without stopping for color changes.

Panel: 12 columns × 24 beads per strand; 288 beads total.
Color key and exact counts: R = coral (48); O = apricot (48); Y = mustard (48); G = sage (48); B = blue (48); L = lavender (48).
Thread each listed column from top to bottom:
- Columns 1, 2: R24.
- Columns 3, 4: O24.
- Columns 5, 6: Y24.
- Columns 7, 8: G24.
- Columns 9, 10: B24.
- Columns 11, 12: L24.
Sort out 48 beads of each color before starting. A mixed tub may contain plenty of beads overall but too few in one shade. Replace an entire stripe with a color you already have instead of introducing a random patch halfway down.
3. Terracotta Chevron
One terracotta V gives a neutral panel a clear focal point. The four-bead band steps lower toward the center, then rises again. It works well beside simple framed prints because the shape reads without needing a busy background.
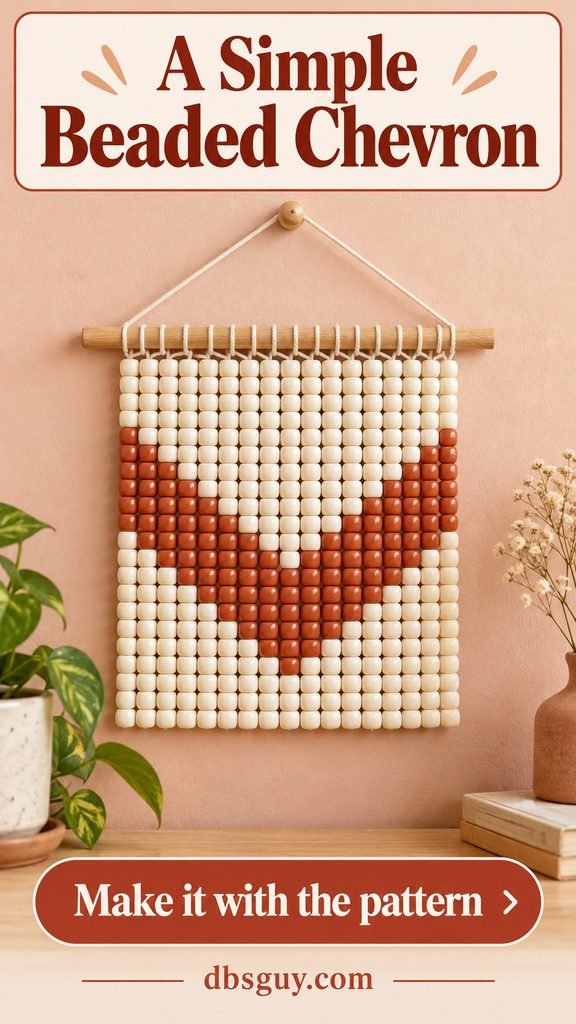
Panel: 15 columns × 24 beads per strand; 360 beads total.
Color key and exact counts: I = ivory (300); T = terracotta (60).
Thread each listed column from top to bottom:
- Columns 1, 15: I5 → T4 → I15.
- Columns 2, 14: I6 → T4 → I14.
- Columns 3, 13: I7 → T4 → I13.
- Columns 4, 12: I8 → T4 → I12.
- Columns 5, 11: I9 → T4 → I11.
- Columns 6, 10: I10 → T4 → I10.
- Columns 7, 9: I11 → T4 → I9.
- Column 8: I12 → T4 → I8.
The left and right halves share the same sequences. Make matching pairs together and label their positions; the center strand belongs in column 8. Reversing the direction on just one side would break the V.
4. Forest Diamond
The forest-green diamond is a useful next step after stripes. Its outline grows toward the center and then narrows again, so you get practice changing colors without managing a detailed picture. Keep the background pale to preserve the stepped edges.
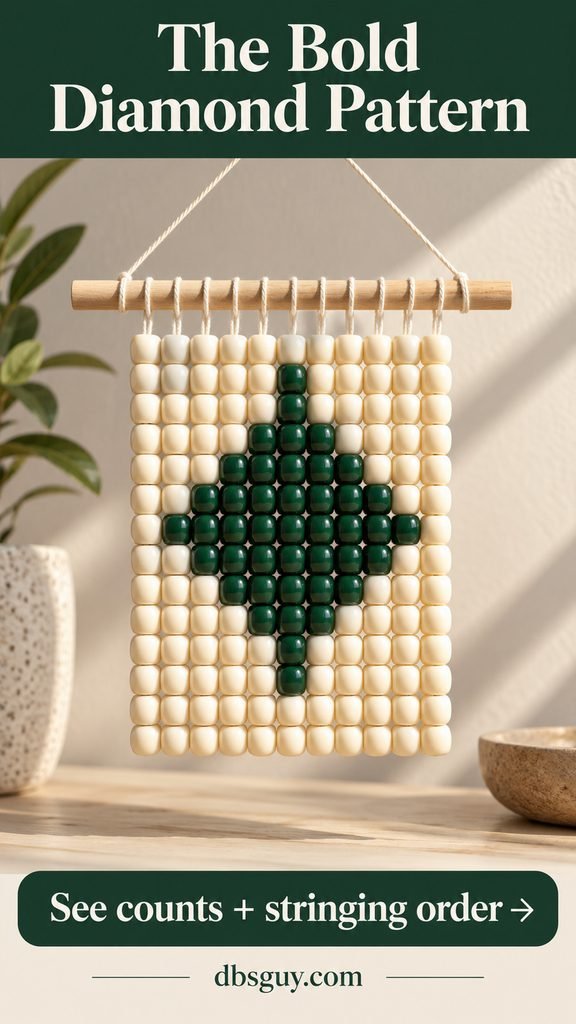
Panel: 15 columns × 24 beads per strand; 360 beads total.
Color key and exact counts: I = ivory (246); F = forest green (114).
Thread each listed column from top to bottom:
- Columns 1, 2, 14, 15: I24.
- Columns 3, 13: I10 → F4 → I10.
- Columns 4, 12: I9 → F6 → I9.
- Columns 5, 11: I7 → F10 → I7.
- Columns 6, 10: I6 → F12 → I6.
- Columns 7, 9: I4 → F16 → I4.
- Column 8: I3 → F18 → I3.
Check the horizontal centerline as you work; a diamond makes even a small vertical shift easy to see. For a larger version, double every column and every bead count together, rather than stretching the spacing between strands.
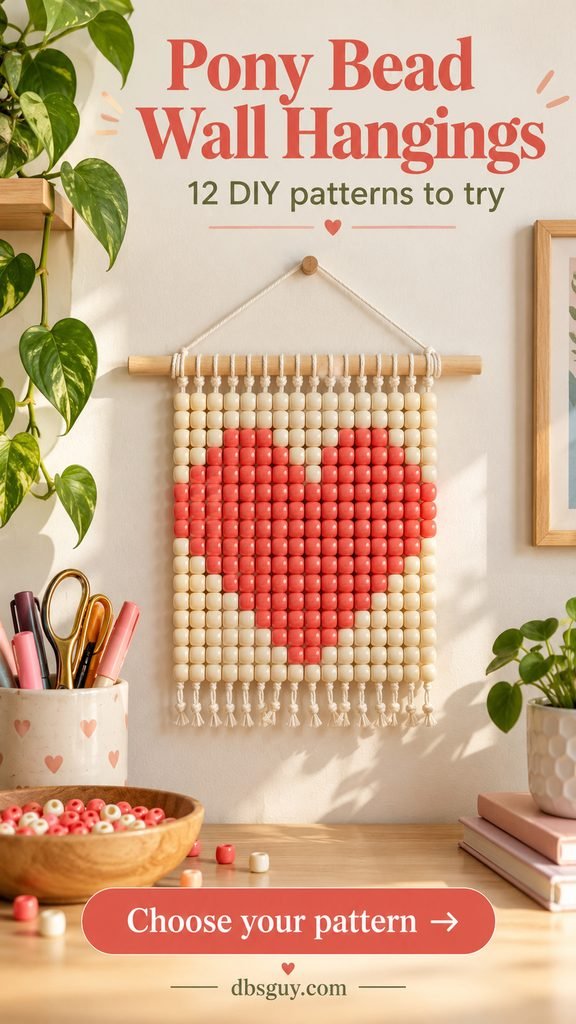
5. Coral Pixel Heart
A coral heart makes a personal gift without adding a name or date. The split at the top and the taper at the bottom do the work, so two contrasting colors are enough. The counted design finishes at the heart’s bottom point rather than adding another background border.
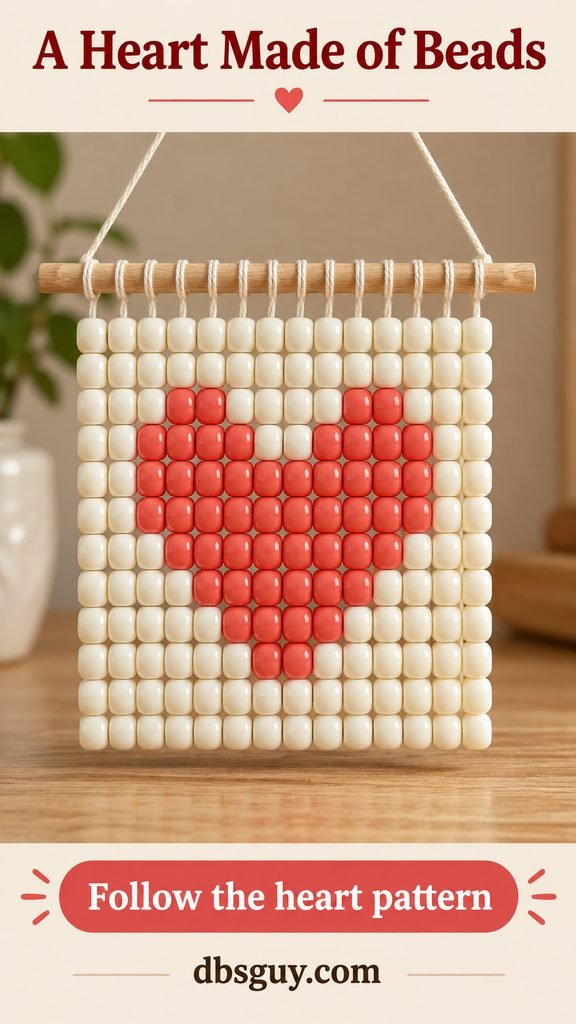
Panel: 15 columns × 24 beads per strand; 360 beads total.
Color key and exact counts: I = ivory (188); R = coral red (172).
Thread each listed column from top to bottom:
- Columns 1, 15: I24.
- Columns 2, 14: I6 → R6 → I12.
- Columns 3, 13: I4 → R10 → I10.
- Columns 4, 12: I2 → R14 → I8.
- Columns 5, 11: I2 → R16 → I6.
- Columns 6, 10: I4 → R16 → I4.
- Columns 7, 9: I6 → R16 → I2.
- Column 8: I8 → R16.
Keep columns 7–9 in their correct order: they define the notch and point. If you want more ivory beneath the heart, add the same two ivory beads to every column and add 30 ivory beads to the shopping count.
6. Lavender Daisy
This is a block-style daisy: four broad white petals around a golden center on lavender. The simplified shape suits a tiny panel better than a flower with many narrow petals, which would need a larger grid to stay distinct.
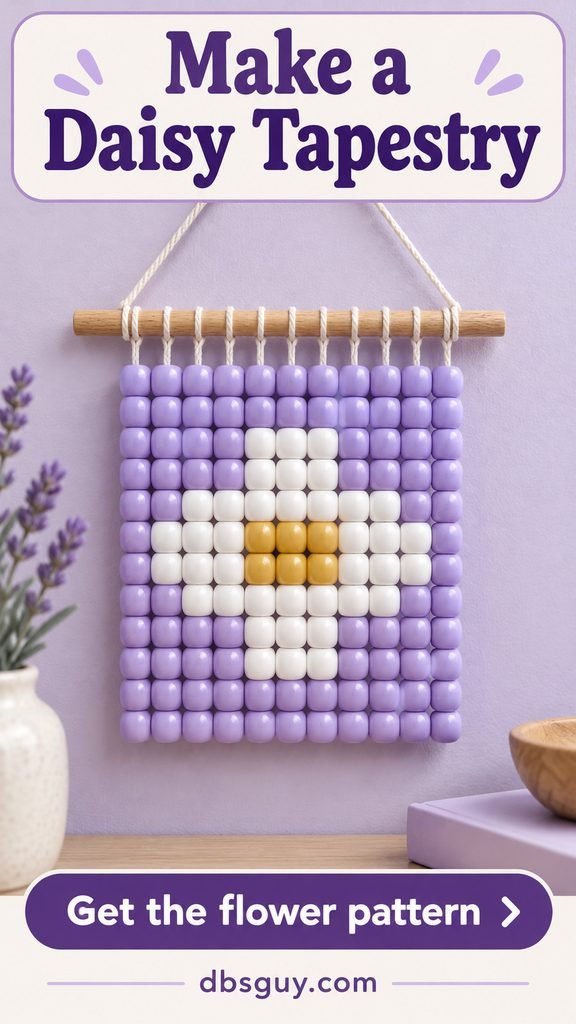
Panel: 15 columns × 24 beads per strand; 360 beads total.
Color key and exact counts: L = lavender (276); W = white (66); Y = gold (18).
Thread each listed column from top to bottom:
- Columns 1, 2, 3, 13, 14, 15: L24.
- Columns 4, 5, 6, 10, 11, 12: L9 → W6 → L9.
- Columns 7, 8, 9: L4 → W5 → Y6 → W5 → L4.
Use opaque white beads for the petals. Clear beads would let the wall color show through and weaken their contrast against lavender. The center is three columns wide and six beads tall; keep that rectangle aligned before judging the flower’s shape.
7. Spotted Mushroom
A red cap, three ivory spots, and a broad stem make this mushroom recognizable without tiny outlines. The sage background carries the woodland mood, while the shared ivory color keeps the supply list to three shades.
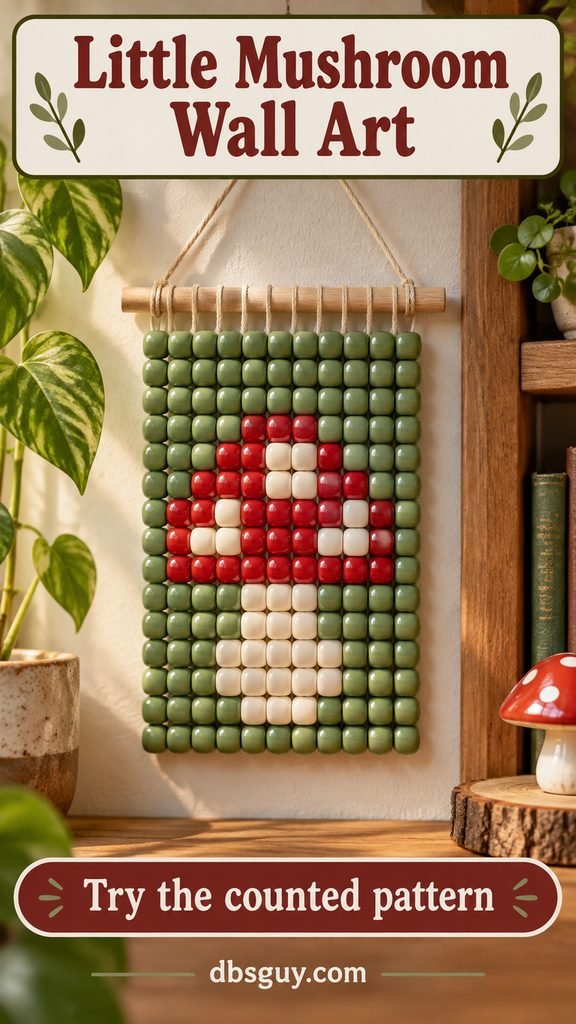
Panel: 15 columns × 24 beads per strand; 360 beads total.
Color key and exact counts: S = sage (236); R = red (72); I = ivory (52).
Thread each listed column from top to bottom:
- Columns 1, 15: S24.
- Columns 2, 14: S9 → R4 → S11.
- Columns 3, 13: S8 → R5 → S11.
- Column 4: S7 → R4 → I2 → S11.
- Column 5: S6 → R5 → I2 → S11.
- Columns 6, 7: S5 → R2 → I2 → R4 → I8 → S3.
- Columns 8, 9: S5 → R8 → I8 → S3.
- Column 10: S5 → R4 → I2 → R2 → I8 → S3.
- Column 11: S6 → R3 → I2 → R2 → S11.
- Column 12: S7 → R6 → S11.
Do not make the spots more regular as you string: their staggered placement is part of the pattern. Check the cap-to-stem transition before securing each cord, especially near the outer edges where the background continues beneath the cap.
8. Crescent Moon
The crescent uses only navy and ivory, but it needs more careful counting than a stripe. Its opening faces right, with a broad curved left edge. Leave the navy field plain so the small crescent has room to read clearly.
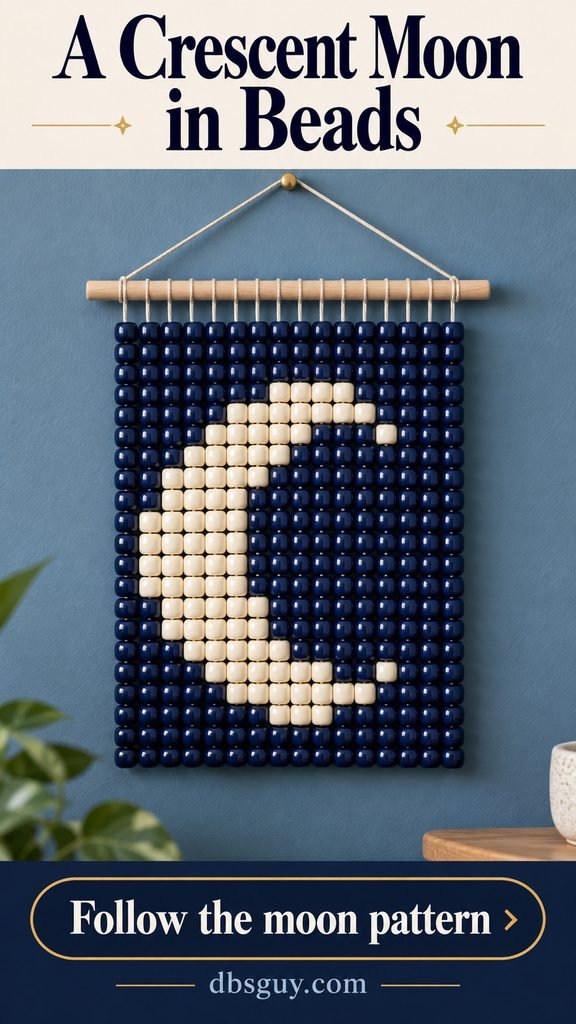
Panel: 15 columns × 24 beads per strand; 360 beads total.
Color key and exact counts: N = navy (299); I = ivory (61).
Thread each listed column from top to bottom:
- Columns 1, 2, 13, 14, 15: N24.
- Column 3: N7 → I10 → N7.
- Column 4: N5 → I14 → N5.
- Column 5: N4 → I16 → N4.
- Column 6: N4 → I1 → N10 → I5 → N4.
- Column 7: N17 → I4 → N3.
- Columns 8, 9: N18 → I3 → N3.
- Columns 10, 11: N18 → I2 → N4.
- Column 12: N18 → I1 → N5.
Work from left to right as viewed from the front of the finished hanging. Turning the dowel over while reading the list can mirror the moon. A small piece of removable tape marked ‘front’ helps keep your orientation consistent.
9. Mountain Sunset
This miniature landscape combines two forest-green peaks with a gold sun in a peach sky. It gives you a scene rather than a single symbol while staying within three colors and the same compact panel size.
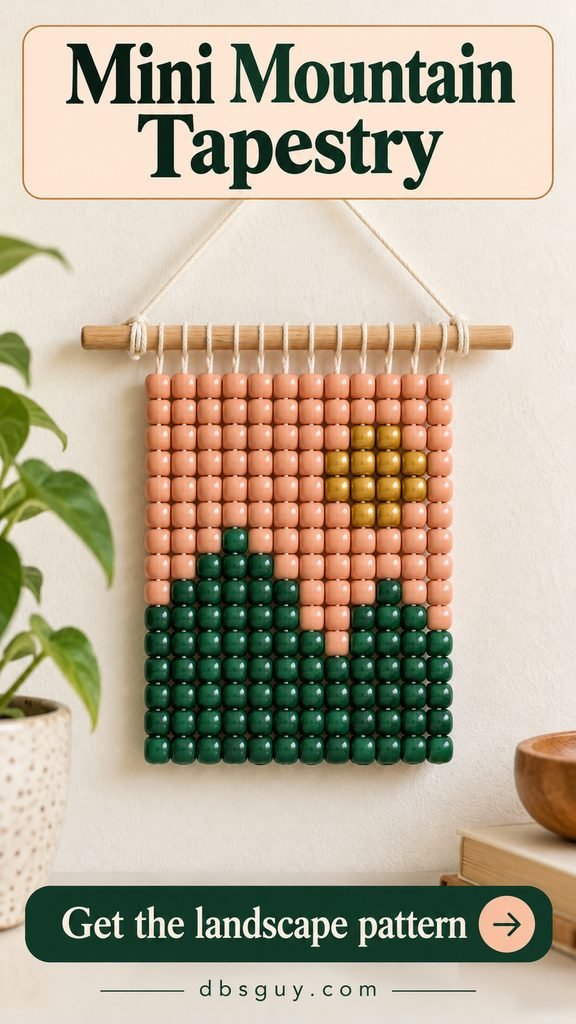
Panel: 15 columns × 24 beads per strand; 360 beads total.
Color key and exact counts: P = peach (178); Y = gold (24); F = forest green (158).
Thread each listed column from top to bottom:
- Columns 1, 9: P14 → F10.
- Columns 2, 8: P13 → F11.
- Columns 3, 7: P12 → F12.
- Columns 4, 6: P11 → F13.
- Column 5: P10 → F14.
- Columns 10, 13: P4 → Y5 → P6 → F9.
- Column 11: P3 → Y7 → P5 → F9.
- Column 12: P3 → Y7 → P4 → F10.
- Column 14: P16 → F8.
- Column 15: P17 → F7.
Keep the sun in the upper-right portion of the panel. Its short gold runs are easy to overlook because several neighboring strands use only peach and green. Set those gold beads out separately before beginning columns 10–13.
10. Ocean Wave
A navy lower section, a pale aqua field, and a thin ivory band suggest a rolling wave. The counted version uses a gentle stepped boundary; the concept image shows how a more dramatic wave can look with a larger, more detailed pattern.
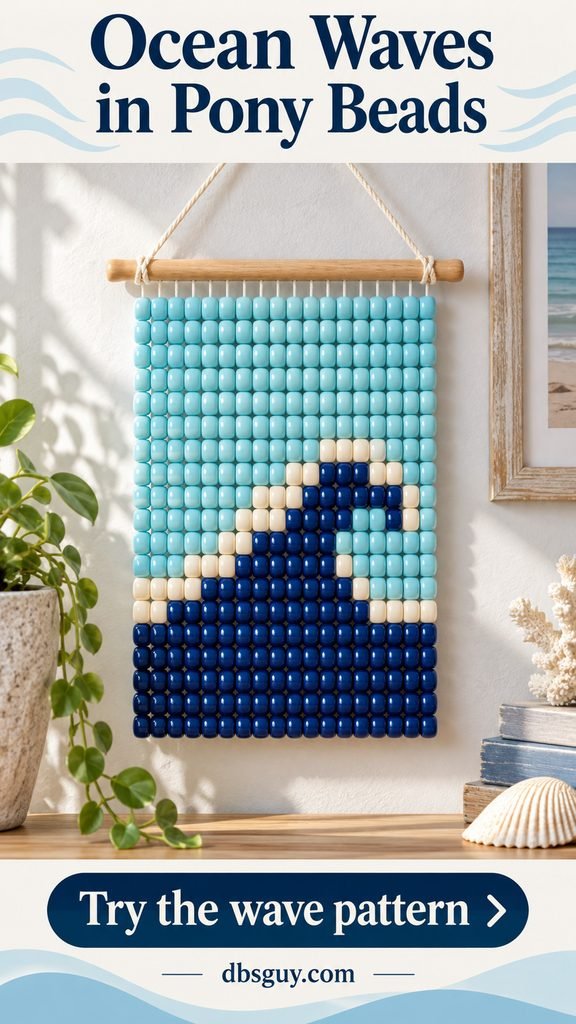
Panel: 15 columns × 24 beads per strand; 360 beads total.
Color key and exact counts: A = aqua (171); W = ivory (30); N = navy (159).
Thread each listed column from top to bottom:
- Columns 1, 8, 13: A12 → W2 → N10.
- Columns 2, 7, 14: A11 → W2 → N11.
- Columns 3, 6, 15: A10 → W2 → N12.
- Columns 4, 5: A9 → W2 → N13.
- Columns 9, 12: A13 → W2 → N9.
- Columns 10, 11: A14 → W2 → N8.
Every strand in this recipe has exactly two ivory beads. Use that as a quick check, then compare where the ivory sits on neighboring columns. Adding extra foam beads to only one strand changes the lower edge as well as the wave.
11. Coral Tulip
This upright tulip adds a floral option with a stem and leaves. Coral stands out against ivory, and the paired green leaves fill the lower part of the panel without adding a second flower or a border.
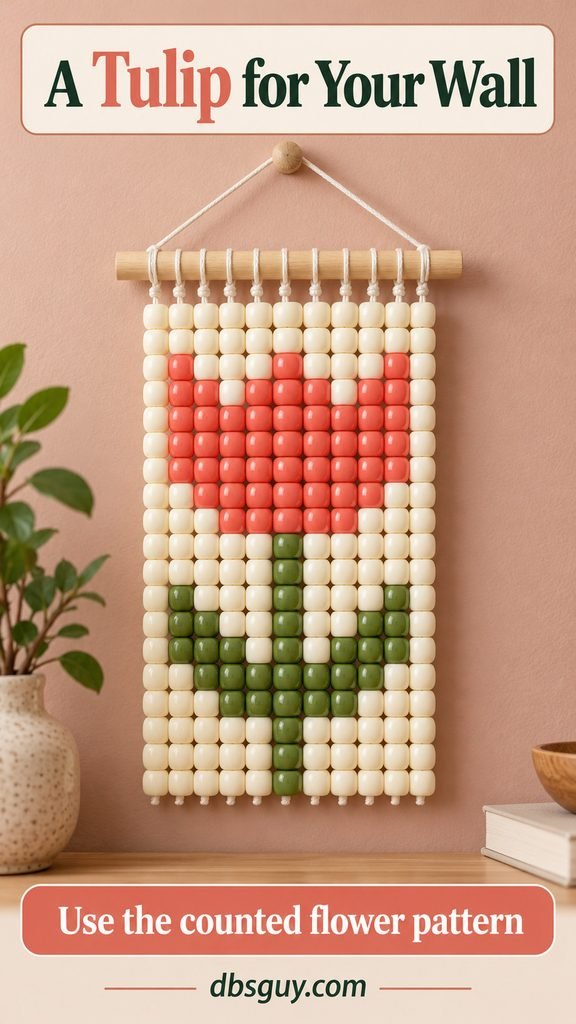
Panel: 15 columns × 24 beads per strand; 360 beads total.
Color key and exact counts: I = ivory (270); R = coral (60); G = green (30).
Thread each listed column from top to bottom:
- Columns 1, 2, 3, 13, 14, 15: I24.
- Columns 4, 12: I4 → R8 → I4 → G2 → I6.
- Columns 5, 11: I4 → R8 → I4 → G3 → I5.
- Columns 6, 10: I7 → R5 → I5 → G3 → I4.
- Columns 7, 9: I7 → R5 → I6 → G2 → I4.
- Column 8: I4 → R8 → G10 → I2.
The stem is just one column wide. Avoid replacing it with transparent beads, which can make the bloom appear to float. If you want a different flower color, swap all 60 coral beads while keeping the green and ivory counts unchanged.
12. Block Initial A
A burgundy block A on pale pink makes a small personalized accent for a desk area or gift. This recipe is specifically for A; it is a starting point for lettering, not a full alphabet pattern set.
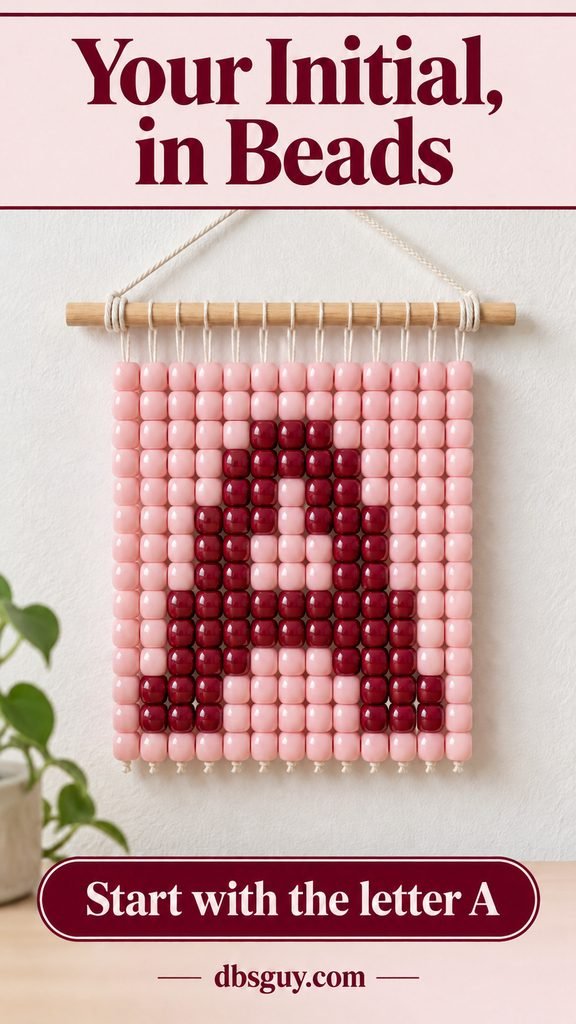
Panel: 15 columns × 24 beads per strand; 360 beads total.
Color key and exact counts: P = pale pink (300); B = burgundy (60).
Thread each listed column from top to bottom:
- Columns 1, 2, 3, 4, 12, 13, 14, 15: P24.
- Columns 5, 11: P9 → B10 → P5.
- Columns 6, 10: P7 → B12 → P5.
- Columns 7, 9: P5 → B4 → P4 → B2 → P9.
- Column 8: P5 → B2 → P6 → B2 → P9.
To adapt it to another initial, draw the new letter on a 15-column by 24-row grid first. Keep a clear background margin, count each color again, and write fresh column sequences. Simply changing one or two strands will not reliably turn A into another letter.
Make the Finished Panel Hang Neatly
If a whole strand sits too low, check its top gap first. A longer exposed section of cord above the beads can shift the entire motif even when the color count is correct. If the top is aligned but the bottom is uneven, recount the beads and look for a different bead size in that strand.
If the strands crowd or spread, adjust their spacing on the dowel. These strands are separate, so they can swing and separate when touched. Place the hanging against a quiet wall away from a fan or frequent traffic; it will not behave like a woven panel.
If the color looks muddy, simplify the palette. Opaque light backgrounds and darker motifs are easier to read than several similar translucent shades. Lay out a small color sample against the actual wall before committing to a full panel.
For a geometric display, pair the diamond or chevron with the simple shapes in our Neo Deco decorating ideas. Keep nearby art quieter so the small bead pattern does not disappear among larger prints.
Questions Before You Start
Can I use a kandi or peyote chart with these instructions?
Only if you redraw it for straight, aligned columns. Some woven bead charts use offset beads or a different thread path. These recipes assume one independent vertical strand per column and should not be treated as peyote instructions.
Can I make one twice as big?
To double both the width and height, make each column twice and double every run within it. A 15 × 24 design becomes 30 × 48, requiring 1,440 beads—four times the original total. You will also need a wider dowel, longer cords, and hardware chosen for the finished weight. Do not just double the cord length and expect the picture to enlarge.
Do I need glue, heat, or a bead loom?
No. These designs use threaded pony beads, a dowel, and knots. A loom is not part of this method, and the beads are not melted or ironed. If your knots do not hold, solve the cord-and-knot fit before assembling the full piece.
Can I substitute colors from a mixed bead tub?
Yes, as long as you have enough of each substitute and the bead dimensions match. Swap one entire color code for another. Keep the motif and background clearly different, and remember that a tub’s total count does not tell you how many beads of each color it contains.
What if I want another initial?
The included letter pattern makes A. For a different letter, fill a 15 × 24 grid with background color and draw a block letter inside it, then translate each column into top-to-bottom runs. Check narrow openings and crossbars at the proportions of your beads before stringing.
If this is your first hanging, finish the rainbow or checkerboard before buying supplies for a larger version. That small panel will show you how your own beads, cord, and knots behave—and leave you with a finished piece to display.
Also Read
- Creative Fall Decorations Wall Ideas for Cozy Homes — ideas for placing a warm-toned mushroom or landscape panel within a seasonal display.
- Neo Deco Is Back: 16 Ways to Add 2027’s Glam Geometric Trend at Home — a next step if the diamond and chevron are your favorites.