17 Valentine Art Ideas With Watercolor, Collage, and Colorful Hearts


For soft color, start with watercolor hearts. For a project without paint, try a torn-paper mosaic or a heart filled with pen patterns. If you want something with depth, fold paper hearts so their edges lift off the page.
These 17 Valentine art ideas give you different ways to work with color, paper, and a familiar shape. Each includes enough direction to get started, whether you’re making a small gift, planning an art night, or choosing a piece for your own wall.

The visuals are AI-generated art concepts that illustrate the suggested projects, rather than photographs of tested, completed work.
Choose a project with the supplies you have
- Watercolor paints: try the blooming hearts, transparent layers, white-heart halo, or painted bouquet.
- Paper and glue: choose the mosaic, magazine strips, tissue collage, woven heart, or paper-leaf wreath.
- A pen and a quiet table: fill one heart with patterns.
- A shared art night: make the two-panel painting or the nine-square paper quilt.
Use watercolor paper for projects with wet washes; it is made for working with water. Cold-pressed paper has a textured surface, while hot-pressed paper is smoother. Cardstock is a useful backing for dry paper projects. You don’t need every material below: collect only what your chosen idea uses.
A 5-by-7-inch sheet is a manageable starting size for a small painting. Keep a pencil, scrap paper, scissors, a glue stick, and a protected work surface nearby. For painting, add a round brush, water, and a paper towel. With children, use age-appropriate supplies and have an adult handle cutting that the child cannot manage.
To make a reusable heart guide, fold scrap paper in half, draw half a heart with its center on the fold, and cut along the curved line. Open it and trace lightly. The measurements and palettes here are starting suggestions; adjust them to your paper and the person you’re making the art for.
Watercolor Valentine art ideas
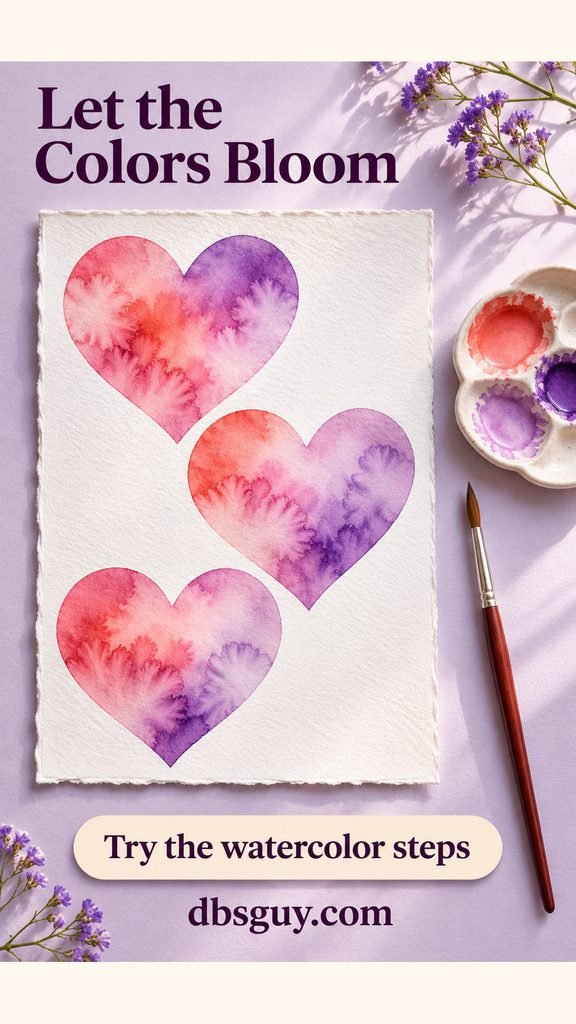
1. Let two colors bloom inside each heart
Three separate hearts give you room to explore soft color without covering a whole page. Try rose and violet, or coral and pink, and leave a strip of white paper between the shapes.
- Lightly draw three hearts on watercolor paper, staggering their positions.
- Brush clean water inside one outline. Aim for an even sheen rather than a puddle.
- Touch diluted color to one side, then add a second color elsewhere in the damp shape. Let them spread before deciding whether to add more.
- Repeat in the other hearts and let the sheet dry flat.
A brush blotted on a paper towel can lift a pooling droplet. Leave some pale areas instead of repeatedly brushing the whole heart; the contrast makes the blooms easier to see.
2. Overlap transparent hearts in dry layers
This version gives you defined shapes and visible color intersections. Use three pale colors, such as rose, yellow, and turquoise. Make a small overlap test first so you can see how your particular paints look together.
Paint the first heart on dry paper and let it dry completely. Add the second heart so it crosses part of the first, then let that layer dry before painting the third. Keep each wash light enough to see the earlier shape through it.
The pause between hearts matters: a new wash over a dry one is glazing. Painting into a wet layer produces softer, spreading edges. Canson’s guide to watercolor washes and layering explains the difference if you’d like to practice before starting your piece.

3. Reveal a white-crayon heart constellation
Draw heart outlines, a few stars, and dotted trails with a white wax crayon on white paper. Brush a blue-and-violet watercolor wash over the drawing to reveal the marks. The white shapes give the finished piece the feeling of a little night sky.
Press firmly enough to leave wax on the paper, and test a mark on a scrap before drawing the whole constellation. Keep the paint fluid and brush over it lightly. A faint wax line may produce a broken outline, which can suit the starry design.
For a child who wants to see the drawing as they work, use a pale yellow crayon instead. This project uses an ordinary crayon; it doesn’t need melted wax or a separate masking product.

4. Leave one white heart inside a watercolor halo
Here, the untouched paper becomes the subject. Trace one large heart in the center of your sheet. Paint a loose band of teal, turquoise, or blue around it, keeping the inside dry and unpainted.
Start beside the outline with a small brush, then use a larger brush to carry the wash outward. Work around the heart in short sections. Let the outer edge wander so you have a clear inner silhouette and an irregular outside border.
You can use a cut-paper heart to trace the shape, but remove it before painting. A loose template is not a watertight mask. If you want a simpler first attempt, use one color around the entire heart and vary how much water you add.

5. Turn watercolor-pencil patches into a colorful heart
Watercolor pencils let you begin with drawing and soften selected areas with a damp brush. Choose pencils labeled water-soluble; ordinary colored pencils won’t behave the same way.
- Draw a large heart and divide it into uneven geometric patches, leaving narrow white channels between them.
- Shade the patches in coral, purple, blue, and yellow. Keep neighboring colors separate at first.
- Use a small damp brush to dissolve the pencil marks in one patch at a time, rinsing between colors.
- Leave one or two patches dry so the hatching remains visible beside the smoother areas.
Start with less water than you think you need. You can add another damp brushstroke, while a flooded patch makes those small white gaps harder to preserve.

6. Paint five hearts as a small bouquet
Arrange five painted hearts like flower heads: one near the top, two below it, and two lower down. Leave room under them for slender stems to meet near the bottom of the page.
Paint the hearts first in red, pink, and coral. Once they are dry, use the tip of a small brush to add green stems and a few leaves. Turning the paper can make a long stem easier to paint. Practice the line on a scrap rather than trying to correct it repeatedly on the artwork.
Keep the lower stems narrow so the heart shapes stay prominent. You can mount a small version on a folded card; for help pairing the artwork with a message, see 21 Valentine Card Ideas That Make a Simple Message Feel Personal.

Valentine collage ideas with paper and texture
7. Build a heart from torn-paper scraps
A torn-paper mosaic is a good place to use odd-shaped scraps that are too small for another project. Pick a few related colors, then add one darker shade so the heart has some contrast.
Draw a heart on a separate piece of backing paper. Tear your colored papers into roughly thumbnail-size pieces and arrange them inside the outline. Overlap the pieces slightly, gluing from the bottom of the arrangement upward. Let the glue dry, then trim the backing and collage together along the heart outline before mounting it on a larger sheet.
That final cut gives you a clear silhouette while keeping the torn edges inside. Use painted-paper leftovers only after they are fully dry. A thin, even application of glue is easier to manage than blobs under every scrap.

8. Arrange magazine strips into a color-gradient heart
Instead of looking for pictures to recognize, look through old magazines for blocks of color: a yellow background, an orange sweater, a pink flower. Cut narrow horizontal strips and sort them from light to dark.
Cover a small backing sheet with the strips, starting with pale yellow at the top and moving through orange, coral, and magenta. Let the glued sheet dry. Trace a heart on the back, cut it out as one piece, and mount it on navy or another contrasting color.
Keep the strips parallel to make the gradient the main feature. If you don’t have magazines, use colored-paper strips. Avoid the thick fold near a magazine spine, which can make a strip harder to flatten.

9. Overlap tissue-paper hearts
Pink, yellow, and pale blue tissue can create a collage with translucent intersections. Cut three large hearts and lay them over one another on white cardstock before committing to the arrangement.
Test a scrap of your tissue with a glue stick first; some tissue colors can transfer when damp. Apply a thin layer of glue to the backing where the first heart will sit, then lower the tissue from one side to the other. Add the next hearts with enough overlap to show the color changes. Press gently with clean, dry fingers.
This is a glued collage, so you don’t need to soak the tissue or peel it off. Fine wrinkles can remain part of the texture. Make a small sample first if keeping a particular overlap color matters to your design.

10. Weave contrasting strips through a paper heart
Choose two colors with a clear difference, such as coral and teal. The over-under pattern should be easy to see without adding extra decoration.
- Draw a large heart on coral cardstock. Fold it down the vertical center.
- From the fold, make parallel horizontal cuts toward the outside edge, stopping about 1/2 inch before the outline. Open the heart. An adult can prepare these slots for a child.
- Weave narrow teal strips vertically through the slots, alternating over and under the coral bands.
- Reverse the sequence in the neighboring strip. Cut out the heart, leaving projecting strip ends about 1/4 inch long. Fold those ends to the back, glue them down, and mount the heart.
Practice on a rectangle first if weaving is new to you. Wider bands and strips are easier to handle; narrow ones create more detail but take more patience.

11. Lift folded hearts into a simple grid
Six folded hearts turn a flat sheet into a small paper relief. Cut matching hearts from pink, coral, and lavender cardstock, then fold each one down its center.
Arrange them in two columns and three rows on an 8-by-10-inch backing. Mark their positions lightly before gluing. Run a narrow line of craft glue along the back of each crease and attach only that spine, allowing both sides of the heart to lift.
Leave enough space for the wings to open without touching the next heart. Display the piece without glass, or use a frame deep enough to keep the folds from being pressed flat. Side light makes the small shadows easier to see.

12. Outline a heart with cotton yarn
A single yarn outline adds texture without filling the page. Start with a pale watercolor wash on thick paper and let it dry fully. Draw a light heart outline over it.
Lay cotton yarn along the pencil line before using glue, then cut it with a little extra length for adjustment. Lift a short section at a time, add a thin line of white craft glue, and press the yarn into place. Begin at the bottom point and travel around the outline so the two ends meet there. Trim the second end to fit.
Use a glue labeled for your paper and yarn, and let the piece dry flat according to its directions. A plain cotton yarn keeps the contour easier to read than a fuzzy, bulky strand. If you’re planning where to display it, browse 25 Valentine Decor Ideas From Heart Garlands to Flower-Filled Tables.

Printed, drawn, and shared heart art
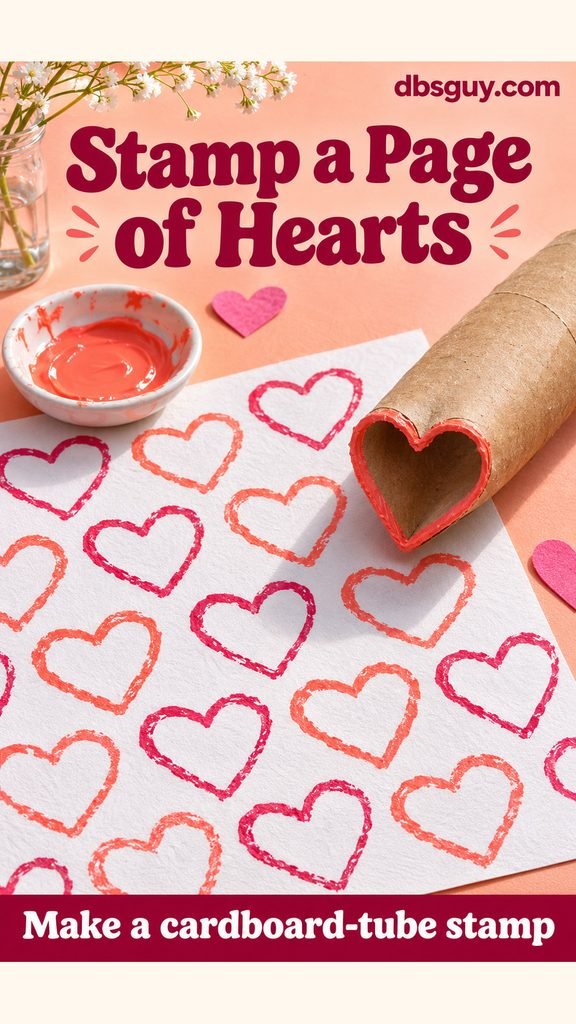
13. Print heart outlines with a cardboard tube
A clean cardboard tube can become a repeating heart stamp. Gently press one side inward to form the top notch and pinch the opposite side into a point. Test the outline on scrap paper and adjust the rim until both curves print.
Spread a thin layer of washable craft paint in a shallow dish. Touch the tube rim to the paint, then press it straight onto paper and lift. Build offset rows in coral and raspberry, leaving some white space around the prints.
Too much paint can fill the notch or leave a heavy blob. Try a light coating and a flat work surface first. Slightly uneven outlines are part of this handmade print; don’t expect the tube to produce identical commercial stamps.
14. Fill one heart with four pen patterns
For a project with very little setup, draw a large heart and divide the inside into four loose sections. Fill them with dots, waves, diagonal stripes, and small loops.
Use a black fineliner on white paper and vary the spacing rather than adding more kinds of pattern. One dense area beside an airy one gives the design contrast. Turn the sheet as you draw so each section is comfortable to reach.
Leave the background blank and mount the finished heart on a narrow coral mat if you want a little color. If the outline feels intimidating, trace a paper heart first. You can make the whole piece with ordinary drawing paper because this version has no wet wash.

15. Arrange paper leaves into a heart wreath
This botanical collage uses cut paper rather than pressed flowers. Choose sage, green, and teal for the leaves, then add a few small coral flower shapes.
Draw a large heart lightly on cream cardstock. Cut a pile of small leaf shapes, varying their size. Arrange them along the outline so the outer edges suggest a heart while the center stays open. Overlap some leaves and leave small gaps elsewhere.
Glue the leaves once the silhouette reads clearly from a little distance. Add the flowers near a few junctions rather than covering the whole border. If the wreath starts looking like an oval, place a smaller leaf near the top notch and sharpen the arrangement at the bottom point.

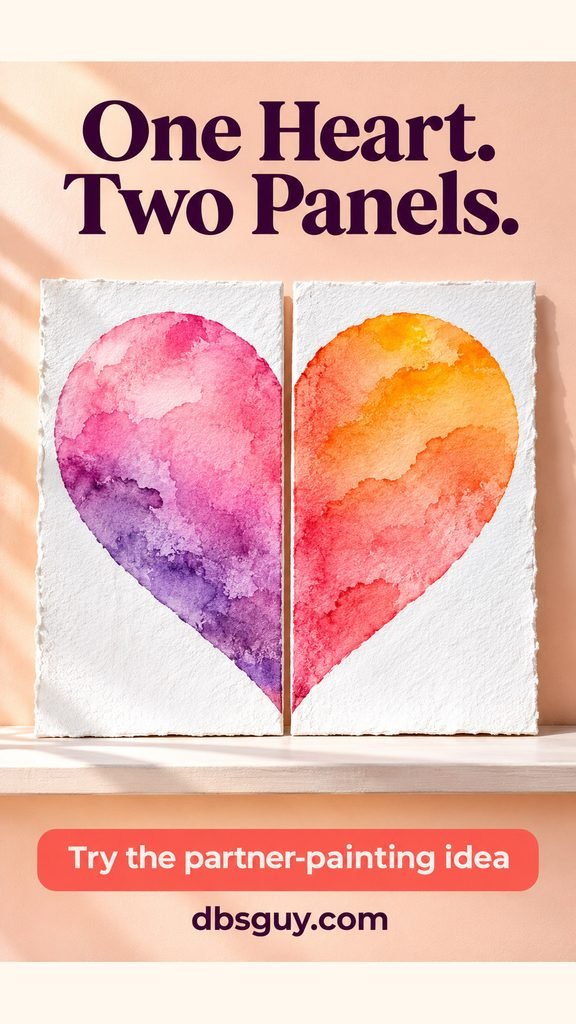
16. Share one heart across two painting panels
Two people can make one connected piece while keeping their own colors. Place two 4-by-6-inch watercolor-paper panels side by side, with their long edges touching, and temporarily tape them together on the back.
Draw one large heart across the pair so each panel holds half. Separate the panels to paint. One person might choose pink and violet while the other uses orange and coral. Keep the shared outline visible at the center edges so you can align it again later.
Let both panels dry before displaying them with a narrow gap. Match the top edges first, then check that the heart joins visually across the middle. If you are working alone, use the two halves to explore different brush marks or palettes.
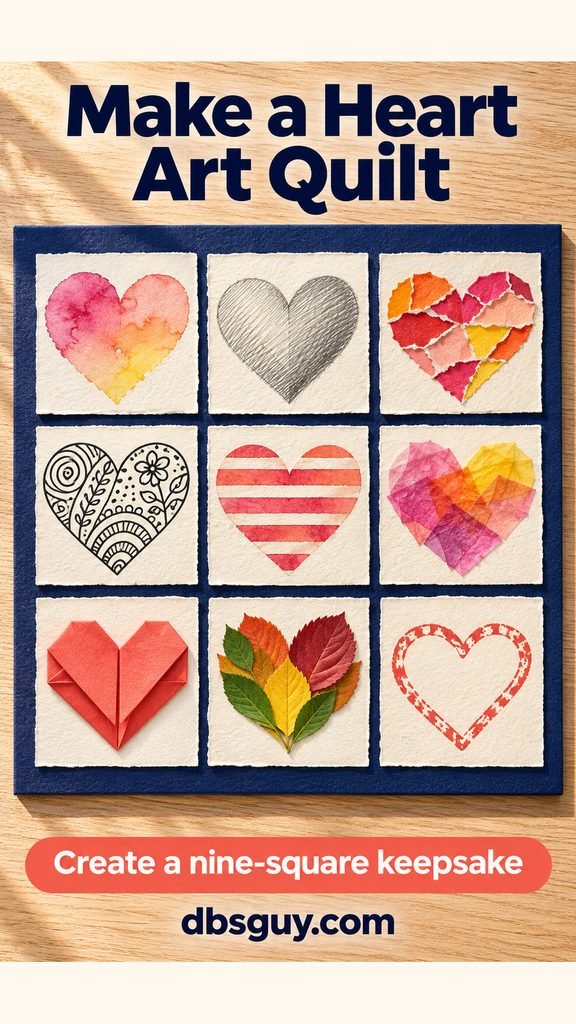
17. Assemble a nine-square paper heart quilt
Make a shared artwork from nine small squares, each with a heart design. Cut 3-inch squares and give each person the same size. For a coordinated result, agree on a few colors while letting everyone choose a technique.
One square might hold a watercolor heart, another a paper mosaic, and another a pen pattern. You can reuse techniques from this list at a smaller scale. Keep raised pieces modest enough that they don’t obscure the neighboring squares.
Let every square dry, then arrange them in a three-by-three grid on a 12-inch-square backing. Leave about 1/4 inch between squares and center the whole arrangement before gluing. This is a paper quilt, with no sewing required. Put names and the date on the back if you want a record of who contributed.
Finish the piece for a card, gift, or wall
Choose the format before trimming the artwork. A small flat painting can sit on the front of a blank card with an even border around it. Collage pieces need a backing sturdy enough to support their layers. Folded hearts and yarn need space in front of the surface, so check frame depth before buying a frame.
Let paint and glue dry completely before stacking, wrapping, or mounting. Drying time depends on the materials and how much you used; follow the product directions rather than working to a fixed countdown. For a gift, add your name, the date, and one sentence on the back about why you chose the colors or design.
Questions about making Valentine art
What is a good first project if I don’t draw well?
Try the torn-paper mosaic or magazine-strip heart. You build a colored surface first and use a traced template to cut the final shape. For painting, start with the three separate watercolor hearts and let the color movement supply the detail.
Can I use printer paper instead of watercolor paper?
Save printer paper for planning, templates, and light pen work. Choose watercolor paper for wet painting. For collage, mount thin colored papers on cardstock rather than asking them to support the whole project by themselves.
How can I adapt these ideas for children?
Offer a small selection of colors, larger shapes, and pre-cut pieces when needed. Torn-paper mosaics, crayon resist, and cardboard stamping give children room to make their own marks. Prepare weaving slots and other difficult cuts yourself, and choose materials labeled for the child’s age.
Do the colors have to be red and pink?
No. Try teal and coral, blue and violet, or a mostly black-and-white design. Repeating a limited palette across the piece can make different papers and marks feel connected. Test paint or tissue overlaps on a scrap when the resulting color matters.