19 Christmas Nails Art Ideas With Tiny Details You’ll Want a Closer Look At

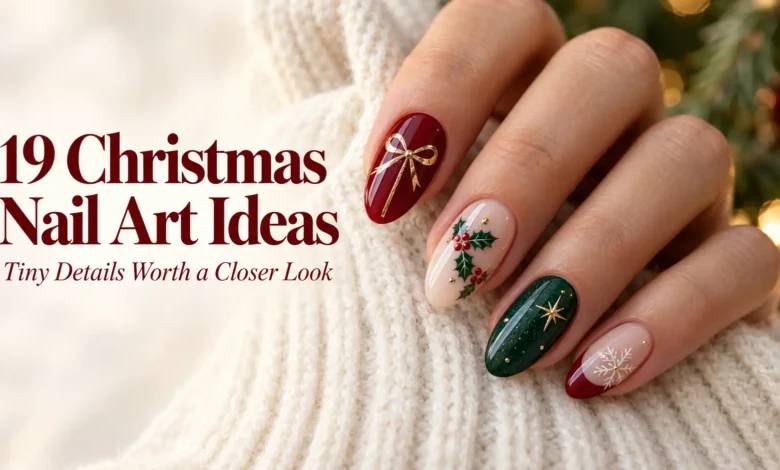
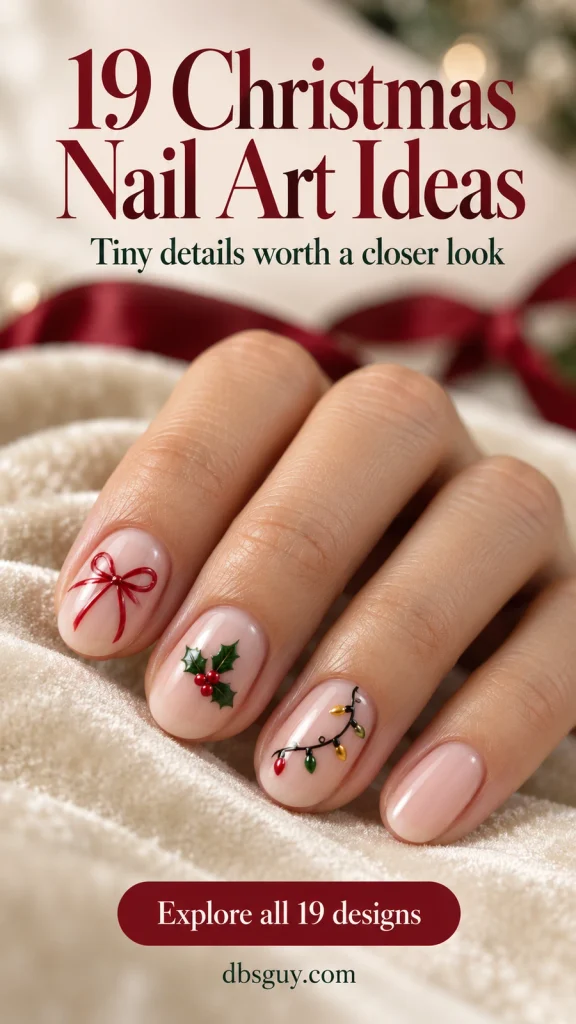
A tiny red bow near a French tip. A single ornament hanging from a gold line. Three bright bulbs on a fine black cord. These 19 Christmas nail art ideas give you a small detail to enjoy up close while leaving the rest of the manicure easy to wear.
Start with the motif you love, then choose a base that lets it show. Below, each of the 19 designs includes a specific placement, a practical way to simplify it, or a detail to discuss with your nail artist. You can borrow one accent without committing to a different picture on every finger.
The images are AI-generated manicure concepts created for dbsguy.com. Use them as visual references to discuss and adapt; they do not document completed salon work or tested products.
Choose Your Tiny Detail First
If you want a manageable home project, start with the holly berries, a simplified wreath, or the ornament’s line-and-dot shapes. The snow globe, poinsettia, and snowy house ask for more control; they are useful references to discuss with an artist or look for in a correctly sized decal.
For short nails, use fewer elements instead of making every line smaller. Keep the motif inside the nail’s outline with a visible border of base color. The thumb may give a detailed drawing more room, even if the reference shows it on the ring finger.
These designs can be adapted to regular polish, so gel or extensions are not required for the look. Use products as their makers direct, and let a regular-polish base dry sufficiently before adding detail. Drying and gel curing are different processes; follow the chosen system rather than borrowing a timing rule from another manicure.
1. A Tiny Red Bow Below an Ivory French Tip
Put a small painted bow just below the ring finger’s ivory French edge, leaving sheer blush visible around the loops. That little gap keeps the bow from merging with the tip. The surrounding nails can stay French, which makes this an appealing choice if you already know you like a classic manicure.
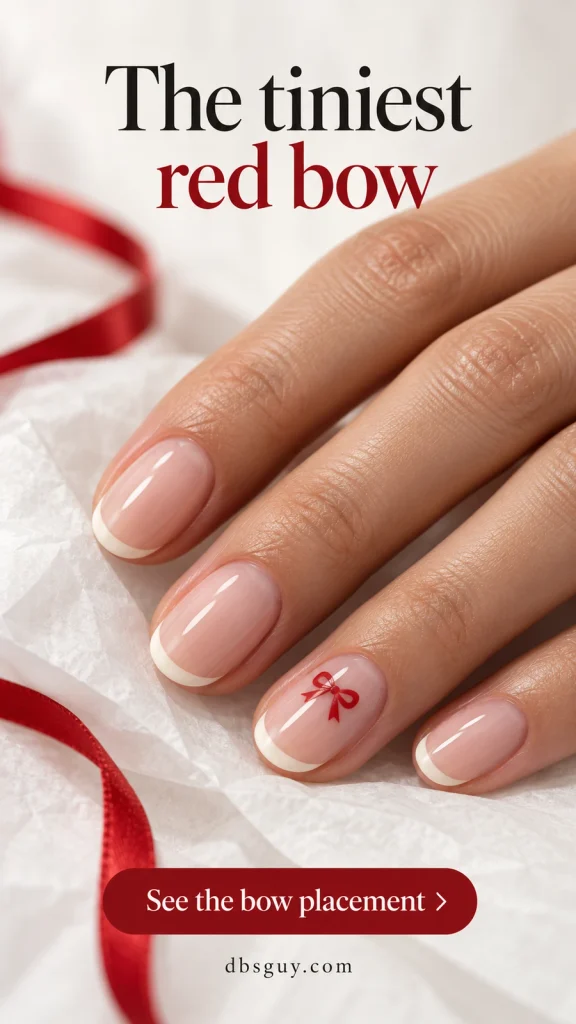
Ask for a flat ribbon drawing with two fine loops and short tails. If the nail is narrow, shorten the tails first instead of squeezing the entire bow into a knot. A small bow decal is another option; check that its full outline fits before applying it.
2. A Holly Sprig Tucked Into One Corner
Milky ivory gives two pointed green leaves and a cluster of red berries a clear background. Keep the holly off-center, close to one outer corner of the ring nail, so the empty space becomes part of the design. It is a small, unmistakably Christmas detail without an all-over pattern.
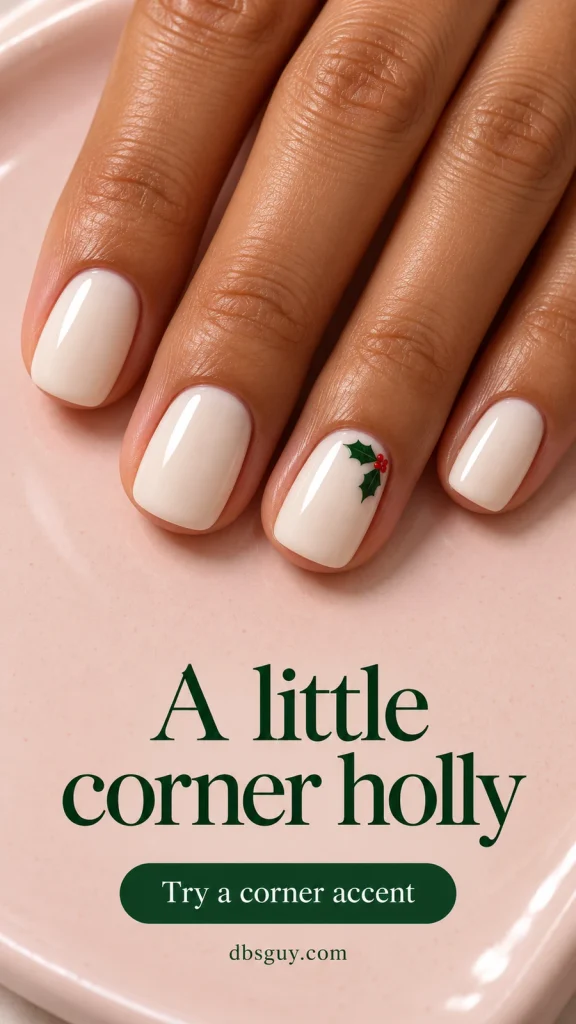
For a home version, make the berry dots first on a dry base, then add the leaves beside them. Practice on a spare tip to judge how much polish your tool carries. Stop while you can still distinguish each berry; an extra dot can turn the cluster into one red patch.
3. One Miniature Candy Cane on a Blush Accent
A little hooked candy cane gives glossy cranberry nails a playful focal point. Place it on one blush accent nail so its white outline stays visible. The shape should read as a candy cane before you add any stripes; if the hook gets lost, extra red lines will not rescue it.
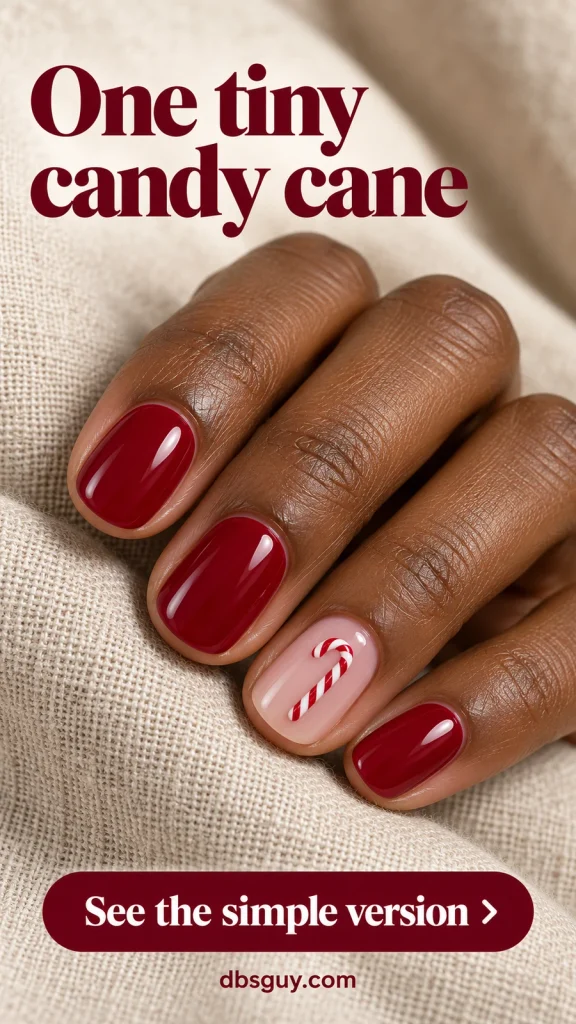
Keep the stripes separated with visible white between them. On a very short nail, use fewer bands and a broader curve at the top. A fitted decal is a sensible shortcut if you want this precise motif but do not enjoy painting small curves with your nondominant hand.
4. A Red Ornament Hanging From a Gold Thread
The fine gold line is what makes this red dot look like a hanging ornament. Run the thread from near the base of the nail toward a small bauble farther up the nail, then add a tiny cap where they meet. A pale curved highlight gives the painted ball a rounded appearance.
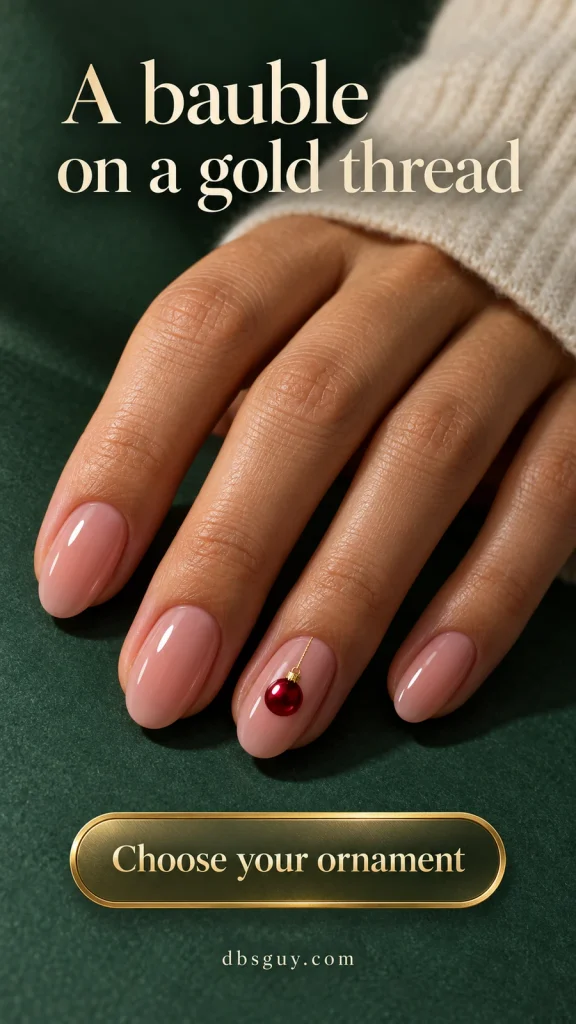
Sheer warm pink keeps the line easy to see. Bring this reference if you want metallic detail without a fully glittered nail. Ask for painted gold rather than a raised chain, and leave some space between the ornament and the free edge so the circle keeps its outline.
5. A Fine Strand of Colorful Christmas Lights
Draw one loose black curve across a milky accent nail, then hang small red, green, and golden-yellow bulbs along it. Keep a short gap between each bulb so the strand remains visible. The other nails can stay milky white; you already have several colors in that one tiny illustration.
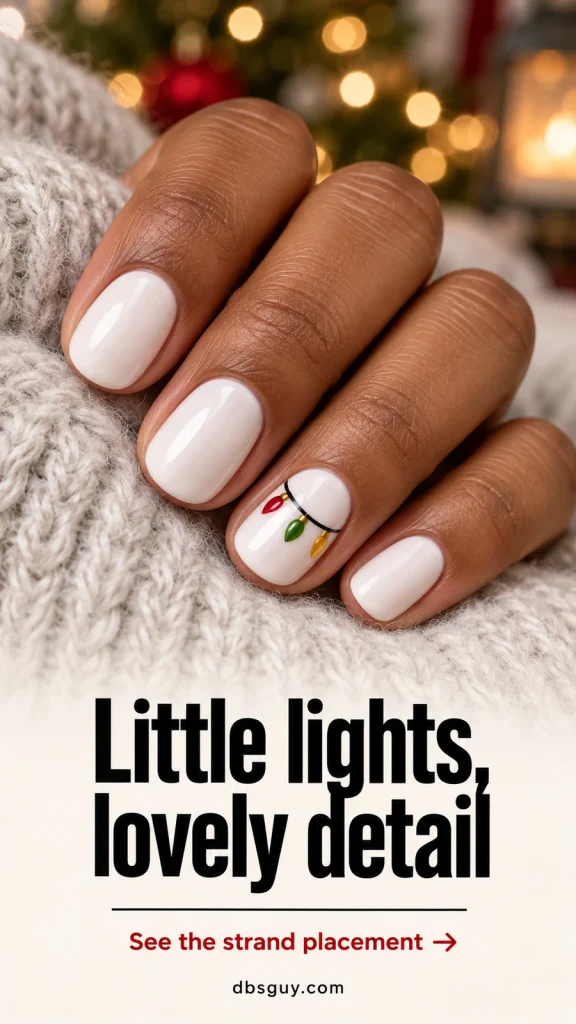
Do not try to make a continuous string line up perfectly across every finger. One complete strand on one nail is easier to adapt and still looks intentional when your hand moves. For a shorter version, reduce the number of bulbs while keeping their little rounded silhouettes.
6. A Tiny Evergreen With a Gold Star
A tapered evergreen silhouette and a small gold star give a sheer blush accent its Christmas-tree shape. Keep the neighboring nails forest green to repeat the color without repeating the artwork. A few clearly separated tiers look crisper at this scale than lots of overlapping branches.
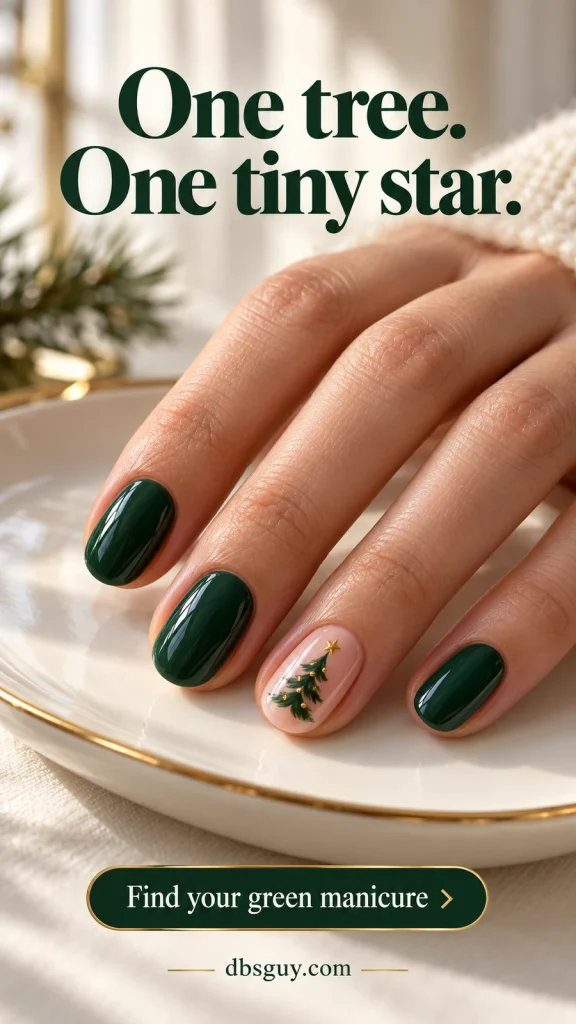
Have your artist check the space above the tree before adding the star. If everything feels crowded, remove an ornament dot or a branch tier rather than pushing the star against the tip. For more ways to build a set around this shade, explore 19 December Nails Green: Emerald, Forest and Festive Shine.
7. A Gingerbread Cookie With Tiny Icing Details
Warm caramel nails set the scene for a small gingerbread figure on a cream accent. White icing cuffs, two little buttons, and a curved smile do most of the work. The cookie’s rounded arms and legs matter more than a highly detailed face.

Choose this if you like a cozy brown palette but still want a literal holiday motif. On a narrow nail, simplify the face to two dots and keep the body slightly wider. Avoid adding a candy cane, a bow, and snowfall around it; the miniature cookie needs some cream background to stay recognizable.
8. A Little Snow Globe on a Dusty-Blue Nail
A white curved dome, a small gold base, and a few snow dots suggest a snow globe without filling the nail with scenery. Inside, one white snowman is enough. Dusty blue gives the white drawing contrast while keeping the manicure softer than a bright red-and-green set.
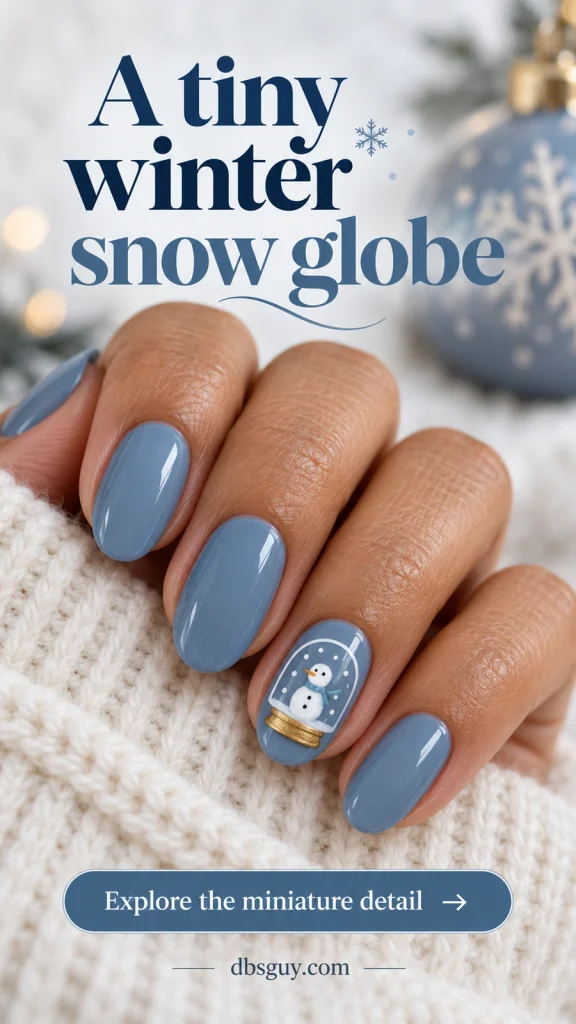
This is a good reference for a detail-focused salon appointment. Ask the artist to scale the dome to the actual nail before deciding how much to put inside it. On very short nails, leave out the snowman’s arms and facial details. The dome and pedestal should remain distinct.
9. A Small Wreath With an Open Center
A ring of little green leaf marks makes a delicate wreath on a pale blush nail. A tiny red bow at the bottom gives the circle a clear direction. Keep the center visibly empty; that opening is what separates a wreath from a solid green flower.
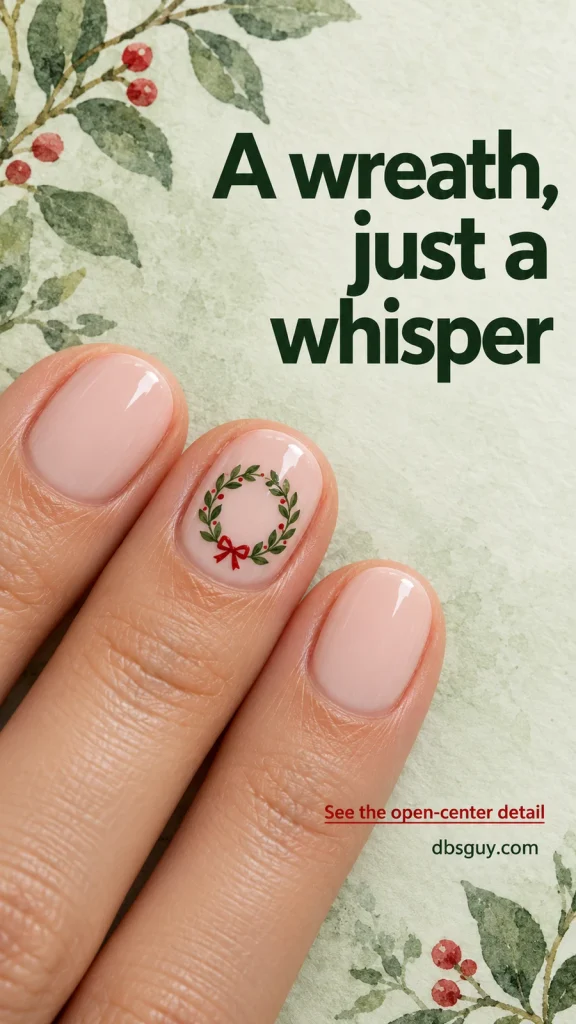
Try one wreath on the ring finger with plain blush nails around it. If you prefer painting at home, lightly plan the circle with a few spaced green dots, then add short leaf strokes between them. Stop before the gaps disappear. A full circle of thick polish will swallow the small bow and make the design feel heavy.
10. A Reindeer Suggested by Antlers and One Red Nose
You do not need a full reindeer portrait to make this accent work. Two fine brown antlers, two small eyes, and one red nose on an oat-colored nail give you the reference immediately. The surrounding chocolate-brown nails keep the playful artwork grounded in a warm palette.

Place the antlers high enough that the nose has its own space below. For a shorter adaptation, omit the eyes and let the antlers and red dot stand alone. Ask for flat painted details if you want the nose to look like a polished dot rather than a raised gem.
11. A Petite Poinsettia With a Gold Center
Pointed red petals around a small gold center give this cream manicure a botanical Christmas accent. Keep the flower toward one side of the ring nail, with a little green visible behind it. That placement leaves enough cream to show the petal outline.
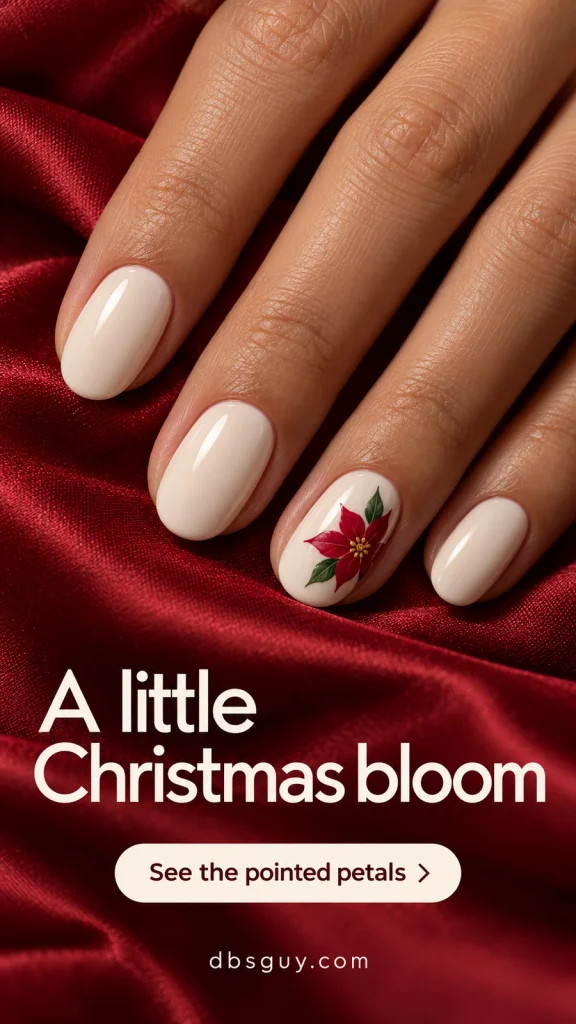
If the flower becomes a solid red circle, reduce the petal count and sharpen their tips. A small nail only needs a simplified blossom. This is an appealing alternative to holly when you want a larger red focal point without using red polish across the whole hand. Leave the other nails plain to keep the flower in focus.
12. Soft Mistletoe With Pearl-White Berry Dots
Mistletoe gives a milky pink manicure a gentler botanical detail. Use muted sage stems, rounded leaves, and a few pearl-white painted berry dots. Let the sprig hang downward from near the base of one nail rather than crowding it into a corner.

The leaf shape and pale berries distinguish it from the pointed holly in idea two. Ask for opaque white dots if a pearly polish disappears into the pink base. Keep them painted and flat for this version; actual pearls would change both the texture and the silhouette of the design.
13. One Tiny Stocking With a Cream Cuff
A small red stocking on a sheer nude nail feels especially sweet beside plain red nails. Give it a clear heel, a rounded toe, and a short cream cuff. Those three shapes matter more than extra stitches, initials, or glitter.
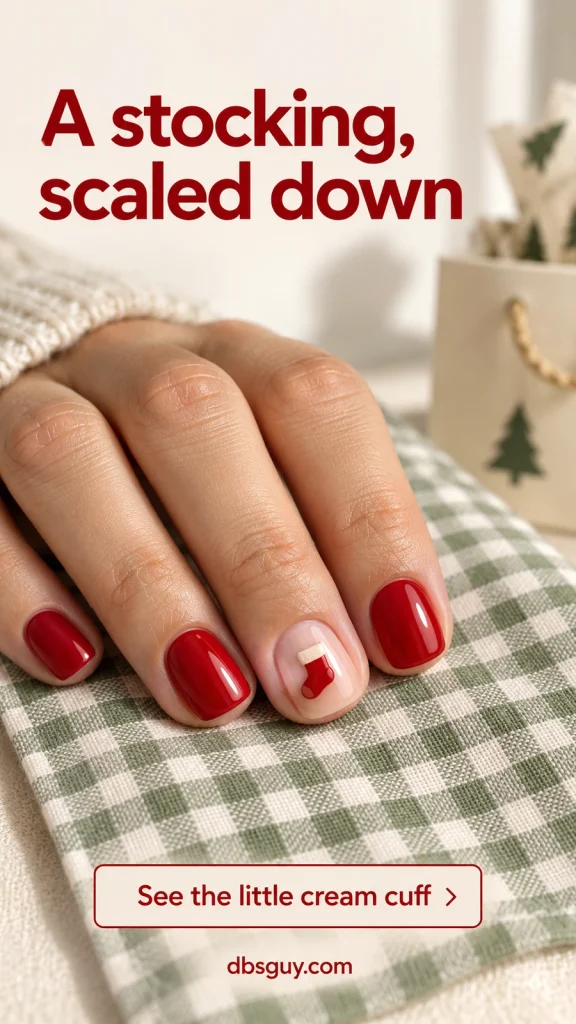
Tilt the stocking slightly so its toe has space without touching the sidewall. If the accent nail is especially narrow, choose the thumb for the artwork and keep the ring finger plain. This is also a useful decal design: hold the motif over the nail before peeling it off its sheet to check that the toe fits.
14. A Santa Hat Perched on One French Edge
Turn the tip of one blush nail into a little Santa hat: a red pointed shape, a slim white cuff, and a single white pom-pom off to one side. Keep the other nails in simple red French tips. The result feels connected across the hand without repeating the hat everywhere.

Show your artist which way you want the hat to lean before the red is painted. On a short nail, a small sideways triangle leaves more blush visible than a tall hat. A painted white dot supplies the pom-pom shape; this concept does not need a fluffy or raised decoration.
15. Two Little Gold Bells on Deep Burgundy
A pair of small gold bell outlines brings metallic detail to a dark burgundy manicure. Give each bell a curved dome, a narrow lower rim, and a little clapper dot, leaving burgundy visible inside the outline. A short red tie connects them, but the gold linework remains the focal point.
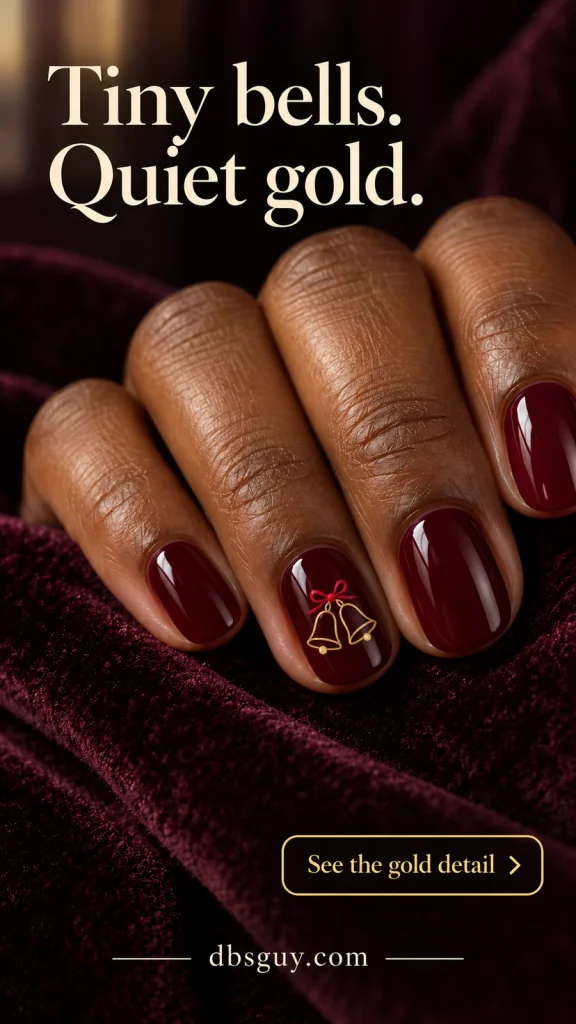
Check your chosen metallic polish against the burgundy before committing. If it looks translucent, a nail artist can help choose a more opaque detail product. On a smaller nail, one clear bell is a better adaptation than two bells squeezed together. Keep the surrounding burgundy smooth and free of extra glitter.
16. Nutcracker-Jacket Buttons in Miniature
Borrow the front of a toy soldier’s jacket instead of trying to paint an entire nutcracker face. On one red nail, two tidy rows of gold button dots and short horizontal braid lines create the reference. Plain red neighboring nails keep it from becoming a costume-like set.
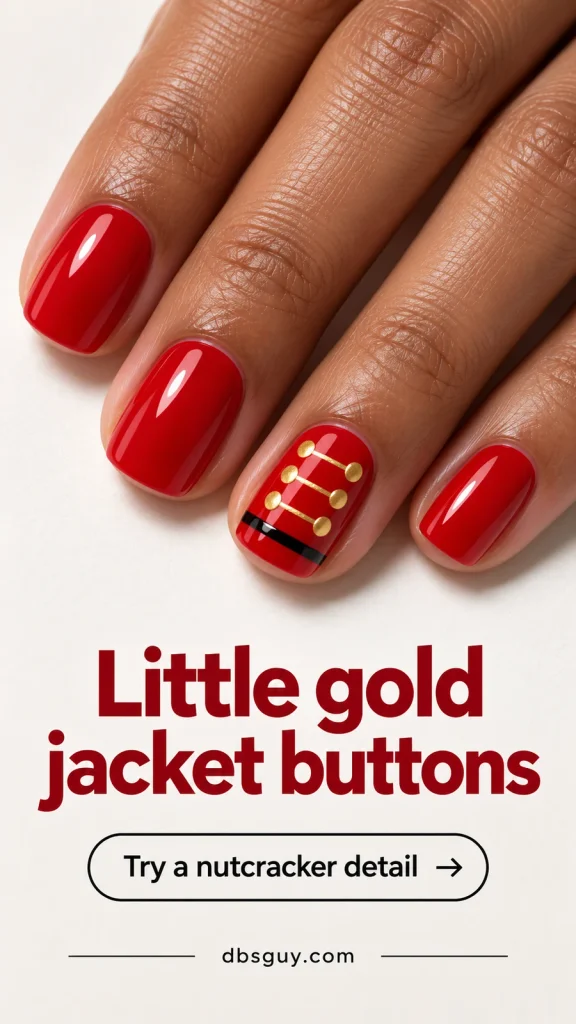
Agree on the button spacing first. If there is only room for two rows with a few dots each, that is plenty; the rows need red showing between them. A slim black line at the tip can suggest the jacket’s belt, but leave it out if it would crowd the gold detail.
17. A Tartan Corner Finished With Fine Gold Stitches
Confine a small cream-and-red tartan to one corner of a forest-green accent nail. Fine gold dashes beside the crossing lines make it feel like a stitched piece of holiday fabric. Leaving most of the nail green keeps the pattern from swallowing the manicure.
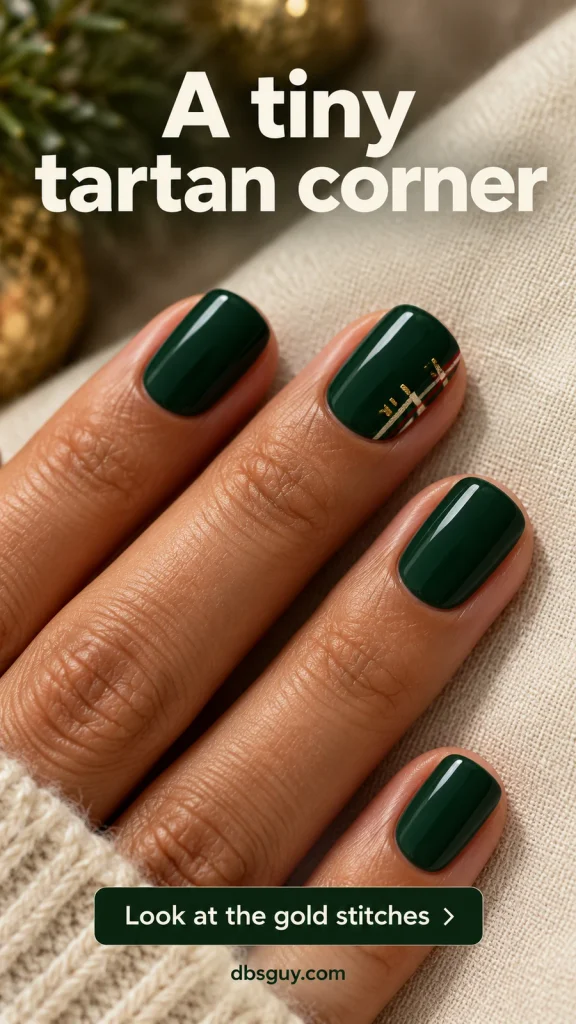
Ask for a partial pattern rather than a full miniature scarf. On short squoval nails, one cream crossing and one thinner red crossing may be enough. The gold dashes should remain short and separated. If they become a solid stripe, you lose the stitched effect that makes this version different.
18. One White Snowflake Over a Red French Tip
Let a single white snowflake straddle the red tip and blush base of an accent nail. That overlap makes the little motif feel placed rather than scattered on top. The remaining nails can stay plain red French, so the white branches have somewhere to stand out.
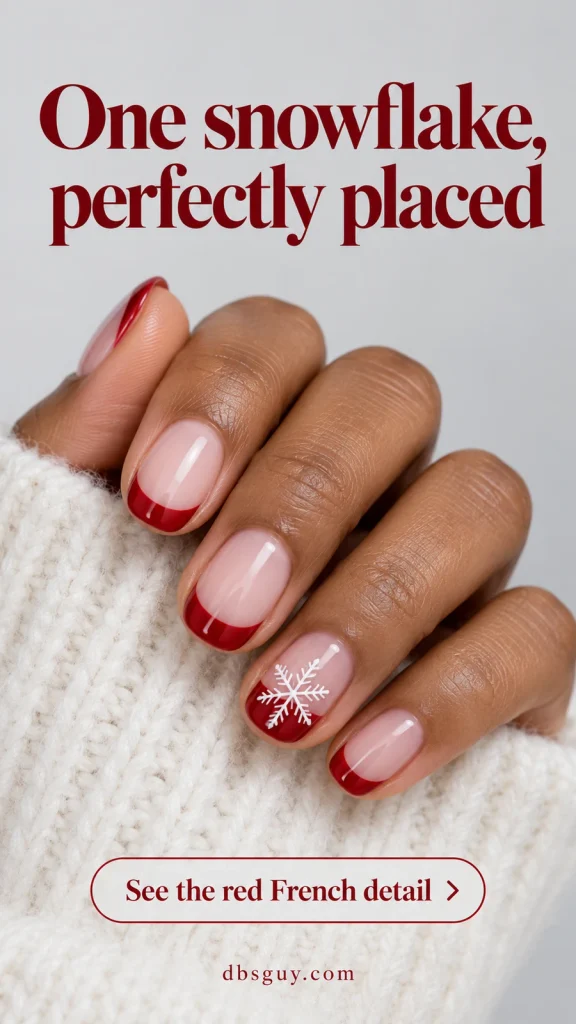
Choose a simplified six-armed shape with only a few small branches. Very fine detail may look lovely enlarged but disappear at your actual nail size. Check a decal against the tip width, or have your artist paint a less intricate version. Keep the center on the nail plate with room around the outer arms.
19. A Snowy Little House With One Golden Window
A small cream cottage on a midnight-blue nail makes the tiniest window feel warm. Keep the roof simple, add a narrow white snow line, and use one golden-yellow square for the window. Fine shimmer across the blue gives this concept a night-sky effect; choose a plain blue finish if you want the house to have all the attention.
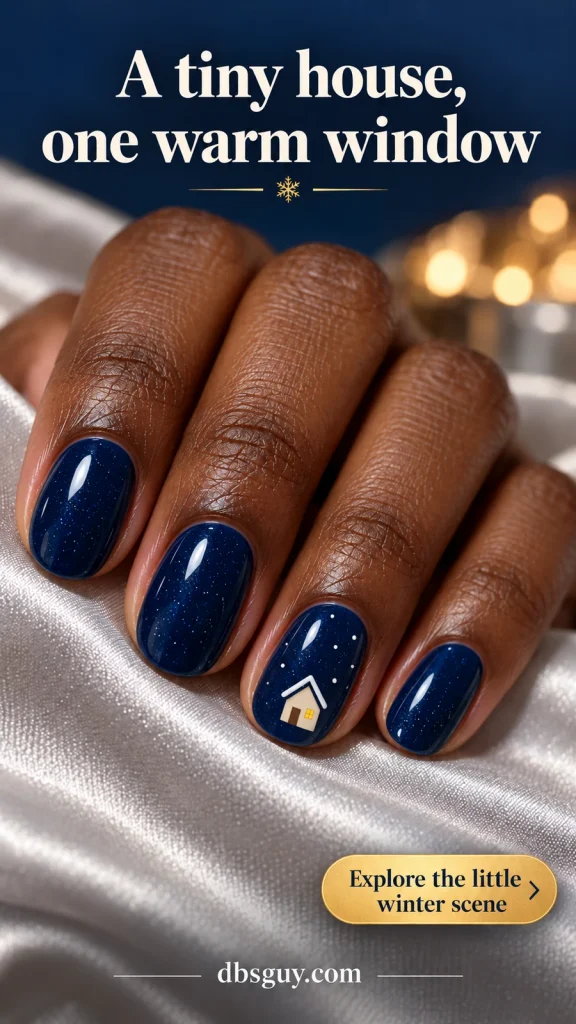
Save this for an artist comfortable with small straight lines, or choose a decal that fits your nail. On a short version, skip the chimney and door. The roof, pale walls, and single window are enough to carry the scene without squeezing in a whole Christmas village.
Turn Your Favorite Image Into a Clear Salon Request
Save one image and identify the part you actually want: the motif, its placement, the base color, or the finish. Then tell your artist what you would simplify. “One small wreath on each ring finger, all the other nails blush, and no raised decorations” is more useful than asking for something vaguely festive.
Decide whether you want the image to read upright to you or to someone looking at your hands. Confirm the direction on one accent before repeating it. Ask about the artwork’s price and appointment time when booking, since a miniature house and a few berry dots are different requests.
For more references at a compact length, also read 21 Short December Nail Ideas That Make Tiny Details Stand Out.
A Few Nail-Care Basics Before Your Holiday Manicure
The American Academy of Dermatology’s gel-manicure guidance recommends leaving cuticles uncut and protecting hands with broad-spectrum, water-resistant SPF 30 or higher sunscreen before a gel appointment; dark opaque gloves with the fingertips removed are another option. Do not peel off lifting gel. Persistent nail changes deserve a dermatologist’s attention.
Christmas Nail Art Questions
Which tiny Christmas designs are the easiest to try at home?
Start with shapes you can make clearly on a spare tip. Holly berries use dots and two leaves; a simple ornament uses a line and a circle. A bow requires more controlled curves. If the motif only looks clear when enlarged on your phone, simplify it before painting your other hand.
Can these ideas work on very short nails?
Yes—choose one small motif with a clean outline, such as holly, a little bow, or a single bell. For the more detailed scenes, move the accent to the thumb or remove secondary marks. You can keep your preferred short shape and change the drawing to fit it.
How do I keep tiny artwork from looking crowded?
Choose a calm base, keep the surrounding nails simple, and leave visible space around the motif. If two details touch, remove one rather than adding more outline. With the light strand, for example, fewer separate bulbs will read more clearly than a row of touching dots.
Should I choose flat art or raised decorations?
The concepts here focus on flat painted details. You can ask for the look of a pearl, a bow, or an ornament without adding a physical charm. If you want raised elements, discuss their size and placement separately; that changes the reference and may feel different during daily tasks.