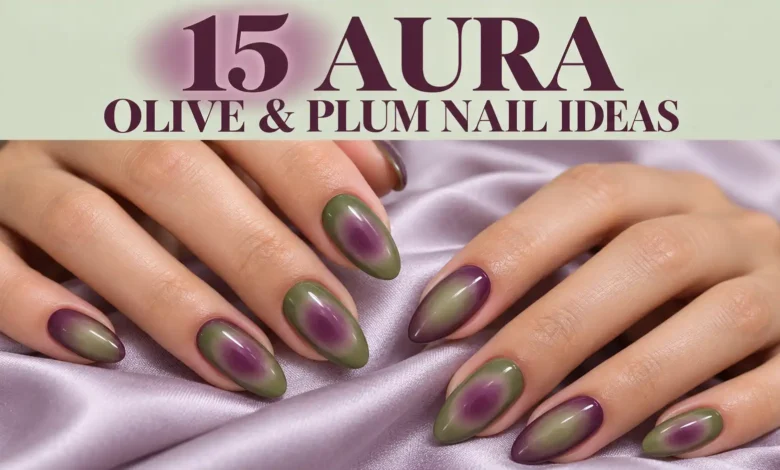
For aura olive and plum nails, start with the placement of the glow. A plum center inside olive gives you a green-led manicure; a pale olive center inside plum makes the contrast brighter. If you want less color, keep the base sheer or put the aura on just two nails.
These 15 ideas show how much that small decision changes the result. There are compact designs for short nails, glassy jelly finishes, and a few graphic details for a more dressed-up set. Each includes the detail to preserve when you take the reference to your nail artist.
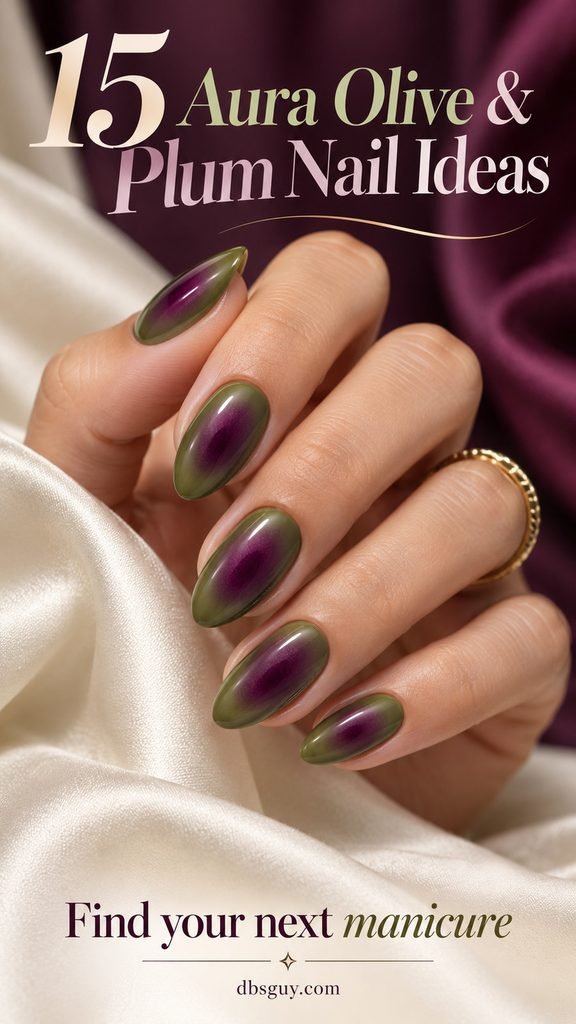
The images are AI-generated design concepts, not photographs of completed salon work. Use them to discuss placement and finish, then choose your colors from real polish swatches.
Choose the Glow Before the Polish
An aura has a concentrated patch of color with a blurred edge. Unlike a simple tip-to-base ombré, it usually leaves another shade visible around that patch. The glow can be dark, light, tiny, stretched, or shifted off-center.
For this pairing, compare a muted yellow-green olive with a clearly purple plum. Burgundy and green nails offer a neighboring color story, but a redder wine shade will change the mood. Keep the actual swatches together when you decide.
- For a quiet first set: try the two short accent nails in idea 3 or the tiny sheer glows in idea 5.
- For a stronger contrast: choose the pale olive centers in idea 2.
- For something more graphic: look at the French tips in idea 8 or cream orbit accents in idea 15.
1. Classic Plum Centers Inside Olive
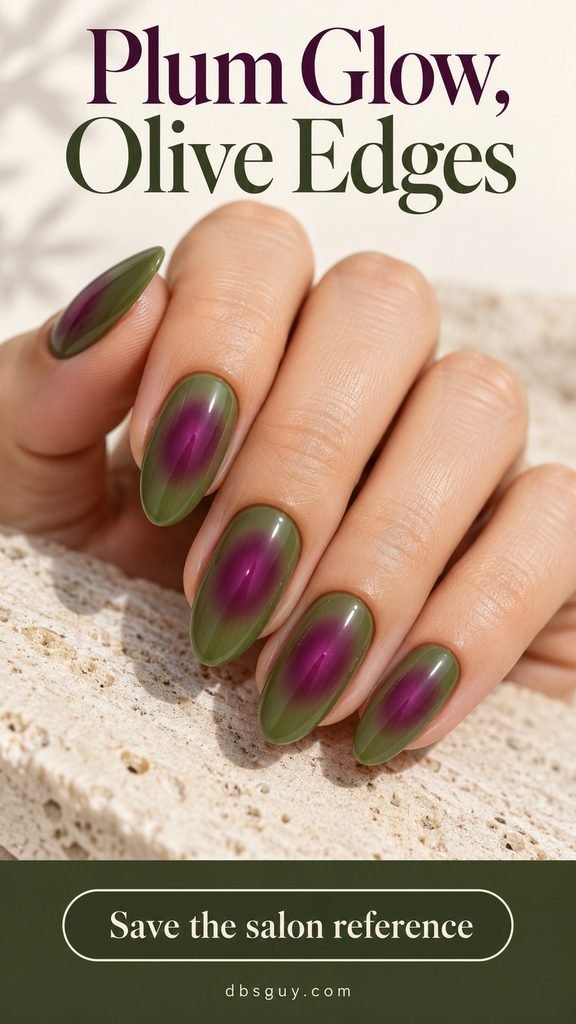
A rich plum oval inside muted olive is a clear starting point for this palette. The green remains visible at the sides and both ends of the nail, giving the purple a soft frame. A glossy almond shape follows the length of the glow without adding another pattern.
Keep the center narrower than the nail. If the plum spreads too far, the olive becomes a thin outline and the balance changes. For a shorter version, shorten the colored oval along with the nail rather than letting it run into the tip.
Salon reference: Olive bases with elongated, softly diffused plum centers. Leave a visible olive margin all around and finish glossy.
2. Pale Olive Light Inside Deep Plum
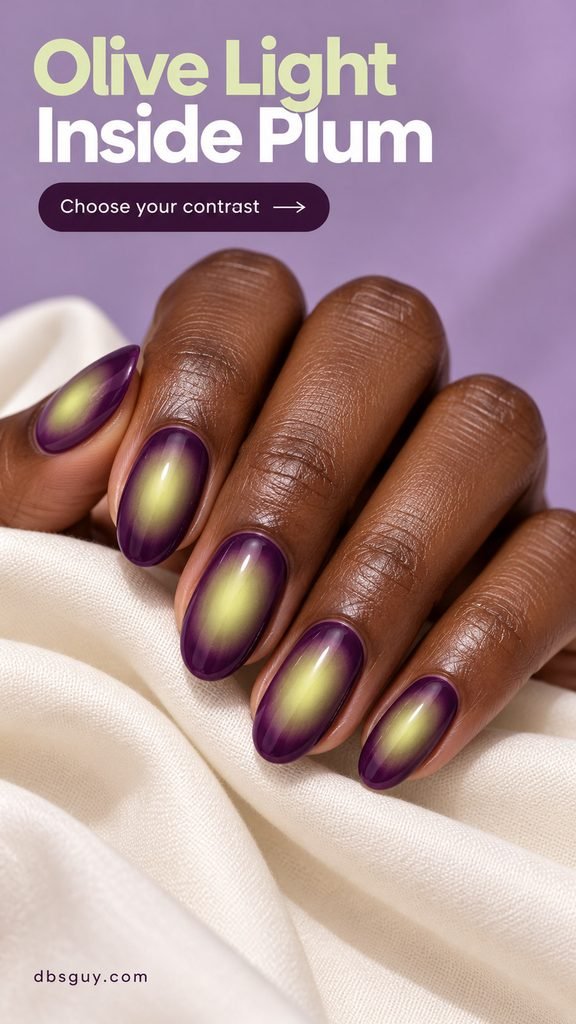
Reversing the colors changes where your eye lands. Here, pale yellow-olive centers appear bright against the deeper purple perimeter. Choose this version when you want the glow to stand out from across a table, rather than only in a close-up.
The center shade matters more than its name. A very dark olive can disappear into plum; a much brighter chartreuse makes the set feel sharper. Ask to compare a muted light olive and a stronger yellow-green on practice tips before choosing the level of contrast.
Keep this detail: A soft transition between the light center and plum edge, with enough purple remaining to hold the oval shape.
3. Two Aura Accents on Short Squoval Nails
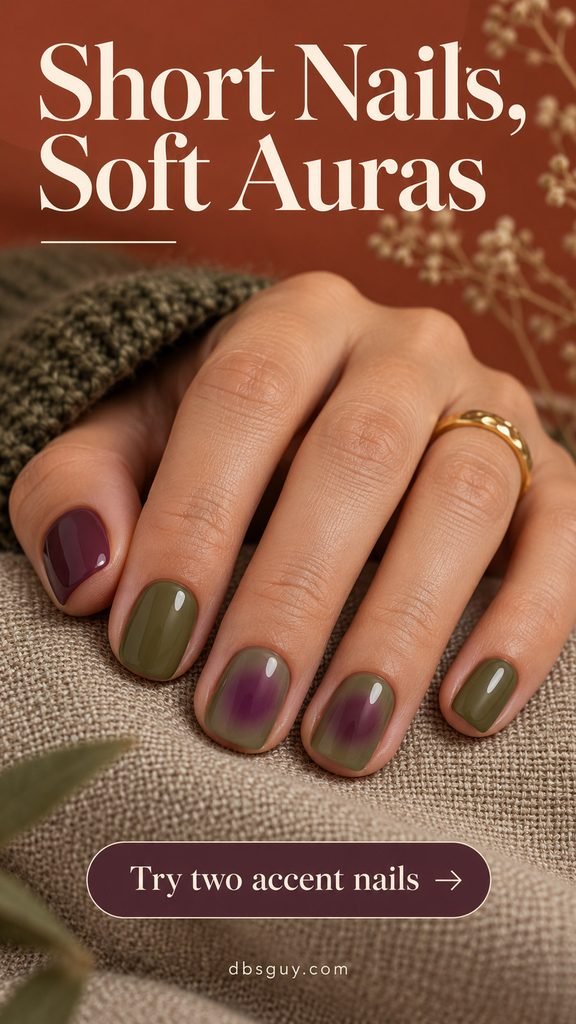
Two neighboring aura nails give a short manicure a focal point without filling every finger with artwork. The middle and ring nails carry plum glows over olive; plain olive nails and a plum thumb complete the set. The rounded square outline keeps the design compact.
This is a useful reference if you like the palette but want to keep the appointment brief in scope: ask the artist to quote two detailed nails per hand, rather than a full aura set. Keep the glows small enough that olive still shows beside them.
Salon reference: Short squoval nails, two olive-and-plum aura accents, plain olive neighbors, and a glossy plum thumb.
Also read: 17 Dark Aura November Nail Designs With a Soft, Smoky Glow.
4. A Smoky Matte Aura
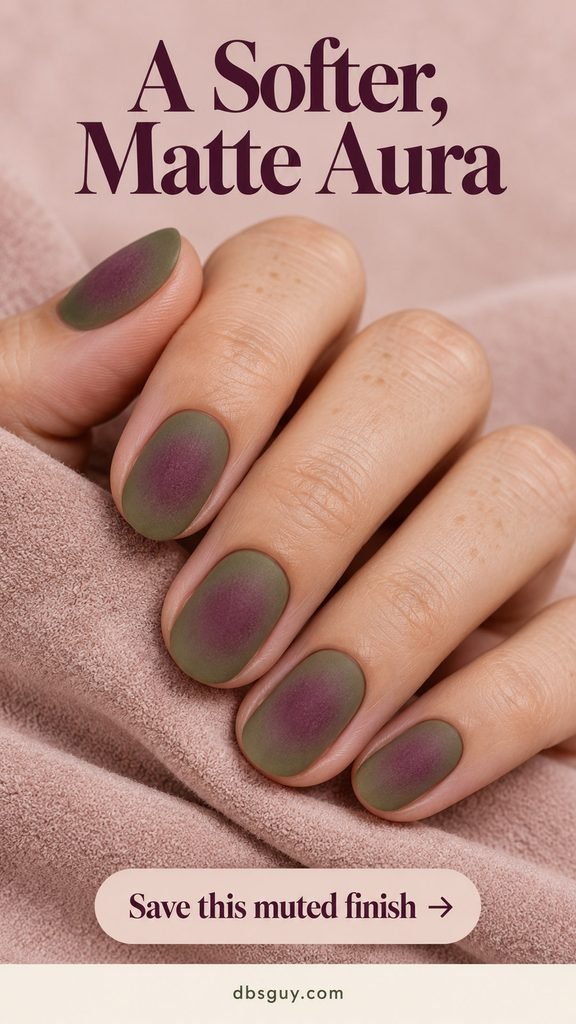
The matte finish makes this version feel closer to soft suede than glossy glass. Dusty plum spreads broadly through the olive, with a gentle fade that suits the rounded nail outline. It is a good direction if your saved earthy nail inspo favors muted color over bright shine.
Agree on the finish before the full set is completed. Compare a sample with the intended matte top coat so you can judge whether the two colors remain distinct. Preserve a little green at the edges; an oversized plum cloud can swallow the quieter olive shade.
Salon reference: Rounded olive nails with broad dusty-plum auras, a smooth matte finish, and no metallic accents.
5. Tiny Glows on a Sheer Nude Base
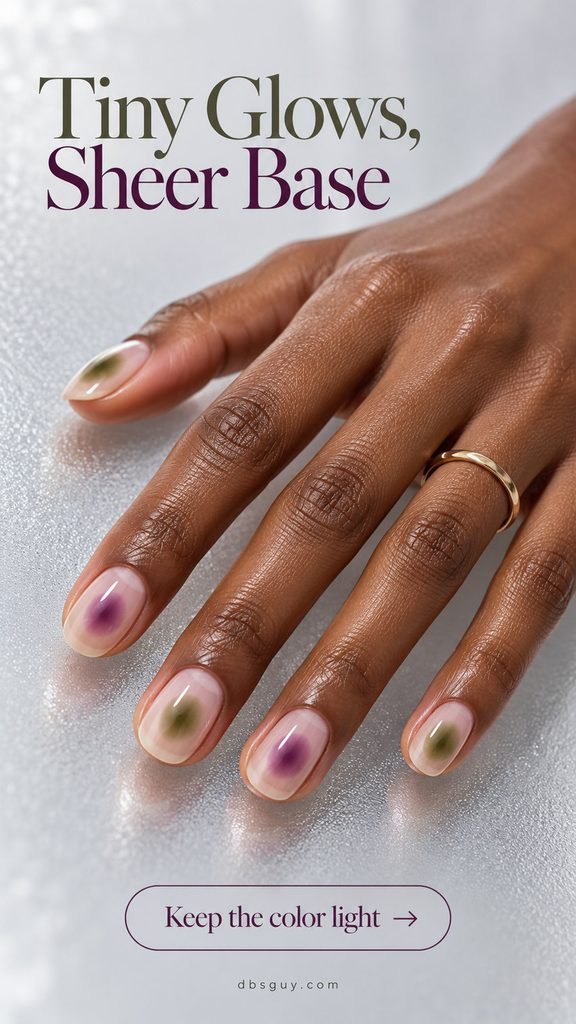
Small olive and plum clouds alternate across a translucent nude base. Instead of blending the two shades together on every finger, the set shares them across the hand. The open space is what makes it feel light.
Choose a sheer base you like on its own, because it will remain the largest visible part of each nail. Keep the colored spots feathered rather than neatly circular. On very short nails, one small glow per nail is enough; enlarging it would move the design toward full coverage.
Ask for: Alternating olive and plum micro auras on sheer nude nails, with plenty of uncovered base around each spot.
6. Side Glows With a Nude Channel
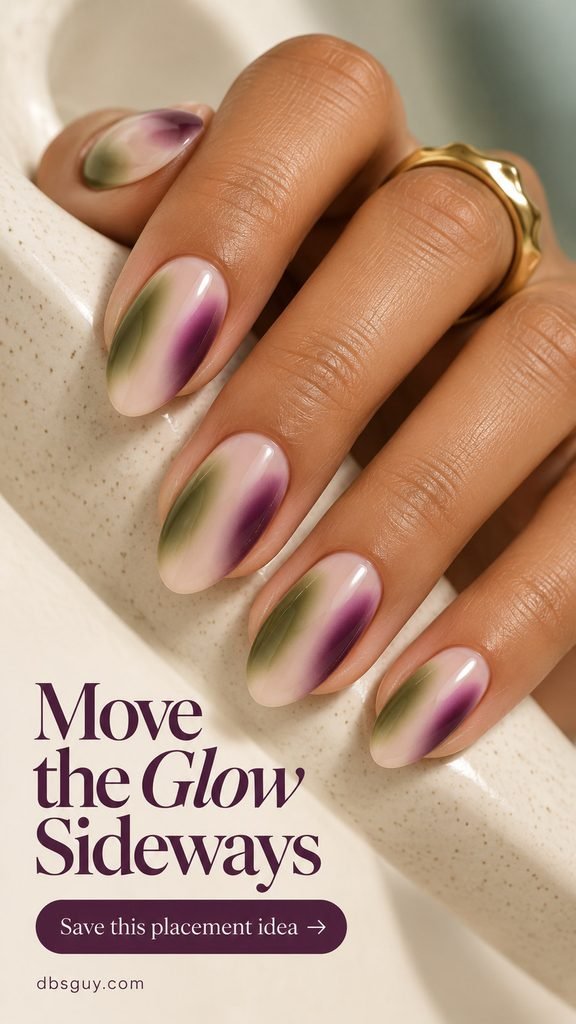
This placement moves the color away from the middle. Olive enters from one side of the nail and plum from the other, leaving a narrow nude channel between them. The two soft patches create movement without turning into a swirl or marble pattern.
The gap is the detail to protect. If the colors meet across the whole center, you lose the open strip that separates this look from a blended two-color nail. On a narrower nail, reduce both patches rather than squeezing out the nude space.
Salon reference: Sheer nude almond nails with an olive side aura and an opposing plum side aura. Leave a visible nude channel between them.
Also read: 19 Olive Green November Nail Ideas That Pair Beautifully With Cozy Neutrals.
7. Twin Plum Orbs on Olive
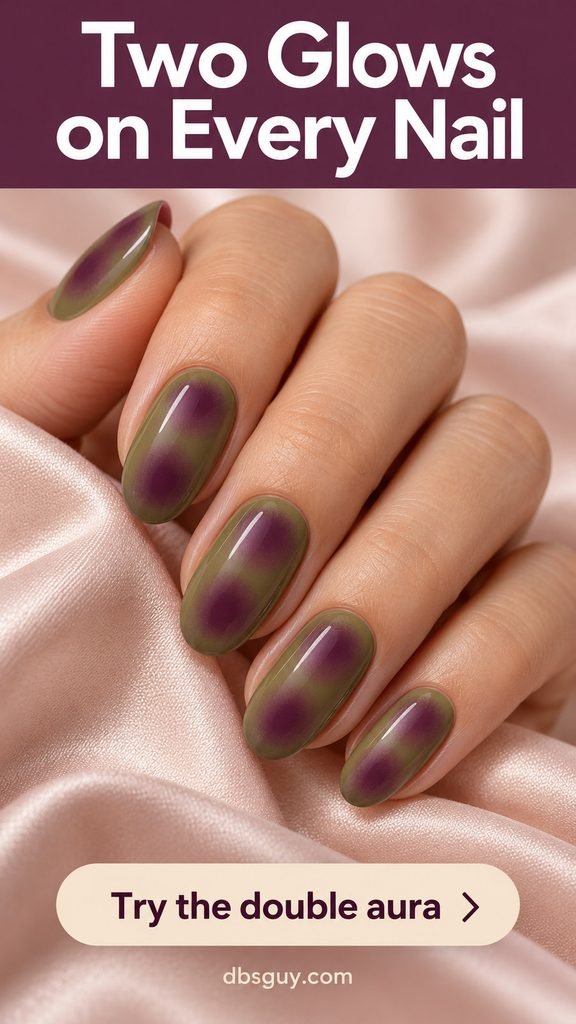
Two separate plum glows give each nail a different rhythm from the usual single center. One sits higher and one lower, with olive showing between them. A medium oval leaves room to read both shapes without making either one tiny.
Save this reference for the spacing as much as the colors. If the glows overlap, they become one long aura. If they have crisp edges, they read as dots. For a short adaptation, put the twin orbs on one accent nail and use a single glow on the others.
Keep this detail: Two fuzzy plum patches with a clear olive interval between them.
8. Olive Auras With Plum French Tips
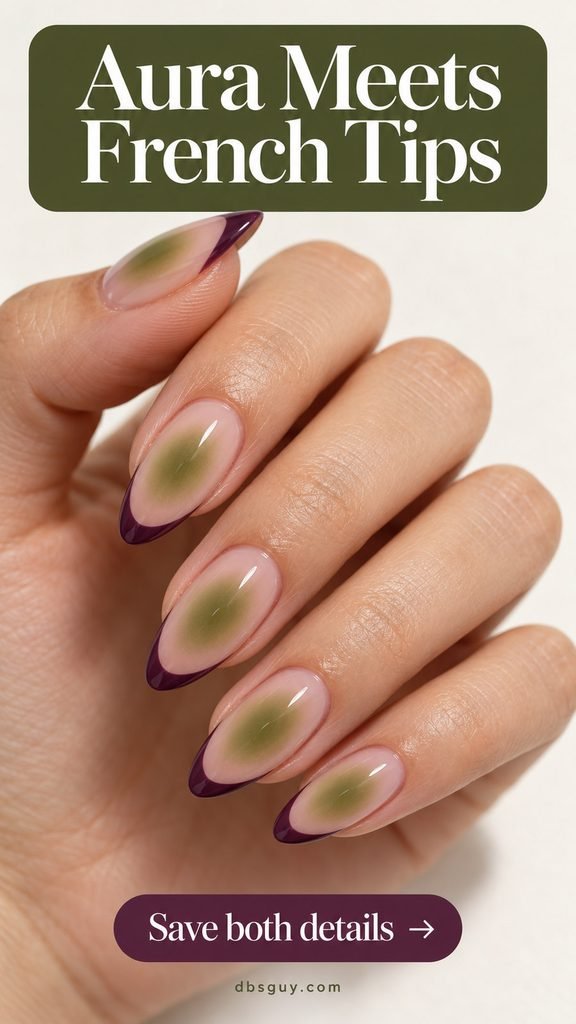
A crisp plum French tip gives a soft olive aura something structured to sit beside. The nail bed stays sheer, the green glow floats near its center, and the purple follows the free edge. You can see all three areas rather than one continuous gradient.
Choose the tip width after deciding how much room the aura needs. A broad French tip can crowd a short nail, so ask for a finer band if you are keeping your natural length. Leave some nude between the glow and tip to keep both features readable.
Salon reference: Sheer nude bases, small diffused olive centers, and narrow, sharply defined plum French tips.
9. Plum Glows Toward the Tips
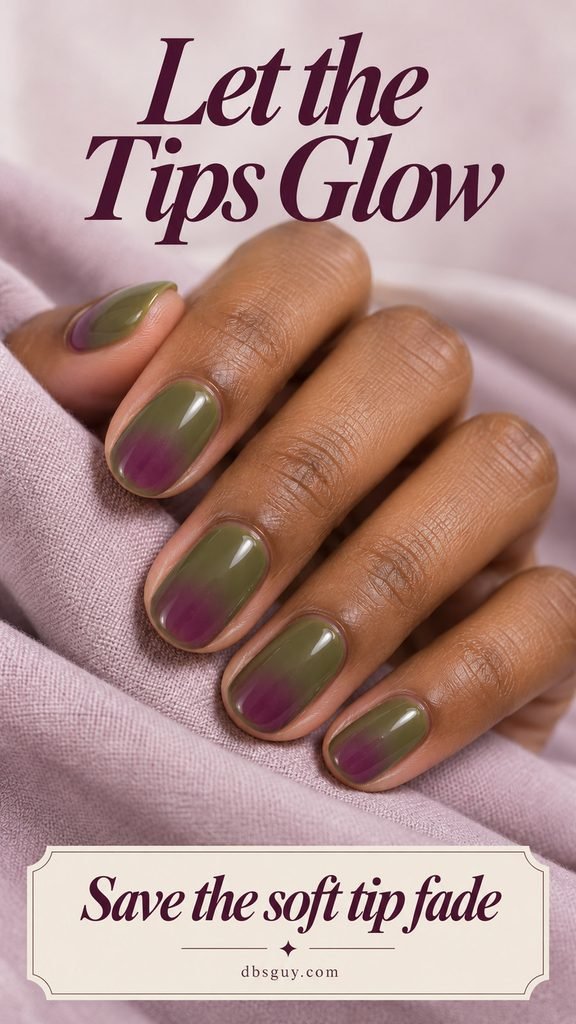
These short olive nails carry their plum color low on the nail, toward the free edge. The result has the suggestion of a colored tip with a much softer boundary. It suits someone who likes French placement but does not want a sharply painted smile line.
Keep the plum concentrated in a rounded patch toward the tip instead of fading the entire nail from green to purple. Olive should remain visible across the upper nail and alongside the glow. A short oval is enough space for this compact version.
Ask for: Glossy olive nails with small, soft plum tip glows. Keep the cuticle-side area olive and avoid a hard French border.
10. A Plum Halo Around an Olive Center
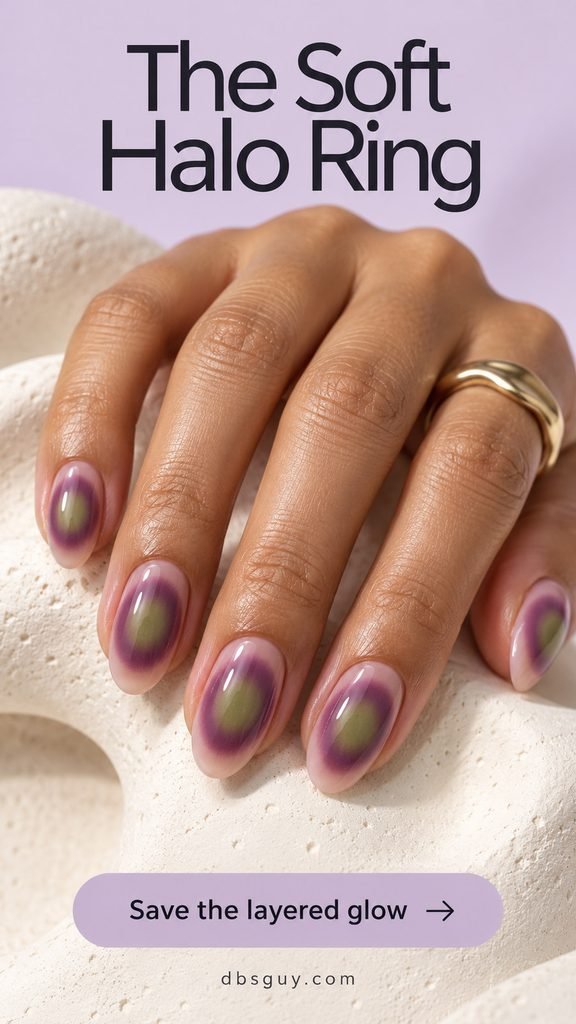
This three-zone design has a pale olive center, a blurred plum ring, and a sheer nude outer margin. The extra nude space changes the effect: the plum appears to float inside the nail rather than cover it from edge to edge.
The ring needs enough width to remain purple after blending, but its edges should stay soft. Ask the artist to show the full arrangement on one tip before repeating it. If your nails are too small to display three clear zones, keep this as an accent and choose simpler neighbors.
Salon reference: A light olive center inside a diffused plum halo, with a visible sheer nude margin outside the purple.
11. Diagonal Auras on Coffin Nails
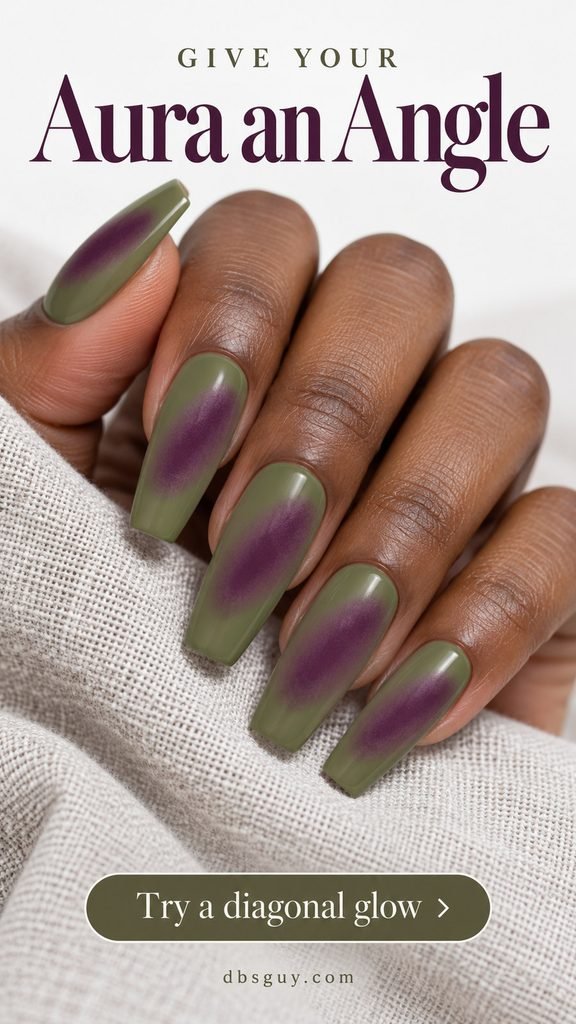
A stretched plum cloud sits at an angle inside an olive coffin nail. The squared tip gives the long shape a firmer outline, while the blurred diagonal keeps the artwork fluid. This option uses the extra length for placement rather than adding more decoration.
Show the artist the angle you want. A centered lengthwise oval will look closer to idea 1; a sharp diagonal stripe will lose the aura effect. The purple should remain soft and contained, leaving olive visible around its ends. If you prefer less length, keep the same direction on a shorter tapered square.
Keep this detail: An elongated, gently slanted plum glow with feathered edges and no crisp stripe.
12. Reversed Colors on Each Hand
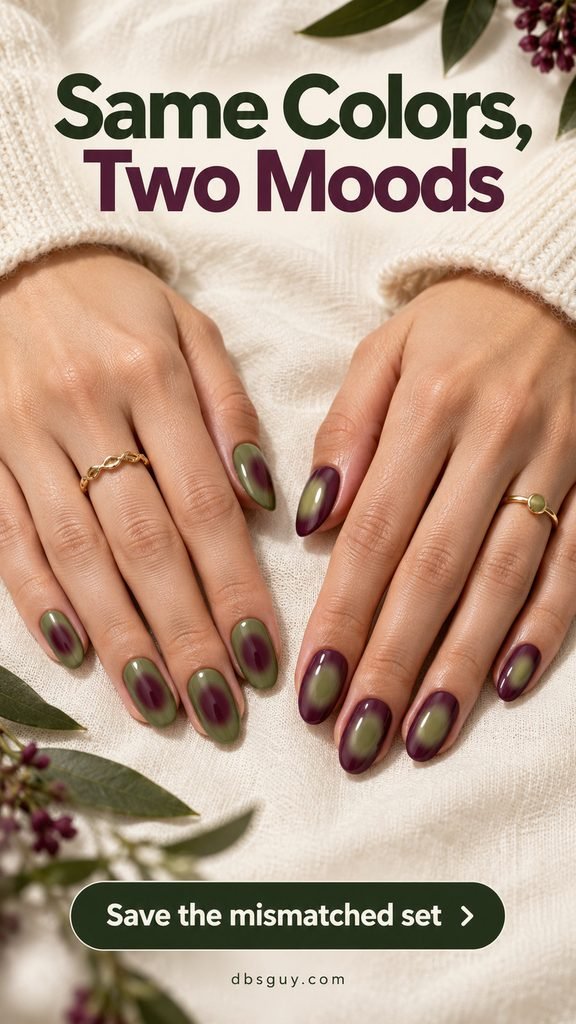
One hand wears olive bases with plum centers; the other wears plum bases with olive centers. The matching nail shape and glossy finish connect the two sides. It is a more obvious color statement than mixing a couple of accent nails into one hand.
Ask to see the same olive in both roles. It may read differently as a softly layered center over plum than as a full base. Agree on the finished appearance of each hand rather than insisting on an identical number of coats or layers.
Salon reference: Matching oval shapes, with olive-outside/plum-inside on one hand and plum-outside/olive-inside on the other.
13. Auras With Two Tiny Silver Stars
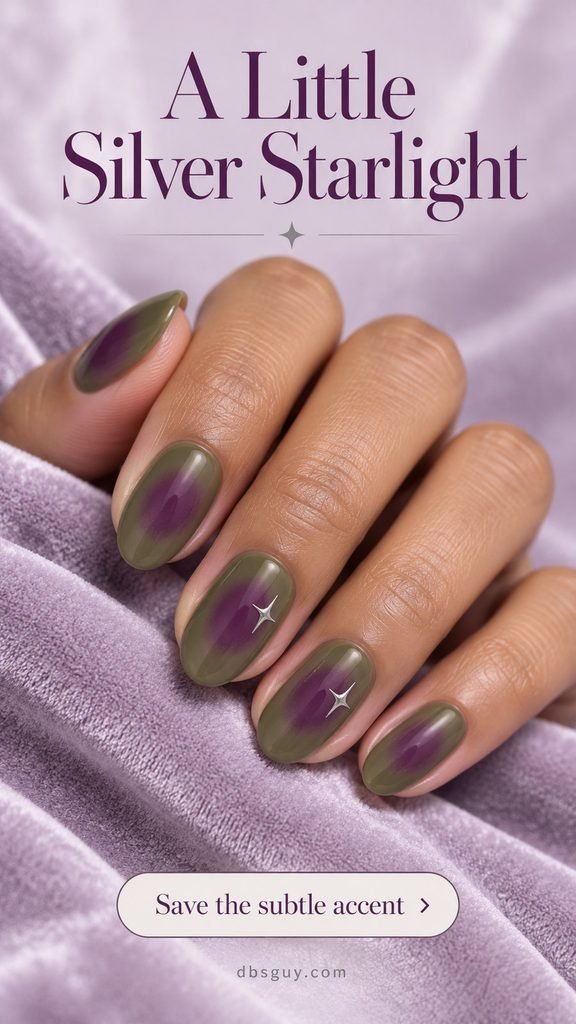
A small silver star on each of two accent nails gives the olive-and-plum blend a celestial detail. The stars sit beside the glows instead of covering their centers. Most of the set remains simple, so the silver feels like a small discovery.
Choose the star size against your actual nail. It should leave the aura visible and have a little space around its points. A flat painted or suitable decal version can express the idea without a raised charm; discuss the available materials with your artist.
Ask for: Olive nails with plum auras and one tiny silver four-point star on each of two accent nails.
Also read: 19 November Nail Designs With Gold Foil Details That Catch Every Little Glimmer.
14. Translucent Plum Jelly With Olive Clouds
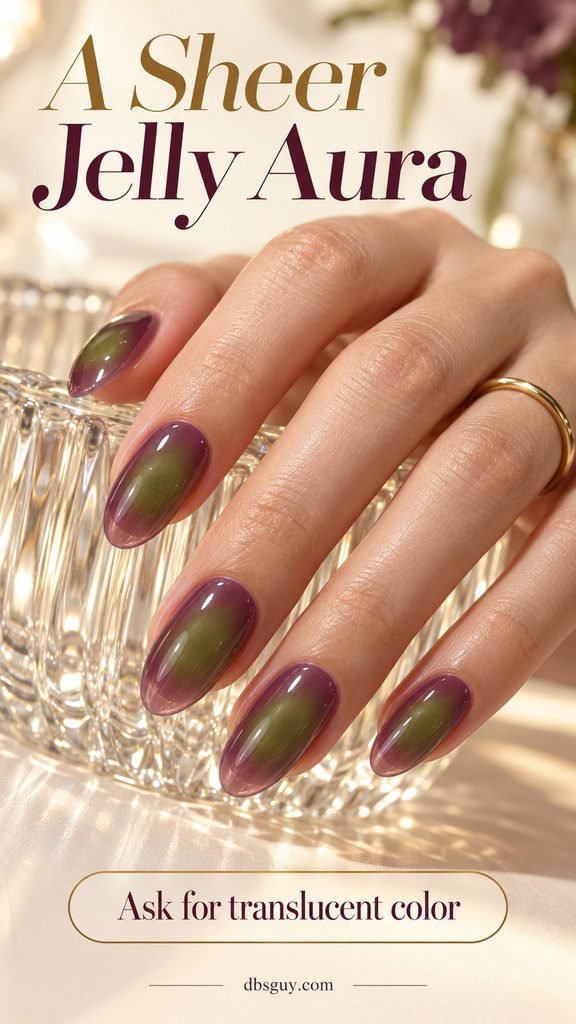
A sheer plum tint and soft olive clouds give this version a glassy, layered appearance. The translucent perimeter is especially useful to save in your reference: it separates the jelly look from an opaque plum manicure with green centers.
Ask for a sample that shows the transparency you like before the artist builds the color. More coverage may deepen the plum but hide the see-through edge. Keep the olive cloud soft enough to sit within the overall look rather than becoming an opaque green dot.
Salon reference: Glossy, translucent plum jelly nails with diffused olive centers and visibly sheer edges.
15. Cream Orbit Accents Around the Glow
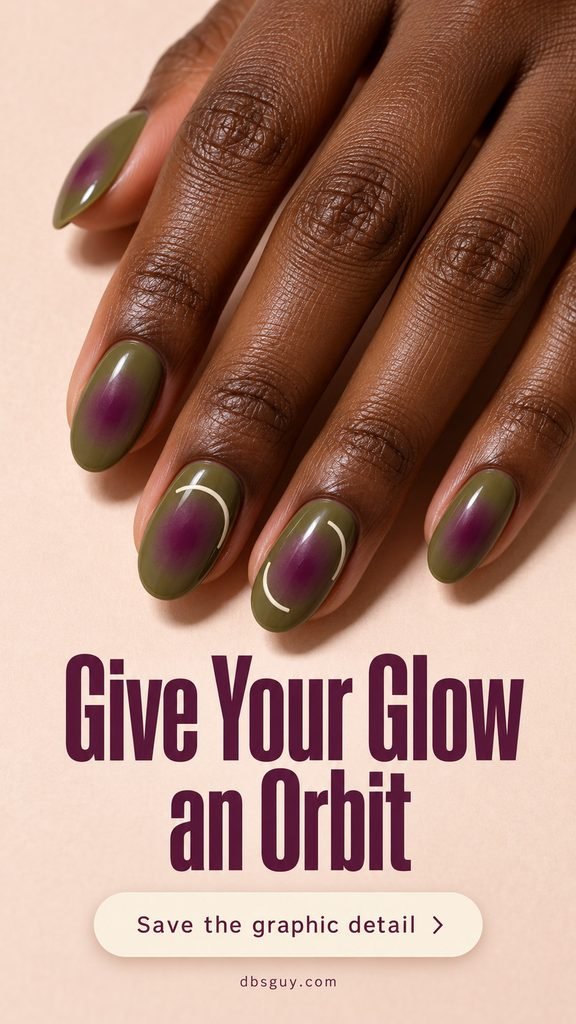
Two thin cream arcs bring a graphic detail to a familiar olive-and-plum aura. Each arc curves partway around its glow, leaving a deliberate opening. The contrast between a sharp line and soft color is the point of this design.
Keep the cream detail on two nails so the remaining auras have room to stand on their own. Ask for a fine painted line with a clear break, rather than a thick full ring. If the nails are short, simplify to one arc on a single accent finger.
Salon reference: Olive bases and plum auras, with a thin open cream orbit on two accent nails. Keep the arcs offset from the centers.
Make Your Salon Reference Specific
Save the image and its placement note together. Tell your artist which color belongs outside, where the glow should sit, whether the base is sheer or opaque, and which nails get extra details. Then choose the length and shape you are comfortable wearing.
For fall nails in 2026, this palette can fit a seasonal mood without requiring leaf art or another motif. Start with the blend itself. Add a French tip, star, or orbit only if that detail is part of the look you actually want.
Questions Before You Choose Your Aura Nails
Can I create an aura with regular nail polish?
Yes. OPI’s sponge nail-art tutorial demonstrates building diffused color with lacquer and a cosmetic sponge. It supports a machine-free approach, although these olive-and-plum combinations have not been tested here. Practice the blend on a nail tip and follow your products’ drying and finishing instructions.
Why do my olive and plum shades look muddy together?
Compare the two colors separately first. If both look very dark, choose one lighter shade so the placement remains visible. Keep the most concentrated color in a smaller area and judge a finished practice tip. A broad blended overlap can obscure the original shades; more color is not always the answer.
Which design should I choose for short natural nails?
Start with idea 3 for two accent nails, idea 5 for small sheer glows, or idea 9 for color toward the tips. All keep the design compact. Reduce the glow to fit the nail rather than choosing an extension solely to reproduce the picture.
Do I need magnetic polish for this effect?
The looks here describe softly blended color placement, not a magnetic cat-eye requirement. Ask your artist which technique suits the products they use. If you want a moving shimmer as well as the aura, discuss that as an additional finish rather than assuming it is included.
How do I keep both colors recognizable?
Choose the outside shade first and reserve enough space for it. On an opaque set, that usually means keeping a visible margin around the glow. On a sheer set, leave open base between the colored patches. A swatch made with the intended finish is more useful than judging two bottles side by side.
Pick the placement you would still like in a simpler version. That gives you a clear starting point even if your artist adapts the exact shade, length, or amount of detail.