21 Christmas Bow Nail Ideas That Make Your December Manicure Feel Gift-Wrapped

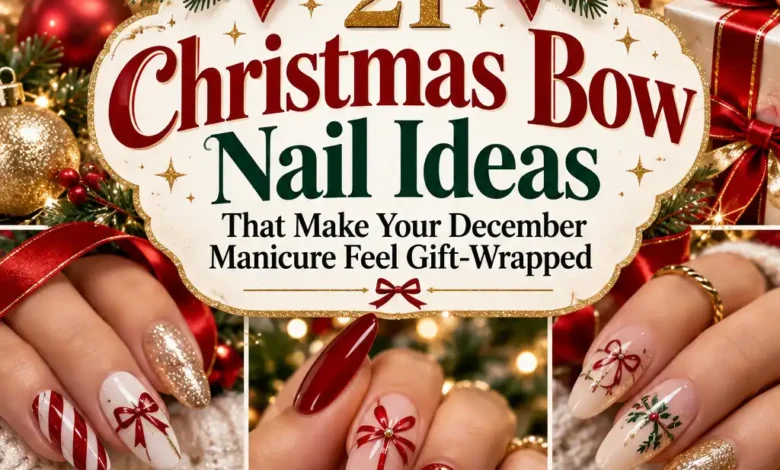
A little bow can change the whole mood of a manicure. Add one to a red French tip and it feels ready for Christmas dinner. Paint a burgundy ribbon over milky nails and an everyday neutral suddenly has a festive detail worth a closer look.
The trick is choosing the right amount of bow. A fine outline gives you a subtle ribbon effect; crossed lines turn an accent nail into a wrapped present; a sculpted bow becomes the centerpiece of the set. You can get the holiday feeling with any of them, including on short nails.
These 21 Christmas bow nail ideas cover soft neutrals, classic red and green, winter blues, and a few dressier finishes. Each look includes a clear salon request and an adjustment you can make for your nail length or daily routine. Start with the color you actually enjoy wearing, then let the ribbon be the finishing touch.
1. Classic Red French Tips With a Tiny Bow
Red French tips already have that Christmas energy. A tiny matching bow adds a playful detail while leaving most of the nail softly neutral. This is a good starting point if you like a French manicure and want a holiday version that still feels familiar.

Notice the space between the bow and the red edge. Keeping the knot just below the French tip helps both shapes stay readable. Long ribbon tails can point toward the cuticle, but they should remain fine enough that the nail does not become a solid red illustration.
Ask for: A pink-neutral base, slim cherry-red French tips, and one small red outline bow on each ring finger. Keep the bow flat, with open loops and delicate tails.
For short nails: Use a very narrow red tip and shorten the tails. If your nail bed feels crowded, move the bow slightly toward the center and leave the neighboring nails plain. This look pairs easily with a cream sweater, a red dress, or a simple black holiday outfit.
2. Short Milky Nails With One Burgundy Bow
Milky nails with one burgundy bow are the quiet version of Christmas nail art. The creamy background lets the small ribbon do the work, and the darker red feels a little softer than a bright cherry accent.

Choose the base against your own hand before committing. A warm ivory, pink milk, or cooler soft white will each change the mood. You want a milky finish you enjoy on its own, since most of this set stays undecorated.
Ask for: Short rounded nails, a glossy milky base, and one centered burgundy bow on the ring finger. No extra dots, glitter, or ribbon cross is needed.
The useful detail: The bow should fit comfortably inside the nail, with visible background on both sides. A tiny decal can be a practical alternative to hand painting. If you want an even smaller holiday hint for workdays, choose thinner loops and a shorter pair of tails.
3. Emerald Gift-Wrap Nails
Emerald and gold look like they belong beside a beautifully wrapped present. Here, one nail carries the ribbon treatment while the rest keep their rich green color. The square shape gives the vertical and horizontal lines a tidy, graphic setting.
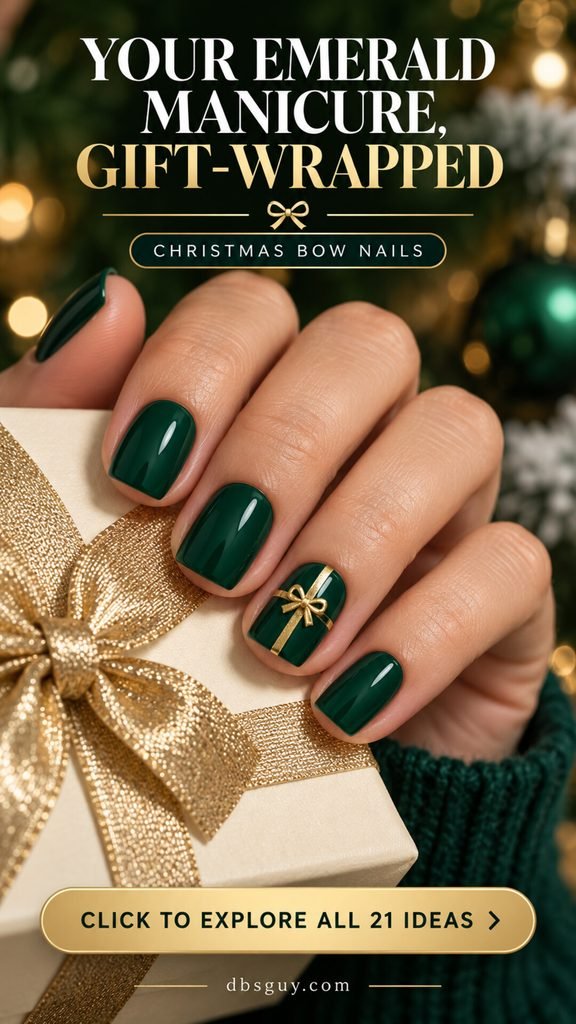
The bow sits at the ribbon intersection, so the design reads as gift wrap rather than a random gold accent. Keep the crossing lines relatively narrow; a thick metallic cross can take over a short nail before the bow is added.
Ask for: Glossy emerald nails with one gold gift-wrap accent per hand. Show the reference and specify whether you want painted gold ribbon art or a small metallic bow detail like the one pictured.
For a smoother version: Use gold nail-art polish or a suitable decal for the bow instead of a raised charm. On very short nails, keep only a vertical ribbon and a small bow. You still get the present-inspired idea with more green showing around it.
4. Ballet Pink With White Ribbon Bows
Ballet pink and white bows have a softer holiday mood. The pink base feels gentle, while the white ribbons bring a frosty detail without adding another strong color. It is an easy palette to carry from a December brunch to a family dinner.

Two accent nails give this set a little rhythm. Keep the bows similar in style, but they do not have to be positioned at precisely the same height. Slightly different placement can make the art feel less like a repeating stamp.
Ask for: Glossy ballet-pink nails with delicate white bows on the middle and ring fingers. Keep the loops open and leave the remaining nails plain.
Make it yours: Oval nails give the tails room to flow. For short round nails, use a smaller bow on the ring finger alone. If your chosen pink is very pale, ask to see the white detail on a sample first so it has enough contrast to show up.
5. Cherry Red With a White Present Accent
This is the manicure version of a red present tied with a white ribbon. It is cheerful, clear, and easy to recognize from across the table. The plain red nails keep the set cohesive, while one wrapped accent supplies the Christmas detail.

The white crossing lines matter as much as the bow. A slender vertical line makes the nail look wrapped; a horizontal line completes the present effect. Place the bow near the crossing point so all three elements feel connected.
Ask for: Glossy cherry-red nails with one white ribbon cross and a small white bow on the ring finger. Keep the other nails solid red.
For short nails: Use thin ribbon bands and a compact bow. You can recreate the color combination with regular lacquer and nail-art polish, provided each layer is ready for the next step. A bow sticker is also an option if painting the loops feels fiddly. Finish according to the products you use.
6. Champagne Shimmer With Black Bows
Black bows give champagne shimmer a crisp little edge. The base supplies the light-catching effect, and the dark ribbon keeps the nail art visible among the sparkle. It feels especially good with black satin, a champagne blouse, or a dress with simple lines.
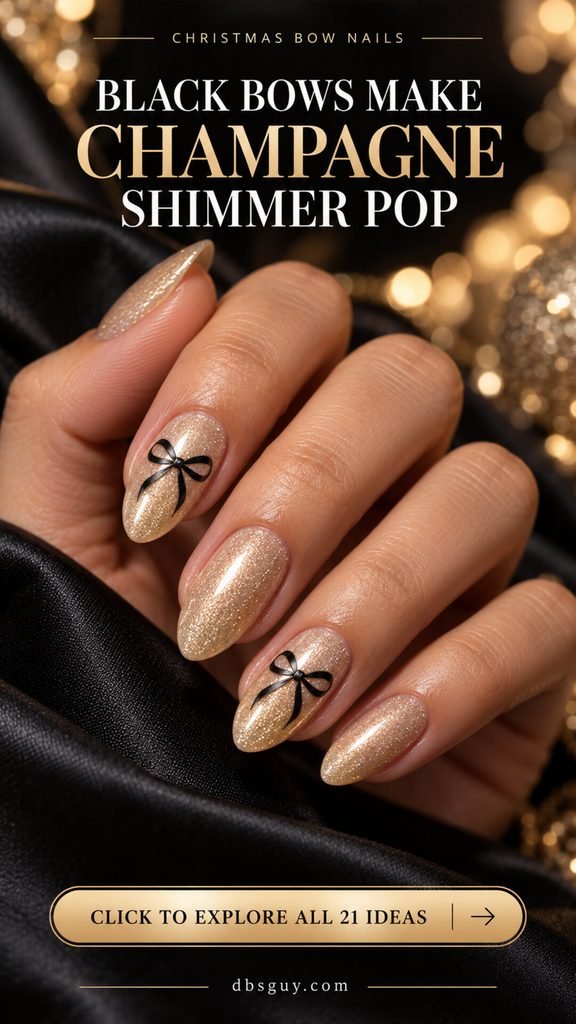
Choose the shimmer before choosing the bow size. A smooth, fine sparkle leaves more visual room for a delicate outline. A busier glitter base usually needs a more defined bow to stay readable.
Ask for: Champagne shimmer nails with black bows on two accent fingers. Keep the bow silhouette clean and skip additional crystals or stars.
Dial it down: Use one bow per hand if you want the shimmer to be the main feature. The reference has fuller ribbon shapes; a flat black outline or decal gives a lighter interpretation. Short oval nails work too—just shorten the tails rather than shrinking every line until the bow disappears.
7. Pearl-Glazed Nails With a Red Bow
One red bow over a pearly base has a lovely contrast: soft glow underneath, clear Christmas color on top. It is an appealing option if you like pale winter nails but want one detail that makes the season obvious.

The base can be created in different ways. A pearlescent polish gives a luminous effect, while a salon glaze or chrome treatment may have a smoother reflection. Show your technician the glow you want rather than assuming every product labeled pearl will look the same.
Ask for: An ivory or softly pink pearl finish with a small red bow on the ring finger. Keep the neighboring nails free of art so the red accent stands out.
For everyday wear: Choose a painted bow or flat decal. A raised ribbon can be beautiful, but it changes the feel of the nail. This design also translates neatly to short round nails because the glow does not depend on a long free edge.
8. Burgundy Nails With Gold Ribbon Art
Burgundy with a gold bow feels dressy without needing glitter on every finger. The dark base gives the metallic ribbon a clear outline, and the longer tails add movement down the nail.

An almond shape works well here because the tails can follow the nail’s curve. Keep the bow slightly above the center and let the ends taper. A heavy gold knot or thick, straight tails can make the detail feel crowded.
Ask for: Deep glossy burgundy nails with one fine gold bow and flowing tails on the ring finger. Specify a flat ribbon design if you prefer a smooth surface.
For shorter nails: Keep the same colors, but use a compact bow with short tails. You can also choose a single gold bow decal without the extended ribbon lines. Let your jewelry guide the tone of gold: warm yellow gold feels different from pale champagne gold, and either can suit this palette.
9. Icy Blue With Silver Bows
Icy blue bows offer a festive option outside the usual red-and-green palette. Silver brings the winter feeling, while the pale blue keeps the manicure light. The two bow accents give the set more detail without covering every nail.

The reference has small metallic bows with visible dimension. If you want that jewelry-like finish, ask to see the actual embellishments before they are attached. Their width and height matter more on short nails than they do in a close-up picture.
Ask for: Glossy icy-blue nails with silver bows on the middle and ring fingers. Confirm whether the bows will be metallic embellishments, flat decals, or painted art.
For a simpler set: Choose one painted silver bow per hand. A slightly deeper powder blue can also create more contrast with silver if a very pale base makes the detail hard to see. This is a pretty match for winter whites, navy outfits, and silver accessories.
10. Neutral Nails With Scattered Mini Bows
Scattered mini bows turn a neutral manicure into a small holiday pattern. They feel playful because the ribbon motif repeats, but the background stays calm. The reference balances three tiny bows on one nail with a single bow on another.
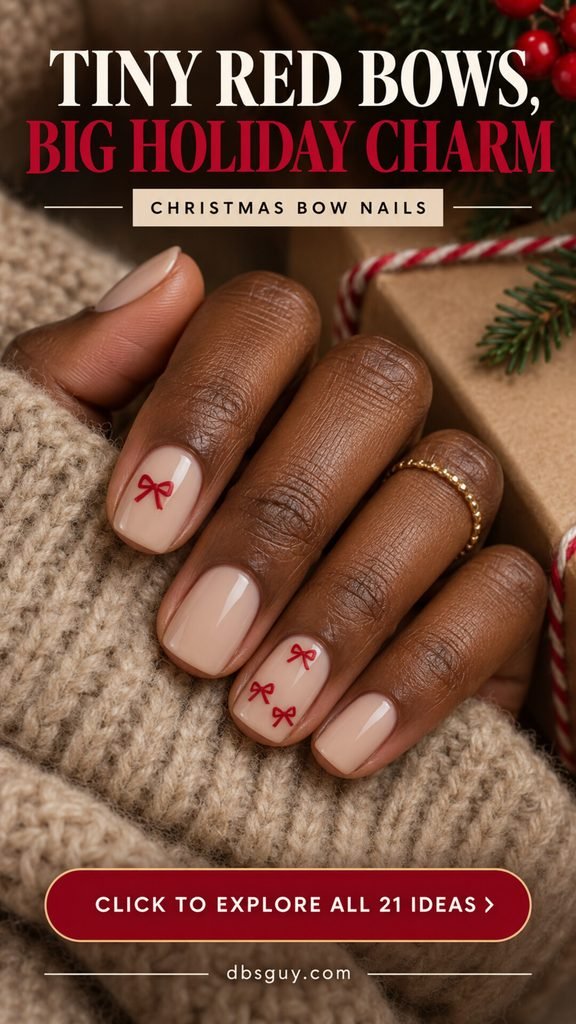
Spacing is the key. Each bow needs a little clear space around it, so the loops and tails stay recognizable. It is better to use fewer readable bows than to squeeze several onto a nail that cannot comfortably hold them.
Ask for: A warm beige or pink-neutral base, three small red bows spaced across the ring finger, and one red bow on the index finger. Keep the other nails plain.
For very short nails: Use two mini bows on one accent nail, or one slightly larger bow instead. Choose the neutral against your hand rather than treating one beige as everyone’s nude. A darker caramel or a rosier neutral can carry this same design beautifully.
11. White French Tips With Black Ribbon
A white French manicure with a black ribbon has a neat, dressy look. The bow adds contrast across the pale tip, so the design feels more graphic than a matching white bow would.

This version is about placement. Let the tails overlap the French edge slightly, but keep the knot on the pink-neutral part of the nail. That helps the bow connect the two colors without hiding the shape of the tip.
Ask for: White French tips over a pink-neutral base, plus one black ribbon bow on the ring finger. Ask for flat art or a decal if you want a smooth interpretation of the reference.
Adapt it: On short nails, narrow the white tip and reduce the length of the tails. You can soften the contrast with a very dark brown bow, too. Keep the remaining fingers simple; extra black outlines around every French tip would turn this into a different, much busier set.
12. Pink Velvet With a White Bow
Pink velvet gives a white bow a glowing backdrop. The pale ribbon is easy to spot against the rose color, while the base adds interest as the light changes. It is a sweet option for a holiday party when you want pink to remain the main color.
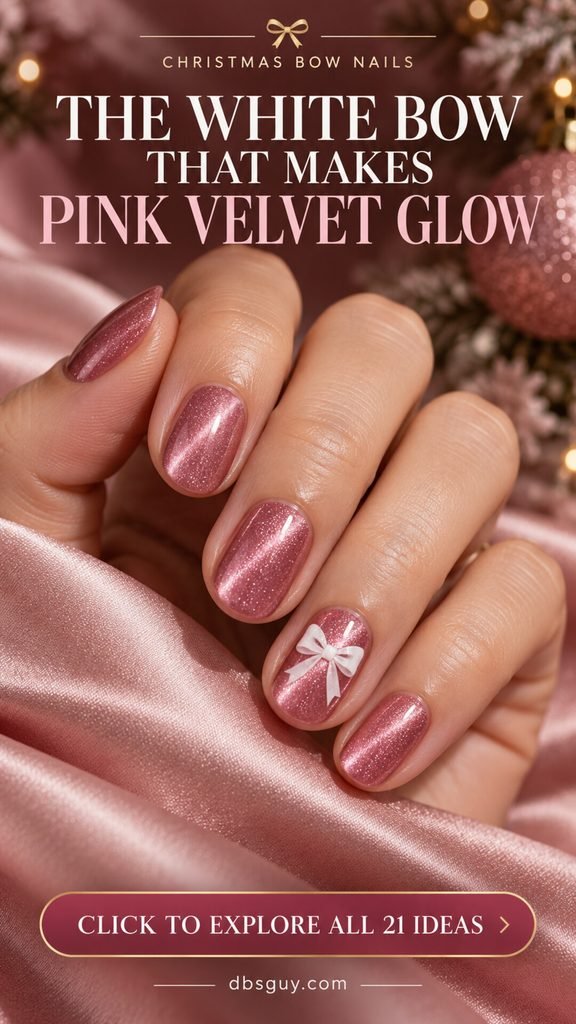
Ask for the finish clearly. A magnetic velvet effect is created with magnetic polish and a magnet; ordinary glitter can look sparkly, but it does not create the same moving effect. The reference captures a bright, shimmery moment, so check a sample from more than one angle.
Ask for: Rose-pink magnetic velvet nails with one white bow on the ring finger. Confirm the shade, glow placement, and whether the bow will be flat or raised before the service starts.
A regular-polish alternative: Use rose shimmer with a white painted bow. It gives you the same color pairing with a different finish. Keep a short oval shape if you want a compact set, and let the bow remain the only extra decoration.
13. Silver Glitter With a Navy Bow
Silver glitter and a navy bow have an evening-ready feel. Navy is dark enough to stand out against silver, but it adds a little color that black would not. It is a good choice if your holiday wardrobe already includes blue velvet or a navy dress.

The reference has visible glitter particles and a fuller ribbon silhouette. That combination looks lively in a close-up. For a quieter finish, choose smaller glitter particles and a thinner bow outline.
Ask for: Silver glitter nails with one clearly defined navy bow on the ring finger. Keep the other nails free of extra designs.
For short nails: Use a bow with compact loops and short tails. If the glitter makes very fine lines difficult to see, choose a filled navy bow rather than an intricate outline. A smooth silver shimmer is another option if you love the palette but prefer less texture and less visual sparkle.
14. Matte Forest Green With Glossy Bows
Matte forest green with glossy bows rewards a closer look. The color stays within one family; the difference comes from how the surfaces catch the light. It is a subtle way to wear Christmas ribbon art when you do not want a contrasting red or gold detail.

This effect is easiest to appreciate in side lighting. A straight-on photo may hide some of the finish contrast, so look at a sample while moving your hand. The bows should remain glossy against a distinctly matte background.
Ask for: Matte forest-green nails with glossy green bows on the index and ring fingers. Explain that preserving the two finishes is part of the design.
The important adjustment: Your technician needs a finish sequence that keeps the bow glossy and the background matte. Covering everything with the same final top coat would change that contrast. For a flatter everyday version, request painted glossy bows instead of a dimensional ribbon shape.
15. Candy-Stripe Accent With a Red Bow
Candy stripes and bows can share a manicure without competing for the same nail. Here, one accent gets red diagonal stripes over ivory, while the neighboring nail carries a small red bow on a soft pink base.
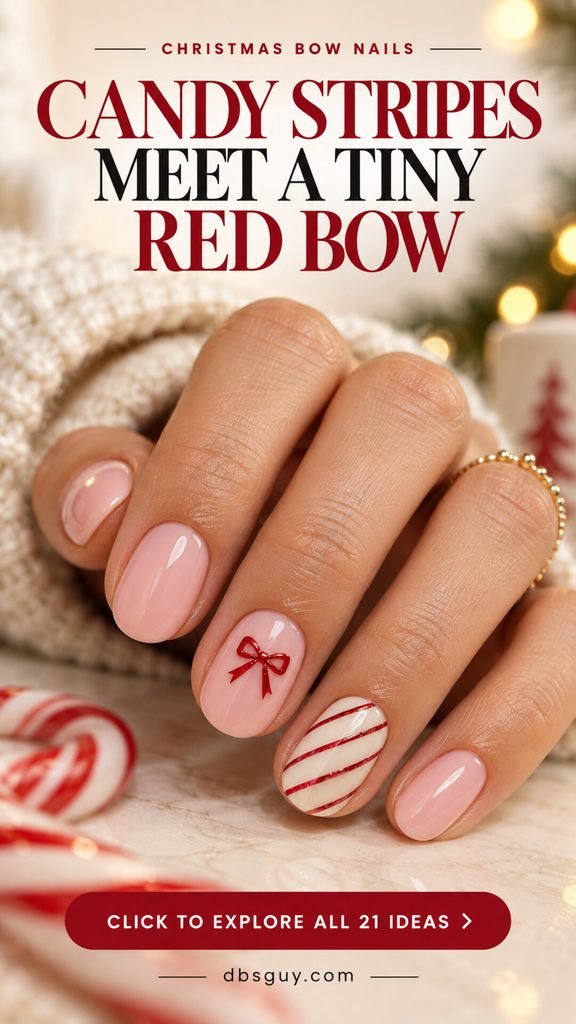
Separating the motifs makes each one easier to read. You still get a candy-cane color story and a present-inspired detail, but the set has some quiet space around them.
Ask for: Pink-neutral nails, one ivory accent with thin red diagonal stripes, and one red bow on the adjacent accent nail. Leave the remaining nails plain.
Keep it balanced: Use the same red for the stripes and bow so they feel connected. On very short nails, use fewer stripes and a compact ribbon silhouette. A full striped background underneath the bow is possible, but it needs stronger contrast and more planning; the two-accent version is the cleaner starting point for this idea.
16. Chocolate Nails With Cream Bows
Chocolate and cream bows bring a cozy color story to December nails. The brown base is rich, the cream ribbons are easy to see, and the set feels right at home around a warm mug or an oatmeal sweater.

This is a useful option when traditional Christmas red is not your favorite. The bow provides the holiday detail, so you can keep the palette close to the browns and neutrals you already wear.
Ask for: Glossy chocolate-brown nails with cream bows on the middle and ring fingers. Keep the cream warm rather than bright white if you want the softer look shown here.
Make it smaller: One bow per hand is enough on short squoval nails. A dark espresso base creates stronger contrast; a lighter cocoa brown makes the whole set gentler. Compare the two against your hand before deciding, especially if you want the manicure to work with your everyday rings and watch.
17. Clear-Pink Nails With a Crystal Bow
A crystal bow makes a sheer-pink manicure feel like it has its own piece of jewelry. The pale base keeps the focus on the sparkling ribbon, and the plain neighboring nails give the embellishment room to stand out.
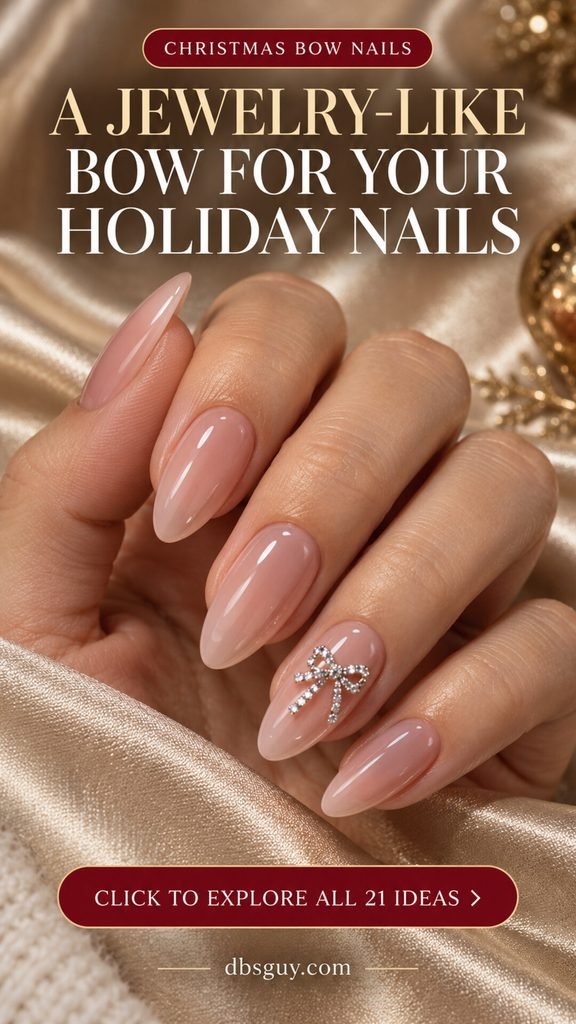
The pictured bow is built from small crystal details and has a raised profile. This is a different choice from painted nail art, so think about how much dimension you enjoy wearing. Bring up gloves, knits, and other things that regularly brush against your nails when discussing the design.
Ask for: A glossy blush-pink base with one small crystal bow on the ring finger. Ask to see the bow’s size and placement before it is secured.
For a flatter alternative: Use a silver bow decal or metallic painted ribbon. On short nails, reduce the bow’s overall footprint rather than letting the loops extend beyond the nail edges. You can keep the jewelry-like color story without using the same raised materials.
18. Red Jelly Nails With Gold Bows
Red jelly nails with gold bows put a lighter-looking spin on a holiday red manicure. The goal is a translucent ruby finish with a couple of fine gold accents, rather than a fully opaque red cream.

Transparency varies with the formula and the number of coats. A reference photo cannot tell you exactly how much of your natural nail will show, so ask for a swatch in the actual product your technician plans to use.
Ask for: Ruby-red jelly nails with small gold bows on the index and ring fingers. Keep the ribbon art delicate and confirm whether it will be flat or metallic and raised.
For short nails: Use one bow per hand and keep its tails compact. If you prefer complete coverage, an opaque ruby base can wear the same gold detail beautifully. It simply gives a different finish from jelly, so decide which look you want before the color is applied.
19. Plaid Accent With a Simple Ribbon Bow
Plaid and a ribbon bow make a manicure feel like coordinated wrapping paper. Burgundy ties the whole set together, while the cream accent nails give the pattern and the bow their own space.

The restraint here is useful: one plaid nail, one bow nail, and solid color everywhere else. There is no need to add a snowflake or a tree to make the Christmas theme clearer.
Ask for: Burgundy nails with two cream accents. Put fine burgundy-and-green plaid on one accent and a simple burgundy bow on the other.
For shorter nails: Simplify the plaid to a few clear crossing lines instead of several tightly packed bands. Keep the bow on its separate cream background so it remains readable. This design takes more detailed linework than a single bow, so show the reference when booking and ask whether the salon needs extra nail-art time.
20. Black Nails With Silver Gift Ribbons
Black nails with silver gift ribbons have a dramatic holiday feel. The dark base frames the metallic detail sharply, and one wrapped accent keeps the design focused. This is an appealing choice if you want your December manicure to work with an evening outfit.

Think of the accent as a small present: narrow ribbon bands meet, then a silver bow finishes the crossing point. Keep the silver lines clear enough to see, with plenty of black still visible around them.
Ask for: Glossy black nails with one silver gift-wrap accent on the ring finger. Discuss a flat painted ribbon or decal if you prefer a smoother version of the dimensional reference.
For short nails: Use a vertical ribbon and a compact bow, or make the horizontal band especially thin. If mirrorlike silver feels too strong, choose a softer silver shimmer. The design works with either, but the reflection and sparkle will look different.
21. Sheer Nails With a Sculpted Ivory Bow
A small sculpted ivory bow is a lovely finish for a sheer manicure. The other nails stay simple, so the ribbon becomes the centerpiece. It gives you a three-dimensional Christmas detail without needing a bright color palette.

Scale matters more than complexity. A modest bow with short tails can look intentional and delicate; an oversized one may dominate both the nail and the whole set. Ask to see it against your nail before the placement is finalized.
Ask for: Sheer beige-pink nails with one small sculpted ivory bow on the ring finger. Keep the bow within the nail’s edges and leave the other fingers plain.
For your daily routine: Discuss the height as well as the width, and ask how the embellishment will be attached and removed with the chosen system. If you want the same soft look on short nails, an ivory painted bow or flat decal is a straightforward alternative.
How to Choose a Bow Design That Fits Your Nails
Start with the amount of detail you want to wear. For a subtle manicure, choose one bow over a neutral or milky base. For a clear Christmas theme, pair red or green with crossed gift ribbons. For a party set, let one crystal or sculpted bow be the focal point and keep the surrounding nails simple.
Choose the size on your actual nail. A close-up image makes a tiny bow look much larger than it will in person. Ask to see the planned outline, decal, or embellishment against your nail before committing. Leave background visible beside the loops and a clean margin near the cuticle. On a narrow nail, reducing the loop width usually helps more than making every line extremely fine.
Decide on flat or raised art. Painted bows and thin decals offer a smoother surface. Crystal, metal, and sculpted bows add dimension, which may matter when you wear gloves or handle knitted fabrics. Tell your technician how you use your hands, and discuss the actual embellishment’s height, attachment, and removal rather than choosing from the photograph alone.
Keep one main idea. If the bow has long tails, give it a plain background. If the base has busy glitter, use a readable ribbon silhouette. If you want plaid or candy stripes too, put them on a neighboring accent nail. The little bit of restraint makes the bow easier to notice.
A Simple Way to Try Bow Nails With Regular Polish
You do not need a raised charm to try this style. A cream polish plus one contrasting bow is enough to recreate the color story of several looks above. Follow your base, color, and top-coat directions, and use nail-art products intended for the finish you are working with.
For a hand-painted bow, practice on a nail tip first. Start with a small center dot, draw one loop on each side, then add two short tails. Check the spacing before filling or thickening any lines. An outline bow can stay delicate; a filled bow will usually be more visible over glitter. Work on one accent nail first so you can adjust the scale before repeating it.
If you prefer stickers, use the product’s directions. In OPI’s lacquer sticker tutorial, the color is dry to the touch before placement. The brand uses tweezers, presses the sticker flat from the center outward, and seals its edges with top coat. That guidance applies to thin stickers; a bulky bow charm needs its own attachment method.
For straight gift-ribbon lines, a suitable temporary stencil can help. OPI’s stencil guide emphasizes flat edges and a light application of color. Its lacquer method removes the stencil while the added color is still slightly wet. Follow the timing for your chosen products and practice first; permanent bow stickers and temporary stencils serve different purposes.
What to Tell Your Nail Technician Before the Appointment
Send the reference when booking, especially for crystal bows, sculpted details, magnetic finishes, or fine plaid. Ask whether the design needs extra time and request a quote for the number of accent nails you want. A photo communicates the look; a short description communicates the parts you care about most.
A useful request sounds like this: “I’d like this color and bow placement, on my usual short oval shape, with flat art on one nail per hand.” If you want a dimensional bow instead, say so. Confirm the base color, bow color, finish, and size before the service begins. You can love a reference and still adapt its length or materials to your routine.
Christmas Bow Nails: Frequently Asked Questions
Do Christmas bow nails work on very short nails?
Yes. A single compact bow on a plain base is a useful starting point. The short milky, neutral mini-bow, and chocolate-and-cream looks above show how the motif can fit a smaller nail. Shorten the tails and keep some background visible around the loops. Extra length is a style choice rather than a requirement for a bow design.
Which bow design is easiest to try at home?
A thin bow sticker over a solid color removes the need to paint matching loops. Choose a small decal that fits fully inside your nail and follow its application instructions. If you want to practice painting, start with one red bow on a neutral base rather than combining French tips, glitter, and ribbons in the same attempt.
Can I use press-ons instead of getting hand-painted bows?
Yes, predesigned press-ons are another route. Olive & June’s Little Gem Bows design, for example, combines a creamy beige base with bow and gem accents. It illustrates the option rather than matching every look here. Check the current design, size, fit, and availability, and follow the specific set’s application and removal directions.
Is pink velvet the same as pink glitter?
No. In OPI’s explanation of magnetic velvet polish, magnetic shimmer creates an effect that shifts with the viewing angle. Glitter supplies sparkle without that same magnet-shaped movement. For the pink-and-white look above, either can carry a bow, but tell your technician which finish you want.
Should I choose bows on every nail or just one accent?
Choose one accent per hand if you want the bow to feel like a finishing touch. Two accents can work when the bows are small or the base is quiet. Repeating the design across every nail creates a stronger pattern, so reduce the size and avoid adding several unrelated motifs. Your preferred amount of detail matters more than a fixed rule.
Which colors make bow nails feel especially Christmassy?
Red with white, emerald with gold, and burgundy with a pale neutral create a clear holiday palette. Icy blue with silver has a wintry feeling, while pink, chocolate, and sheer neutrals offer softer options. A crossed ribbon or a small bow can carry the Christmas theme even when the base color is one you wear all year.
If you’re still deciding, choose the base color first. Then pick one bow detail you would be happy to see every time you look down at your hands. A simple manicure with one well-placed ribbon can feel every bit as festive as a more elaborate set.
Technique References
Application guidance was checked against OPI’s lacquer sticker tutorial, OPI’s stencil tutorial, and OPI’s magnetic velvet explanation. The color pairings, layout suggestions, and salon briefs in this article are original styling ideas.
About the images: These are AI-generated manicure inspiration images, not photographs of tested salon work. Use them to discuss color, placement, and scale; your technician can adapt the design to your nails and the products they use.