21 Candy Cane Nail Designs for December Beyond Basic Red-and-White Stripes


Candy cane nails can be a tiny holiday detail or the whole mood of your December manicure. A striped French tip, a little hooked cane on sheer pink, or a peppermint swirl on one finger all borrow the same sweet idea. The placement is what makes them feel different.
These 21 candy cane nail designs for December go beyond an all-over red-and-white stripe. You will find short-nail options, softer pink and mint palettes, warm burgundy and cream, and a few shimmer finishes for holiday dinners. Each look includes a salon brief and a way to simplify the artwork, so the inspiration can turn into a clear plan for your own nails.
Before picking a favorite, decide how much pattern you want to wear. One accent nail can carry the holiday reference beautifully; a patterned tip or corner keeps more of the base visible. The important part is choosing a motif that fits your nail length, with enough room for the red and white details to stay separate.
1. Ruby Glitter Candy Stripes on Short Nails
A little red sparkle changes the familiar candy stripe without losing its holiday charm. Keep the neighboring nails glossy ruby red, then give one white ring nail the striped detail. The light accent makes the pattern easy to spot on a short, softly squared shape.

Use a red microglitter or fine shimmer for the broader diagonal bands, with a thin red line beside a few of them. That mix of widths gives the design a more deliberate rhythm. Leave clear white gaps; if the glitter covers most of the base, the accent will read as a red nail with a few light marks.
Ask for: “Short ruby-red squoval nails with one white candy-stripe ring accent. I would like fine red sparkle in the wider stripes and some thinner red companion lines.” Ask to see the glitter texture before choosing the final sheen.
For very short nails: Use two or three wider diagonals and skip any extra line that makes the accent crowded. A smooth red stripe is a useful alternative if the glitter particles are too large for the detail you want.
2. Candy Cane French Tips With a Sheer Pink Base
Candy cane French tips keep the familiar pink-and-white manicure shape, with a little December pattern inside the tip. Put red diagonals on two white accent tips and leave the remaining tips plain. The result has plenty of open pink space, even on medium almond nails.

The white tip needs enough depth for the stripes to show. A very narrow micro-French may have room for a red mark but little room for a recognizable candy pattern. Decide where the stripe ends before the artwork starts; keeping it inside the white area makes the French shape clearer.
Ask for: “Sheer-pink almond nails with white French tips and red candy stripes on the middle and ring tips.” Show the artist the amount of pink base you want visible and whether you prefer a soft curve or a deeper smile line.
For short nails: Pattern one tip with a few red diagonals, or choose a full white candy-stripe accent beside plain French tips. Both keep the idea without asking a tiny free edge to carry too many details.
3. Tiny Candy Canes on Sheer Pink Nails
Small candy canes over sheer pink are a lovely choice when you want the holiday detail to feel light. One little hooked motif on each of two nails is enough. The rest of the manicure can stay plain, letting the natural-looking pink base remain the main color.
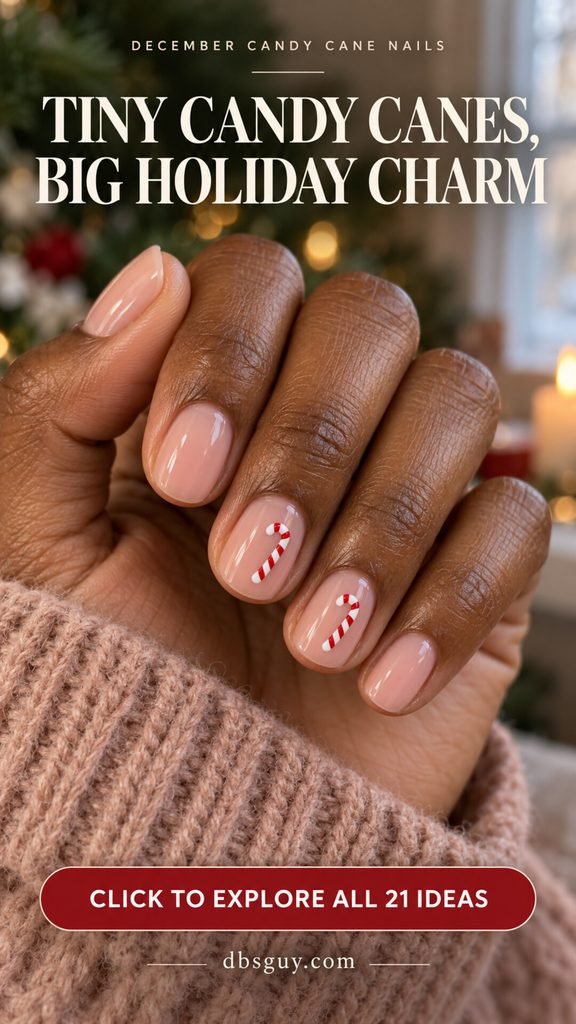
Make the white hook clear before adding the red bars. A motif that is too tiny may lose its curved top, especially in a photo taken from farther away. Keep enough pink around each cane to separate it from the edge of the nail.
Ask for: “Short sheer-pink rounded nails with one small red-and-white candy cane on the middle and ring fingers.” Specify that you want flat painted artwork and a clearly hooked shape, rather than a raised charm or a straight striped line.
For very short nails: Use a single cane on the ring finger and enlarge it slightly. A little more space around one readable motif will usually communicate the idea better than several miniature canes squeezed together.
4. A Peppermint Swirl Ring Nail With Red Neighbors
A peppermint swirl gives the candy theme a round, playful shape. Put the pinwheel-style pattern on one white ring nail and keep the neighboring nails glossy red. That single accent can be the focal point of the set, with no need for a different holiday motif on every finger.
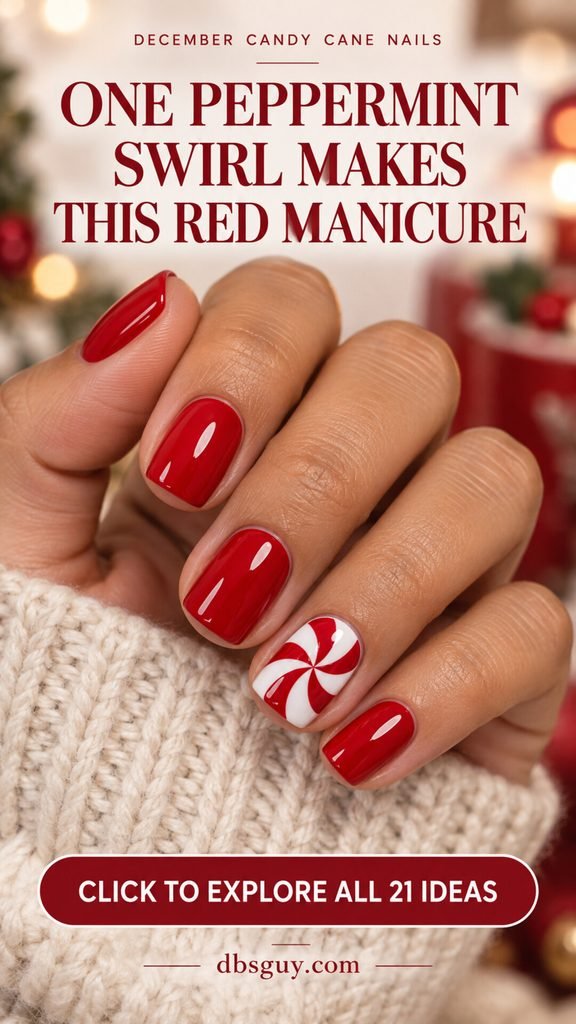
Agree on the swirl center and the number of curved sections before painting. Broad red spokes with visible white gaps make the pattern easier to read. If every section is very thin, the swirl can become visually busy on a small nail.
Ask for: “Short red square nails with one white peppermint-swirl ring nail.” Show whether you want the swirl centered or slightly offset; those choices change how the pattern reaches the edges.
For very short nails: Use fewer, broader curved spokes. You can also make the peppermint a smaller painted disk on a plain white accent if you prefer open space around the shape.
5. Pink and White Candy Ribbon Nails
Pink candy ribbons bring a softer palette to the December theme. Use warm pink on the plain nails, with pink diagonal bands over white on two accents. The white keeps the pattern recognizable, while the pink makes the set feel cheerful without relying on a bright holiday red.

Mix wider and finer ribbon stripes, and leave some white showing between them. A pink with enough contrast against the base will make the design clearer. If the shades are very pale, ask to see a finished sample before committing to the full set.
Ask for: “Warm-pink almond nails with two white accents and pink candy-ribbon stripes in different widths.” Decide whether the stripes should be straight or gently curved; the curved version gives the print a softer movement.
For shorter nails: Keep one patterned accent and reduce the number of bands. A deeper rose stripe can help the design show clearly while the plain neighbors stay a lighter pink.
6. Matte Burgundy and Cream Candy Cane Nails
Burgundy and cream make candy stripes feel warm and understated. A matte or satin finish adds another change from the glossy cherry-red version. Keep the patterned nail cream and the surrounding fingers wine-colored, so the palette feels coordinated rather than busy.

Choose the cream and burgundy together. A warm ivory base creates a different mood from a bright white, and a brown-leaning wine shade looks different from a purple-leaning one. The finished top coat can soften the contrast, so a sample with the intended sheen is useful.
Ask for: “Short burgundy oval nails with a matte cream candy-stripe ring accent, using broad and fine burgundy diagonals.” Confirm whether you want every nail matte or only the patterned finger.
For very short nails: Keep two broad stripes with generous cream gaps. If you prefer a crisper finish, use gloss with the same colors; the warm palette will still carry the quieter holiday feeling.
7. A Gold-Edged Candy Ribbon on Neutral Nails
One curved candy ribbon can give a neutral manicure a festive focal point. A white ribbon travels through the ring nail, with little red bars inside it and a fine gold edge. The surrounding beige-pink space is part of the design, so the accent feels lighter than a full striped nail.
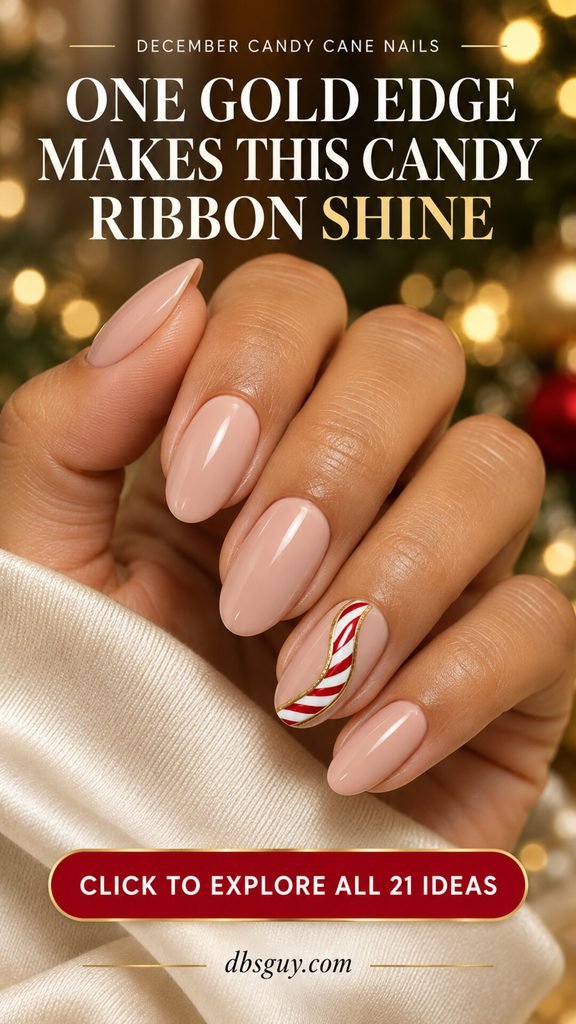
Keep the ribbon wide enough for its red detail and the gold outline very slim. A thick metallic border can become the main feature. Tell your artist that you want the finished artwork smooth, then let them choose a compatible way to create the metallic line.
Ask for: “Beige-pink oval nails with one curved white-and-red candy ribbon on the ring finger, outlined in fine gold.” Show the curve you like and how much plain base should remain beside it.
For shorter nails: Use a simpler curve and fewer red bars. You can also outline just one side in gold if two metallic edges make the ribbon feel crowded.
8. Silver Shimmer With a Tiny Candy Cane Accent
Silver shimmer gives a small candy cane a bright winter backdrop. Keep the red-and-white motif on one finger, with the rest of the set in the same fine silver finish. The manicure gets its interest from the contrast between the shimmer and the flat painted shape.
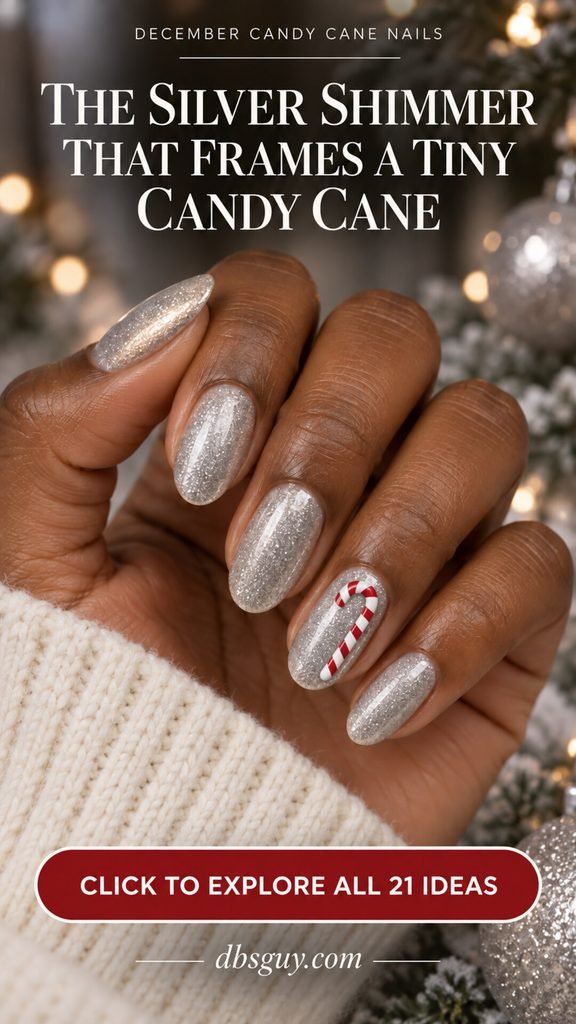
Choose a smooth, fine shimmer if you want the hook and red bars to stay crisp. Chunky glitter creates a different surface and can make tiny linework harder to see. The white cane should be opaque enough to separate it from the silver underneath.
Ask for: “Silver-shimmer oval nails with one small painted red-and-white candy cane on the ring nail.” Ask to compare the white artwork against the finished shimmer, rather than judging the colors only in their bottles.
For short nails: Make the cane a little larger and keep the red bars sparse. A pale silver base with one clear motif can be easier to read than a dense glitter accent with several small decorations.
9. Mint and White Candy Cane French Tips
Mint and white offer a fresh interpretation of candy cane tips. The diagonal bands stay familiar, but the green palette gives the manicure a softer winter feeling. A sheer-pink base and plain white neighboring tips keep the design tidy on short squoval nails.
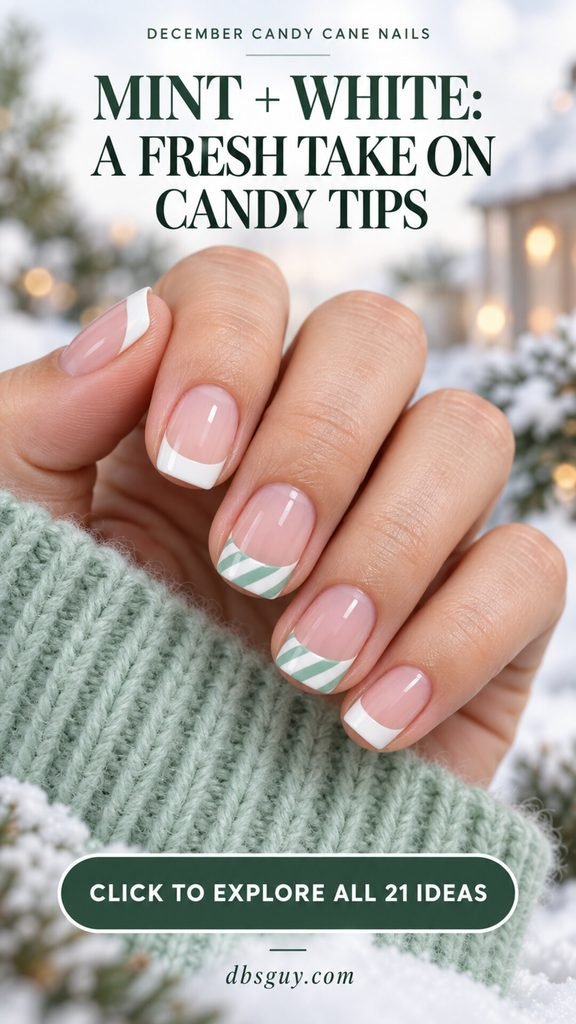
Use a white tip with enough room for a few mint stripes. A mint shade that is too close to white may disappear in bright light. A finished sample will help you find the gentle contrast you want without making the green much darker than planned.
Ask for: “Short pink-and-white French nails with mint candy stripes inside the middle and ring tips.” Explain that the mint replaces the red in this version, so the artist keeps the palette consistent.
For very short nails: Pattern one tip, or move the mint-and-white stripes onto a full accent nail. A pale green plain neighbor is another option if you would like more mint in the set.
10. Forest Green Nails With Crossed Candy Canes
Two small crossed candy canes make a clear holiday accent over forest green. The dark background helps the white hooks show, while the red bars tie the design back to the familiar candy palette. Plain green neighbors give the little crossed pair a quiet frame.

The hooks need room to remain separate at the top. If the canes are too close or the crossing is too dense, they may look like a striped X. Keep the outline simple and avoid adding several extra holiday symbols around the pair.
Ask for: “Short forest-green oval nails with two small crossed red-and-white candy canes on the ring finger.” Point out that you want the curved hooks facing outward and the artwork painted flat.
For very short nails: Choose one cane instead of the crossed pair. You can keep the same deep-green background and make the single hook larger, leaving enough space for the red-and-white detail to show.
11. Candy Cane Cuticle Cuffs
A striped cuff moves the candy detail to the base of the nail. A narrow white crescent with small red bars follows the cuticle curve, while the center and tip stay pink. It is an interesting choice if you like a clear base but want a placement that feels different from a French manicure.
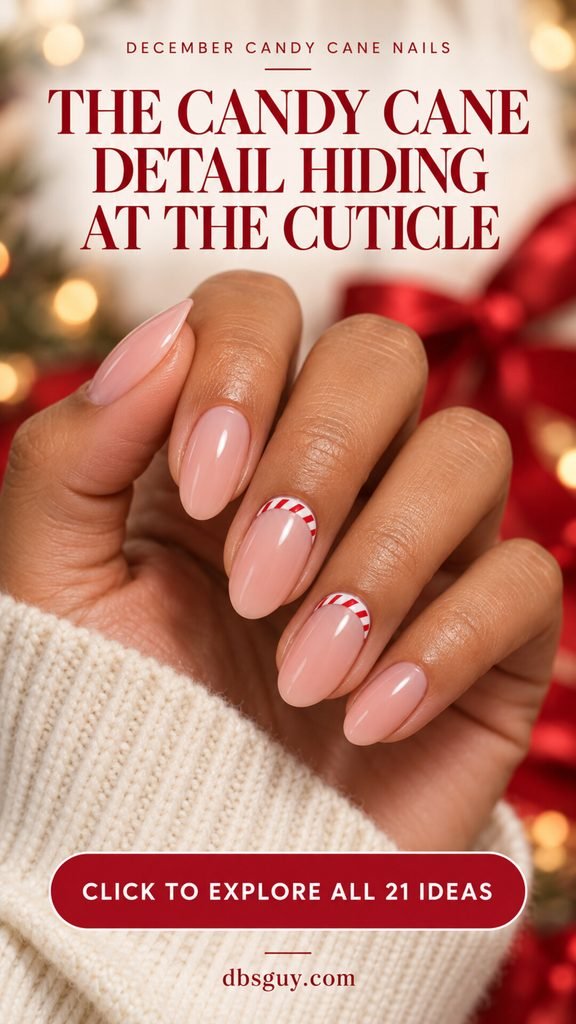
Keep the painted cuff just inside the nail perimeter. Its width should allow the little red bars to stay inside the white area without covering too much pink. A sample on one accent nail will make that balance easier to judge.
Ask for: “Sheer-pink oval nails with red-and-white candy cuffs on the middle and ring fingers, and plain pink tips.” Show the base placement clearly so it is not interpreted as a striped French tip.
For short nails: Use one cuff and fewer red bars. If the crescent feels too busy, a small striped arc along part of the base can give a similar effect while leaving more pink visible.
12. Half-Nail Candy Stripes With a Clean Pink Edge
Half-nail candy stripes let the print share the accent with a plain pink area. One side of the ring nail carries white and red diagonals, while the other stays clear pink. The division gives the design structure without covering the whole nail in pattern.

Choose the split and the stripe angle together. A lengthwise division leaves a long plain area beside the artwork, which can suit an almond shape nicely. Keep the red bars inside their white section so the clean pink edge remains clear.
Ask for: “Pink almond nails with one lengthwise half-candy-stripe ring accent, leaving the other half plain pink.” Decide which side gets the stripes and whether the placement should be mirrored on the opposite hand.
For shorter nails: Let the patterned side take slightly more room if needed, then use fewer diagonals. The important part is keeping a visible plain section next to the print.
13. A Peppermint Heart on Sheer Pink Nails
A small striped heart gives the candy theme a sweet shape without adding a full peppermint swirl. Place it on one sheer-pink ring nail and keep the other fingers plain. The red-and-white fill makes the heart feel connected to December, while the open pink base keeps it light.
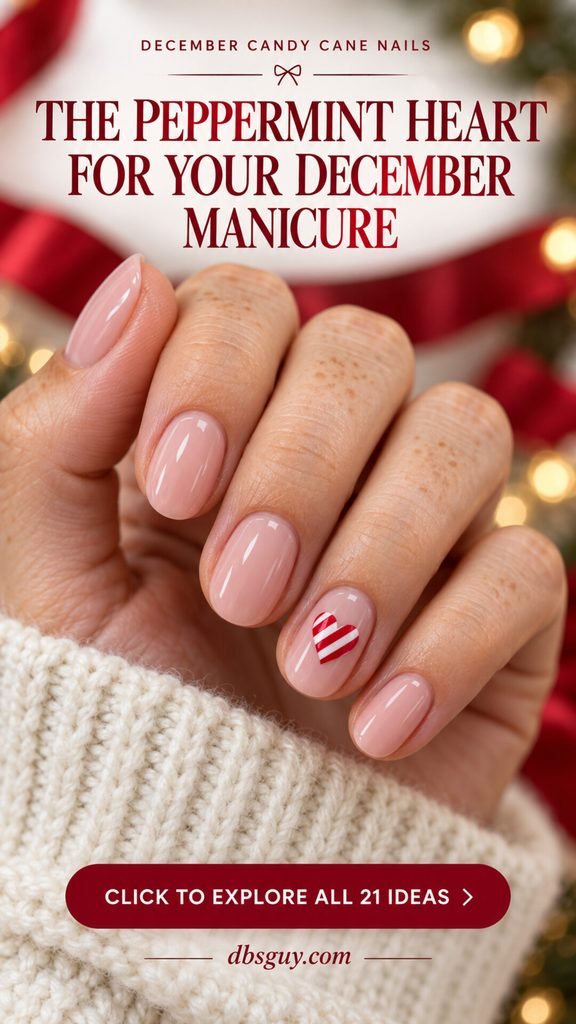
Give the heart a clean outline and enough space for the stripe pattern inside it. If the motif is too tiny, the red and white can merge into a busy mark. Decide whether you want a round, soft heart or a more defined pointed shape.
Ask for: “Short sheer-pink oval nails with one small heart filled with red-and-white candy stripes on the ring finger.” A close reference will help the artist judge the heart size relative to your nail.
For very short nails: Enlarge the heart a little and use only a few stripes. If you want a quieter version, keep most of the heart white and add one red diagonal as the candy detail.
14. A Tiny Candy Cane and Painted Bow Pairing
A candy cane and a little red bow make a cheerful two-accent pairing. Put the cane on one cream nail and the bow on its neighbor, using the same red in both. The shared color links them together without needing a different pattern on every finger.
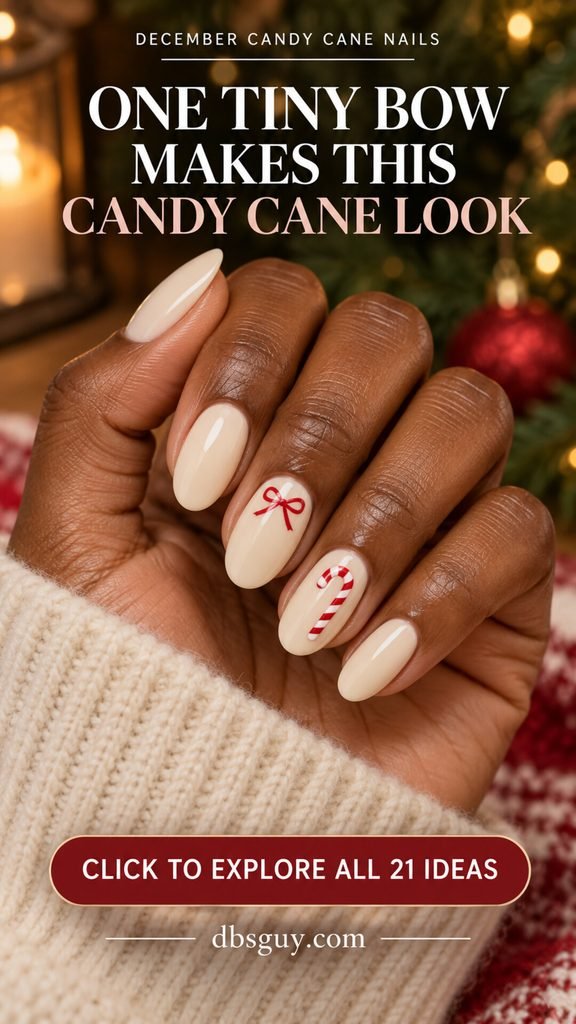
Keep both motifs petite and flat. The cream base gives them a soft backdrop, and plain neighbors stop the set from feeling crowded. A very pale cane may need a more opaque white to stand out from the cream.
Ask for: “Cream oval nails with a small painted candy cane on the ring finger and a tiny painted red bow near the base of the middle nail.” Specify painted artwork and show the size you want for each motif.
For short nails: Keep the cane as the main accent and make the bow especially small. You can also remove the bow and use one plain red neighbor if you want the color connection with less detailed artwork.
15. Frosty Blue Nails With a Candy Cane and Snowflake
Frosty blue gives the candy theme a snowy backdrop. A small red-and-white cane on one nail and a delicate white snowflake on another create a winter pairing, while the plain blue neighbors keep the palette consistent. The red detail becomes a small pop rather than the main color.

Choose an icy blue that lets the white artwork show. If the base is almost white, a tiny snowflake may be difficult to see. A slightly stronger blue or a simpler flake can help preserve the winter effect without adding extra colors.
Ask for: “Short icy-blue squoval nails with one painted candy cane and one fine white snowflake on neighboring accents.” Decide how detailed the snowflake should be; a simple six-arm shape needs less room than lots of tiny branches.
For very short nails: Keep the cane on one finger and replace the snowflake with a few small white dots on its neighbor. The colors will still suggest a frosty holiday set.
16. Charcoal Nails With a Candy Cane Side Stripe
A candy stripe along one side gives charcoal nails an unexpected festive detail. The main surface stays dark, while a narrow white band with small red bars follows the accent nail’s edge. It is a useful option when you like dark winter colors and want only a little candy-cane artwork.
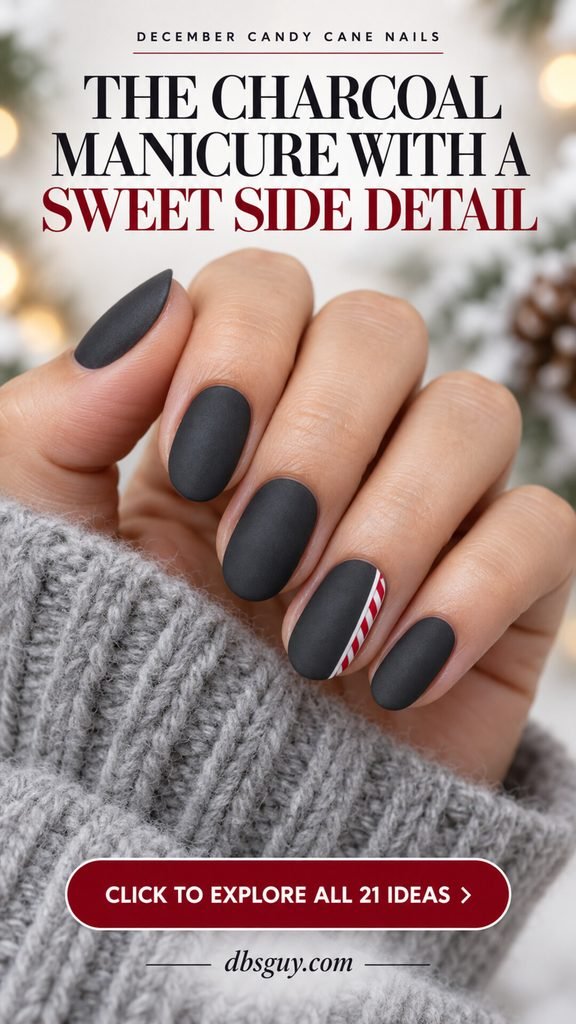
Leave enough width in the white band for the red marks to show. A hairline border may read as a simple outline rather than a candy stripe. The charcoal can be matte or glossy; decide the finish alongside the artwork rather than after the colors are chosen.
Ask for: “Charcoal oval nails with one red-and-white candy side stripe on the ring finger, leaving most of the nail dark.” Show which edge should carry the stripe and confirm the layout for the other hand.
For short nails: Use a slightly wider side band with fewer red bars. If the full edge feels too detailed, restrict the candy stripe to a short section near the tip.
17. Pearl Glaze With a Candy Cane Corner
A small candy corner can change a pearly pink manicure without taking over its finish. Keep the red-and-white stripes inside a little white triangle at one tip. The rest of the nail stays pearlescent, so the holiday detail feels like an accent to the glow.
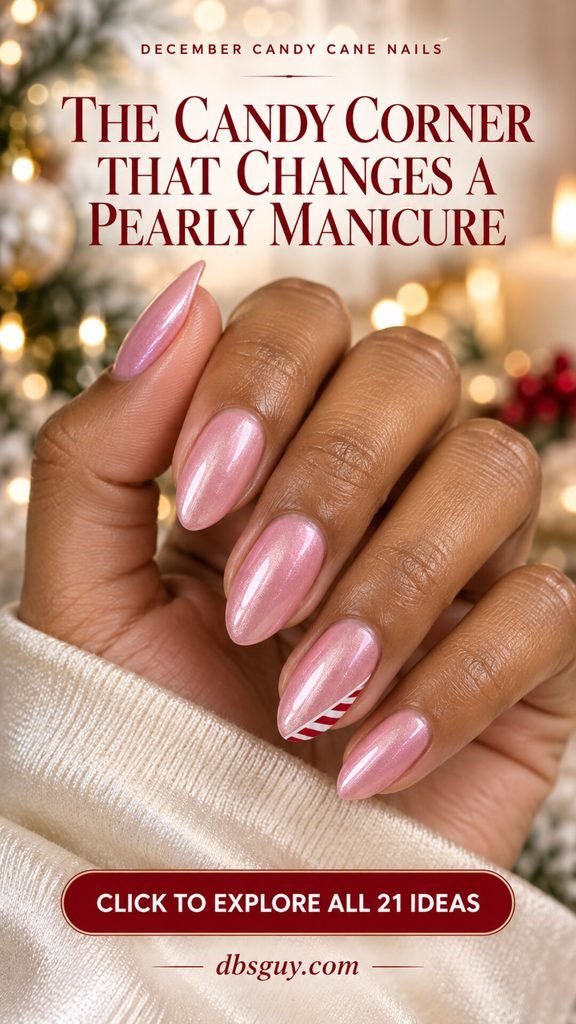
Decide how visible you want the pearl effect to be. A subtle pearly polish and a more reflective chrome treatment create different results. The corner should stay opaque and clearly defined, with enough surrounding pink to keep the placement recognizable.
Ask for: “Pearlescent-pink almond nails with one small white candy-stripe corner on the ring tip.” Ask which compatible product process will give you the sheen you want and whether the artwork will sit above or within that finish.
For shorter nails: Use a smaller corner with one or two red bars. You can place the detail slightly farther in from the free edge if the tip has very little room for a neat triangle.
18. Chocolate-Brown Nails With Candy Cane Tips
Chocolate brown makes striped cream tips feel warm and cozy. Keep the plain fingers deep cocoa, then use a lighter toasted-brown base beneath the two patterned tips. The two brown tones give the candy accents their own place in the set, with a different mood from a sheer-pink French manicure.

On a tapered square or coffin shape, choose a tip depth that suits the actual length. The cream section needs space for the red diagonals, with some lighter brown left visible below it. A warm cream can make the palette feel softer than a bright white. You can also use one chocolate shade throughout if you prefer a more uniform set.
Ask for: “Chocolate-brown tapered square nails with lighter cocoa accents and cream-and-red candy French tips on the middle and ring fingers.” Confirm the two brown shades and how much base should remain visible below the patterned tips.
For shorter nails: Use a softer square shape and one patterned tip, or a single full cream candy-stripe accent beside plain brown nails. You can keep the color pairing without adding long extensions.
19. A Candy Cane Border Around a Clear Pink Center
A striped border gives the candy pattern its own outline around a plain pink center. Little red bars sit inside a thin white frame, with the open middle of the ring nail left clear. Plain red neighbors bring the accent back into the rest of the manicure.
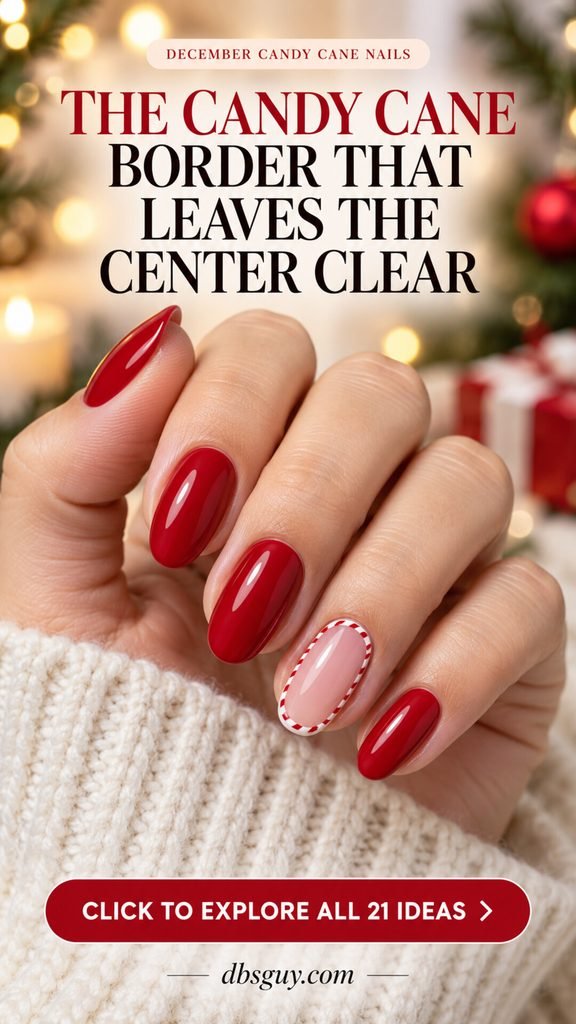
This is detailed linework, so the border needs enough width for the red to stay inside it. Keep the clear center large enough to look intentional. Ask your artist to check the spacing before continuing around the entire perimeter.
Ask for: “Glossy red nails with a clear-pink ring accent framed by a thin red-and-white candy border.” Specify that the center stays plain and the artwork follows the edge of the nail.
For short nails: Use the border only along the sides and tip, or choose one side stripe instead. A partially framed accent can keep the idea while giving the small nail more open space.
20. Red Velvet Nails With a Peppermint Accent
Red velvet-style shimmer gives a peppermint accent a richer evening mood. Keep the surrounding nails luminous red, then place a small red-and-white peppermint disk on a plain white ring nail. The white space around the disk separates its shape from the shimmering neighbors.
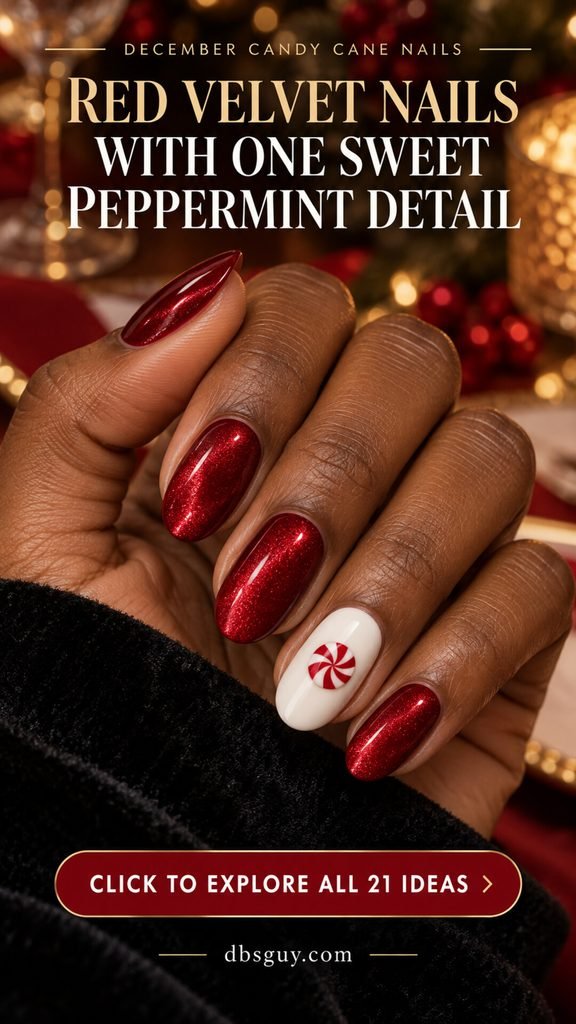
The velvet effect refers to the appearance of magnetic shimmer, not fabric on the nail. Ask to see the proposed finish from a few angles; light can change how the shimmer looks. Keep the peppermint artwork smooth and clearly defined so it remains the main painted detail.
Ask for: “Ruby-red magnetic velvet-effect oval nails with one white ring accent and a small flat peppermint pinwheel.” Let the artist choose the technique and products that suit the magnetic finish you want.
For shorter nails: Use fewer spokes in the peppermint disk and leave white space around it. A regular red shimmer is a useful alternative if you want the color and glow without a magnetic-gel service.
21. Candy Cane Confetti on Milky White Nails
Tiny candy canes and a few green dots make milky white nails feel festive in a playful way. Keep the little confetti arrangement on two accents and leave the other fingers plain. The light base gives the scattered motifs room to be seen without turning every nail into a full pattern.
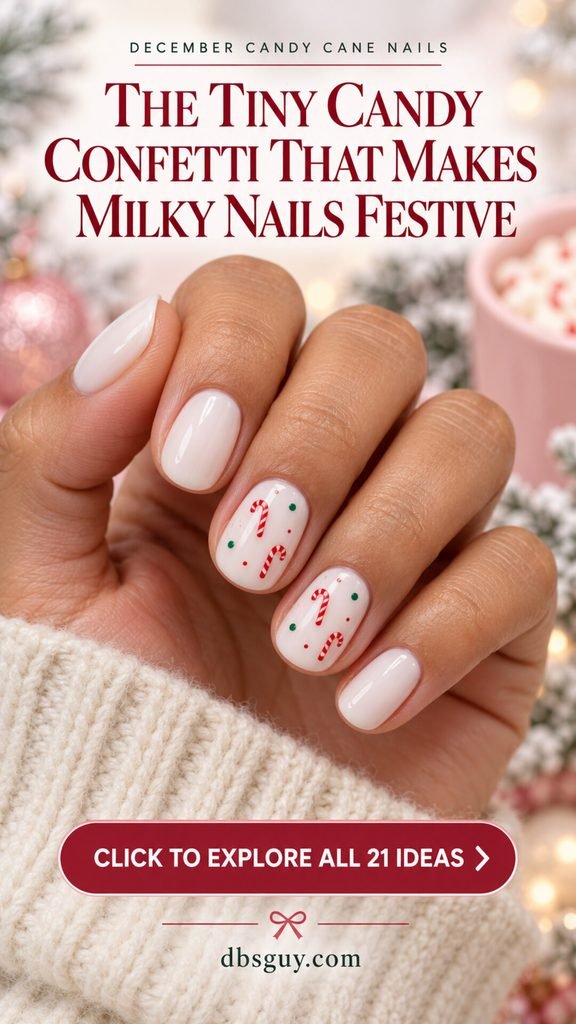
The spacing matters more than the number of decorations. Two readable canes with a few small colored marks can make a clearer design than a dense collection of tiny shapes. Keep the hooks distinct and use the same red and green throughout the set. A pale mint green is an alternative if you want softer dots.
Ask for: “Short milky-white rounded nails with sparse candy-cane confetti on the middle and ring fingers, plus a few green dots.” Explain that you want flat painted motifs with plenty of open white space.
For very short nails: Use one cane per accent with only a few dots. If you prefer a simpler palette, remove the green and keep the confetti red and white.
Choose a Candy Cane Design That Fits Your Nails
Start with the space you actually have. A short nail can carry one clear motif or a few broad stripes beautifully. A longer nail gives you more room for a patterned tip, a curved ribbon, or a border. Pick the placement first, then decide how many details belong inside it.
For short natural nails: The ruby stripe accent, tiny candy cane, peppermint heart, and milky-white confetti are useful starting points. Keep the number of motifs small and the white-and-red contrast clear. You can borrow the colors from any of the longer looks without choosing the same length.
For a subtle manicure: Try sheer-pink canes, a small pearl-glaze corner, or one candy cuff. Plain space gives the holiday detail room to stand out. A softer palette can work too, provided the stripe or motif is still visible against its base.
For a statement set: Choose a full peppermint swirl, red velvet-style shimmer, or two patterned candy tips. Decide whether the finish or the artwork should be the main feature. Keeping the other element simpler can make the manicure feel more coordinated.
Gloss, Matte, Pearl, or Velvet: Decide the Finish Early
Gloss gives candy stripes a crisp, polished appearance. Matte or satin brings a softer mood to burgundy and cream. Pearl adds a gentle glow behind a small accent, while fine glitter or silver shimmer can give the motif a brighter backdrop. These are different styling choices, so ask to see the finish with the actual colors.
A shimmer polish, a reflective chrome treatment, and a magnetic velvet effect are different services. Tell your artist which appearance you like, then let them choose a compatible product process. Essie’s Christmas French-tip guide also discusses changing a holiday French with shimmer and metallic details; a small finish adjustment can be enough when the tip already carries a pattern.
For the velvet idea above, Gelish’s Sparkle & Shine tutorial demonstrates shaping magnetic shimmer while the gel is wet before curing. That is a product-specific technique. Ask your artist for a sample, and use the directions for the exact products and compatible lamp rather than borrowing another system’s timing.
A Manageable Candy-Stripe Plan With Regular Polish
Start with one accent nail, a white base, a red stripe color, a fine nail-art brush, and the base and top coats required by your lacquer system. A broad diagonal stripe is a more manageable first project than a tiny hooked cane, a full border, or an intricate swirl. Practice the spacing on a spare nail tip before moving to your hand.
Apply the base and color according to your product directions, using thin, even layers and allowing the color coats to dry between applications. OPI’s regular-polish application guide covers that foundation. Let the base color dry before starting the artwork so the brush is less likely to disturb it.
Plan the broad diagonal stripes first, leaving visible white gaps. Add a fine red companion line only if there is room. OPI’s Candy Paint Job tutorial uses a detail brush for spaced diagonals with thinner lines beside them inside a French tip. You can adapt that line rhythm to a full white accent instead of a tip.
Keep the brush load small enough to control the line, and make the spacing consistent rather than trying to add as many stripes as possible. Manucurist’s striped-manicure guide describes using a fine liner brush after the base color is ready. The simplest useful practice is one clear stripe, a gap, then the next stripe.
Let the artwork dry as directed before applying a compatible top coat. Keep the surrounding nails plain while you practice. If you use gel instead of ordinary lacquer, follow your exact gel system’s application and curing instructions throughout; the drying process described here is for air-drying polish.
Small Fixes for Candy Cane Nail Art
If the pattern looks crowded: Remove a companion line, use fewer spokes, or move the artwork to one finger. A larger repeat with visible base color can be easier to appreciate than lots of tiny stripes.
If the white disappears: Check its opacity against the actual base. A tiny cane over silver or cream may need stronger white coverage. Adding more little red bars will not fix a hook that is hard to see.
If a French tip feels too narrow: Use one patterned tip or move the candy stripe onto a full accent nail. The same palette can carry the idea without requiring extra nail length.
If the mini cane looks like a straight line: Enlarge the hooked top and reduce the red detail. The curved outline is what makes the small motif recognizable.
If the shimmer competes with the artwork: Choose a finer sparkle, make the candy motif slightly larger, or keep the accent on a plain base beside the shimmer nails. Discuss the smoothness of the finished surface before adding more decoration.
Bring a Clear Brief to Your Nail Appointment
Choose one main reference, the nail length and shape, the base and detail colors, and the fingers that receive artwork. Specify the finish and the size of the motif. Confirm the nail-art price and appointment time before adding another detailed finger, metallic outline, or specialty finish.
A useful brief might be: “I would like short sheer-pink rounded nails, one small red-and-white candy cane on the ring finger, plain pink neighbors, and a glossy finish. Can we check the hook size on a sample first?” That gives the artist a clear result while leaving room for the technique that suits their products.
For a two-accent set, agree on the layout for both hands. You may prefer the same arrangement, a mirrored placement, or a slightly simpler design on the other hand. Decide before the artwork starts so the set feels intentional.
Candy Cane Nail Questions, Answered
Can candy cane designs work on short natural nails?
Yes. A few diagonal stripes, one small hooked cane, or a simple peppermint heart can fit a short nail. Choose a readable motif and discuss the product service with your artist. The pattern does not require long extensions.
Do candy cane nails have to be red and white?
No. Pink and white, mint and white, or burgundy and cream can borrow the same stripe pattern. The red-and-white version makes the familiar holiday reference especially clear, while a different palette gives it another mood.
What is the simplest design to try at home?
One white accent nail with a few broad red diagonals is a useful starting point. Keep the other nails plain, practice the spacing first, and use drying time appropriate to your polish. A tiny cane or full peppermint swirl adds more detailed brushwork.
Can I make the design with regular nail polish?
Yes. Diagonal stripes and small motifs can be painted with ordinary air-drying lacquer and a fine brush. Follow the base-color, drying, and top-coat directions for the products you use. Gel is another option with its own process.
Should every nail have candy cane artwork?
It is a styling choice. One accent per hand gives you a clear focal point, while two patterned neighbors can make the motif feel more present. A full patterned set needs a planned palette and repeat size. Confirm the layout and price with your artist.
Are peppermint swirls part of the candy cane theme?
They are a related candy-inspired option in this guide. A hooked cane is a little striped shape; a peppermint swirl uses curved red-and-white sections around a center. Show the exact reference so your artist knows which version you mean.
Can the metallic and velvet looks be simplified?
Yes. Swap a metallic outline for a fine painted line, choose pearly polish instead of a more reflective treatment, or use regular red shimmer in place of a magnetic finish. The placement and candy motif can stay the same while the finish changes.
How should I care for and remove the manicure?
Follow the directions for the specific products used and ask your salon about the finish. Ordinary lacquer, gel, and press-ons have different removal processes. Use the care guidance supplied with your service rather than choosing a removal method based only on how the design looks.
Choose the Candy Detail You Want to Wear
The most useful starting point is the part of the idea you enjoy: a small hooked cane, a bright swirl, a striped tip, or a little corner of color. Give that detail enough space, choose the finish alongside it, and let the rest of the manicure support the look. A single clear accent can bring plenty of December charm.
Images are AI-generated design inspiration, not photographs of tested salon sets. Use them to discuss color, placement, pattern size, and finish with your nail artist; the finished result depends on the products and technique used.