21 December Nail Ideas Christmas: Tiny Ornaments, Twinkly Lights and Red Done Right


For Christmas nails with a little personality, start with one detail: a tiny ornament on a sheer base, a strand of painted lights, or a red finish you love. Leave enough space around the artwork for it to read clearly. You can get the holiday feeling without putting a different picture on every finger.
These 21 December nail ideas cover seven ornament looks, seven ways to interpret twinkly lights, and seven red manicures. Each has a specific placement or finish to discuss with your nail artist, plus a way to simplify it when your nails are short or you are painting at home.
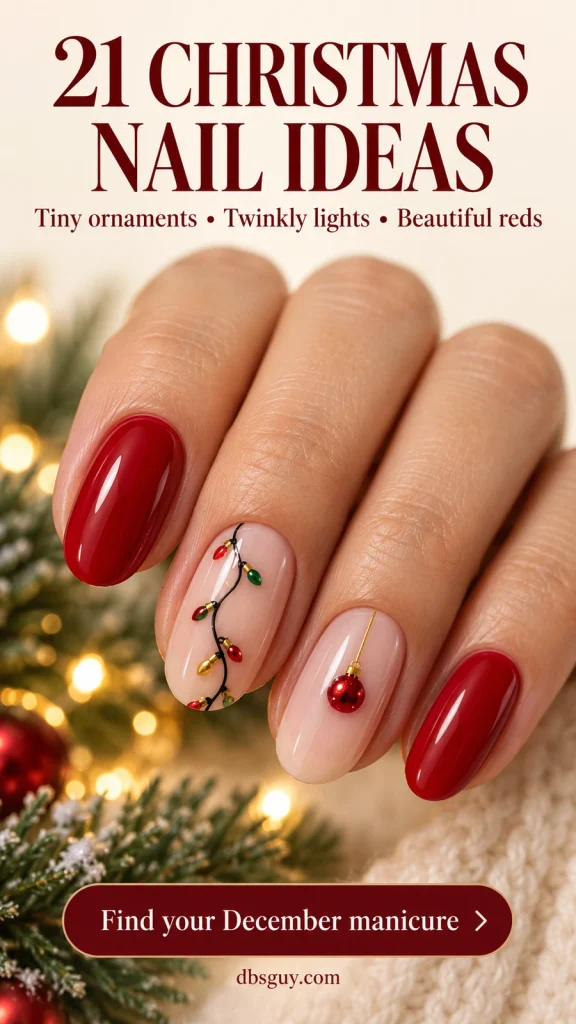
Image note: These visuals are AI-generated design concepts for dbsguy.com, not photographs of completed or tested salon work. Reflections and glow are illustrative; actual colors, detail, and finish depend on your nails, products, and lighting. Ask for flat painted or decal interpretations of the motifs if you prefer to skip raised decorations.
Choose Your Christmas Detail First
- Want a recognizable little decoration? Start with the single gold ornament (1), ruby baubles (2), or ornament tips (7).
- Love the glow of a Christmas tree? Choose colorful lights on a sheer base (8), warm bulbs on pine (9), or a light-trimmed French (13).
- Prefer color to tiny artwork? Go straight to cherry-red gloss (15) or ruby velvet (18).
- Keeping your nails very short? Pick one accent nail, a solid color, or small dots. Reduce the detail instead of adding length just to copy a reference.
The placements below are styling suggestions. Keep your usual comfortable length, and choose a base shade against your own hand rather than expecting the same pink or beige to suit everyone.
Tiny Ornament Nail Ideas
1. One Tiny Gold Ornament on Sheer Blush
A single hanging bauble gives a nearly bare manicure a clear Christmas detail. The sheer blush base and short oval outline keep the focus on that one gold circle; this is a useful starting point if you want something festive for a dinner without decorating the whole hand.
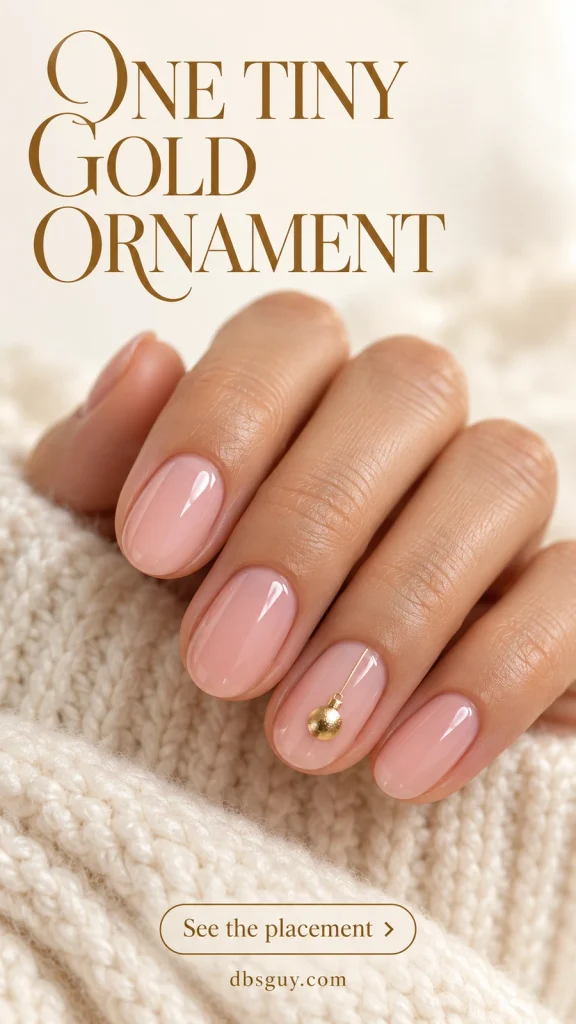
Ask for the ornament on the ring finger, with a tiny cap and a fine thread leading toward the cuticle. A flat metallic nail decal or a painted gold dot can interpret the dimensional shine in the image. Keep pink visible around the whole ornament. On a smaller nail, shrink the circle before shortening the thread into an unreadable mark.
2. Three Ruby Baubles on Milky Ivory
Milky ivory turns the accent nail into a little display of red ornaments. Three baubles hang at staggered heights on the ring finger, while the other nails stay plain. The rounded-square outline gives the tiny arrangement a compact, tidy frame.
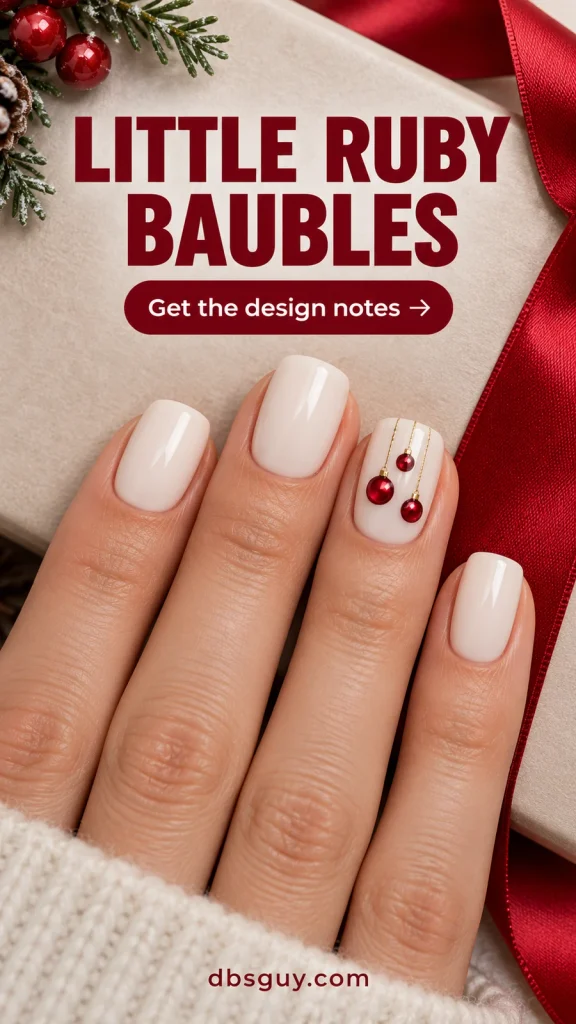
Place the circles before drawing their fine gold threads so you can check the spacing. Small highlights can suggest shiny glass without a raised charm. If three baubles crowd your nail, use two at different heights and keep the remaining ivory visible. A matching decal is the simpler home option; individually painted caps and threads require a steady hand.
3. Pastel Vintage Ornaments on Buttercream
This set borrows the colors of older glass ornaments: dusty pink, soft sage, and powder blue against buttercream. A round bauble, a tapered drop, and an oval make the set feel collected rather than perfectly matched. Fine gold details connect the different shapes.
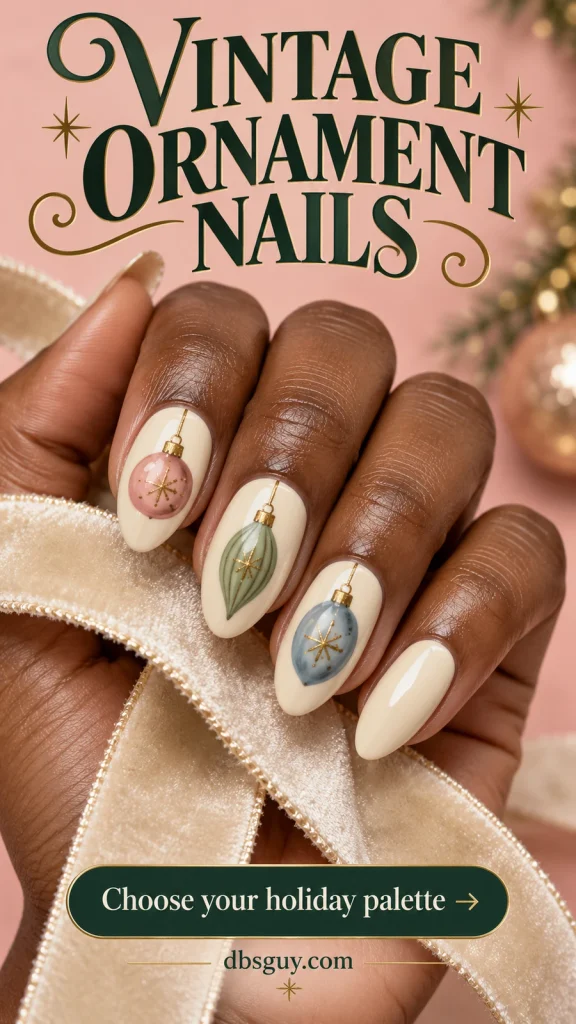
Bring a three-color palette to the appointment and ask for one ornament on each of three nails, leaving the others plain. The reference has small gold starburst details inside the ornaments; omit those first if you need a simpler version. On short nails, keep just the round and oval shapes on two fingers. The muted colors matter more than squeezing in every tiny line.
4. Icy Blue French Tips With a Silver Bauble
A pale blue French gives the familiar Christmas ornament a cooler setting. The sheer pink nail beds stay open, and a small silver bauble hangs on the ring finger beneath the blue tip. It is a good reference when your December wardrobe leans toward gray, denim, or silver jewelry.

Keep the tip narrow enough to leave room for the ornament. Ask for a painted metallic circle with a small cap and silver thread; the image illustrates a jewel-like reflection, which does not require using an actual stone. For short nails, reduce the blue to a thin edge and place one tiny silver motif in the center of the remaining pink space.
5. Evergreen Nails With One Gold Ornament Accent
Deep green supplies most of the color here. The ring nail changes to blush and carries a gold bauble, making the ornament easy to see without covering every nail in artwork. The short soft-square shape also gives this version a different feel from the delicate sheer set in idea 1.
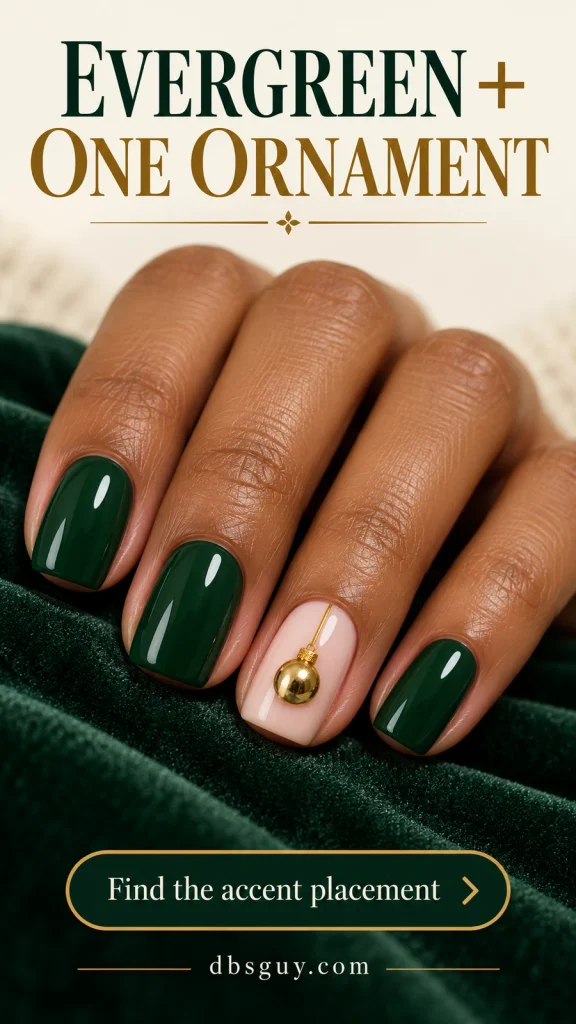
Specify which nail stays blush before the color application begins. Match the blush to the warmth you like against your hand, and keep the green nails undecorated. If you are using regular polish at home, a small flat gold ornament decal can stand in for the image’s reflective circle. Choose one that fits inside the nail with space for its thread.
6. Gold Outline Ornaments on Garnet
An outline changes the whole ornament idea: the burgundy remains visible inside the circle, so the design feels graphic rather than filled with metallic color. Two decorated nails sit among plain garnet nails. This is a dressier option for someone who likes dark polish and fine jewelry.
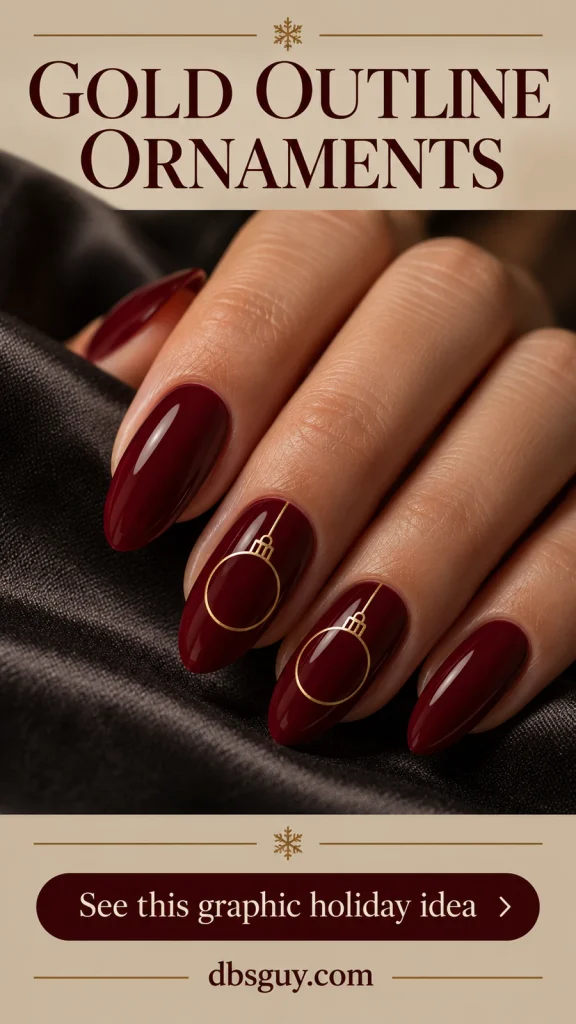
Ask for thin gold circles, little caps, and short hanging lines on the middle and ring nails. Show the image and emphasize that the centers stay burgundy. These open circles expose an uneven line more readily than a filled dot, so this is a precision design. For a shorter or simpler set, keep one outline on the ring finger and leave the second nail plain.
7. Red Ornament French Tips
Instead of hanging a bauble in the middle of the nail, this design turns each tip into one. Rounded red shapes meet the free edge, with tiny gold caps pointing back toward the pink nail bed. The result has more character than an ordinary red French while keeping most of the base sheer.
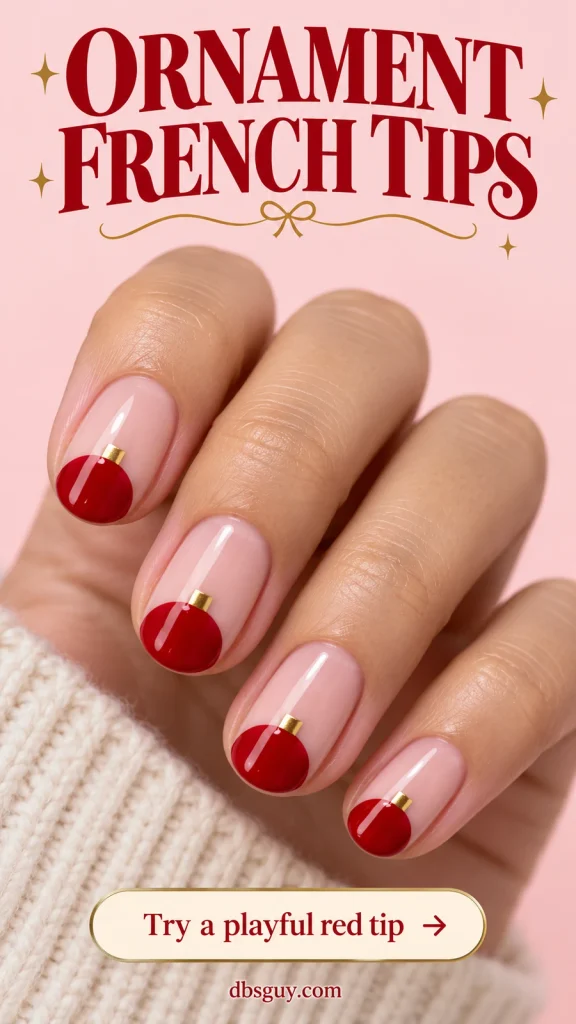
Describe the tips as cropped round ornaments, not straight red bands. The cap is the detail that makes the shape recognizable. On very short nails, use the ornament tip on just the thumb and ring finger and leave the rest sheer. Ask for painted caps or flat decals if you want to avoid adding a raised piece at the edge.
Twinkly Christmas Lights and Soft Sparkle
8. Tiny Multicolor Lights on a Sheer Base
A curving green wire and a few red, yellow, and green bulbs bring the Christmas-tree feeling to short nails. The sheer pink background lets the small colors stand out. This is the most literal light-strand option in the group, with a repeated motif across the hand.
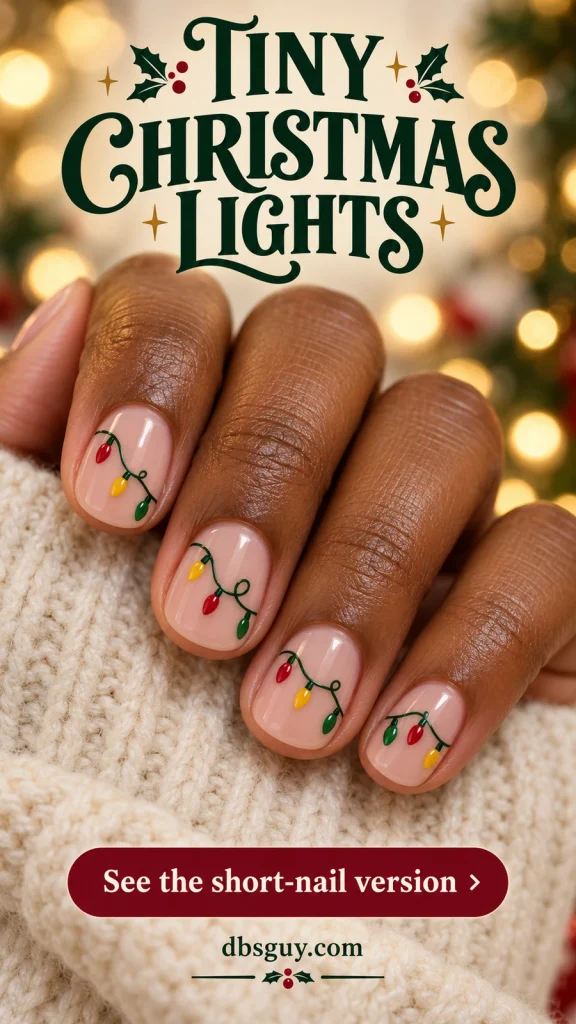
Start with one loose curve per nail, then add a few small bulbs with space between them. Three is a useful starting point on a short nail, not a number you need to force. A tiny stem joining each bulb to the wire helps it read as a light rather than a random dot. Simplify to one decorated ring nail if repeating the line on your second hand feels awkward.
9. Warm White Lights on Pine Green
Warm ivory bulbs against pine green suggest the glow of a tree with white lights. The gold wire and pale dots stay on the middle and ring nails; plain green on the others gives them room. Choose this over multicolor strands if you prefer one quiet light color.
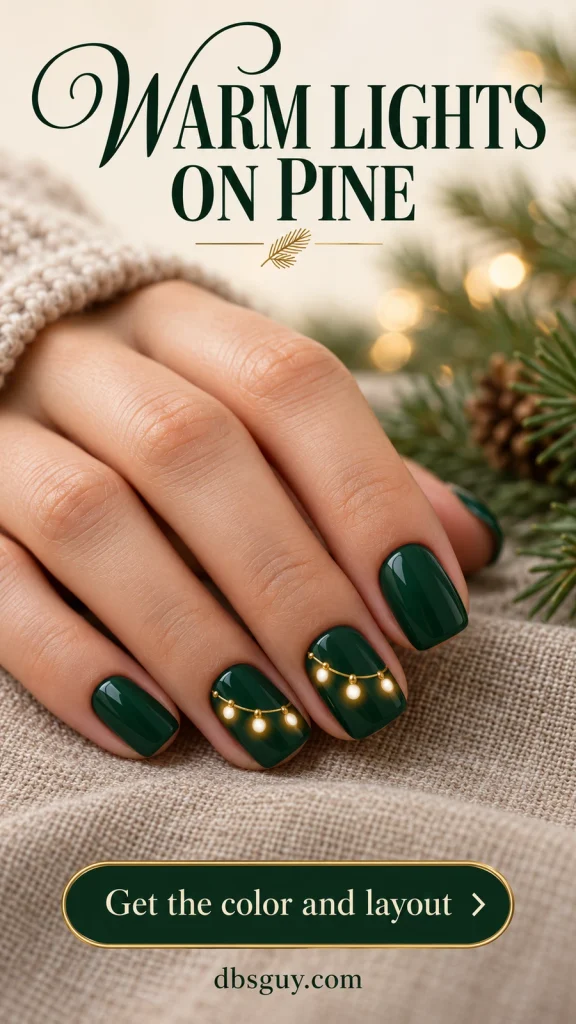
For a painted interpretation, use a fine gold curve with spaced ivory dots just below it. The soft halos in the concept image illustrate glow; ordinary painted dots will not emit light. Keep the dots small enough that green remains visible between them. A thin warm-gold outline around a pale center can suggest that glow, but skip it if it makes the bulbs too large.
10. Icy Silver Lights on Midnight Navy
Midnight navy and icy white offer a cooler, evening version of light-strand nail art. Silver lines sweep across two nails, leaving the others glossy and dark. The contrast makes each pale bulb visible without adding more colors or a layer of glitter.

Choose a navy swatch that still looks blue in ordinary room light. Then ask for thin silver strands and a few small white teardrop bulbs, keeping the design inside the nail edges. The image uses the index and ring fingers, so the decorated nails are separated by plain navy. For a smaller nail, a shorter curve with fewer bulbs preserves the same idea.
11. Red-Only Lights on Milky Pink
Using just red bulbs gives Christmas lights a gentler palette. Milky pink softens the contrast, and the dark burgundy wire ties the red shapes together. With artwork on two nails, the set leaves plenty of plain pink around the holiday detail.
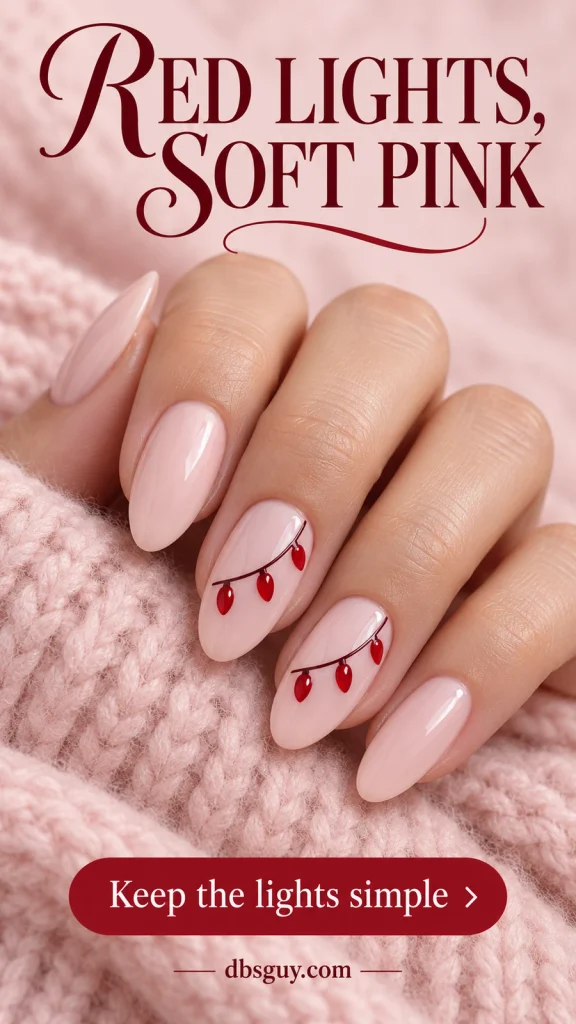
Ask for small red teardrops hanging from a fine curved line on the middle and ring fingers. Keep green, yellow, and blue out of the palette if you want this particular look. A tiny pale highlight inside each bulb is optional. If the base becomes too opaque or too white for your taste, compare a sheerer pink before adding the artwork; that change affects the entire set.
12. One Vertical Light Strand With Cobalt Nails
A vertical strand uses the length of one accent nail instead of running the artwork across every finger. Cobalt nails frame a sheer pink ring finger with three colored bulbs. The blue is deliberately bright, making this a playful alternative to traditional red and green.

Request a loose lengthwise wire on the ring nail, with the little bulbs alternating sides. Keep the surrounding nails solid cobalt. A short nail can still hold the motif if you reduce the number of bulbs and leave clear space at the base and tip. Avoid turning the line into several tight loops, which can overwhelm the small open background.
13. Emerald French Tips Trimmed With Fairy Lights
Here the light strand follows the smile line, the curved boundary of a French tip. Emerald sits at the free edge, and little gold bulbs decorate the curve just below it. The open pink nail bed makes the border feel deliberate rather than crowded.

Ask for a slim emerald tip first, then a fine wire and a few small gold circles along its inner curve. The bulb effect can be painted flat even though the concept shows strong metallic highlights. On short nails, keep the trim on two fingers and give the others plain green tips. If the full border fills too much space, choose the tip or the lights instead of squeezing both in.
14. Soft Silver Twinkle Without a Light Strand
You can borrow the twinkle without drawing actual bulbs. A sheer smoky-beige base, fine silver shimmer, and a few starbursts create a quieter holiday look. This is the option to save when you want sparkle that still makes sense after the Christmas decorations come down.

Keep the larger starbursts on the middle and ring nails, with the remaining nails carrying only fine shimmer. Small flat starburst decals can replace hand painting. Compare the decal against the finished base before placing it: very pale silver may be hard to see on a light shimmer. Skip chunky glitter if you want to preserve the image’s soft, scattered light effect.
Red Christmas Nails, From Cream to Chrome
15. True Cherry-Red Gloss on Short Nails
A clean cherry red needs no accent nail. The rounded-square outline and glossy cream finish let the color do all the work. Choose this when you want an unmistakable holiday red and would rather spend your effort on neat edges than small artwork.

Compare a true red swatch with a warmer tomato red and a deeper cranberry beside your hand. Pick the one you like in daylight as well as salon lighting; there is no single correct red for every skin tone. For regular polish, use thin coats and the preparation and drying instructions for your products. Keep a narrow, even margin from the skin rather than overloading the brush to reach every edge.
16. Oxblood With Sheer Half-Moons
Deep oxblood feels richer and less bright than cherry red. A small sheer half-moon at the base of every nail gives the dark color a repeated curved detail. This is a graphic option for someone who wants red without a Christmas picture.

Ask for shallow blush semicircles near the cuticles, with oxblood covering most of each nail. Keep the boundary smooth and omit metallic trim so the contrast remains simple. If using nail guides at home, follow their directions for base preparation and removal; a base that feels dry to the touch may still mark under adhesive. One accent half-moon is a useful simplification if repeating ten even curves is too fiddly.
17. Cranberry French Tips With a Hairline Gold Edge
Cranberry tips bring in red while leaving the nail beds sheer. A fine gold line traces the lower edge of the red, giving the French a jewelry-like detail. The gold is a border, not a second wide band.
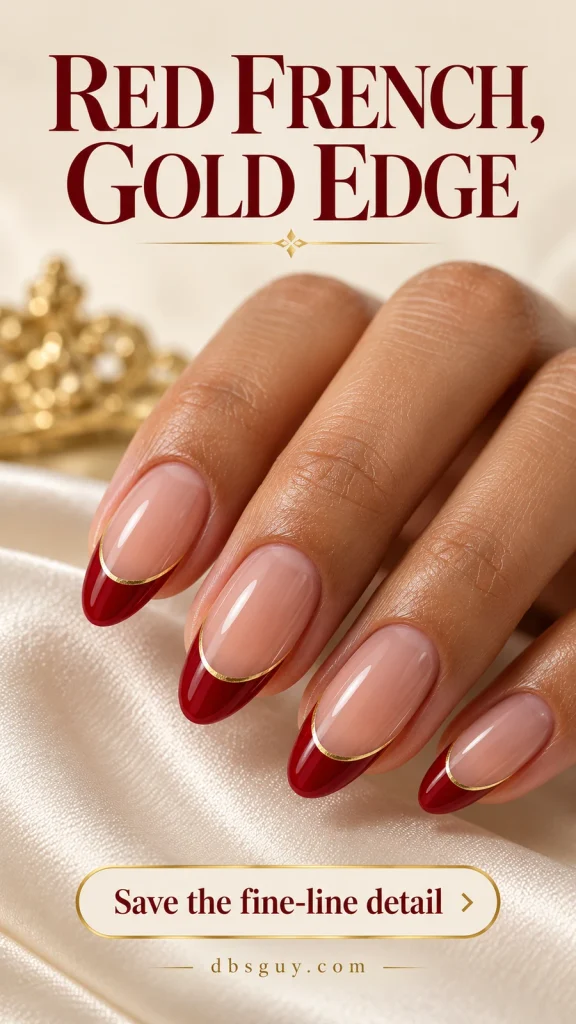
Bring the reference and ask for the gold to follow the red curve closely. Keep the tip proportional to your nail rather than copying its width from a longer set. This design has two precise boundaries, so a salon appointment may be more convenient than painting both hands yourself. For a home version, choose either plain cranberry tips or gold edging on a single accent nail.
18. Ruby Velvet With No Extra Artwork
Ruby velvet changes with the light instead of relying on a painted motif. The fine reflective particles create a luminous area with darker red around it. Keeping every nail the same finish lets that movement be the decoration.

Ask your nail artist for a ruby magnetic velvet effect and show the broad, soft reflection you want. Magnet placement changes how magnetic shimmer looks; the technique and timing depend on the product system. Ask to see a finished sample move under light before choosing. A regular red shimmer lacquer is a simpler alternative if you want sparkle, but it will not necessarily reproduce the same magnetic effect.
19. Red Chrome With One Small White Bow
Reflective red chrome gives the manicure a stronger metallic surface than cream gloss or velvet shimmer. One small white bow on the ring finger supplies the Christmas detail. The other nails remain reflective red, so the little bow does not have to compete with a pattern.

Request a flat painted bow or a thin compatible decal, with short tails contained inside the nail. A raised bow charm would change the look and feel. Show the technician that you want reflective metallic red, since “shiny red” can also mean ordinary glossy polish. For a simpler regular-polish interpretation, use red metallic lacquer and one white bow decal, accepting that its reflection will look different from the concept.
20. One Candy-Cane Stripe Accent Among Red Nails
An ivory ring nail with diagonal red stripes gives a solid red set one clear holiday pattern. Keeping the stripes on one finger makes the design easier to read than repeating them everywhere. The short squoval outline suits the compact placement.

Use a few narrow, parallel red diagonals with visible ivory between them. Match the stripe red to the surrounding nails, and let the actual nail width determine how many lines fit; the reference uses a sparse arrangement. A striped nail wrap or suitable decal can replace freehand linework. If using adhesive guides, follow the product’s directions so they do not lift the ivory base.
21. Cranberry Jelly With One Gold Star
A translucent cranberry red has a lighter, glass-like depth than an opaque cream polish. One small gold star gives it a holiday detail without hiding that transparency. This is a useful reference if you like red but want a softer-looking finish than the solid cherry set.
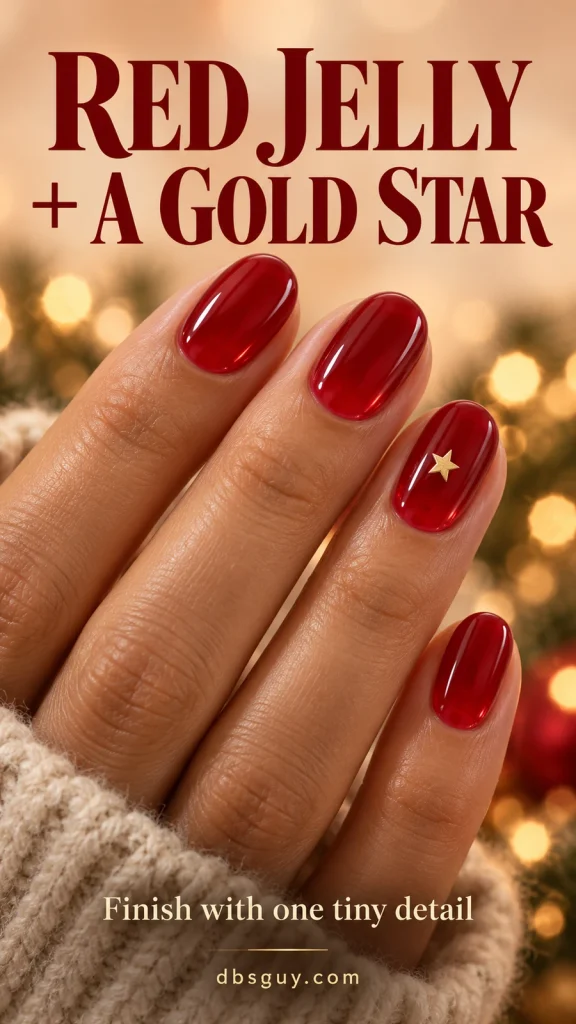
Ask for a sheer red jelly finish and view a sample over a natural-looking nail tip so you can judge the coverage. Extra coats can make a sheer color look deeper, so stop at the coverage you prefer within the product’s directions. Add one small flat gold star just above the ring nail’s center. Leave the other nails plain and choose a star that fits without reaching the sidewalls.
Turn Your Saved Reference Into a Clear Salon Request
Choose one reference, then decide what you are keeping: the base color, the finish, the motif, or the placement. Bring a photo of your current nails too if you are booking artwork in advance. Ask whether the design fits your length and how the amount of detail affects the appointment and quote.
For a home manicure, the single-color cherry red is the simplest starting point. Flat decals can simplify ornaments, stars, and bows. Fine circles, curved French borders, and delicate wires take more control; practice the accent on a spare nail tip before committing to both hands. Follow your specific polish, decal, and finishing-product instructions rather than combining incompatible steps from different systems.
If you prefer the least detailed options, our simple December nail ideas focus on manageable finishes and small accents. For a wider mix of motifs, browse Christmas nail ideas from classic red to unexpected twists.
A Brief Nail-Care Note
The American Academy of Dermatology’s gel-manicure guidance recommends protecting your hands with broad-spectrum, water-resistant SPF 30 or higher before a gel manicure, or using dark, opaque gloves with the fingertips cut off. It also advises against picking gel polish and recommends moisturizing nails and cuticles between manicures. Choose your design separately from the product system; a festive color does not require extensions.
Frequently Asked Questions
Which Christmas nail ideas work best on very short nails?
Cherry-red gloss, one gold ornament, and a single star do not need much room. For lights, keep a few separated bulbs on one accent nail. For an ornament, check that the circle, cap, and thread all fit before choosing the size. A smaller motif with visible base around it is more useful than a long-nail design squeezed into less space.
Can I use regular nail polish for these designs?
Most color and painted-art concepts can be interpreted with regular lacquer and compatible nail-art products or decals. The ruby velvet look needs a suitable magnetic product to create its particular effect, while a red chrome reference may need a specialist finish. You can choose red shimmer or metallic lacquer as alternatives, with a different result.
How do I keep tiny ornaments from looking like random dots?
Include a small cap and a thin hanging thread, or use a recognizable ornament-shaped decal. For the tip version, the cap turns a rounded red edge into a bauble. Skip extra decoration until those basic shapes read clearly.
Do painted Christmas lights actually glow?
No. Pale centers, highlights, and contrast can suggest light, but these are decorative nail-art concepts, not illuminated nails. Use the images to choose the arrangement and colors, and expect the effect to change with real lighting and materials.
How do I choose between cherry, cranberry, and oxblood red?
Start with how bright or deep you want the manicure to look. Cherry is the brighter reference here, cranberry is a deeper red, and oxblood is the darkest. Shade names vary between brands, so compare actual swatches beside your hand. Finish matters too: the same general red family looks different as cream, jelly, shimmer, or chrome.
When should I book Christmas nail art?
Contact your salon early enough to ask about its holiday schedule and the artwork you want. Share the reference when booking so the appointment allows for it. Plan around your own wear and removal needs rather than expecting one manicure to last all December.