18 New Year Decoration Ideas for Tables, Entryways, and Party Backdrops


A New Year’s Eve party starts to feel pulled together when the table, the entrance, and the photo corner share one small detail. That could be black ribbon, silver stars, or warm gold. You can repeat that detail without decorating every available surface.
These 18 New Year decoration ideas give you six options for each area. For a dinner party, start with the black-and-gold table or the white bud vases. For a casual gathering, try a party-hat tray by the entrance and one backdrop where people can take pictures. Choose the pieces that suit your room; you do not need all 18.

The visuals are AI-generated decorating concepts, not photographs of completed homes. Candle-style lights in these concepts represent flameless LEDs.
Choose the Spots That Fit Your Party
Pick your decorating spots before buying supplies. Put the dinner plates and serving dishes on the table, open the front door fully, and stand where you expect to take photos. Those three checks reveal the space you actually have. For backdrop stands, include the feet and supports in your measurements, then assemble and secure the stand according to its instructions.
New Year Table Decoration Ideas
Decide whether the table will hold dinner, desserts, or drinks before adding a centerpiece. A low arrangement suits conversation; a serving table needs clear access to plates and utensils.
1. Anchor a Black-and-Gold Table With a Narrow Runner

A black runner makes everyday white plates look ready for an evening party. Add gold-toned flatware if you own it, or keep your usual silverware and repeat gold in just one small accessory. The contrast does most of the decorating.
Place three short flameless pillar candles on a slim tray down the center, keeping the tray below seated guests’ sight lines. Set out the actual serving bowls before deciding how long the display can be. If dinner needs the middle of the table, move the tray to a sideboard and leave the runner in place.
Skip loose glitter here. A clean black surface, folded napkins, and a little reflected light create the mood without adding anything to brush away before eating.
2. Space White Bud Vases Between the Place Settings

For a lighter New Year tablescape, divide a few white flower stems among small clear bud vases. Use stable, narrow-necked containers and trim the stems so the flowers do not sit between diners’ faces. The small arrangements are easier to reposition than one sprawling bouquet.
Start with three vases on a rectangular table, then remove one if it crowds the serving dishes. A tiny silver-star display on a shallow tray adds a party detail without scattering decorations around the plates.
Keep the rest of the setting quiet: cream linen, plain dishes, and clear glasses. If you are reusing holiday flowers, discard damaged stems and use clean vases rather than trying to hide tired blooms in a larger arrangement.
3. Gather Disco Balls on One Coffee-Table Tray

A coffee table can carry the party mood while the dining table stays available for food. Set a shallow, stable bowl on a tray and arrange a few small mirrored disco balls inside. Keep any extra pieces within the tray’s edge so the display stays contained.
Choose lightweight decorative balls with intact surfaces, and avoid stacking them into a mound. Add a pair of flameless votives if there is room, then check the view under your normal evening lighting. The mirrored pieces need light to reflect; they will not create a moving disco effect on their own.
Keep a clear landing spot for guests’ drinks. On a small coffee table, the bowl alone may be enough.
4. Make Removable Clock Napkin Rings

A little clock turns a plain napkin into a countdown detail without taking extra table space. Make the ornament from a cream cardstock circle, simple black hour marks, two drawn hands, and a gold paper band. A circle about 2 to 3 inches across is a useful starting size; check it against your napkin.
Roll the napkin first. Wrap the band loosely around it, overlap and fasten the band ends, then attach the paper clock with craft adhesive or short ties through punched holes. Let any adhesive dry fully before setting the ring on a clean plate.
Guests should be able to slide the entire ring off easily. Keep the clock decoration away from food, and store the finished rings flat-sided in a shallow box for another year.
5. Tie Jewel-Tone Napkins With Gold Ribbon

Emerald and plum feel festive when you want something richer than an all-metallic table. Use solid-colored napkins with plain white plates so the fabric remains the main color. Alternate the two shades, or choose just one if that is what you already own.
Fold each napkin into a rectangle, tie a slim gold ribbon around the middle, and add one lightweight paper star at the knot. Trim the tails so they stay on the napkin rather than trailing under glasses or across neighboring settings.
This idea works especially well when dinner will occupy the table center. The decoration travels with each place setting, and guests can untie it before the meal. You can also leave off the star and let the ribbon supply the shine.
6. Give the Dessert Table a Clear Front and a Raised Back

A dessert table looks more deliberate when the food has a clear arrangement. Put a low cake stand toward the back, a flat platter toward the front, and a stack of dessert plates at the side where guests will begin. Repeat one party finish through baking cups or a short ribbon along the table’s front edge.
Use stable serving stands designed for the purpose, with every base fully supported. Avoid balancing platters on improvised towers. Set a small star decoration behind the food rather than scattering confetti between cookies.
Before the party, walk through serving yourself: pick up a plate, reach for the tongs, and take a dessert. Move anything that interrupts those simple steps. Decoration should not make guests reach over other food.
Also Read: 15 Small Christmas Table Decor Ideas That Still Leave Room for Dinner
New Year Entryway Decoration Ideas
The entrance should welcome guests and help them settle in. Keep decorations on existing furniture where possible, and leave door movement, coat storage, and walking routes clear.
7. Style a Welcome Console With One Framed Greeting

A framed “Happy New Year” greeting is enough to make an existing console feel part of the celebration. Use a frame with a stable stand, then place it beside one vase and a shallow tray of shatterproof silver ornaments. The tray keeps the ornaments from rolling.
Leave a generous patch of tabletop empty for keys or a bag set down briefly. That open space is useful when guests arrive together, and it keeps the display from spreading across the whole entrance.
If you already have a mirror above the console, let it remain the backdrop. There is no need to add a banner as well. Repeat the tray’s gold finish somewhere else in the party room to connect the entrance with the table.
8. Hang a Small Star Wreath From a Mirror Frame

A simple ring of gold stars gives an entry mirror a New Year accent without filling the console below. Choose a lightweight wreath that leaves plenty of the mirror visible, then finish it with one black velvet bow.
Use this only on a securely installed mirror whose frame and mounting can accommodate the decoration. A short ribbon over a suitable frame, as illustrated, avoids sticking anything directly to the glass. If that attachment does not suit your mirror, choose the framed greeting instead.
Keep the bow tails within the mirror area. A key dish can remain on the console below, so the space still works as an entrance after the party starts.
9. Put Party Hats and Horns on a Grab-and-Go Tray
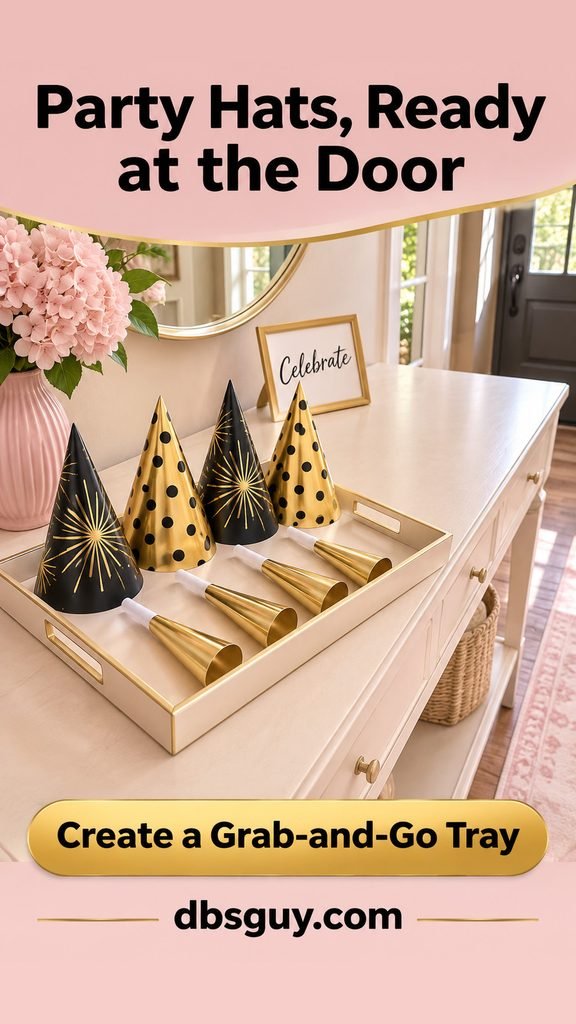
Party accessories make a useful entry decoration when guests can take them as they arrive. Stand a few paper hats at the back of a shallow tray and arrange party horns across the front. The different shapes give the display some height without needing a separate centerpiece.
Use a tray wide enough that picking up one item does not pull several others with it. Set out a small batch, then keep extras nearby rather than piling everything into the entrance.
Match the hats to your main palette—black and gold in this concept—and leave room beside the tray. If people tend to stop in the doorway, move the tray farther into the room so arrivals can keep moving.
10. Add a Pair of Lanterns to the Console

Two lanterns of different heights can make a plain console feel warm at night. Put a correctly sized flameless pillar candle inside each one, and keep their bases fully supported on the furniture. A small ribbon on a handle can repeat the party color.
Leave the hallway’s ordinary lighting on. Decorative glow is an accent, and guests still need to see where they are walking. Keeping the lanterns on the console also avoids placing obstacles beside a door or on a stair.
Check the candles’ switches and batteries before guests arrive. Use lighting products according to their instructions, including any restrictions on enclosed use, and keep battery compartments secured.
11. Invite Guests to Add a Wish to a Tabletop Tree

A wish tree gives the entrance something personal to collect during the evening. Use a low, heavy vase with a broad base and a few short decorative branches that stay within the console’s footprint. Add several blank cardstock stars on short loops, with spare cards and pens beside them.
Invite guests to write a hope, a small goal, or something they would like more of in the coming year. Keep participation optional, and let people leave cards unsigned if they prefer.
Assemble the branches first and check that the vase remains steady when a card is added. If your entrance is too narrow for people to pause, put the same display on a side table inside the party room.
12. Display a Few Favorite Memories From the Year

A tabletop photo board makes a welcoming New Year decoration when the gathering includes people who shared the year with you. Choose four to six snapshots and clip them to short strings secured within a corkboard frame. A small gold bow at one corner is enough party detail.
Use a board with a stable tabletop support, and check that its feet fit completely on the console. Keep the photos inside the frame so nothing trails into a drawer or catches on a sleeve.
Include a mix of ordinary moments and bigger occasions. Ask before displaying personal photos of other people, particularly at a larger gathering. Landscape, pet, and still-life pictures can make a lovely display too.
Also Read: 15 Apartment Holiday Decorating Ideas for Small Spaces
New Year Party Backdrop Ideas
Pick one backdrop where a small group can stand comfortably. Check the phone-camera view before decorating the full area; the background only needs to fill the picture. Keep supports out of the walking route and use the stand’s specified securing method.
13. Hang a Silver Fringe Curtain on a Backdrop Stand

Silver fringe gives a plain corner a recognizable party finish with one main material. Attach the curtain to a suitable backdrop stand using its recommended fittings. Start with enough width for the photos you want, rather than covering an entire wall automatically.
Keep the fringe ends above the floor, and place a phone tripod to the side when it is not in use. Check the setup with the room lights on; a light directed toward guests from the front is usually more useful than a bright window behind the fringe.
Take a test photo with someone standing in the spot. If the edges of the stand appear, adjust the camera position or framing before adding more decorations.
14. Build a Balloon Garland Around One Side of an Arch
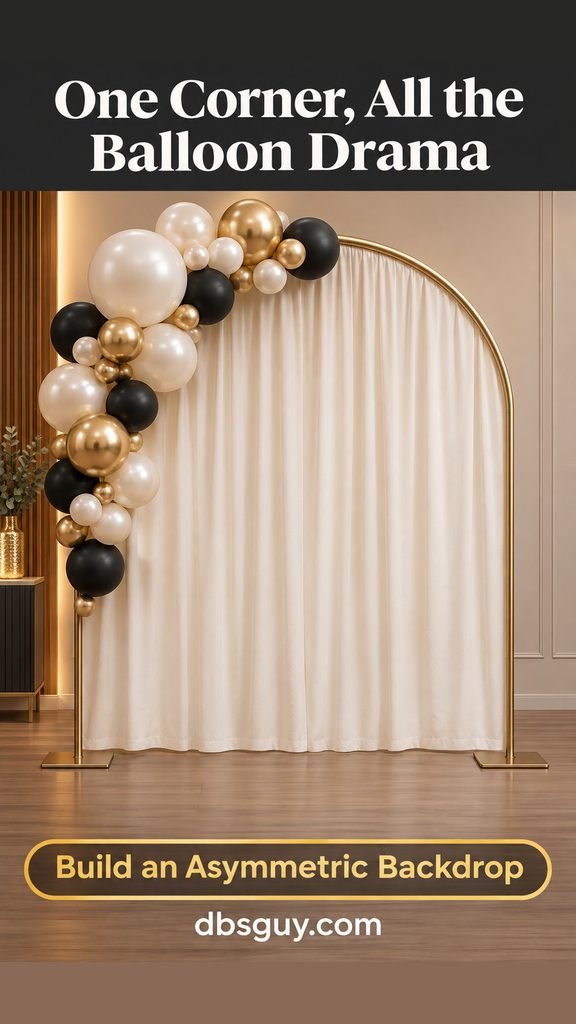
An asymmetric balloon garland can frame photos without surrounding the whole backdrop. Use an air-filled balloon kit in two or three coordinating colors, make small clusters according to the kit instructions, and fasten them along one side and the upper corner of a suitable arch stand.
Check that the frame is rated for the attachments and secured as directed. Leave its center open and keep the balloons and supports away from the path guests use. Inflate to the balloon maker’s guidance rather than forcing every balloon to the same size.
Have an adult handle setup and cleanup. Keep uninflated balloons and broken pieces away from children, especially those under 8, and discard broken pieces promptly. If balloons do not suit your household, choose the paper fans instead.
15. Arrange Paper Fans in One Off-Center Cluster

Paper rosette fans give a backdrop color and texture without a balloon kit. Choose three sizes and a limited palette, such as burgundy, blush, copper, and cream. Lay the fans out on the floor first to decide which edges should overlap.
Move that arrangement onto a stable display board using attachments suitable for the fan weight and board surface. Keep the main cluster around the upper part of the photo area so guests do not hide every decoration when they stand in front.
For fans you want to use again, choose a reusable closure such as the maker’s clip system rather than permanently gluing the folds shut. Close them carefully after the party and store them dry, without crushing the pleats.
16. Make a Midnight-Sky Backdrop With Paper Stars

A navy cloth and a small collection of gold stars create a quieter backdrop for an evening party. Use a matte fabric panel on a stand designed to hold it, then attach lightweight paper stars directly to the fabric with a suitable removable method. Leave open areas instead of covering the cloth evenly.
Keep the stand’s feet outside the photo spot and away from the walking route. The concept uses no powered lights in the fabric; the stars catch the room’s existing light.
Place a lamp toward the front or side, with its cord kept clear of feet, and take a test photo. Navy can look almost black in a dim room, so adjust the lighting until both the stars and people’s faces remain visible.
17. Use a Checkerboard Panel for a Graphic Photo Corner

A checkerboard panel gives a New Year photo corner a bold, graphic look. Choose large black-and-ivory squares on a matte panel or backdrop fabric so the pattern reads clearly without shiny glare. Use a freestanding support made for the panel’s dimensions and weight.
Clip a few wide gold ribbons to one upper edge and let them fall along the border, stopping above the floor. Keeping them to the side leaves a clear space around faces.
Test your camera distance before adding furniture. If a stool helps with seated pictures, use a stable one and move it out of the standing-photo area when needed. This look needs very little additional decoration because the grid already fills the background.
18. Make a Giant Paper Clock the Countdown Backdrop

A giant paper clock makes the countdown itself the main decoration. Start with a cream cardstock circle about 24 to 30 inches across, adjusting the size to your display board. Mark 12 evenly spaced hour positions and cut two hands in different lengths from black cardstock.
Fasten the hands at the center with a paper brad, leaving them loose enough to move, then attach the clock securely to a stable freestanding board. Test the movement before the party so the hands turn without tearing the paper.
Treat this as a decorative clock, not a timekeeper. Use a phone or actual clock for the countdown and move the paper hands to midnight at the right moment. A few stars at the board’s lower corners finish the scene without competing with the face.
Also Read: 21 Easy New Year’s Eve Appetizers, From Warm Dips to Bite-Size Snacks
Bring the Party Spaces Together
For a dinner party, pair one table idea with one small entry display. If photos are part of the plan, choose a single backdrop and repeat a finish from the table. Black ribbon, silver, or warm gold can travel between the spaces without making them identical.
Set up dry paper decorations and stands before the day gets busy, leaving food and fresh flowers until their condition and serving needs call for them. Walk through the room once more with chairs pulled out and doors open. Afterward, store folded fans, paper rings, and ribbons by material so they are easier to use again.
Use flameless candles for the compact arrangements shown here, and keep paper, ribbon, and fringe away from heat sources. For any decorative light strings you add elsewhere, check for damaged cords, follow the maker’s connection limits, and turn them off before leaving home or going to bed. The NFPA’s winter holiday safety guidance explains these precautions.
Frequently Asked Questions
What is the easiest New Year decoration to start with?
For a dining table, tie ribbon around the napkins you already own. For an entrance, put a framed greeting beside one tray of decorations. Both let you finish a small area before deciding whether the room needs more.
Can I reuse Christmas decorations for New Year’s Eve?
Yes. Silver or gold ornaments, plain ribbon, lanterns, and some paper stars can move into these setups. Remove pieces that pull the display toward a different theme, and replace any damaged lights or decorations rather than hiding the wear.
How do I decorate a small apartment for a New Year party?
Choose the table or console you already have, then add a backdrop only if its full support footprint fits. The clock napkin rings and ribbon napkins work without a centerpiece. A tabletop greeting or memory board brings the entrance into the celebration without another piece of furniture.
How can I put up a backdrop without attaching it to the wall?
Use a freestanding backdrop stand or supported display panel suited to the material and weight. Follow its assembly and securing instructions, and account for the feet when checking the space. A stand still needs a clear, stable location; it should not block a door or the route through the room.
Do New Year decorations have to include the year?
No. Stars, clocks, metallic accents, and a simple Happy New Year greeting all communicate the occasion. Leaving off a year makes paper fans, napkin rings, and signs easier to reuse.
Also Read: 30 Happy New Year 2027 Wishes and Images to Send at Midnight