
A cardboard Christmas village gets its charm from a few different roof heights, windows that soften the light, and enough open space to see each little house. You can build all three into the shipping boxes already sitting by your recycling bin.
This tutorial makes three freestanding houses in six steps, with cut-out windows, folded cardboard roofs, and battery-powered LED lighting. Start with one small house, get its roof and glow right, then use the same method for the other two. No purchased house kit or printable pattern is required.
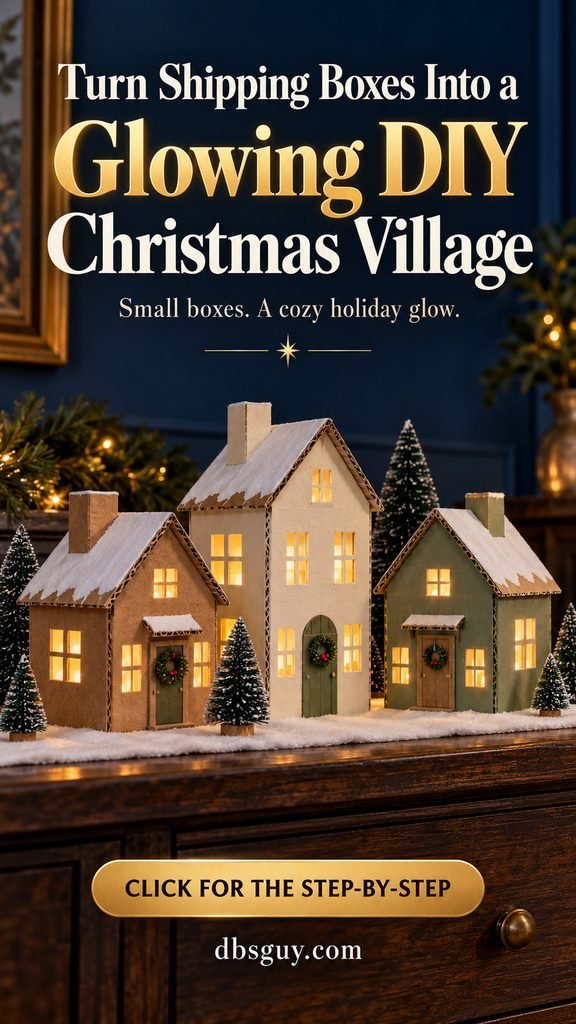
The images are AI-generated concepts that illustrate the construction and styling. Actual box proportions, window arrangements, cut edges, and light brightness will vary.
What you need for a three-house village
- Three clean, dry corrugated shipping boxes with intact corners and bottoms, plus spare flat cardboard for gables and roofs.
- A pencil, metal ruler, craft knife, and cutting mat. Scissors are useful for thin cardboard, paper, and felt.
- Masking tape and cardboard-compatible craft glue. Choose an adhesive labeled for the materials you are joining and follow its drying directions.
- Matte acrylic craft paint and a small brush: warm ivory, muted sage, and white. Leave one house natural kraft brown.
- Translucent vellum or tracing paper for window backing, plus a glue stick suitable for paper.
- White paper strips or a paint pen for frames and trim, and colored cardstock for solid doors.
- Three small warm-white battery-powered LED lights with intact, secured battery compartments. Check that the manufacturer’s instructions permit the intended placement, and measure each light before making its access opening.
- A stable display board or tray, white felt, and a few miniature trees. These finish the scene without needing loose artificial snow.
For a first attempt, plan two craft sessions: one for measuring, cutting, and fitting the roofs, and one for painting and assembly after the parts have dried. Drying time depends on your products and how heavily you apply them. Complete one house before cutting every box.
Use LED lighting only. Cardboard and paper must stay away from flames and heat sources. The U.S. Consumer Product Safety Commission recommends flameless candles whenever possible. Adults should handle the craft knife; children can help choose colors and make paper decorations.
1. Choose the boxes and mark a layout that fits your shelf
Measure the display surface before choosing boxes. A delivery carton can look small on your worktable and still overwhelm a narrow shelf once its roof sticks out. Count the roof overhang, rather than just the box footprint.
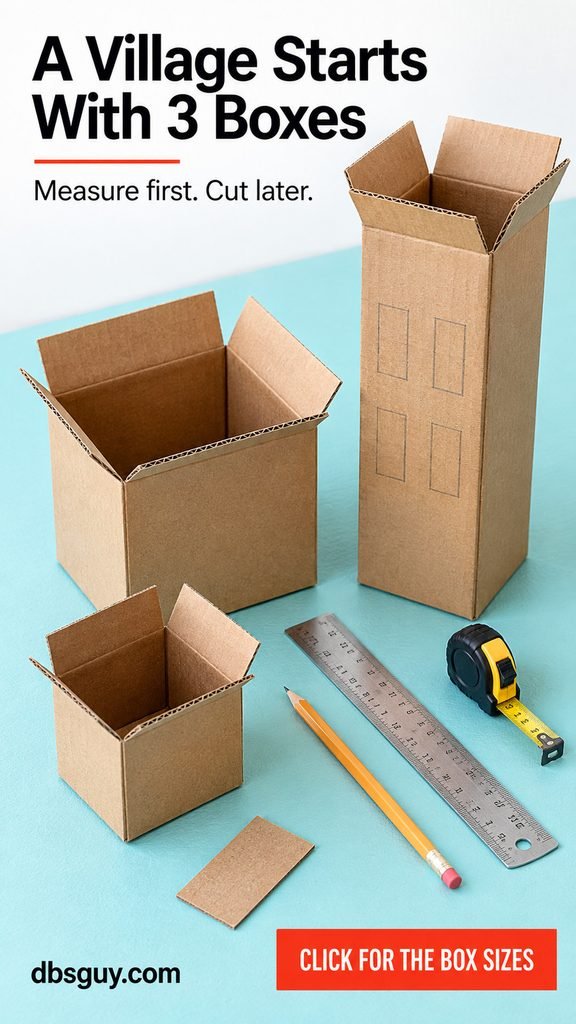
For a village similar to the finished concepts, use these suggested starting dimensions. Each measurement is front width × depth × wall height, before adding a roof:
- Small kraft cottage: about 5 × 4 × 5 inches; add a gable with a 2-inch rise.
- Tall ivory house: about 7 × 5 × 9 inches; add a gable with a 3-inch rise.
- Medium sage house: about 6 × 4 × 6 inches; add a gable with a 2½-inch rise.
A board approximately 30 × 12 inches gives this example room for roof overhangs, small trees, and gaps between buildings. Your boxes do not need to match those sizes exactly. Keep one noticeably taller than the others, and dry-arrange the boxes on your actual surface before committing.
Remove shipping labels and loose tape. If peeling a label tears the front, rotate the box to put that face at the back. Skip boxes with moisture damage, grease, musty smells, or crushed corners.
Stand each box with its bottom secured and its top open. Mark the front in pencil: two windows for a small cottage, or four in two rows for the taller house. Reserve a solid area for a paper door near the bottom. There is no need to cut out that door.
2. Cut the windows and a separate opening for the light
Trim off the top flaps, saving usable pieces for roof parts. Reinforce a loose bottom seam from inside with tape. Keep the bottom in place so each house can stand on its own and support its light.
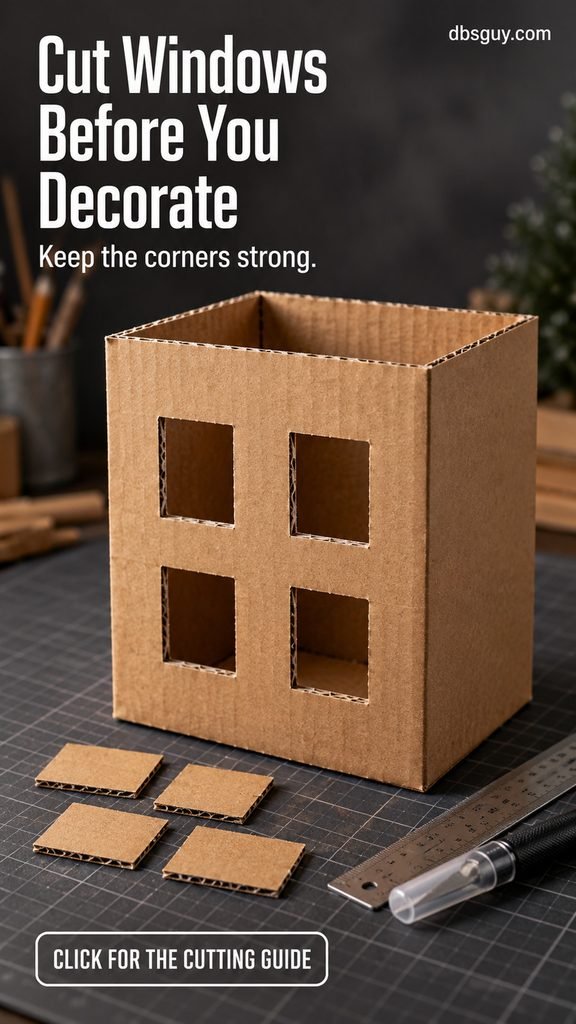
On the tall example, windows around 1 × 1½ inches are a manageable place to start. Scale them down for smaller boxes. Leave roughly ½ inch of solid cardboard between openings and at least ¾ inch near the outside corners and bottom edge. Those are starting allowances, not a guarantee of strength; increase them if your cardboard feels weak.
Work on a stable cutting mat with the marked face turned upward. Support that wall from inside with a sacrificial scrap board or thick cardboard. The backing supports the cut and keeps the blade from reaching the opposite wall. Use a metal ruler for straight cuts, keep fingers outside the blade’s path, and make several controlled passes rather than forcing through the cardboard.
Cut a separate rectangular access opening in the back, near the bottom. For a small light, an opening around 3 × 3 inches may work, but size it to your actual light and your hand. On the smallest box, use a smaller opening if needed to preserve the corners. Leave a solid lower lip and side borders. Test that you can insert, remove, and switch the light before moving on.
Save the window cutouts for scraps. Trim loose fibers carefully; a narrow paper frame can cover minor roughness later. Avoid cutting thin crossbars into corrugated cardboard. Add those as paper strips after painting.
3. Add triangular gables and fit a folded roof
The gables are the triangular pieces above the front and back walls. They hold the roof’s pitch. Making them from separate cardboard means the height of your shipping box stays useful, even after its flaps are removed.
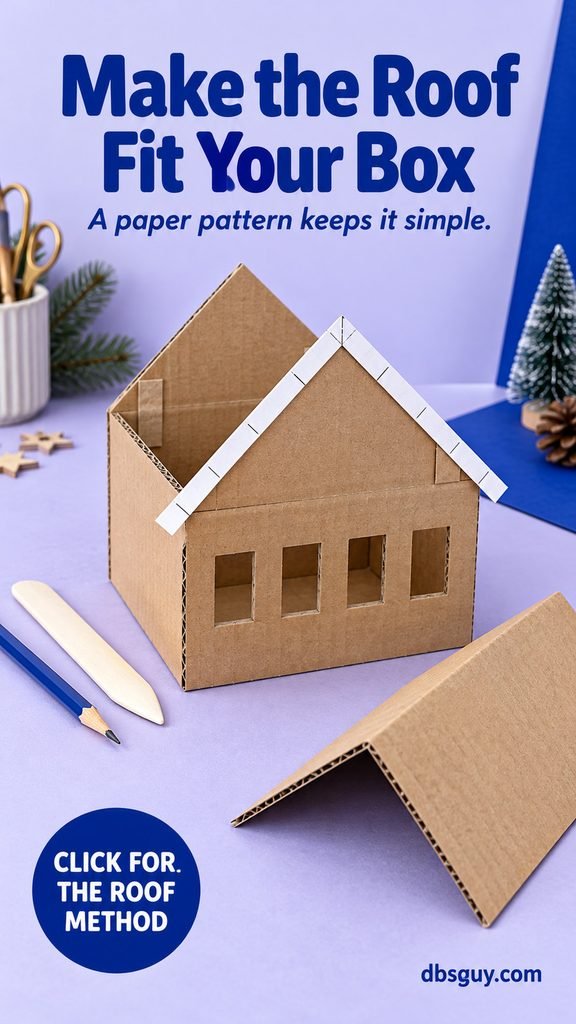
The roof-fitting concept shows a wider box with four windows in one row. The same roof method works on the taller, two-row house; adapt the window layout to the box you have.
For each house, draw a triangle whose base matches the front width of the box. Mark the midpoint of the base, measure straight up by your chosen rise, and join that peak to both base corners. Add a ½-inch-high rectangular strip below the triangle as a glue overlap. Cut two identical pieces. If you want a glowing gable window like the finished concepts, cut a small opening in the front triangle now, leaving generous solid borders.
Glue each overlap against the inside of the front or back wall so the triangle rises above the box. Keep it in the same vertical plane as the wall. Reinforce the joint inside with tape while the glue dries. Check the peaks from the side: they should line up.
Now make the roof by fitting a paper pattern:
- Drape a strip of scrap paper over the front gable, from one eave over the peak to the other eave.
- Mark where the roof should end, allowing about ½ inch past each side wall. Mark the peak as the fold line.
- Use that span as the width of a cardboard roof blank. Its other dimension should be the box depth plus about 1 inch, giving roughly ½ inch of overhang at the front and back.
- Score the ridge gently with a blunt scoring tool, fold, and dry-fit it over both gables. Adjust the edges before painting.
For the 7-inch-wide, 5-inch-deep ivory house with a 3-inch gable rise, a roof blank around 10¼ × 6 inches is a useful first trial. Fold across the 10¼-inch span at its midpoint. Cardboard thickness and the actual gable shape can change the fit, so trust the paper pattern and dry-fit over an exact number.
Thin, stiff packaging cardboard is easier to fold than heavy corrugated board. If the roof sags, strengthen its underside with a second layer along each slope, keeping the fold flexible. Leave the roof loose for now so you can reach inside to finish the windows.
4. Paint the houses and soften the windows with vellum
Keep the palette simple: natural kraft for the small cottage, ivory for the tall house, and sage for the medium one. The brown cardboard remains part of the design, so there is no need to cover every edge perfectly.
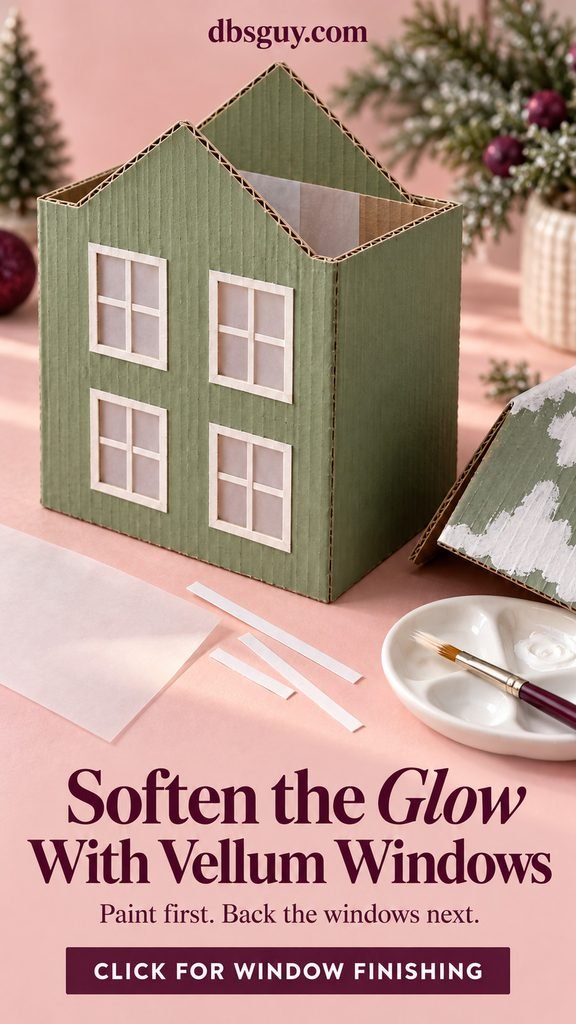
Paint the bodies and detached roofs with thin coats, letting each coat dry according to its label. Avoid soaking the cardboard. Paint white patches or a narrow white line along the roof edges for snow; keep the folded ridge clear of thick glue or heavy decoration.
After the paint is dry, cut vellum pieces that extend about ¼ inch beyond each window opening on all sides. Working through the open top, apply a small amount of paper-safe adhesive to the cardboard around each opening, then press the vellum onto the inside. Keep glue out of the visible window area and let the backing dry flat. A single patch can cover a group of windows if it fits neatly inside the wall.
For divided windows, glue thin white paper strips across the outside of each opening, attaching the ends to the surrounding cardboard. A simple cross is enough. Add a cardstock door and a tiny paper or ready-made wreath. The door stays solid; the light shines through the windows.
The cover also shows optional door awnings and decorative chimneys. For an awning, fold a short cardboard rectangle and support it on two tiny scrap brackets above the door. A small folded cardboard tube with a closed top makes a purely decorative chimney. Keep either detail light, and add it only after the roof fits.
If you cut a gable window in Step 3, back it with vellum too. It is optional; the main wall windows supply the glow.
Once the backing and trim are dry, glue the roof to the gable slopes and let the joint set. Keep the back access opening clear.
5. Test the LED glow before finishing the display
Switch on one light and place it upright on the flat bottom inside the house, away from the vellum. Look at the windows from the front in the room where you plan to display the village. Daylight can hide a glow that looks warm and inviting after sunset.
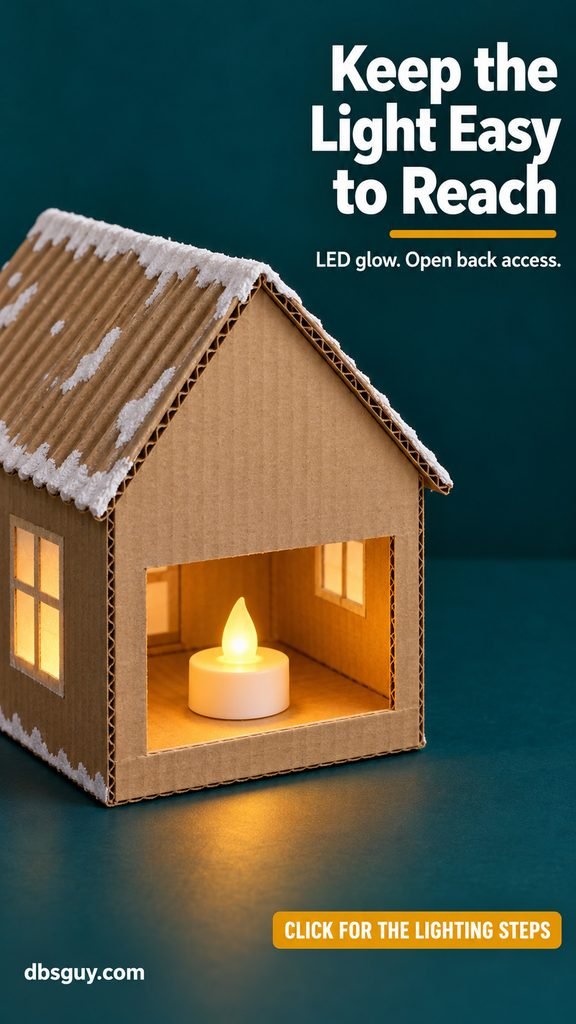
The goal is an even glow, rather than a visible bright point pressed against a window. Move the light toward the center or a little farther back. If a large box stays dim, try a brighter suitable battery LED light before adding more window backing. A single small tea light will not necessarily light a tall house evenly.
Use the light exactly as its manufacturer directs. Do not cover it with felt, cotton, or faux snow; glue it into the house; block its battery compartment; or use a product that is not intended for the placement. The access opening should remain usable, and the house should not be sealed airtight. Skip real tea lights, incandescent bulbs, and improvised electrical wiring.
Check lights for damage before use. The U.S. Fire Administration’s holiday guidance warns against frayed or pinched light wires. Turn the village lighting off when you leave home or go to bed, and keep the display away from fireplaces, heaters, and burning candles.
Small flameless lights may contain button or coin batteries. Choose intact, secured compartments and keep the lights and spare batteries away from children. See the CPSC’s button-battery guidance when choosing products. Treat the village as decorative display, rather than a toy.
6. Arrange the village so every house gets its moment
Cover a stable board or tray with a flat piece of white felt, trimmed so it stays inside the edges. Place the tallest house toward the back, then set the two smaller houses slightly forward at different positions. Check the roof edges do not touch.
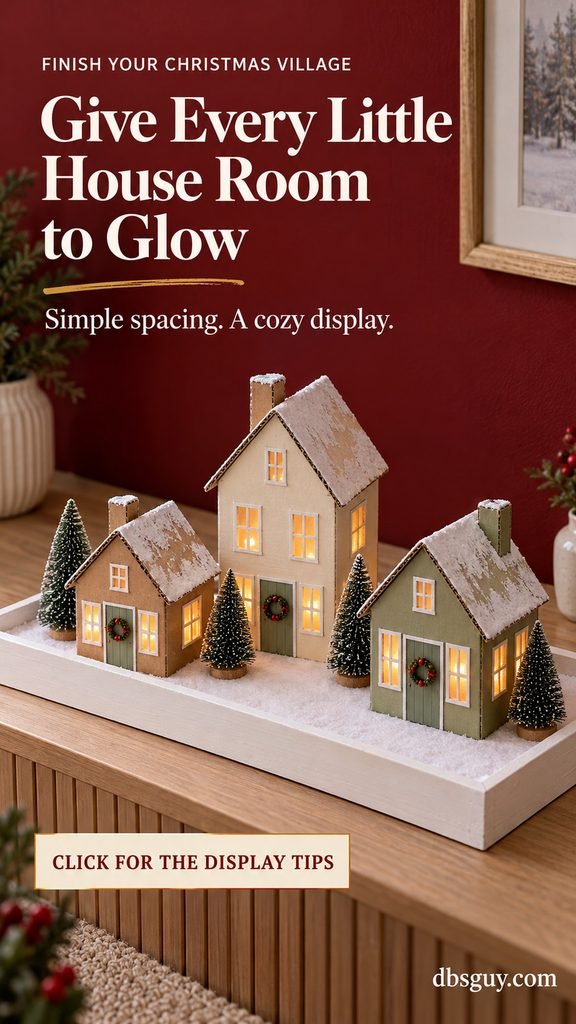
Leave enough room behind each building to reach its light. A display that looks lovely from the front becomes frustrating if all three switches are trapped against a wall.
Add a few short miniature trees beside the houses and one or two near the front. Keep them below the most important windows. The empty spaces become the village’s paths; you do not need an accessory in every gap.
Before calling it finished, step back to your usual viewing distance. If a window is hidden, move the tree or house. If the scene looks crowded, remove an accessory. Then turn on all three lights together and check that their colors feel reasonably consistent.
Keep the village indoors on a dry, stable surface, beyond the reach of pets and small children. It should be easy to enjoy, switch off, and lift away without catching a roof on nearby greenery.
If a part of the build is not behaving
The cardboard curls after painting
Stop adding wet coats and let the piece dry fully. For the next piece, use less paint per coat. Slight curling can sometimes be supported with a dry cardboard layer underneath; replace a badly warped roof instead of forcing it into place.
The light shows as a bright dot
Move the LED farther from the window and try a different position. Check that the vellum lies flat. Add a second small backing layer only if the room still looks too bright through that window; too many layers can make the whole house look dim.
The roof rocks or leaves a gap
Check that both gables have the same rise and that their peaks align. Refit the paper roof pattern, then trim the blank. If the top of the box has become uneven, reinforce that wall from inside before gluing the roof.
Questions about a shipping-box Christmas village
Can I make it with cereal boxes?
Use thin cereal-box cardboard for roof blanks, trim, and small decorative parts. For the freestanding house bodies in this tutorial, intact shipping boxes provide a more substantial starting structure. Very small houses can be made from thin card, but they need a different fold-and-tab pattern.
Do I have to paint all three houses?
No. Natural kraft cardboard works with white trim and vellum windows. Paint only the roofs or one accent house if you want to reduce the amount of painting. Let the exposed cardboard texture be part of the handmade look.
Can this village go on a covered porch?
This version is intended for indoor use. A covered porch can still expose cardboard to damp air and wind. Craft paint does not make the boxes reliably weatherproof, so keep them inside unless you redesign the project with outdoor-suitable materials and lighting.
How do I store it for next Christmas?
Switch off and remove the lights, then remove batteries as directed by their manufacturer. Let the village dry completely before packing. Support each house in a larger storage box so nothing presses on the roofs or trim, and store it somewhere dry. Keep loose paper decorations in a labeled envelope alongside the houses.