

A glowing red-and-white pathway, a striped bow on the door, and a few oversized peppermint shapes can make an ordinary front yard feel wonderfully festive. Candy Cane Lane decorating has that familiar, storybook charm: cheerful color, playful scale, and an entrance that makes people slow down for a second look.
The most inviting displays give those details a clear place to belong. A repeated stripe along the walkway creates movement. Evergreen around the porch adds texture. One larger piece gives the eye somewhere to land. You can build that feeling on a spacious suburban lawn, a narrow townhouse frontage, or a porch in a warm-weather neighborhood.
These 19 candy cane outdoor Christmas decor ideas cover the whole approach to your home, with materials, placement tips, and practical ways to make each look your own. Choose a few that suit your space; the goal is a yard that feels connected from the sidewalk to the front door.
Start with a Simple Candy Cane Lane Plan
Before buying decorations, stand where visitors first see your home. Pick the feature you want them to notice: the walkway, the entrance, or a small scene on the lawn. That becomes your main display. Repeat its colors in one or two supporting areas so the theme carries through naturally.
Choose one red and one white. Cherry red with crisp white gives a classic peppermint look. Deep red with warm ivory feels softer beside brick, stone, or a wood door. Bring a piece of ribbon when shopping so the shades relate to one another. Evergreen can provide the background without competing with the stripes.
Make the stripes readable from the street. Tiny patterns disappear at a distance. Wider bands, larger peppermint disks, and a few recognizable cane silhouettes usually communicate the idea more clearly. Photograph a trial arrangement from the sidewalk before adding the smaller details.
Match the materials to the location. Choose outdoor-rated props and lights for an exposed yard. Keep delicate fabric and craft details on a sheltered porch. Corrugated plastic sign board can work for lightweight cutouts, but its paint, graphics, attachments, and supports still need to suit outdoor use. For wooden pieces, use an appropriate exterior finish system and follow its preparation and curing instructions.
Plan the everyday route. Leave room for the door to open, packages to land, and people to walk comfortably. Keep cords and props away from the walking surface. In snowy areas, allow room for shoveling and snow storage before setting your display in place.
1. Line the Walkway with Glowing Candy Canes
A row of candy cane pathway lights is one of the clearest ways to establish the theme. The repeated curves pull your eye toward the house, while the red-and-white stripes remain recognizable in daylight. It works especially well when the walkway already has a gentle bend.
Gather: outdoor-rated candy cane light stakes, their specified mounting hardware, a measuring tape, and an outdoor-rated timer if your setup needs one.

Measure the usable planting strip beside the path, then divide it into even intervals. Lay the canes out before installing them, keeping the position of each hook consistent. On a narrow approach, a single row can be enough; on a wider path, paired rows give the entrance a more formal rhythm.
Set the stakes back from the edge so shoes, bags, and a snow shovel can pass without catching them. Keep the walking surface clear and route the electrical supply through the landscaped side of the display. Connect only the number of pieces allowed by the product instructions.
The detail that makes it work: consistent spacing. A modest number of evenly placed canes looks thoughtfully arranged. If the yard is small, concentrate them near the entrance rather than stretching the set across the entire property.
2. Frame the Entrance with Two Oversized Candy Canes
Two tall candy canes can give the front door a little holiday-stage presence. Their scale makes the theme visible immediately, which is useful when the yard is small or the house sits close to the sidewalk.
Gather: a matched pair of outdoor cane figures and the bases, stakes, or anchors specified for them. Matching planters are optional if the figures can be mounted securely within an appropriate support system.
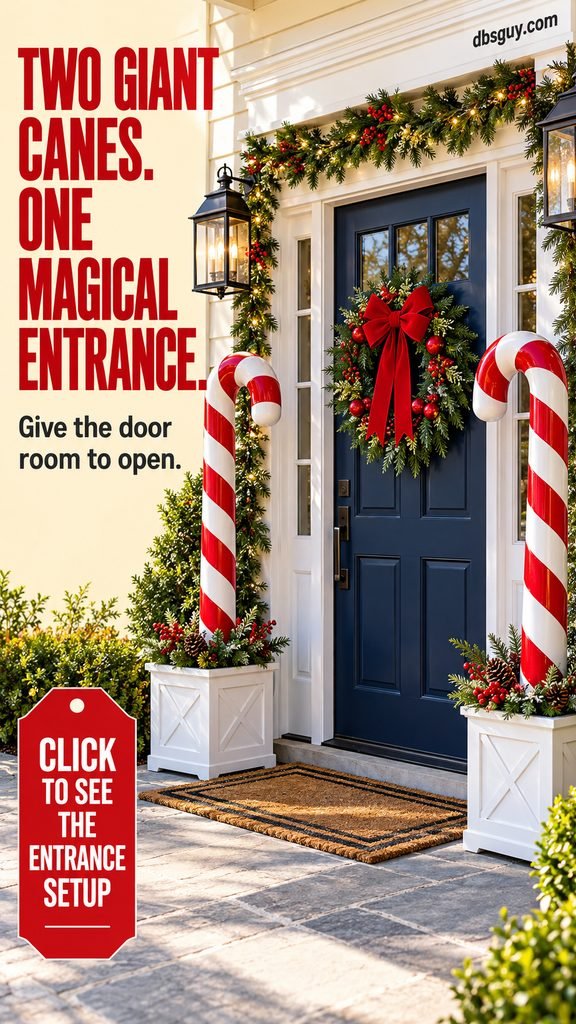
Position one cane on each side of the entrance, outside the full sweep of the door. Let the tops sit at similar heights. If the canes curve inward, give the doorway enough space that the arrangement feels welcoming and the opening remains unobstructed.
For a planter-based display, secure the actual support first, then conceal it with greenery. Loose soil or a decorative pot alone may not stabilize a tall, wind-catching figure. Choose an installation that suits the product and site, and move the pieces to shelter when conditions exceed the manufacturer’s guidance.
A simple wreath is enough to finish the door. If you already own large canes, try this arrangement before adding a second big lawn feature. The entrance can carry the whole display, with smaller red accents on a nearby window or railing.
3. Make a Striped Bow the Star of the Front Door
A generous red-and-white bow brings the peppermint theme right up to the entrance. On a dark green, navy, or black door, the contrast is especially striking. On a pale door, a deeper red ribbon gives the loops a clearer outline.
Gather: outdoor-suitable striped ribbon, a ready-made bow or bow-making supplies, and a door-compatible hanger rated for the finished weight.

Make the bow wide enough to be seen from the approach while leaving space around the handle, lock, and doorbell. Shape the loops before hanging it. Trim the tails so they stay clear of the latch and threshold, then check the view with the door both open and closed.
For a sheltered entrance, a textured ribbon can make the decoration feel substantial. For an exposed door, check that the ribbon is intended for outdoor conditions; a beautiful indoor fabric can lose its shape after rain. A small evergreen sprig at the center adds depth without hiding the striped pattern.
Keep the surrounding detail simple: one bow and a little greenery can be a complete door treatment. Repeat the same ribbon on a nearby planter if you want the entrance to connect with the yard.
4. Build a Peppermint Wreath with an Evergreen Base
An evergreen wreath is a useful starting point because the greenery softens the candy shapes. Peppermint disks, little cane ornaments, and a striped ribbon give it a playful identity while keeping the front door grounded in a traditional Christmas look.
Gather: an outdoor-suitable evergreen wreath, lightweight weather-ready peppermint accents, soft ties or appropriate craft wire, and a hanger that supports the finished wreath.

Place the larger accents first, spreading them around the wreath so the weight and color feel balanced. Leave plenty of greenery visible. A few small cane shapes can fill gaps; one bow can mark the bottom or sit slightly off-center for a softer arrangement.
Attach ornaments to the wreath frame or a firm structural branch, using the attachment method appropriate to each piece. Check them individually before hanging the wreath. Put cut wire ends on the back where they cannot scratch the door, and confirm that the wreath can move slightly without hitting the glass.
Use decorative candy shapes rather than real candy in an outdoor display. Keep small removable pieces out of young children’s reach. A peppermint theme should be easy to recognize while every ornament stays secure and clearly part of the decoration.
5. Turn Plain Porch Columns into Candy Cane Stripes
White porch columns are a natural canvas for a candy cane pattern. A wide red ribbon spiraling around each column creates a bold architectural detail, and the stripe can be seen from much farther away than a tiny ornament.
Gather: outdoor-suitable red ribbon, soft removable ties, a tape measure, and a small ribbon sample for checking the surface.
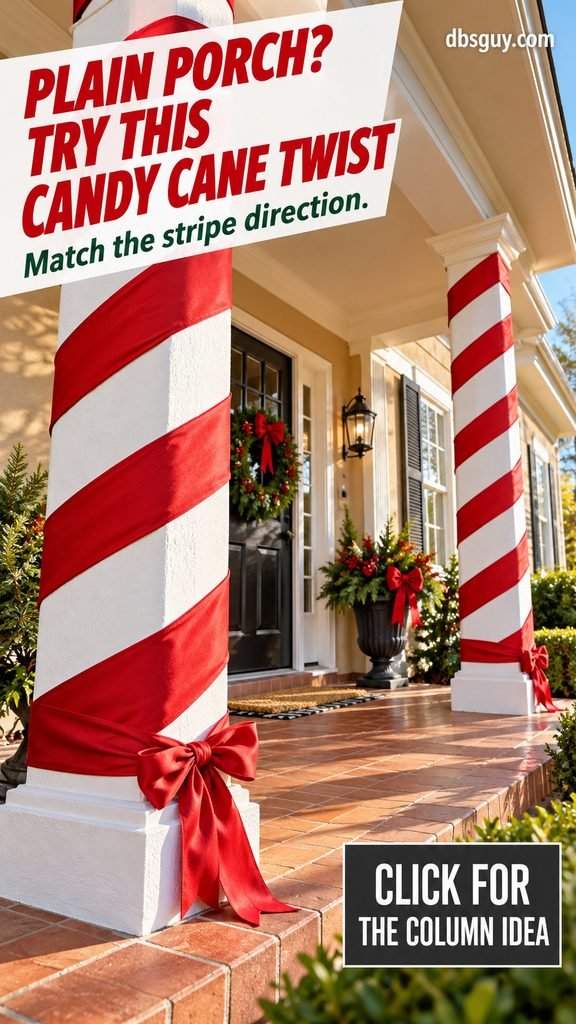
Start with one column and test the angle from the sidewalk. Leave enough white showing between the red bands that the spiral reads clearly. Once the spacing looks right, repeat that pitch and direction on the next column. A helper holding the ribbon in place makes it easier to check the pattern before securing it.
Tie the ribbon around the column with a surface-compatible method rather than sticking ordinary tape directly to painted trim. Check that wet red fabric will not transfer color onto the finish. Keep all material clear of light fixtures and door hardware, and finish the loose ends neatly on the less-visible side.
A useful restraint: when the columns carry strong stripes, plain evergreen around the door gives the eye a quieter place to rest. You can still add a red bow, but every porch surface does not need another pattern.
6. Thread Peppermint Details Through a Fence Garland
A low fence can turn into a cheerful introduction to the rest of the yard. Evergreen garland creates a continuous line, and repeated peppermint accents make that line feel connected to the walkway or entrance.
Gather: outdoor-suitable garland, a small set of matching peppermint disks or cane ornaments, striped ribbon, and fence-compatible removable ties.
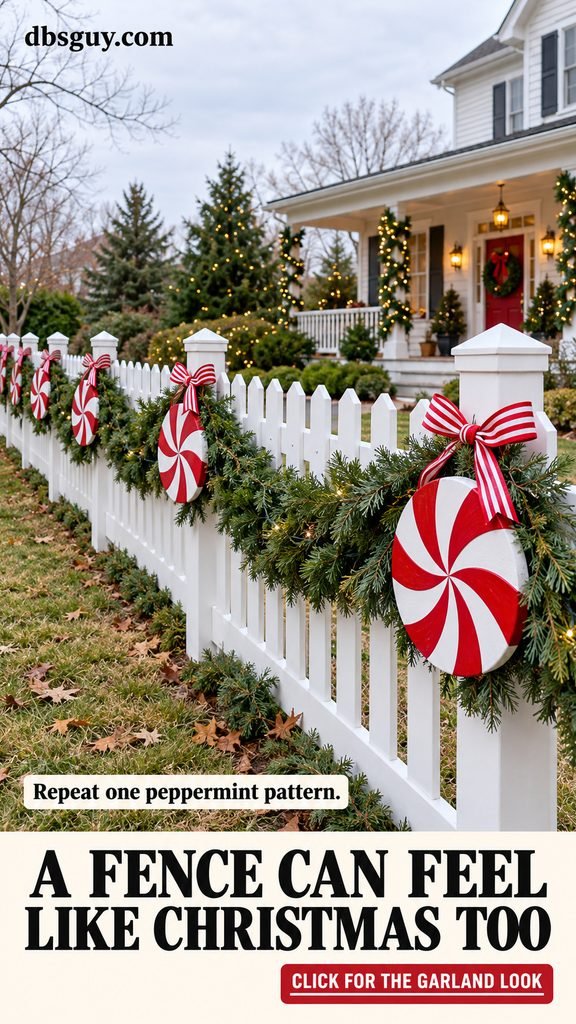
Choose a rhythm before attaching anything. You might place a disk at every second post, with a small bow between the disks, or use one candy cane shape at each end of a short fence. Repeat that sequence across the whole section so the eye can follow it.
Fasten the garland at several points rather than asking a single ornament or ribbon to carry its weight. Keep the decoration on the yard side when it would otherwise project into a public walking route. Leave the gate’s latch, hinges, and opening clear, and test the gate after everything is installed.
On a long fence, decorate the stretch closest to the front entrance first. That lets you use existing supplies where they have the most impact. Wider peppermint shapes work well here because the pattern needs to remain visible across a horizontal distance.
7. Plant Giant Peppermint Lollipops in a Garden Bed
Oversized lollipops add the playful scale that makes a Candy Cane Lane scene feel like a storybook. A cluster in a flowerbed gives them a clear home and keeps the walking route separate from the display.
Gather: three outdoor lollipop props, or rigid peppermint cutouts with suitable supports and outdoor-compatible graphics. A ready-made set is the simpler choice when you want lighting or a tall display.

Arrange the heads at different heights in a loose triangle. Put the tallest one slightly behind the others and leave a little space between the disks so each swirl can be read. Three related pieces often create a clearer scene than a scattered row of different candy colors.
If you are making cutouts, check the board manufacturer’s guidance before choosing paint or adhesive. Corrugated polypropylene can be difficult to bond, so use a mechanically supported design or a fastening system suited to the material. Secure each disk to its support before installing it in the bed.
Wide disk shapes catch wind, even when the board is light. Follow the support system’s anchoring instructions, keep the cluster away from a walking route, and bring it in when needed. Skip loose clear wrapping outdoors; the painted swirl already communicates the lollipop shape.
8. Fill a Striped Planter with Winter Greenery
An empty summer pot can become a substantial Christmas accent with a few broad stripes and a full arrangement of greenery. This idea is especially useful beside steps, where a compact display can add height without spreading across the porch.
Gather: a sturdy outdoor planter, a removable striped sleeve or compatible exterior paint system, evergreen branches, two cane picks, and a few large securely attached ornaments.

Give the pot a simple pattern: broad vertical red stripes on white are easy to read. If you want to reuse the pot unchanged next summer, use an outdoor-suitable sleeve that does not cover the drainage holes. Check painted and adhesive finishes against the planter material before applying them.
Build the arrangement from the center outward. Put upright greenery or bare twigs near the back, fuller branches around the middle, and cedar-like trailing greenery at the edge. Anchor the canes in the supporting arrangement so a gust cannot lift them out, then add large ornaments where they remain visible.
The visual balance: let the stripes belong to the pot and the texture belong to the branches. A mass of ribbon, candy disks, berries, and picks can hide both. A few strong accents make the planter look fuller and more deliberate.
9. Give the Mailbox a Candy Cane Makeover
A little peppermint near the curb can introduce the theme before anyone reaches the walkway. The mailbox is a practical feature, though, so the decoration needs to work around its daily use.
Gather: a small outdoor evergreen swag, striped ribbon, and a soft removable attachment suitable for a privately owned mailbox post.
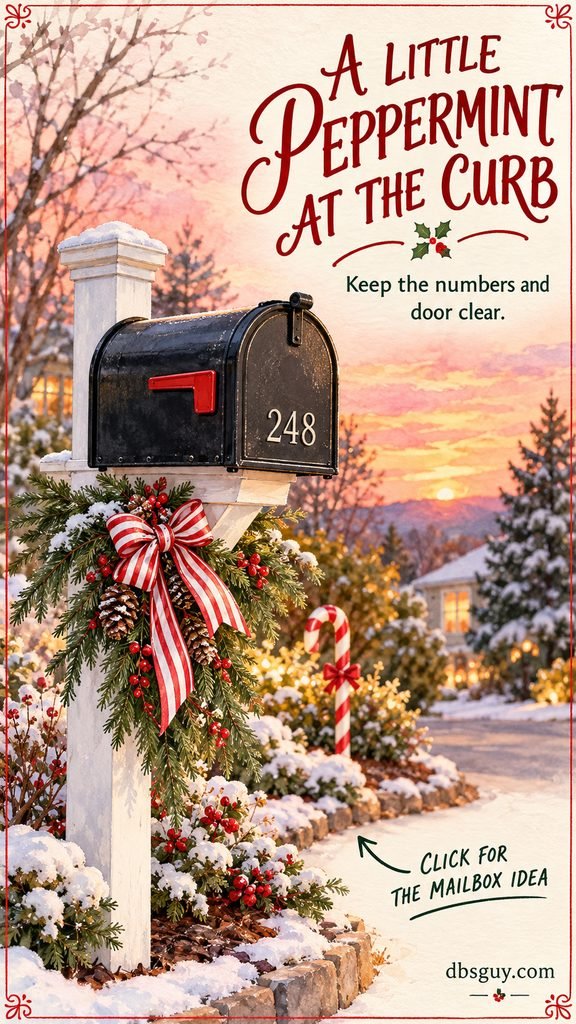
Place the swag below the box, where it does not cover the address, interfere with the door, or catch the flag. Keep the ribbon tails short. Open the box fully and check the approach from the carrier’s side after you have attached the decoration.
A small cane stake nearby can repeat the theme, provided it sits safely on your property and clear of the delivery approach, road edge, and snow-removal area. The post needs only one accent; bulky props beside the mailbox can make a routine delivery awkward.
Shared or postal-owned mailbox equipment needs to stay free of personal additions unless the responsible owner permits them. For those settings, move the peppermint detail back to your own entrance. You still get the welcoming effect while keeping the delivery area accessible.
10. Hang Peppermint Disks from a Small Front-Yard Tree
A bare tree has a beautiful branching shape in winter. A few large peppermint disks can make those branches part of the holiday scene without hiding the structure that gives the tree its character.
Gather: lightweight outdoor hanging ornaments and broad, soft loops that fit the branches without cinching tightly.

Choose low, sturdy branches you can reach safely from the ground. Spread the ornaments across a small section of the canopy at different heights. Leave enough space around each disk for the swirl to stand out against the sky, and check that nearby ornaments will not hit each other as they move.
Use soft loops rather than wire tightened against the bark. Keep the pieces light, avoid drilling into the tree, and inspect the attachments after windy weather. The exact number depends on the tree: a small ornamental tree may need only a few disks to make the theme clear.
This idea is strongest in daylight, so place it near a display that already has evening lighting if you want the whole yard to feel connected after sunset. In a windy location, a low lollipop cluster may be easier to manage than hanging ornaments.
11. Add a Storybook Candy Cane Lane Sign
A simple sign gives the display a name and a little personality. It can also connect separate pieces—a pathway here, a wreath there—by making the overall theme immediately understandable.
Gather: an outdoor-ready sign, or a rigid sign blank with suitable lettering, plus a freestanding support and site-appropriate anchoring.

Keep the message short: “Candy Cane Lane†is enough. Use large, high-contrast letters, and test the text from the sidewalk before adding borders or decorative details. An arrow shape adds storybook charm, but the lettering should remain the easiest part to see.
Place the sign within a planting area near the start of the approach. Keep it low enough to sit comfortably among the decorations while leaving sightlines, address numbers, and walking space clear. A red-and-white post can repeat the stripes without filling the sign face with extra patterns.
For a DIY wood version, protect the front, back, cut edges, and fastener openings using the appropriate exterior coating instructions. For plastic board, use a finish or graphics system suitable for that exact material. A sign that stays crisp through the season is more useful than an elaborate one made from moisture-sensitive craft supplies.
12. Stack Red-and-White Outdoor Present Boxes
Present boxes add a different shape to a candy cane display. Their straight lines give the curved canes and peppermint swirls something to play against, especially on a porch with plenty of vertical detail.
Gather: sturdy outdoor decorative present boxes or a purpose-made lighted present set, with the supports or connectors supplied for it.
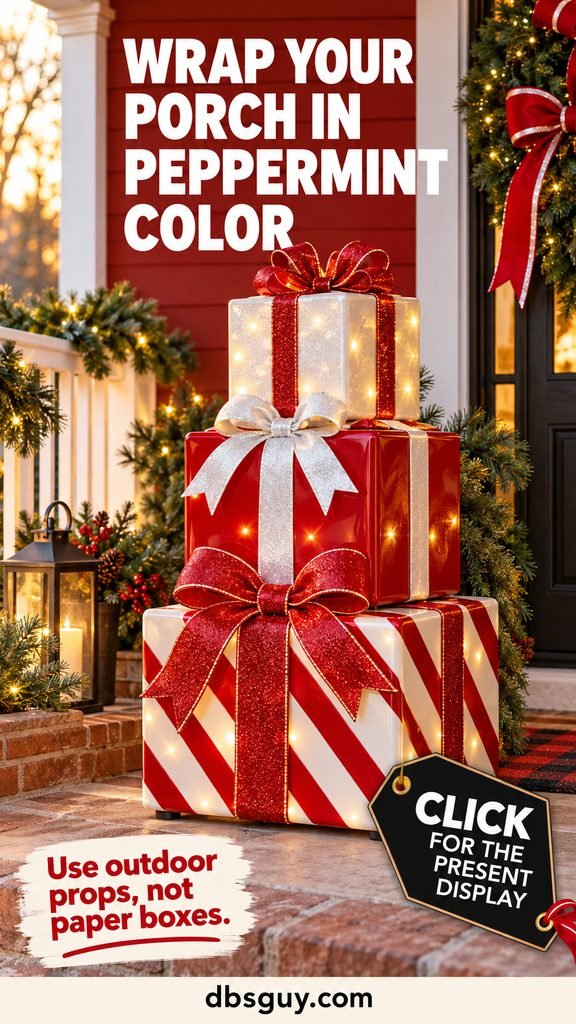
Use three related finishes: one striped box, one solid red box with white ribbon, and one white box with a red bow. Arrange the largest low to the ground. If the pieces are designed to stack, follow their assembly instructions; otherwise group them at different heights within a stable display rather than balancing them loosely.
Ordinary cardboard gift boxes and indoor wrapping paper are poor choices for an exposed porch. Choose actual outdoor props and keep any electrical parts within the location and conditions permitted by the label. A sheltered corner can help, but shelter does not turn an indoor-only lighted piece into an outdoor one.
Keep the grouping beside the entrance rather than in the package drop-off spot. That leaves room for real deliveries while the decorative presents provide the festive color. One small evergreen branch nearby is often enough to connect them to a wreath.
13. Create a Tiny Gingerbread Village with Peppermint Details
A little gingerbread village gives the peppermint theme a setting. Brown house shapes, white painted “icing,†and candy cane doorway details create a scene people can understand at a glance.
Gather: outdoor gingerbread-house silhouettes or appropriately finished rigid cutouts, independent supports, and a few red-and-white accents.
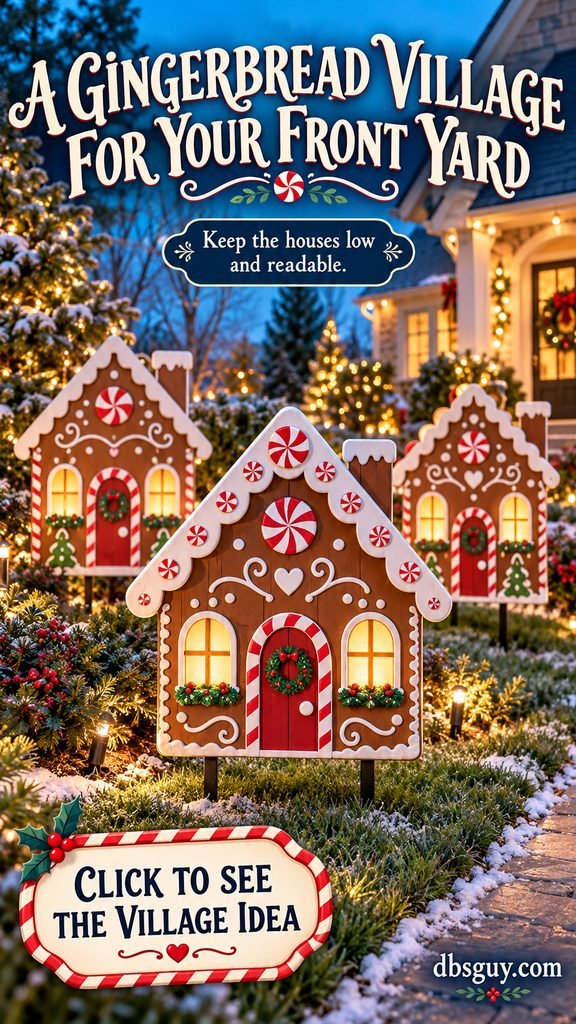
Start with two or three houses and vary their height slightly. Put the clearest silhouette at the front, then stagger the others behind it so their roofs stay visible. Repeat the same white icing line and peppermint color on each house; that makes the village feel like one place.
Keep the little scene in a garden bed or defined lawn area where it can be viewed without stepping around stakes. Secure each house independently. If you want an evening glow, use an outdoor-rated light positioned according to its instructions, with the cable clear of the route through the yard.
The houses can stay simple. A roofline, a door, two windows, and a few large candy details read well at a distance. Tiny painted sprinkles may take hours and disappear from the street. Use sturdy decorative materials throughout; real baked pieces belong indoors.
14. Dress Window Boxes in Red, White, and Evergreen
Window boxes can connect the yard display to the house itself. Repeating the peppermint palette here helps the decorations feel planned across the facade, even when the lawn has only one statement piece.
Gather: seasonal greenery, lightweight outdoor red and white ornaments, short cane picks, and suitable ties for the supporting arrangement.
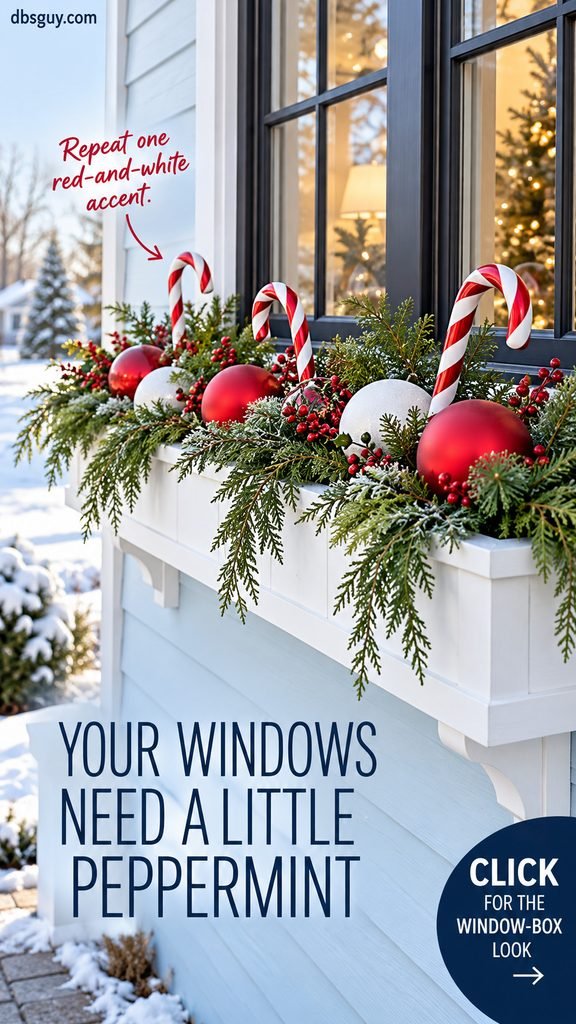
Place the greenery first, leaving the fullest branches near the corners and letting a little trail over the front edge. Add a few larger ornaments where the red and white can be seen from below. Finish with short cane picks rather than tall pieces that would dominate the window.
Secure the accents to the arrangement’s support so they cannot roll or blow out. Keep the box’s drainage clear and stay within its mounting capacity, especially if the greenery and soil become wet. Work only on boxes you can reach safely, and leave opening windows and required exits usable.
On a house with several window boxes, repeat the same basic recipe in each one. You can change the greenery’s natural shape while keeping the accent colors consistent. That repetition is often what makes the whole exterior feel pulled together.
15. Let a Snowman Carry the Candy Cane Theme
A snowman gives a family-friendly yard a recognizable character. A striped cane and a red scarf can bring it into the peppermint theme without adding an entire cast of holiday figures.
Gather: an outdoor snowman with a candy cane detail, or a display designed to accept a compatible lightweight accessory.

Set the snowman in a defined part of the lawn or garden bed, where its shape is easy to see from the approach. Give it enough open space that the scarf and cane remain readable. If the figure is lighted, check how its glow looks alongside the nearby red-and-white lights before adding more pieces.
Install the manufacturer’s anchors and any required tethers. For an inflatable, allow the specified clearance around its blower and air intake, and keep the collapsed fabric clear of the walkway when it is switched off. Follow the product’s weather limits rather than relying on its size to hold it in place.
Style around the character: a nearby peppermint planter or short cane row can echo the color. Let the snowman remain the focal point in that part of the yard so visitors can appreciate the scene from the sidewalk.
16. Style a Porch Bench as a Peppermint Rest Stop
A porch bench adds a lived-in, welcoming note to a theme full of oversized candy. Striped cushions and a little greenery can make the space feel festive while it still looks like somewhere you would sit.
Gather: outdoor cushions in red-and-white stripes, one coordinating solid cushion, and an existing planter or small evergreen accent.
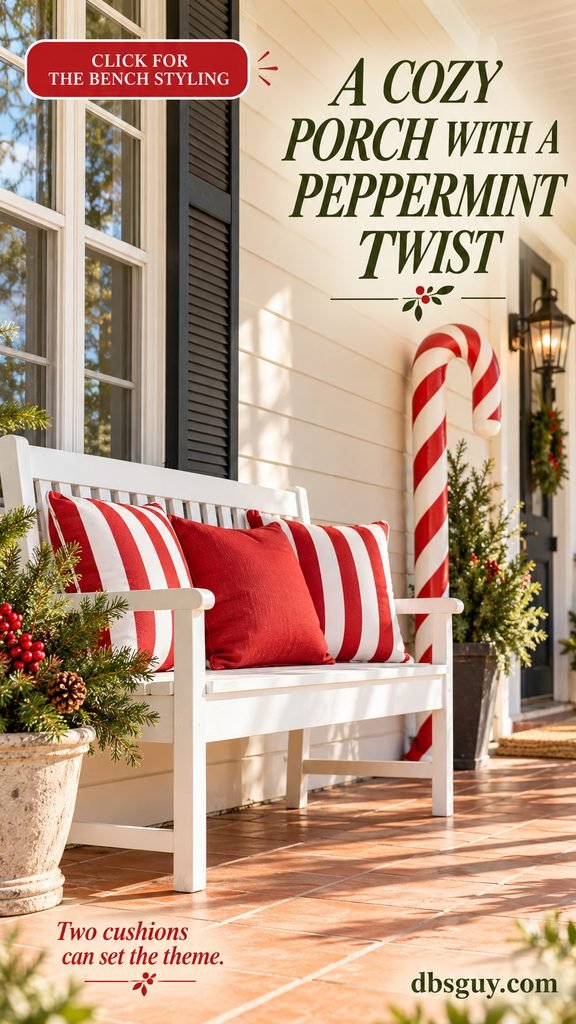
Use one striped cushion at each end of the bench and a plain red or white cushion between them. Leave some of the seat visible. Put greenery beside the bench, with any cane prop behind or to the side where it will not interfere with sitting down.
A covered porch gives textiles a more protected setting, but wind-driven rain can still reach them. Check the fabric’s care instructions and bring cushions in during poor weather when needed. Reserve indoor throws and delicate pillows for dry conditions when someone is actually using the porch.
This is a good choice for warm-weather Christmas decorating. Strong peppermint stripes, evergreen texture, and a bright entrance establish the seasonal mood without needing snow. If you already own red outdoor cushions, begin with those and add one striped cover that suits the furniture.
17. Alternate Red and White Lights Across Low Shrubs
Low shrubs can provide a broad band of peppermint color after dark. Alternating red and white across separate shrubs creates a rhythm that is easy to see from the street and does not require work on the roof.
Gather: outdoor-rated red and white net lights or string lights suited to the shrubs, plus the outdoor electrical accessories specified for the setup.
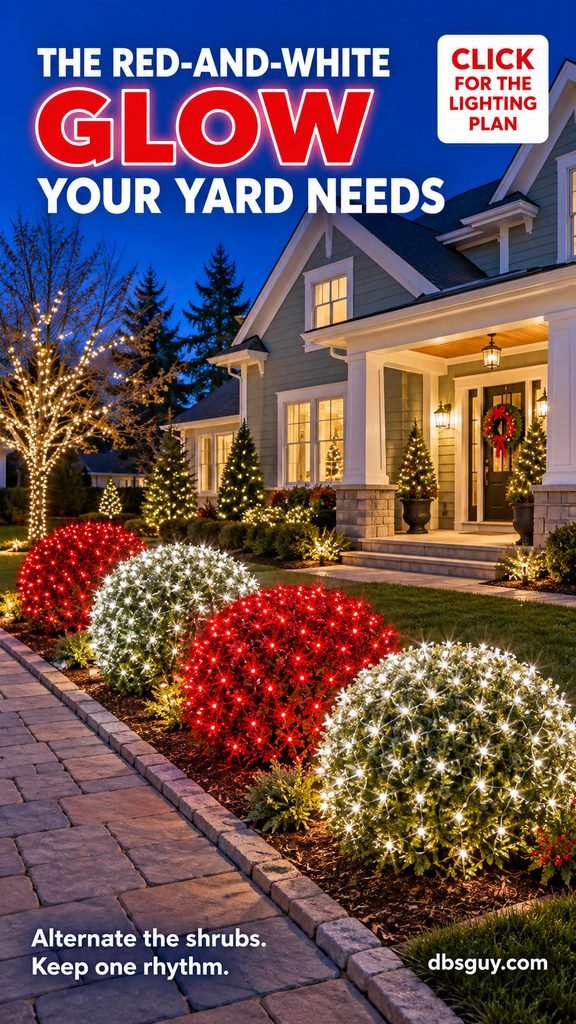
Choose a short row of shrubs with roughly related sizes. Light one in red, the next in white, and repeat the sequence. Test a small section at dusk first: a very bright cool white can overwhelm a softer red, so a balanced pair matters more than the total number of bulbs.
Drape net lights according to the manufacturer’s instructions, keeping their wires loose enough that branches are not pulled out of shape. Avoid stretching the sets to reach the next shrub. Check the connection limit on each set, and use an appropriate separate feed when the layout requires it.
Keep the power route clear of the path and protected from standing water according to the electrical accessories’ instructions. A simple wreath or daytime cane feature can link this evening display to the rest of the yard when the lights are off.
18. Add Peppermint Color Around a Lantern Post
An existing lantern post already gives the yard a vertical focal point. A small evergreen collar and striped ribbon below the fixture can make it part of the Christmas scene while preserving the useful light.
Gather: a modest outdoor evergreen swag, striped ribbon, a few lightweight peppermint accents, and a removable attachment compatible with the post.

Place the decoration on the post well below the lantern, keeping the glass, bulb area, ventilation openings, and access panel clear. Leave the fixture itself visible. Follow any clearance requirements from its manufacturer, and keep fabric and greenery away from heat-producing parts.
Secure the swag at more than one point so it cannot slide up or swing into the light. Use short ribbon tails and check that the attachment will not damage the finish. Outdoor adhesive hooks must suit both the surface and the conditions; check their installation temperature, surface preparation, and wait time before hanging the decoration.
One bow and a couple of peppermint disks are usually enough here. Because the post has height, a small amount of color can be seen across the yard. It is a useful finishing touch when the entrance already has a larger candy cane display.
19. Build a Small-Yard Candy Corner Around One Statement Piece
A compact yard can have a strong Candy Cane Lane identity with one carefully placed feature. A large cane in a tiny planting area, a peppermint accent near its base, and simple greenery can make a complete scene.
Gather: one outdoor-rated statement piece that fits the space, its mounting system, and one or two smaller accents you already own.
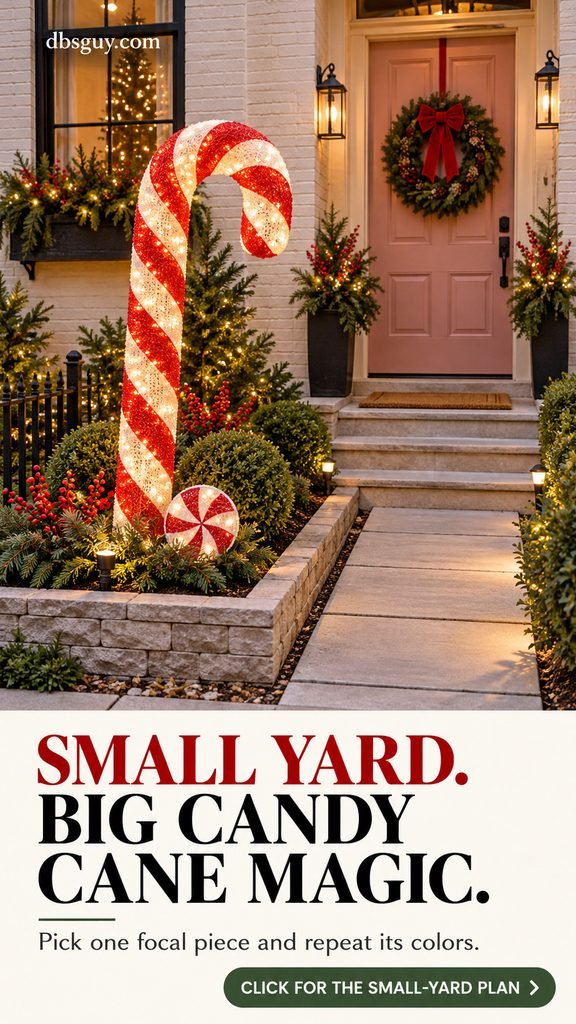
Measure the available area before choosing the feature. Include its base, tethers, power connection, and any clearance in that measurement. Position it to one side of the path where it can be seen from the sidewalk without narrowing the route to the door.
Repeat the red-and-white palette once more on the entrance, perhaps in a bow or wreath. Leave the remaining planting area simple. In a narrow townhouse frontage, that small repetition can make the whole space feel connected without spreading props across every available surface.
Check the view from both directions: visitors should see the focal piece as they approach, and anyone leaving the house should still have a clear route out. Choose a lower feature if a tall one would obstruct a window, address number, or important sightline.
Make Your Outdoor Candy Cane Display Easy to Live With
Once the pieces are in place, walk the route you use every day. Carry a grocery bag, open the door fully, and look for anything that catches a sleeve or crowds a step. A display feels more welcoming when the entrance still works comfortably.
- Use the right lights. Check the outdoor-use label, inspect wires and sockets, and choose sets tested by a recognized safety laboratory. Discard damaged sets.
- Follow the power instructions. Use outdoor-rated cords and accessories, a GFCI-protected supply, and the connection limits printed on the products. Switch lights off when leaving home or going to bed; an appropriate timer can help.
- Secure the shapes. Wide candy disks, tall canes, and signs need the specified anchors or supports. Recheck them after wind or heavy weather, and take pieces in when conditions exceed their guidance.
- Keep routes usable. Leave doors, steps, the sidewalk, and mailbox access clear. Allow space for snow removal where needed.
- Check the small details. Secure removable ornaments and battery compartments, and keep candy-like pieces and small parts out of young children’s reach. Use outdoor-rated flameless lighting in decorative lanterns.
When the season ends, let every piece dry fully before packing it away. Label light connections and group the ornaments by area—pathway, door, or garden bed—so next year’s setup starts with a clear plan. Store flat cutouts where their edges and graphics will not be crushed.
Questions About Candy Cane Outdoor Christmas Decor
What colors work best for a Candy Cane Lane yard?
Red and white establish the theme most clearly. Evergreen adds texture and helps the candy shapes stand out. Choose crisp white for a bright traditional look or ivory for a softer palette, then repeat your chosen shades across the main display and a few supporting details.
How can I get the look on a smaller budget?
Start with what you have: a wreath, a planter, outdoor cushions, or a low fence. Add one consistent striped ribbon and a small set of weather-ready peppermint accents. Build one strong area first. Reusing existing greenery and repeating a simple pattern helps every new piece work harder.
Will the theme work without snow?
Yes. The stripes, cane silhouettes, and peppermint shapes provide the seasonal identity. Pair them with greenery, a welcoming door, and a little evening lighting. A bright porch in a mild-weather neighborhood can carry the theme just as clearly as a snowy lawn.
Can I use homemade candy cane decorations outdoors?
Yes, when the materials, finish, attachments, and supports suit the location. Check the specific board, paint, adhesive, and hardware instructions. Keep moisture-sensitive craft pieces in shelter, use independent supports for larger cutouts, and inspect the finished decorations through the season.
Bring the Storybook Feeling Home
Choose the idea that suits your home best, then repeat its colors in one or two nearby details. A cane-lined path might lead to a peppermint wreath. A pair of oversized canes might frame a simple bow. A tiny yard might need only one statement piece and a matching door accent.
Give the stripes room to show, keep the entrance usable, and let a little greenery soften the scene. That is how a collection of red-and-white decorations becomes a front yard people remember.




