
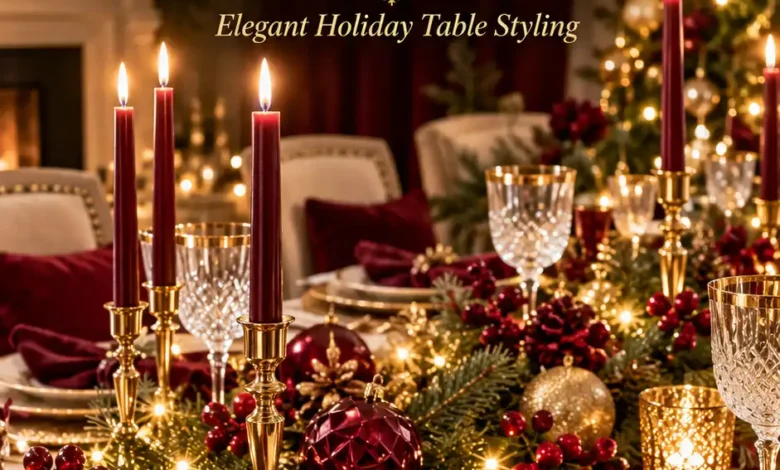
Burgundy brings the cozy part of Christmas to the table. Gold gives it a little lift. Put the two together, and even a plain white plate can feel ready for a holiday dinner.
The challenge is keeping the richness from swallowing the table. A dark cloth, tall centerpiece, sparkling chargers, and elaborate napkins can all look beautiful individually. Add them at once, though, and there may be nowhere for the potatoes to land. A better starting point is one burgundy detail, one warm gold accent, and the dishes you already use.
These 19 burgundy and gold Christmas table decor ideas range from a single place setting to a full dinner-table look. Each includes what to gather, how to arrange it, and a finishing detail that makes the idea easier to use at home. Choose the parts that suit your room; you do not need to recreate every object in an image.
Choose Your Burgundy Anchor First
Set out your dinner plates, glasses, and empty serving dishes before choosing decorations. Check the space from a seated position as well as from above. A centerpiece that looks compact in a photo can still block the person across from you or crowd the dish you need to pass.
Pick your burgundy anchor first: napkins, a runner, a tablecloth, or colored glassware. Let the gold come from a few repeated details, such as flatware, a tray, or napkin rings. Brushed, antique, and shiny gold finishes can share a table; repeating a similar warmth matters more than finding an identical set.
The lighted ideas below use battery-operated LEDs. NFPA recommends flameless candles, which are a useful choice around ribbon and greenery. Keep decorative chargers underneath food-safe plates, and keep craft supplies separate from anything guests will eat.
1. Start With White Plates, Burgundy Napkins, and One Gold Detail
If you already own white dinner plates, you have the most useful starting piece. The napkin supplies the deep color, while a gold accent catches the light around it. You can try the whole combination at one seat before buying anything for the rest of the table.

What you need: White plates, burgundy cloth napkins, clear glasses, and gold-toned flatware or a gold napkin ring.
How to style it:
- Put down the dinner plate and the utensils you will actually use for the meal. Add a salad plate only if the menu calls for one.
- Fold the napkin into a simple rectangle and lay it across the plate, or gather it gently through a ring. Leave the burgundy fabric visible.
- Add the gold detail you already have. Flatware gives a larger outline; a single ring supplies a smaller accent if your everyday utensils are silver.
- Repeat the same fold at the remaining seats, then set the water glasses where guests can reach them easily.
Finishing tip: Keep the plate itself mostly clear. A neat napkin and one metallic detail are enough to establish the palette before you touch the center of the table.
You can add an evergreen tip for the first look, but put it beside the setting rather than loose on food. Remove any decorative pieces from the plate before serving.
2. Let a Burgundy Velvet Runner Dress a Wooden Table
Velvet brings texture to an otherwise plain table, and exposed wood keeps the result warm. The runner becomes the main decoration, so the surrounding objects can stay simple. This is a good choice when you like the look of your dining table and would rather leave most of it visible.
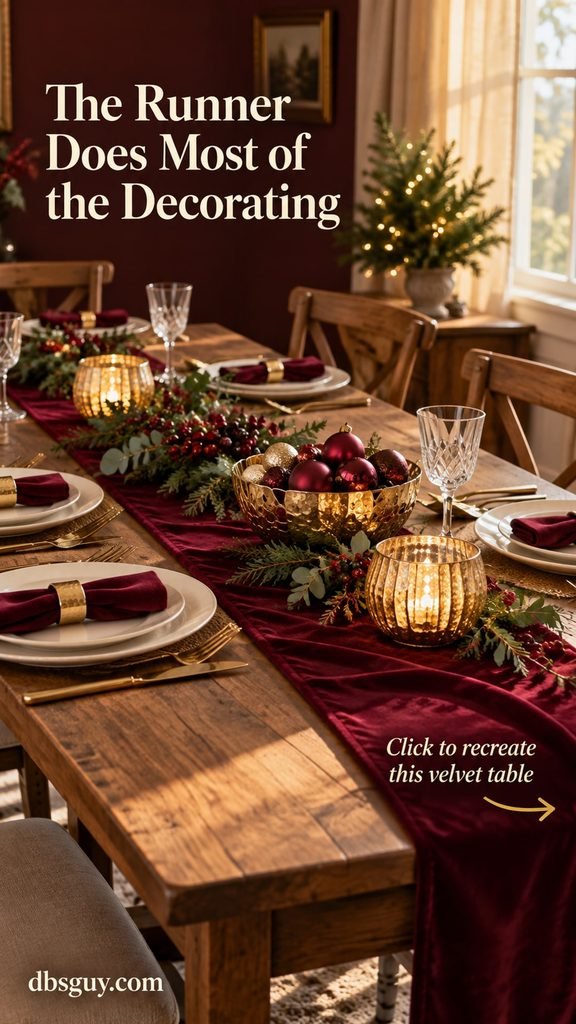
What you need: A burgundy velvet runner, white plates, clear glassware, and a few low gold-toned accents.
How to style it:
- Center the runner lengthwise and smooth the fabric without flattening every soft fold. Keep enough bare wood at both sides for complete place settings.
- Check both ends. The fabric should fall neatly without dragging across chair seats or catching on guests’ knees.
- Set the plates and glasses first, then add a small gold tray, low bowl, or LED votive group down the middle.
- Leave breaks in the decoration for serving dishes. If dinner will be family-style, keep the middle arrangement on something easy to lift.
Finishing tip: Brush or smooth velvet in a consistent direction if its pile looks patchy. The fabric’s changing sheen is part of its character, but a twisted runner can distract from the setting.
The fuller pictured look includes optional greenery and ornaments. Start with the runner and one low accent; add those extras only when your serving space allows.
3. Give a Low Greenery Garland Burgundy Bows and Gold Baubles
A garland feels more personal when you add the colors yourself. Small velvet bows soften the greenery, and a handful of gold ornaments supplies the shine. A loose, low arrangement is easier to fit around dinner dishes than a thick, fully decorated garland.

What you need: A short faux or purchased evergreen garland, burgundy ribbon, lightweight gold ornaments, and ties that suit the stems.
How to style it:
- Lay the greenery in the space left after arranging the plates and serving dishes. Curve it slightly instead of forcing a rigid straight line.
- Tie small bows around sturdy stems at a few separated points. Turn the loops upward and keep the tails within the garland’s footprint.
- Nestle the ornaments between branches and secure their hanging loops where needed so they cannot roll into a plate or onto the floor.
- Look along the table from both ends. Move a bow or bauble if all the visible color sits on one side.
Finishing tip: Make one bow first and set it beside the dishes. That tells you whether the ribbon width suits your table before you cut the rest of the spool.
Use fewer ornaments than you would on a tree. The greenery needs gaps, and the table needs landing places for the meal. Keep decorative branches away from exposed food.
4. Make Burgundy Glass Votives Glow With Warm LEDs
Here, the glass does the color work. A warm light inside a ruby or burgundy holder makes the ribbing and edges part of the display. Three low holders gathered on a gold-toned tray can bring the palette to a dinner table without a tall centerpiece.
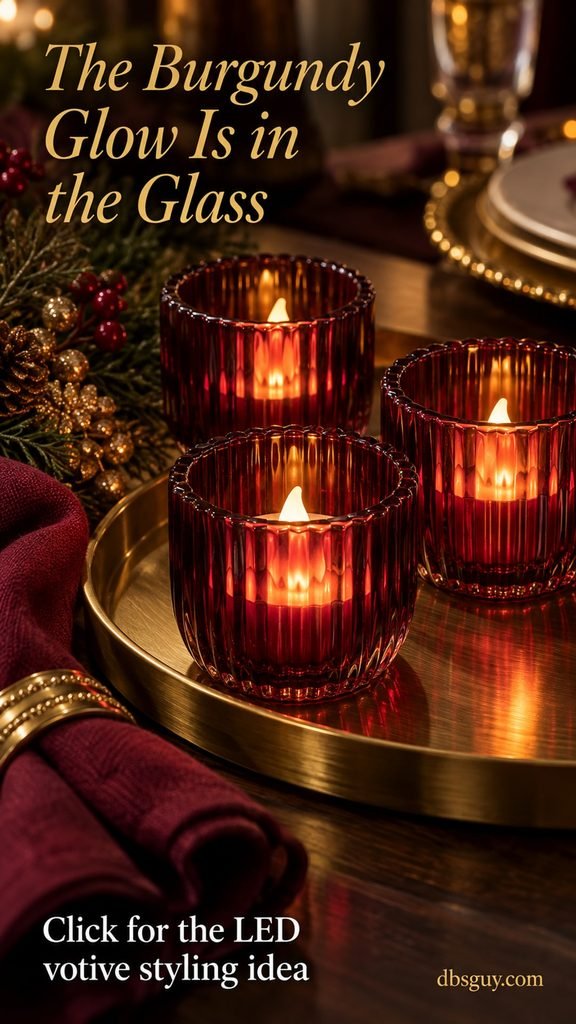
What you need: Low burgundy glass votive holders, battery LED tealights that fit inside them, and a shallow gold-toned tray.
How to style it:
- Test each LED and check that it sits flat inside its holder. Choose similar light colors so one cool-white point does not interrupt the warm group.
- Arrange the holders on the tray with a little space between them. Vary their position rather than lining them up like a display shelf.
- Put the tray in the intended spot and check its height from the chairs. Keep it clear of serving handles and glass stems.
- Turn the LEDs on in the room’s evening lighting, then adjust the spacing until each glass edge is easy to see.
Finishing tip: Clear glass holders you already own can work with a burgundy napkin placed beneath the tray. You will get less colored glow, but the same small-footprint arrangement.
Follow the LEDs’ instructions, keep their battery compartments accessible, and turn them off after the gathering. A tray makes the whole cluster easier to move when dinner arrives.
5. Use an Ivory Base to Keep Burgundy From Feeling Too Dark
An ivory tablecloth gives rich colors room to breathe. Burgundy napkins and a small floral accent look deeper against it, while gold edges stay easy to notice. This version suits a daytime gathering or a dining room where a dark cloth would make the table feel closed in.
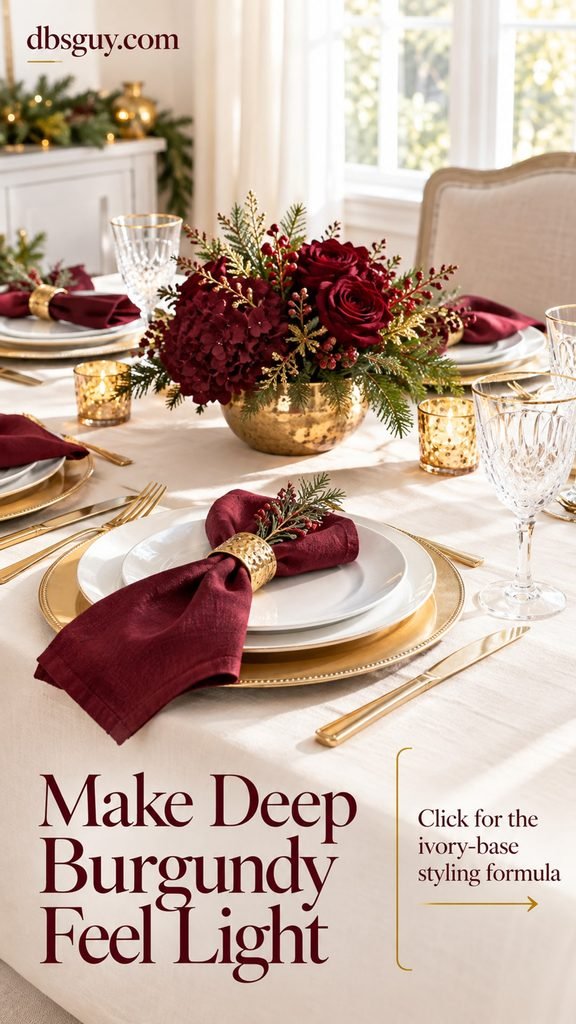
What you need: An ivory tablecloth, white plates, burgundy napkins, gold chargers or rings, and an optional low burgundy flower arrangement.
How to style it:
- Spread the light cloth so it hangs evenly and does not bunch beneath the plates. Smooth the main creases where guests will sit.
- Set white dishes on the gold chargers, if using them. Make sure each charger leaves comfortable space for utensils and glasses.
- Repeat burgundy through the napkins and one center detail. Keep the larger visible surfaces light.
- Check the table from the doorway. If the center looks crowded, remove an extra object before adding more color.
Finishing tip: Ivory and bright white do not need to be identical. Fabric texture, clear glass, and a warm metal finish can connect them more comfortably than another layer of decorations.
Keep flowers low and choose one arrangement rather than several competing focal points. The light base is most effective when you can still see plenty of it between settings.
6. Add One Burgundy Plaid Layer Under Plain Dishes
Plaid gives this palette a relaxed, traditional Christmas feel. A placemat-sized layer is enough; you can keep the rest of the setting simple. Look for a pattern that already includes cream or a muted green so it connects with white dishes and seasonal greenery.
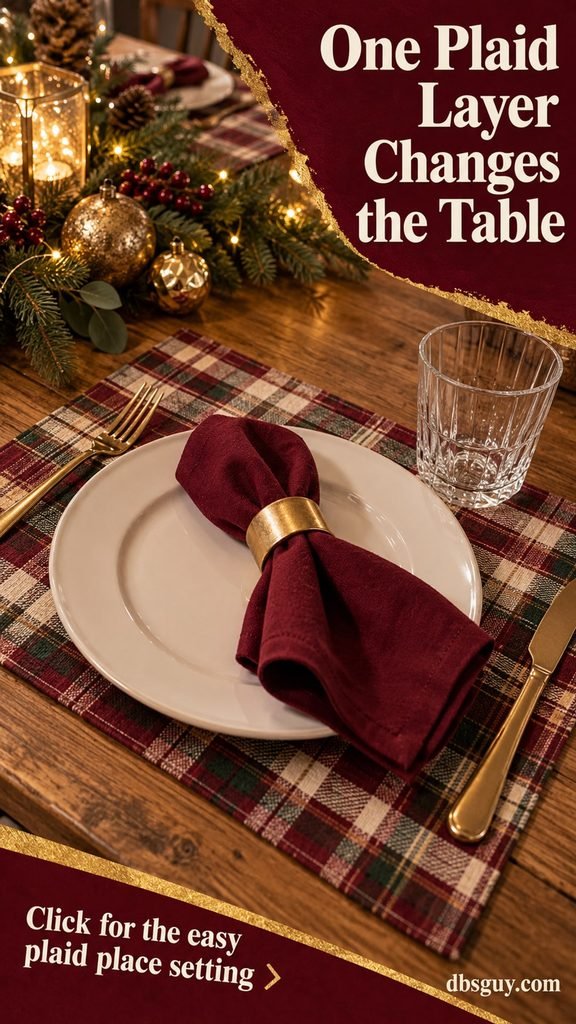
What you need: Burgundy plaid cloth placemats, plain white plates, solid burgundy napkins, and a small gold ring or other metallic accent.
How to style it:
- Set one plaid mat at each seat and check that the full plate fits comfortably inside its outline.
- Use plain dishes above the pattern. Leave a little plaid visible around the plate instead of hiding it under several oversized layers.
- Fold the solid napkin simply and add the gold accent. Keep patterned ribbon and patterned glassware out of this particular setting.
- Repeat the same mat direction around the table so the lines look deliberate rather than crooked.
Finishing tip: If you only have enough plaid fabric for a runner, let that be the patterned piece and use plain mats. One repeated pattern is easier to coordinate than several unrelated checks.
Make sure any improvised cloth mat lies flat. A thick folded edge beneath a glass or charger can turn a decorative layer into an awkward place to set something down.
7. Arrange Burgundy Flowers in a Low Gold-Toned Bowl
A compact flower arrangement gives burgundy a softer shape than another fabric layer. Carnations, roses, or a mix can work; choose stems in the wine-red family available to you. A low vessel keeps the flowers close to the table and helps people see each other across it.
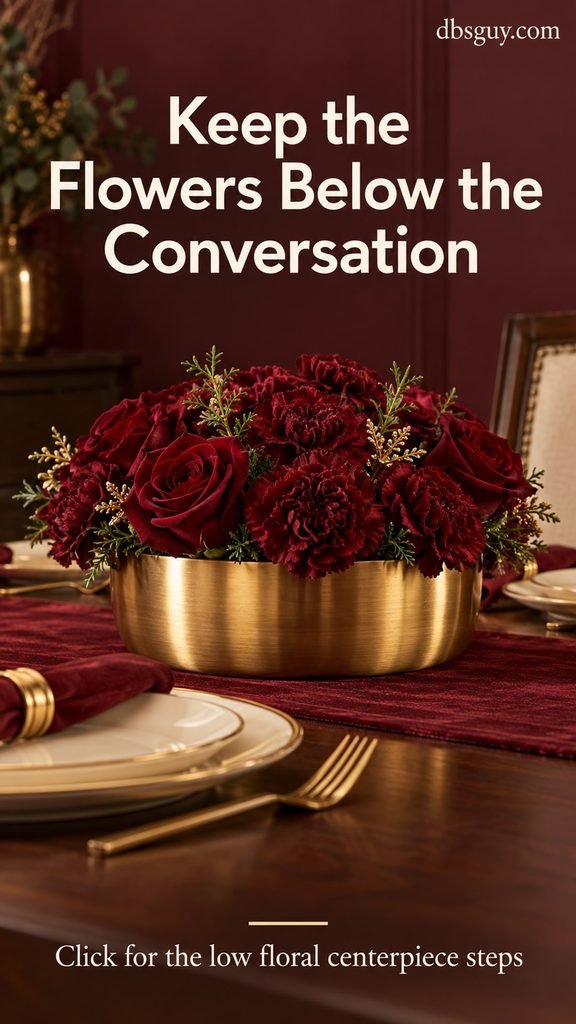
What you need: A low gold-toned cachepot, a stable watertight insert that fits inside, fresh burgundy flowers, clean clippers, water, and packaged flower food if supplied.
How to style it:
- Fit the empty water container inside the decorative vessel. It needs to stand securely and stay below the outer rim.
- Clean the insert, prepare flower food according to its packet, and remove leaves that would sit below the waterline.
- Trim the stems gradually and arrange them in a low rounded cluster. Turn the vessel as you work so it looks complete from both sides.
- Place it on a protective base and check the flowers from seated height. Shorten a few stems if the top crosses the sightline.
Finishing tip: Follow UF/IFAS Extension’s cut-flower care guidance for clean cuts, submerged-leaf removal, and refreshing cloudy water. Good preparation matters more than an elaborate arrangement.
Keep water in the inner container, not in a decorative vessel that may leak or react to it. Wipe the outside before it touches the cloth, and leave the arrangement away from heating vents.
8. Tie a Gold Bell Around a Burgundy Napkin
A little bell gives a plain napkin one clear Christmas detail. The burgundy fabric supplies the background, so the ribbon and bell do not need to be large. This works with everyday plates and can replace a napkin ring you would otherwise buy.
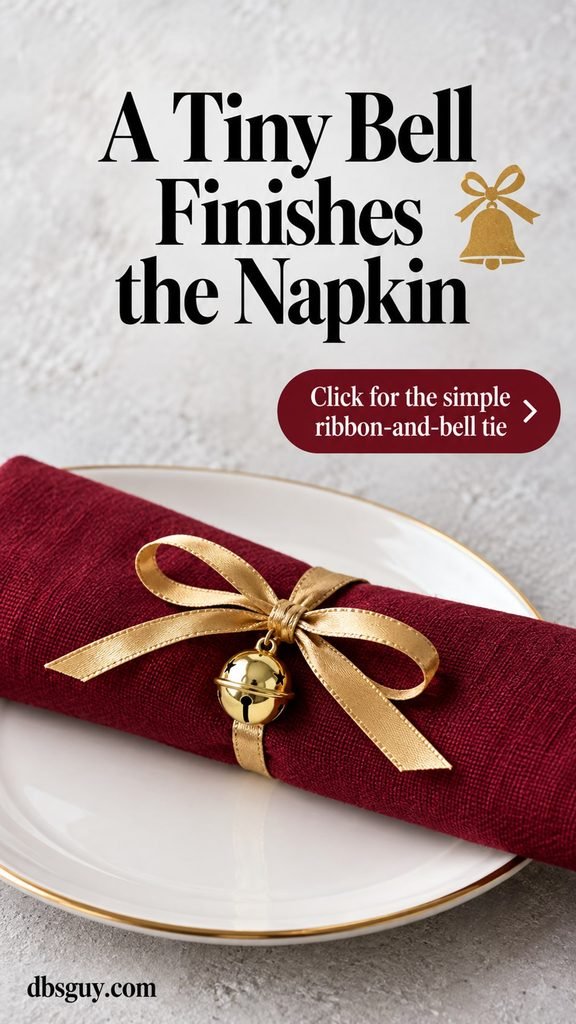
What you need: Burgundy napkins, narrow gold ribbon, decorative bells with secure hanging loops, and scissors.
How to style it:
- Fold or roll one napkin and set it on the plate to judge the finished width.
- Thread the ribbon through the bell’s hanging loop before tying anything around the fabric. Let the bell sit near the ribbon’s center.
- Wrap the ribbon around the napkin and tie a loose, easy-to-open bow. Position the bell just below the knot.
- Trim the tails so they sit on the napkin, then repeat the same tie at the other seats.
Finishing tip: Try the first bow with an uncut length of ribbon. Once its size looks right, use that measured piece as a guide rather than guessing for every seat.
Choose a smooth bell without rough edges, and remove the ribbon and bell before the napkin is used. For young children’s places, a plain paper name tag is an easier choice than a small detachable ornament.
9. Write Guest Names in Gold on Burgundy Place Cards
A handwritten card brings the palette to the table while doing a useful job: showing everyone where to sit. Deep burgundy cardstock makes a simple gold name easy to notice. You do not need an elaborate menu or a printed design for the setting to feel considered.
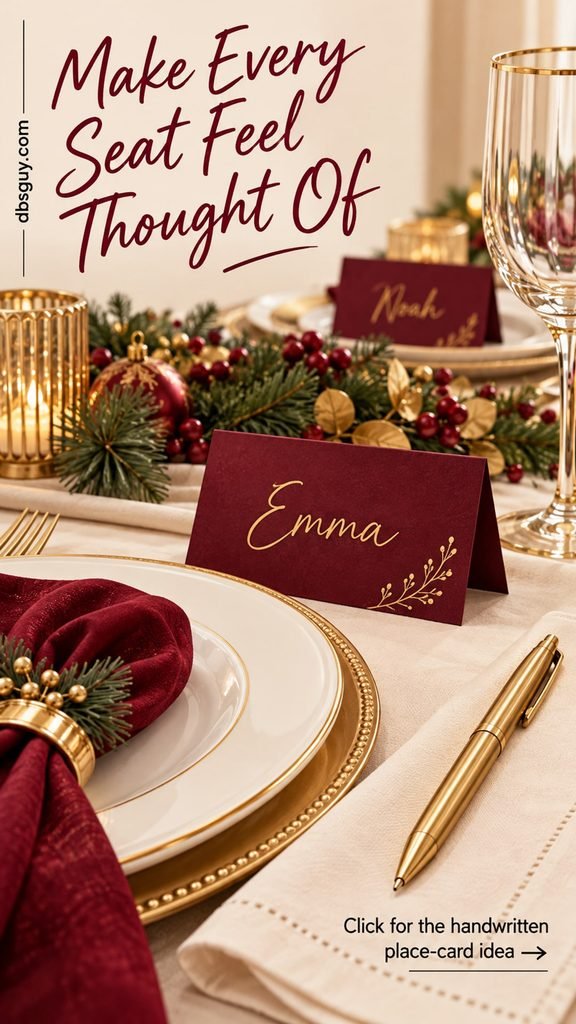
What you need: Burgundy cardstock, a gold pen suitable for that paper, a ruler, scissors, and a guest list.
How to style it:
- Cut a small test card and fold it into a tent that stands on its own. Check that it fits above the plate without blocking the glass.
- Try the pen on a scrap first. Some metallic inks need a moment to dry or another pass to appear clearly on dark paper.
- Write the guest’s name in generous, readable letters. Let the ink dry before stacking or folding the finished cards.
- Position each card where it is visible from the chair. Check the seating plan once before guests arrive.
Finishing tip: Plain lettering often looks better than rushed calligraphy. If the gold ink does not show clearly on your cardstock, use a cream name panel on a burgundy folded base.
Make cards consistent in size, but let the handwriting feel human. A slight variation in the letters adds more warmth than a page of decorative swirls that guests struggle to read.
10. Mix Brass and Gold-Toned Holders Instead of Buying a Matching Set
Different metal pieces can make a table feel collected over time. A slim brass holder, a rounder gold-toned one, and a small older piece may work together even when their shapes differ. Their shared warmth connects them; the burgundy nearby gives the group a clear Christmas color.
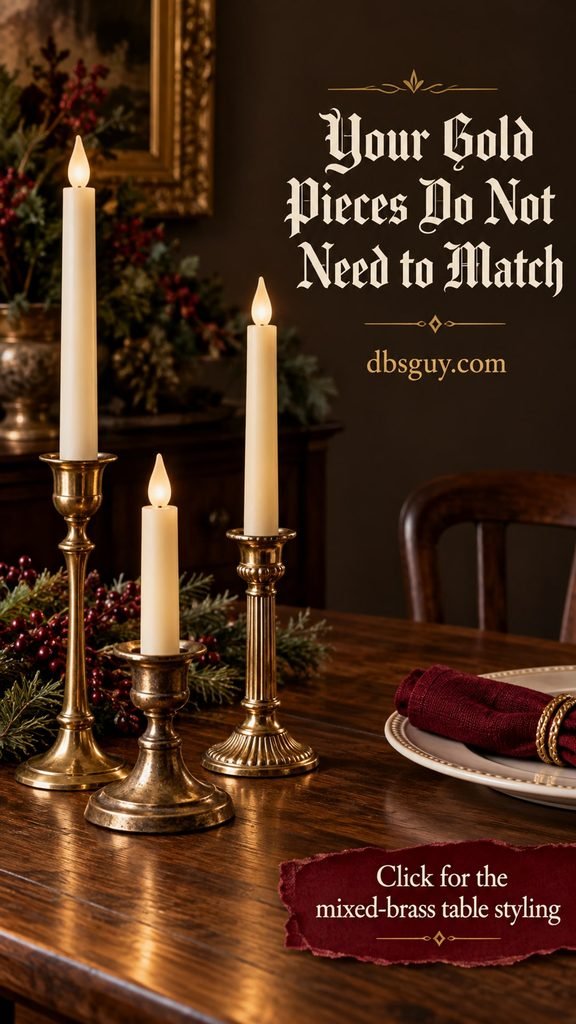
What you need: Stable brass or gold-toned holders, compatible flameless LED tapers, burgundy linens, and a protective base if needed.
How to style it:
- Gather a small group of holders and check their bases. Use only pieces that stand securely on your table.
- Fit the LED tapers according to their instructions. Skip a holder that leaves a candle loose, tilted, or awkwardly wedged.
- Arrange the group off center or in a staggered line with open space between the pieces. Keep taller elements away from the main sightline.
- Repeat burgundy in the nearest napkins or a runner, then leave the rest of the center simple.
Finishing tip: A softly aged finish does not need to be polished into bright gold. Keep each piece clean and follow its care directions, especially if you are unsure whether it is solid brass or plated.
Test the grouping from the seats, not just from the doorway. If the holders make passing food difficult, give them a place on the sideboard and keep the dining-table version lower.
11. Make Whole Pomegranates the Burgundy Centerpiece
Whole pomegranates bring wine-red color and an interesting crown-shaped top. Gather them in a low gold-toned bowl, and you have a focal point with very little arranging. This is especially useful when you want rich color but would rather skip flowers or another set of ornaments.
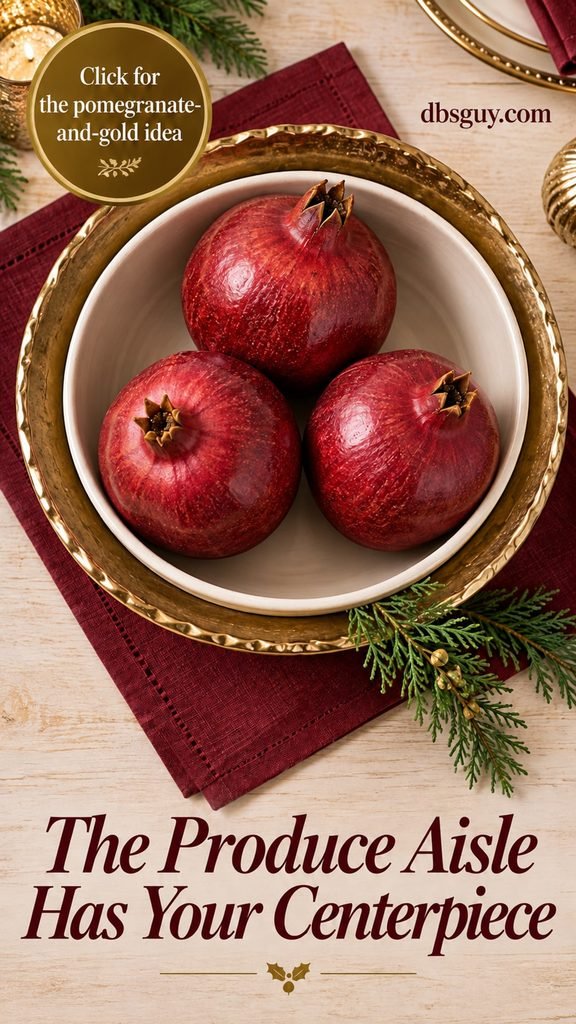
What you need: Whole unpainted pomegranates, a low gold-toned decorative bowl, a clean food-safe liner, and a burgundy fabric square if desired.
How to style it:
- Place a stable food-safe bowl or liner inside the decorative vessel if its surface is not suitable for food.
- Choose sound, whole fruit and dry the outside. Set the largest pomegranate slightly off center.
- Add the other fruit so the crowns face in different directions and the pieces sit securely rather than balancing above the rim.
- Set the bowl on a protected surface. A small evergreen sprig beside the bowl can add the Christmas detail without touching the fruit.
Finishing tip: Sheila’s pomegranate-and-pine table at Maison de Cinq shows how produce can carry a seasonal color scheme. Here, a low bowl contains the fruit and makes the arrangement easy to move.
Keep fruit you plan to eat separate from paint, glue, loose glitter, and other craft materials. You do not need to decorate the pomegranates themselves; their natural skins supply the burgundy.
12. Put a Burgundy Favor Box and Gold Bow at Each Seat
A little box can be both a decoration and something thoughtful to take home. Burgundy paper and a gold ribbon connect it to the table before the contents are revealed. Keep the package small so it adds a welcome detail rather than taking over the place setting.
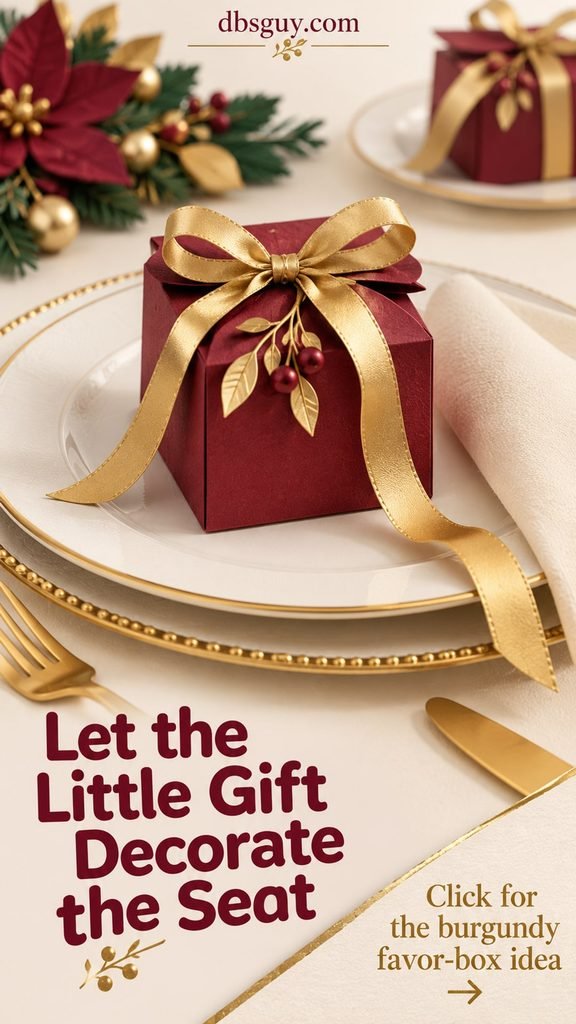
What you need: Small favor boxes, burgundy paper or ready-made burgundy boxes, narrow gold ribbon, and a suitable small gift.
How to style it:
- Choose the gift first so you know the box size. A note, a tiny photo, or a packaged treat can be enough.
- Wrap or assemble the boxes and keep their bottoms flat. Use a simple closure that guests can open without tools.
- Tie a narrow gold bow around each box. Keep the loops within the package’s outline so the ribbon does not spread across the plate.
- Place the box above the plate or on a clear side of the setting. Move it before serving if it starts on the plate.
Finishing tip: Make the favor do a second job by adding a guest’s name to the ribbon tag. Then you can skip a separate place card and another item at every seat.
Treats belong in food-safe wrapping inside the decorative box, and the contents should suit the guests receiving them. An empty box with a handwritten message can be just as thoughtful as a purchased gift.
13. Use One Compact Gold Tray on a Small Round Table
A round table does not need a long garland to look finished. One contained arrangement can carry both colors and leave the outer area for plates and serving. The tray also gives you a way to remove the decoration when dinner needs the middle of the table.
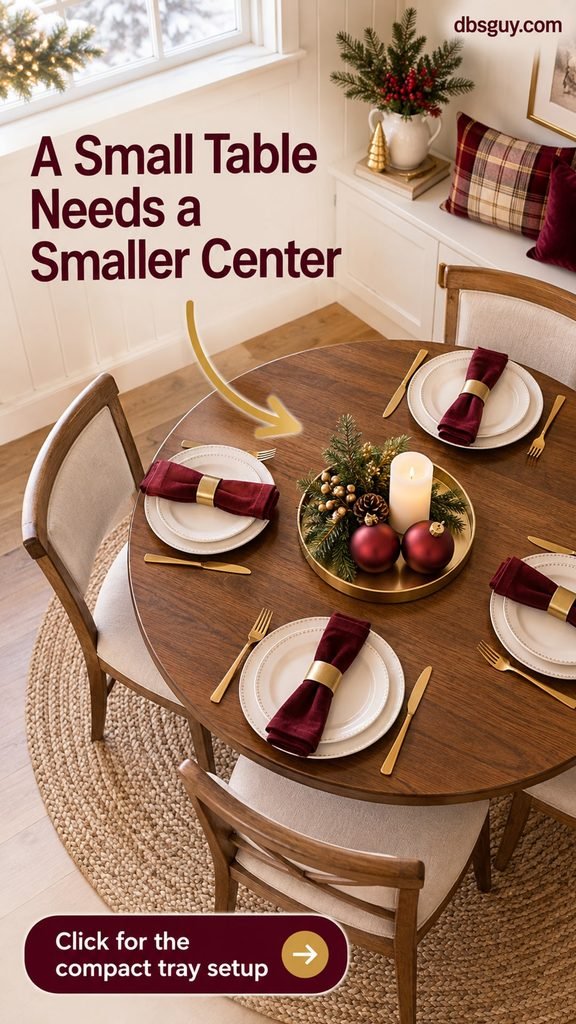
What you need: A compact low gold-toned tray, a few shatterproof burgundy ornaments, a short evergreen sprig, and an optional small LED pillar.
How to style it:
- Set the plates, glasses, and serving bowls out first. Try the empty tray in the remaining center space.
- Add the low main object, such as an LED pillar, then place the ornaments beside it instead of stacking them into a mound.
- Tuck in one small piece of greenery and turn the ornaments’ hanging caps inward. Check that nothing can roll off the tray.
- Lift the finished tray carefully to test its weight and balance. Choose a nearby landing place if it needs to move for dinner.
Finishing tip: Leave the round table visible around the tray. The circle of place settings already supplies a strong shape, so you can keep the center arrangement quite small.
A tray that only fits before the food arrives is still too large for a family-style meal. In that case, display it on the buffet and use the burgundy napkins and gold place-setting details at dinner.
14. Move Burgundy Bows Onto the Chair Backs
Chair bows let the Christmas color reach beyond the tabletop. They are especially useful when your plates and serving dishes already occupy most of the surface. A small gold ribbon layered into the knot connects the chairs with the warm metal details at dinner.
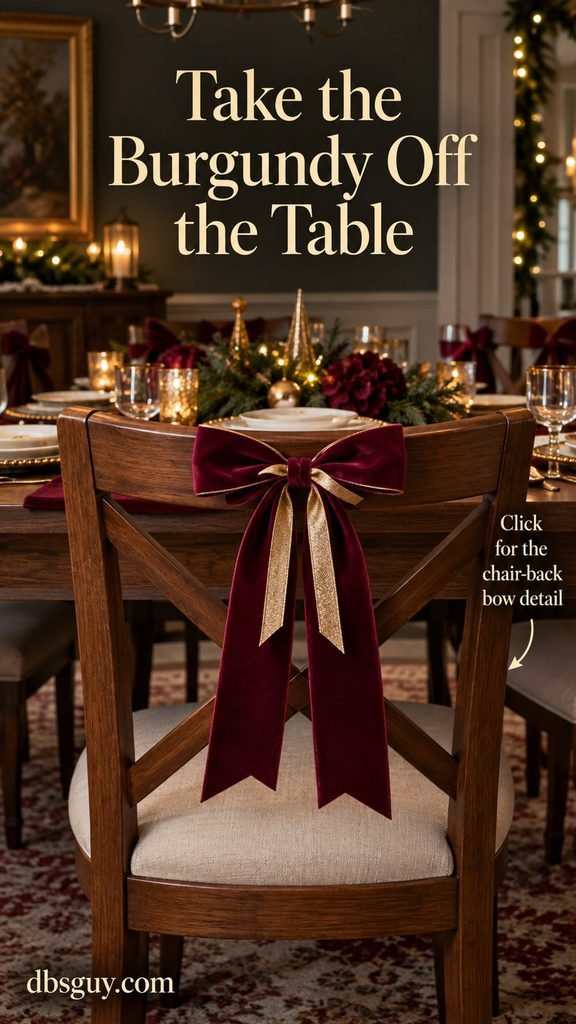
What you need: Burgundy ribbon, a narrower gold ribbon, scissors, and chairs with a suitable open rail or secure tie point.
How to style it:
- Test one chair before cutting ribbon for the whole set. Choose a spot that does not interfere with the person sitting against the back.
- Tie the burgundy ribbon into a manageable bow around the rail. Pull it snug enough to stay in place without squeezing the loops flat.
- Add a short gold ribbon at the knot or make a smaller bow in front. Keep the burgundy as the main visible layer.
- Trim the tails well above the seat and check that the knot does not snag clothing when someone sits down.
Finishing tip: Decorate just the two end chairs if you prefer a quieter version or have a limited amount of ribbon. You do not need a bow on every chair for the color to feel connected.
Skip chair decorations when there is no comfortable attachment point. Avoid sharp pins in upholstered backs, and remove or shorten anything a guest would have to keep moving out of the way.
15. Line Up a Few Small Gold Trees on a Burgundy Strip
Miniature trees give the center of the table an unmistakable Christmas shape. Gold bottlebrush trees look warm against burgundy fabric, and their repeated outline means you can use fewer other objects. Pick tabletop sizes that sit comfortably below the conversation rather than borrowing a tall mantel display.

What you need: Small freestanding gold trees with stable bases, a narrow burgundy fabric strip, and a light tablecloth or bare table.
How to style it:
- Lay the fabric strip flat in the remaining center space. Keep its edges away from glass bases and serving spots.
- Choose a few trees in different small sizes and check that each one stands firmly on its own.
- Arrange them in a loose staggered row instead of a tightly packed forest. Leave a little visible fabric between their bases.
- Sit at the table and check the tallest tree. Move it to the buffet if its top interrupts the view across dinner.
Finishing tip: One larger miniature and two smaller ones give the group variety. If you only own a pair, use the pair; the repeated shape matters more than meeting a decoration count.
A soft fabric fold can make a narrow tree base tilt. Smooth the surface underneath each piece, and skip loose glitter or unstable trees near plates and glasses.
16. Carry Burgundy and Gold to the Dessert Station
The main table can stay practical while a sideboard carries an extra festive detail. Burgundy napkins and one gold-toned tray make the dessert area feel connected to dinner. You can use a cake, a covered pie, or the desserts you planned to serve; this is a styling idea rather than another baking assignment.
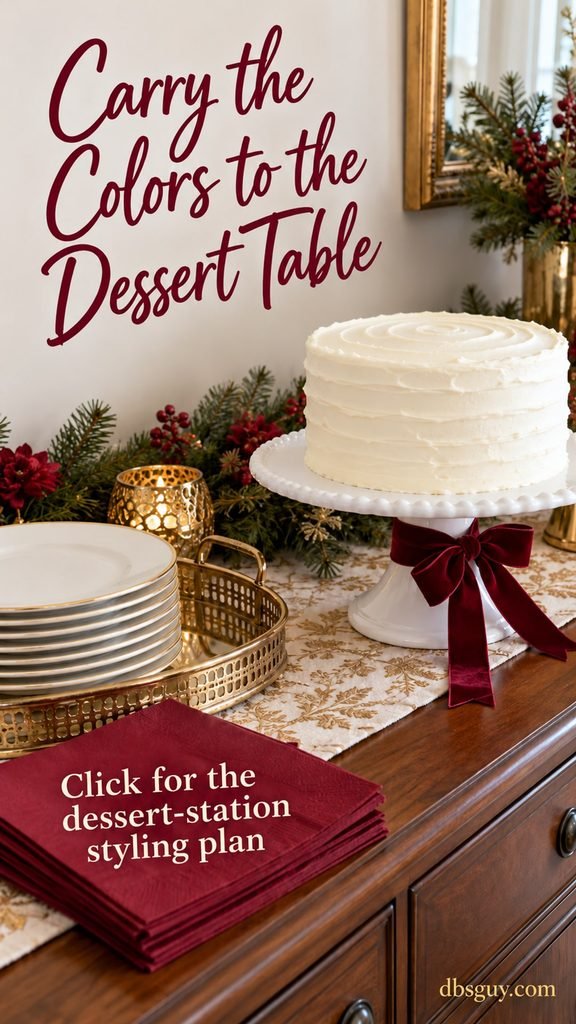
What you need: A food-safe cake stand or dessert platter, white dessert plates, burgundy napkins, a gold-toned tray, and optional burgundy ribbon.
How to style it:
- Set the dessert on its proper serving stand and leave room beside it for the knife, server, and any lids you will remove.
- Gather clean dessert plates on the gold-toned tray. Keep the stack low enough for guests to lift a plate comfortably.
- Put burgundy napkins next to the plates. If using ribbon, tie it neatly around the outside of the stand’s pedestal, away from food.
- Walk through how someone will take a dessert, plate, napkin, and utensil. Move a decorative item if it blocks that simple route.
Finishing tip: Use the same ribbon or napkin shade as dinner. Repeating one small detail can connect the areas more effectively than rebuilding the entire centerpiece on the sideboard.
Keep decorations off the serving surface and preserve the dessert’s usual covering and storage until it is time to serve. Ribbon belongs on the outside of the stand, not under slices of cake.
17. Balance a Moody Burgundy Tablecloth With White and Gold
A full burgundy cloth creates a more dramatic evening look than a runner. It works best when the dishes and lighting give your eyes a lighter place to land. White plates, clear glasses, and low ivory LEDs help the rich fabric feel welcoming rather than turning the table into one dark block.
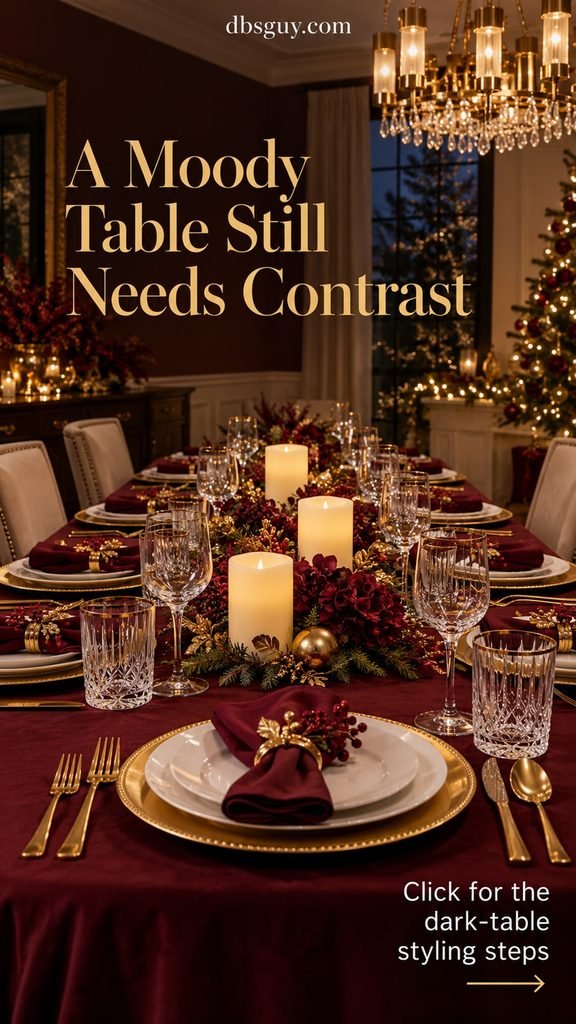
What you need: A burgundy tablecloth, white dishes, gold-toned chargers or accents, clear glasses, and low ivory LED candles.
How to style it:
- Spread the cloth and check its drop around every seat. Keep hems clear of guests’ feet and chair movement.
- Set the white dishes and gold accents before adding the centerpieces. Leave visible burgundy between settings rather than filling every gap.
- Use a small group of low ivory LEDs and one restrained floral or greenery detail. Keep both colors easy to recognize.
- Check the room after dark with the overhead or side lighting you plan to use. Add gentle room light if the plates or food would be difficult to see.
Finishing tip: Clear glass is helpful here because it adds sparkle without another solid color. You can keep your everyday glasses even if the tablecloth is the most formal piece you own.
A dark tablecloth cannot provide the whole atmosphere by itself. Comfortable light, clear views, and enough space for dinner matter more than adding another gold ornament to an already full surface.
18. Let Burgundy Glassware Supply the Main Color Accent
Colored glasses can carry burgundy while the plates and linens stay neutral. A fine gold rim adds a second detail without another decoration at the seat. You do not need an entire new set of glassware: one colored glass beside a plain clear water glass can create the effect.
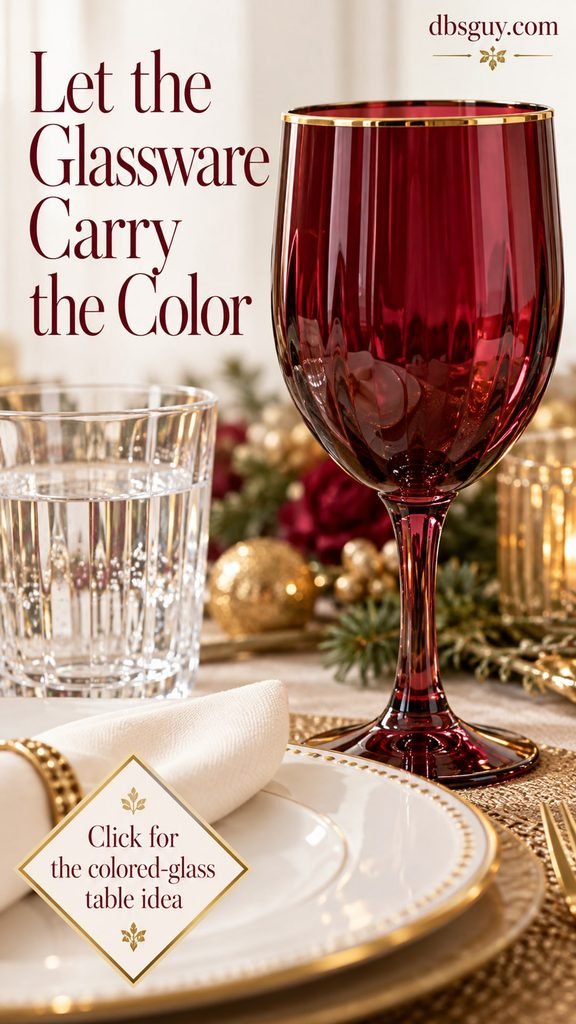
What you need: Food-safe burgundy drinking glasses, plain clear glasses, white plates, neutral napkins, and an existing gold accent if the glasses have no gold trim.
How to style it:
- Check the colored glasses for chips and confirm they are intended for drinks. Wash them according to their care instructions.
- Place one colored glass where it suits the drink being served. Keep its base fully on the table or mat.
- Use clear glass for the other drink rather than adding another competing color at every seat.
- Keep the napkin and plates simple, then repeat a small amount of burgundy elsewhere only if the table needs it.
Finishing tip: The glass does not have to be exactly the same shade as the fabric. Hold the pieces together in your room’s light; a related wine-red tone can look more natural than a forced match.
Use manufactured drinkware rather than applying craft paint, glitter, or metallic tape to rims or drinking surfaces. If you do not own colored glasses, burgundy napkins provide a straightforward alternative.
19. Build a Casual Family Table With Burgundy Paper Napkins
The palette can work for a relaxed family dinner, too. Burgundy paper napkins give ordinary plates the color, while large flat gold name tags add a little warmth. Keep the surface easy to use and let durable everyday tableware do its usual job.
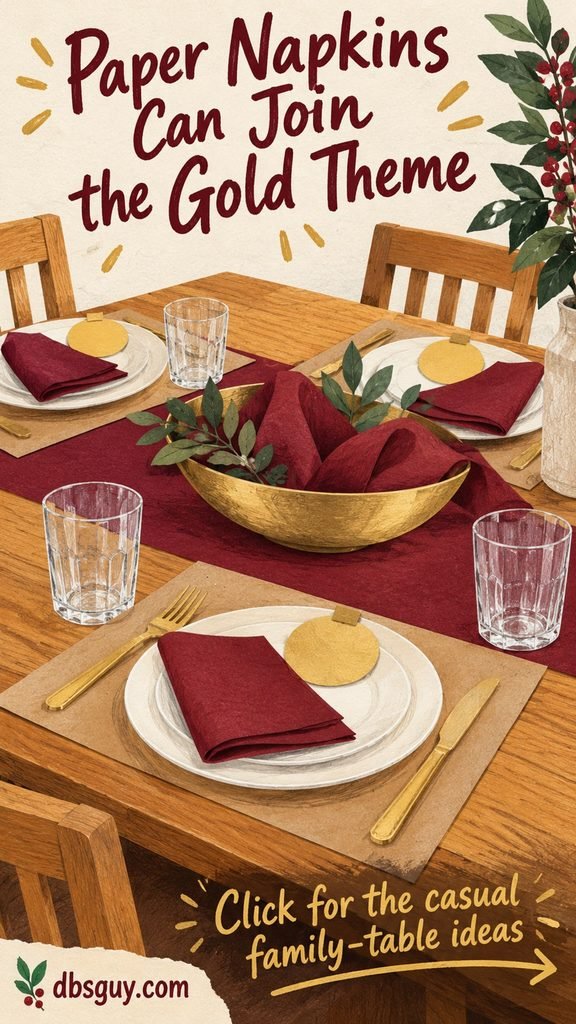
What you need: Sturdy everyday plates and tumblers, burgundy paper napkins, kraft paper placemats if desired, and large flat gold paper place tags.
How to style it:
- Set the everyday dishes and drinks out first. Use the plates and cups that suit the people at your table.
- Fold the paper napkin into a clear, simple shape and place it beside or across the plate. Keep the same fold at each seat.
- Write names on the larger paper tags and put them above the plates. Skip loose tiny ornaments and glitter.
- If you want a center detail, use a low gold-toned bowl to hold spare folded napkins. Leave enough room for the shared dishes.
Finishing tip: You can put a short handwritten welcome on each tag instead of a formal name. The paper details are an easy place to make the table feel personal without complicating the setup.
Choose a flat placemat layer that will not slide or curl beneath the glasses. For a busy family meal, a useful napkin bowl can be a better center detail than something everyone has to reach around.
Put Together the Version That Fits Your Christmas Dinner
For an easy starting combination, use white plates, burgundy napkins, and one gold detail at each seat. Add a compact tray or low flower bowl only after the serving dishes fit. For a richer evening look, let a burgundy runner or tablecloth be the main piece and keep the remaining shapes clear.
Prepare the dry details ahead of time: cut ribbons, write place cards, check the LEDs, and test any tray you will need to move. Arrange fresh flowers closer to the gathering and check their water before guests arrive. Give the dessert station its final setup when it is time to serve.
Then sit in a chair and look across the table. Can you see the person opposite you, lift your glass, and imagine passing dinner without rearranging half the decorations? If so, the burgundy and gold are doing their job. Leave that last bit of open space for the food and the people you made the table for.




