
Milky white nails have a lovely way of looking dressed up without asking for much attention. They can peek out of a chunky sweater, sit beside a silver ring, or soften a sparkly December outfit. Add one tiny detail and the same quiet base takes on a completely different mood.
The secret is choosing the right amount of white. A translucent, cloudy finish lets a little of the natural nail show through; a denser white looks brighter and more defined. Neither is wrong, but deciding which you prefer makes it much easier to get the manicure you imagined.
These 17 milky white December nail ideas explore soft shine, delicate winter artwork, and restrained sparkle. Each includes a clear salon request and a short-nail adjustment. Start with the finish you love, then choose one accent that feels like you.
1. Short Milky White Gloss
Short milky white nails are simple in the best way. The cloudy color softens the natural nail underneath, while a glossy surface makes the whole manicure feel neat. There is no artwork to compete with the shape or the gentle translucency.
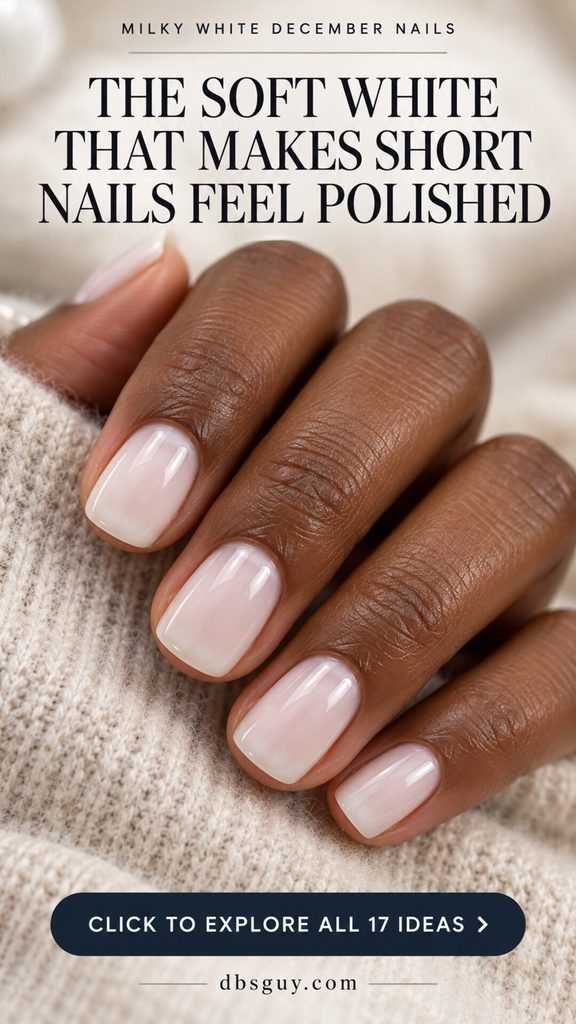
Ask for a sheer-to-milky white with softly rounded square edges. Tell your artist whether you want the natural free edge faintly visible. “Milky” alone does not specify the coverage, so a sample nail is a useful way to agree on the result.
This is an approachable regular-polish option if you enjoy painting at home. Choose a formula designed for a sheer white finish and follow its directions, rather than expecting an opaque white to behave the same way. Keep the length comfortable and the shapes consistent. A cream knit and a simple ring are all the styling this look needs.
2. Milky White With a Pearl Glaze
A pearl glaze adds a soft glow to milky white. Instead of obvious glitter pieces, the surface reflects light in a smooth, luminous sweep. It is especially pretty when you want a quiet manicure to feel a little more special for December evenings.
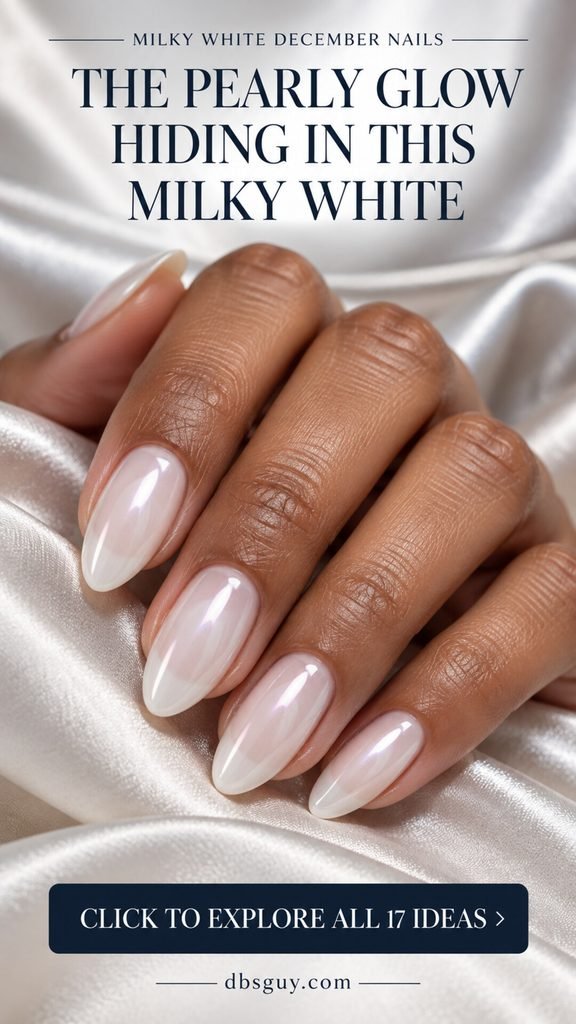
Ask for a translucent milky base with a subtle pearly finish, and explain how much reflection you want. A soft sheen and a strong mirror chrome can both be described as “glazed,” so show the reference and ask to see the finish over your actual base shade.
Almond nails give the glow a graceful outline, but short round nails work too. Keep the pearl layer light enough that the softness underneath still comes through. This is a good choice for a winter dinner, a wedding guest outfit, or any occasion when you want shine across every nail without adding a motif.
3. Milky White With Silver Micro Tips
A silver micro tip gives milky white a crisp little edge. Most of the nail stays soft and translucent, while the narrow metallic line adds definition right where the nail ends. It feels wintry without relying on Christmas artwork.
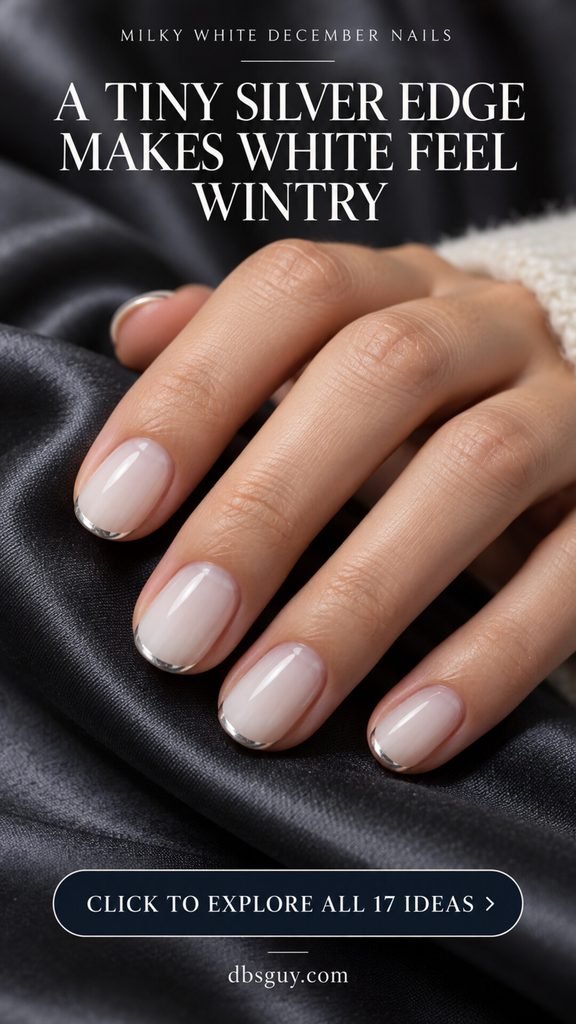
Ask for a milky white base and the finest practical silver line along the free edge. Approve the width on one nail before the whole set is done. A thick band can turn the manicure into a much bolder metallic French look.
On short oval nails, follow the natural curve and keep the silver shallow. A painted metallic tip, foil detail, and chrome-powder tip will reflect differently, so discuss the method instead of assuming they are interchangeable. If you wear silver jewelry often, this small repeated accent can tie the manicure into your everyday style without needing more decoration.
4. Milky White With One Silver Snowflake
One silver snowflake brings a clear winter detail to a soft white manicure. Against the cloudy base, the metallic branches catch light gently, making the accent feel delicate rather than stark.
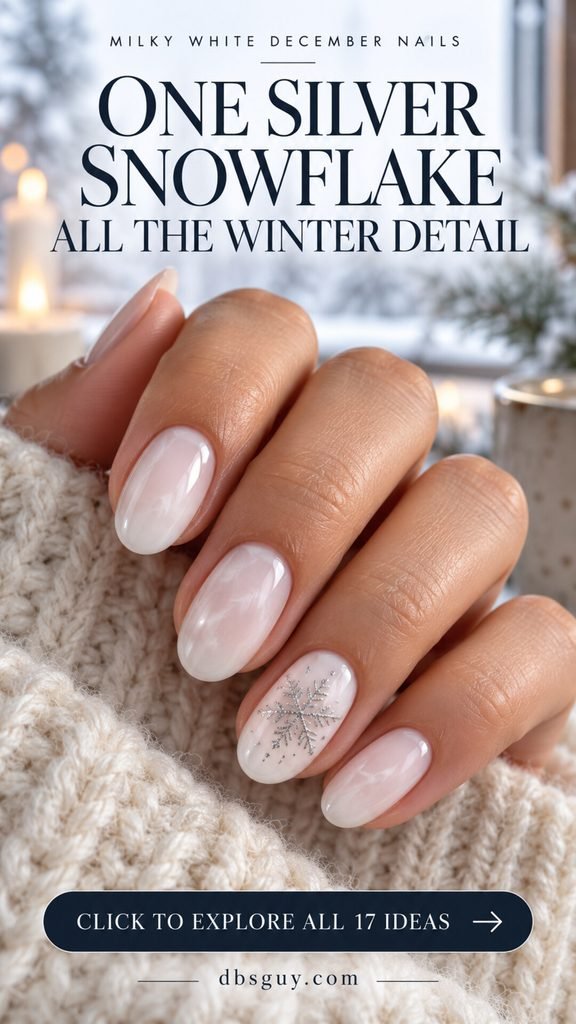
Ask for a fine silver snowflake on the ring nail, leaving space around every side of the motif. Keep the surrounding nails plain. A few tiny accompanying flecks, like those in the reference, can add sparkle, but they are optional; the snowflake should still be the main detail.
For short nails, simplify the branches and reduce the overall size. Thin, separated lines are more important than squeezing in every little offshoot. If your artist offers a suitable decal or stamp, that may be another route to a crisp motif. Check the silver against the base before proceeding, since a very pale metallic shade can disappear in some lighting.
5. Soft Pink-to-Milky White Ombre
A blush-to-milky-white fade gives the softness of a French manicure without a sharp smile line. The pink stays near the base and gradually gives way to cloudy white at the tips, creating a light, blended effect.
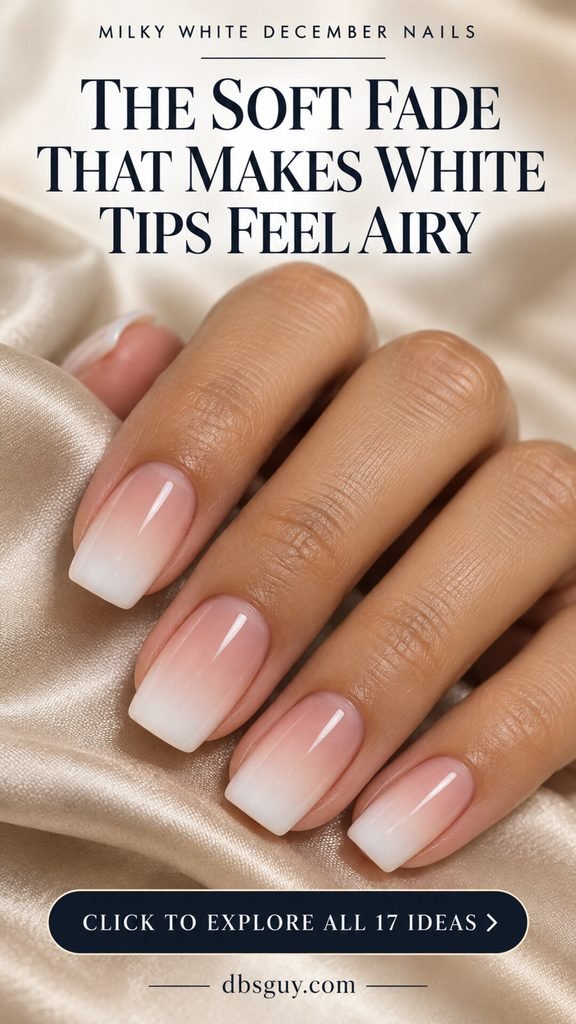
Ask for a sheer blush base fading into soft white, with no obvious dividing line. Choose the pink against your own hand; the shade that looks natural in one reference may feel too pink or too pale on someone else.
On short nails, keep the white section modest so there is enough room for the transition. A medium squoval shape provides more blending space if you prefer the proportions shown here. This is a useful choice when you want a manicure that can move from holiday events into everyday wear. The detail is in the blend, so extra glitter or a charm is entirely optional.
6. Milky White With a Tiny Pearl
A single tiny pearl gives milky white nails a jewelry-like focal point. The creamy accent stays within the same soft color family, while its rounded shape adds a little dimension that plain polish cannot create.
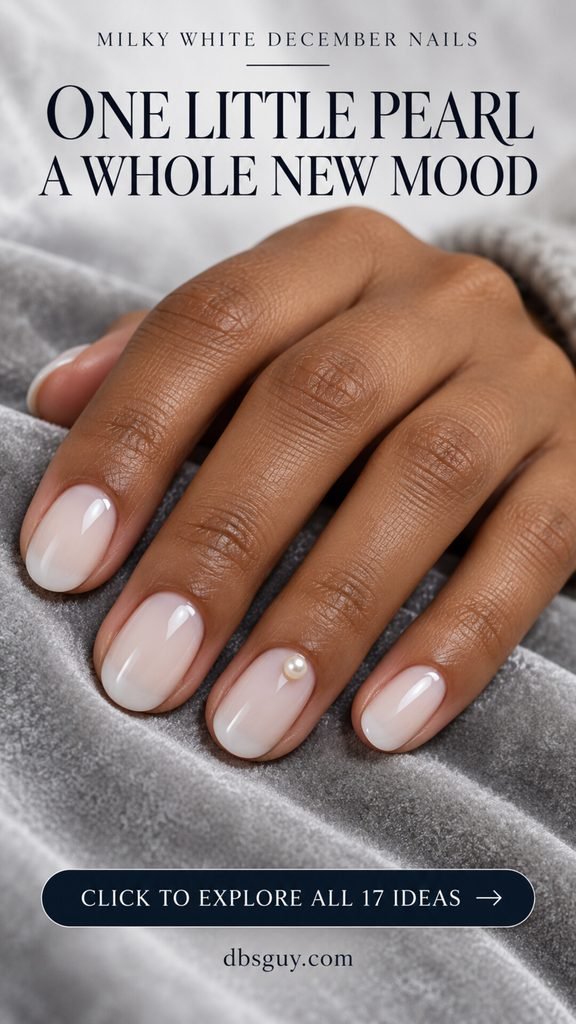
Ask for one small flat-back nail-art pearl near the base of the ring finger, with a gap from the skin. Look at its height as well as its width before it is attached. A pearl that appears small from above may still feel noticeably raised.
Short oval nails suit this design when the pearl stays petite. If you prefer a smooth manicure, a painted pearly dot can suggest the same idea, though it will not have the same shape or depth. Keep the other nails plain so the little accent has room to stand out. It is a lovely pairing with satin, a fine knit, or a simple evening outfit.
7. Matte Milky White With Glossy Tips
Matte milky white with glossy tips is a detail you notice as the hand moves. The color stays close throughout the nail, but the tip catches a clearer reflection than the softly diffused base.
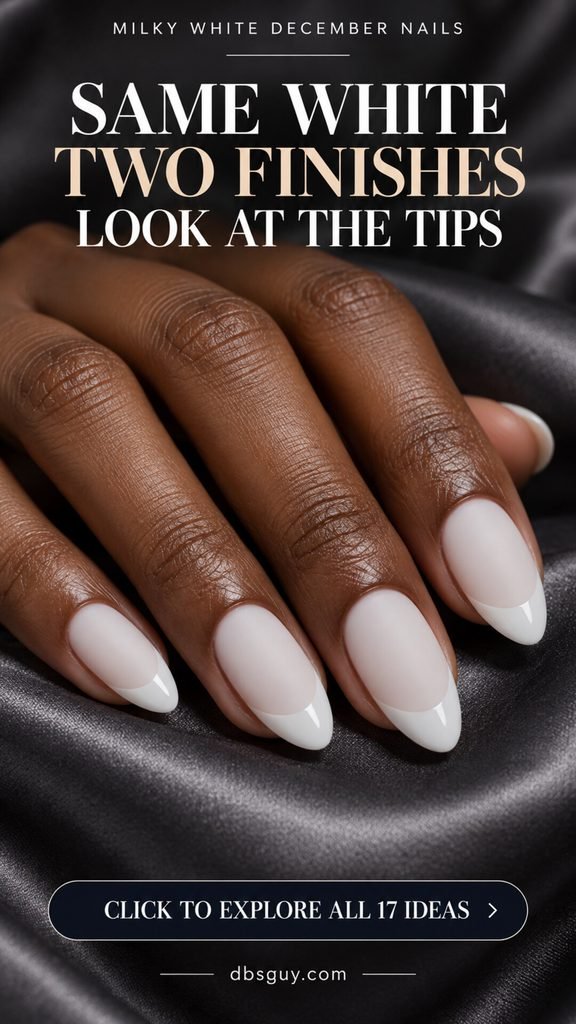
Ask for a milky white manicure with a matte main surface and a narrow glossy French tip. Explain that the contrast should come primarily from the finish. The tips may appear brighter because of their coverage and reflection, so check a sample if you want the difference to remain very subtle.
For short nails, keep the glossy edge shallow. A deep tip can dominate the available surface and reduce the quiet effect. Let your artist choose a compatible finishing sequence for the products being used. This is a thoughtful option if you enjoy understated nail art and would rather play with texture than add another color.
8. Milky White With Champagne Foil
Champagne foil brings a warm glint to milky white nails. Scattered fragments on one accent nail feel relaxed and irregular, with the cloudy base still visible between them. The warmth is especially pretty beside oatmeal or camel clothing.
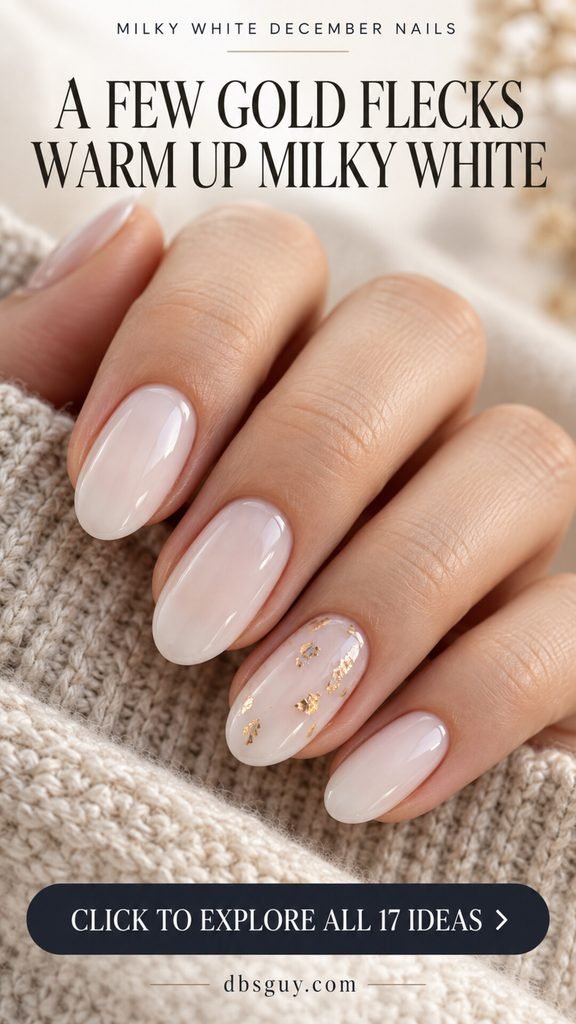
Ask for a few small pieces of champagne-gold nail-art foil on the ring nail. Describe the amount of open space you want, not just the metal color. A sparse arrangement gives a very different impression from a nearly solid foil surface.
On short nails, use smaller fragments and stop before they overlap into a large patch. Ask for a smooth finish if you dislike texture. Pale champagne keeps the contrast gentle, while a stronger yellow gold makes the detail more noticeable. Compare the foil with your chosen white before applying it, particularly if the base already has a warm ivory cast.
9. Milky White With a Fine White Bow
A white bow over a milky base is a lovely detail for someone who enjoys subtle nail art. The opaque ribbon stands out against the translucent background, yet the colors remain close enough for the manicure to feel soft.
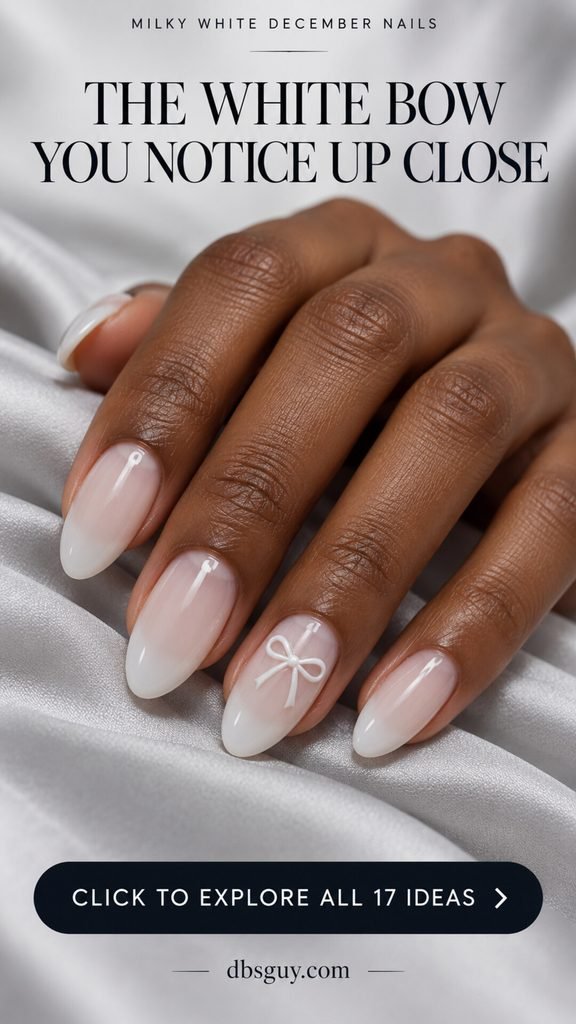
Ask for one small white bow on the ring nail, with two open loops and short tails. Specify whether you want a flat painted design or the more dimensional appearance shown in the reference. The outline may be similar, but the texture and technique will differ.
On shorter nails, shorten the tails and keep the loops away from the sidewalls. If the bow disappears against the base, make the base sheerer rather than automatically making the bow bigger. This is a sweet December choice that also works beyond the holidays, especially if you like delicate ribbon details in your outfits.
10. Milky White With Silver Glitter Tips
Silver glitter fading from the tips adds sparkle while leaving most of the manicure milky and soft. The scattered transition feels lighter than a solid metallic band, making this a good option for a little party shine.
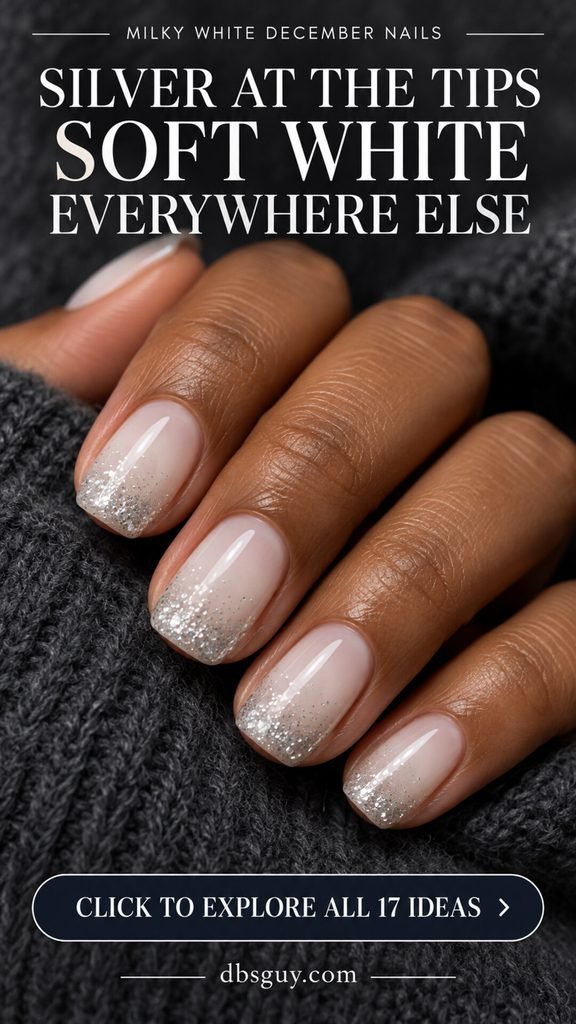
Ask for silver glitter concentrated at the free edge and gradually thinning toward the center. Keep the area near the cuticle plain. Showing the direction matters: a glitter fade starting at the base creates a different design.
On short square or squoval nails, keep the fade compact so the white remains visible. For a regular-polish interpretation, choose a compatible silver glitter topper and test the density on a spare tip. Some formulas contain large pieces, others fine shimmer, and some mix both. Choose the particle size you like instead of expecting every silver glitter polish to give the same effect.
11. Milky White With a Clear Crystal
One clear crystal gives milky white a small flash of light. The color palette stays almost neutral, but the faceted accent adds a sparkle that feels different from a soft pearl or a flat metallic dot.
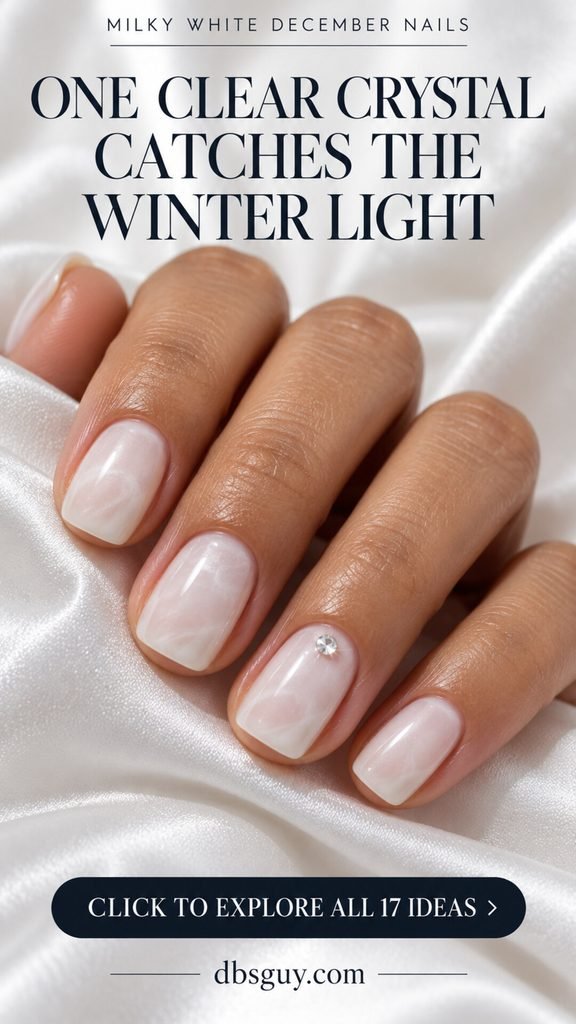
Ask for one tiny clear rhinestone near the base of the ring nail, leaving room between the stone and the skin. Choose the size on the actual nail before it is secured. With a light base, even a modest crystal can become the focal point.
For very short nails, keep the accent low-profile and small. If you often wear close-fitting gloves or simply dislike raised nail art, discuss a flatter alternative. A silver painted dot offers a different but similarly restrained detail. The cloudy white underneath can stay simple; it does not need extra glitter for the crystal to feel special.
12. Milky White With a Thin Gold Half Moon
A fine gold half moon gives milky white nails a warm little frame at the base. Repeating the curve across the hand makes the manicure feel deliberate, while the narrow metallic area leaves the white in focus.
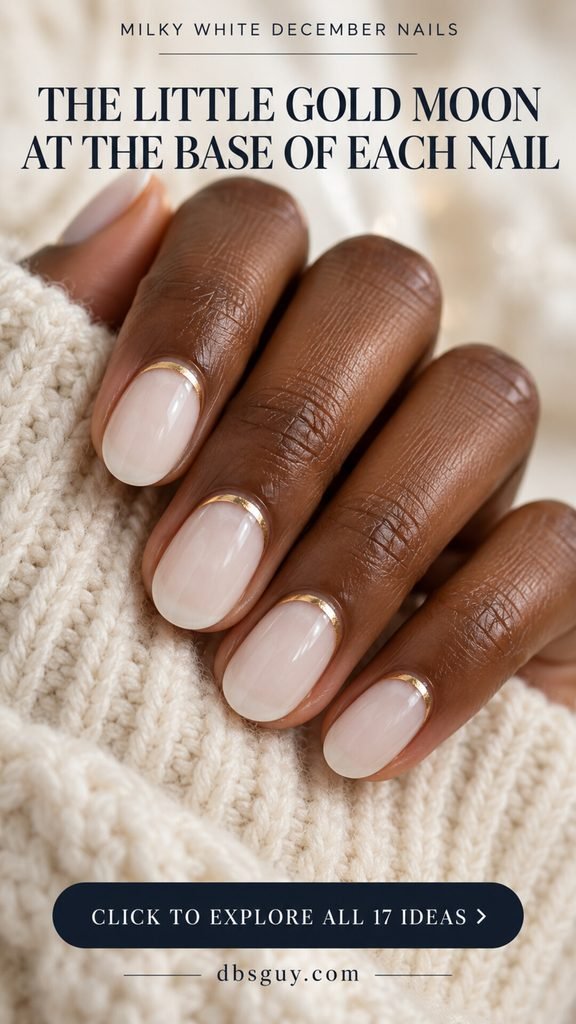
Ask for a shallow champagne-gold crescent near the cuticle area, with a clean gap from the skin. Show that you want the metal at the base, not along the tip. A thin painted version can keep the finished surface relatively flat.
On short oval nails, make the crescent especially slim. If it becomes a thick block, the balance changes from a small accent to a much stronger gold design. This is an appealing option when you prefer repeated details over a single accent finger. Pairing it with one gold ring is enough to echo the color without making the look busy.
13. Milky White With a Delicate Gray Branch
A delicate gray branch brings a quiet winter landscape feeling to milky white. The fine linework has a little more contrast than white-on-white art, but it stays gentler than a bold black drawing.
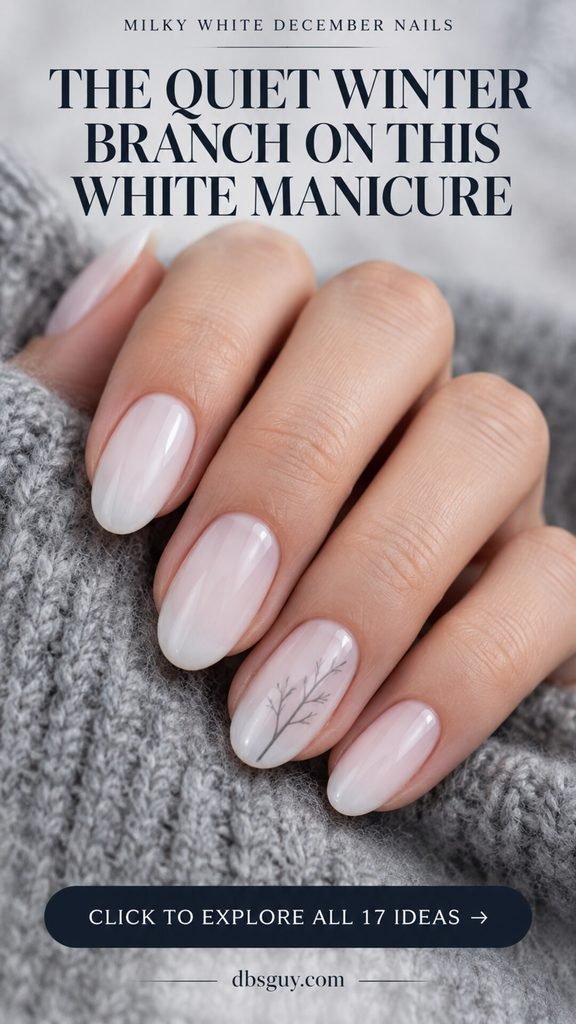
Ask for one slender, leafless branch on the ring nail, using a cool gray with a few small offshoots. Keep the lineweight fine and leave white space around the motif. The design should feel like a small sketch rather than a whole tree squeezed onto the nail.
On short nails, shorten the main stem and reduce the number of branches. A suitable decal can be an alternative if you prefer a repeatable outline. This is a lovely choice for someone who enjoys nature-inspired details and wants a winter manicure that does not rely on sparkle, ribbons, or obvious Christmas symbols.
14. Milky White With a Sheer Icy Blue Accent
One sheer icy blue nail gives a milky white set a gentle change of color. The palette still feels light, but the small blue accent suggests winter in a way that an all-white manicure does not.
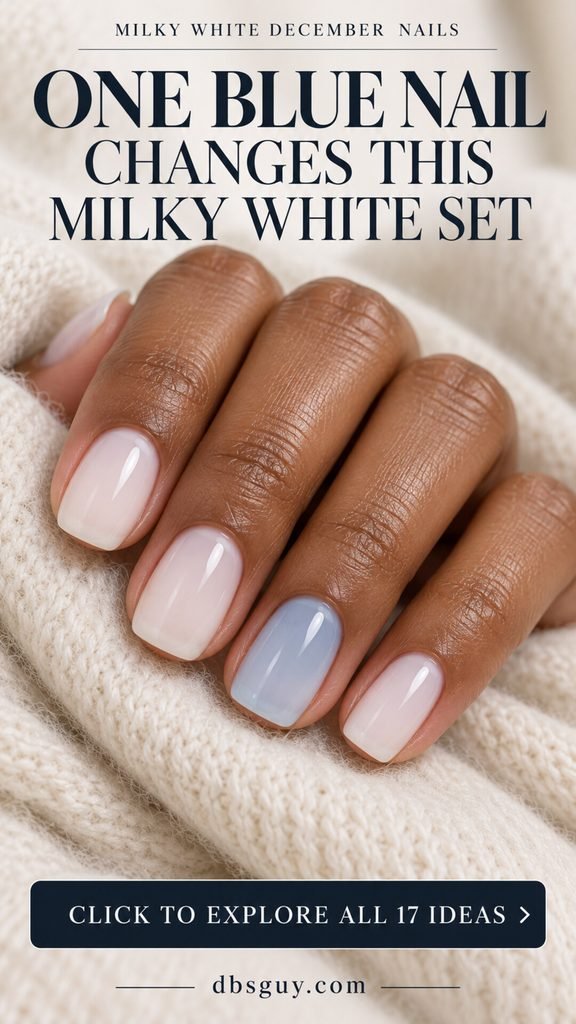
Ask for milky white on most nails and a translucent pale blue on the ring finger, with a similar glossy finish throughout. Compare the two shades together. A stronger blue creates more contrast; a softer wash stays closer to the quiet mood of the white.
Short squoval nails are a good fit because each small area of color looks neat. For a home version, this layout is approachable because it does not require detailed drawing. The important choice is coverage: if one shade is fully opaque and the other very sheer, the difference will be more pronounced. Choose that contrast intentionally rather than discovering it after painting.
15. Milky White With Tiny Silver Dots
Tiny silver dots give one milky white accent nail a light scattering of sparkle. The round marks feel playful, while the plain surrounding nails keep the overall manicure restrained.
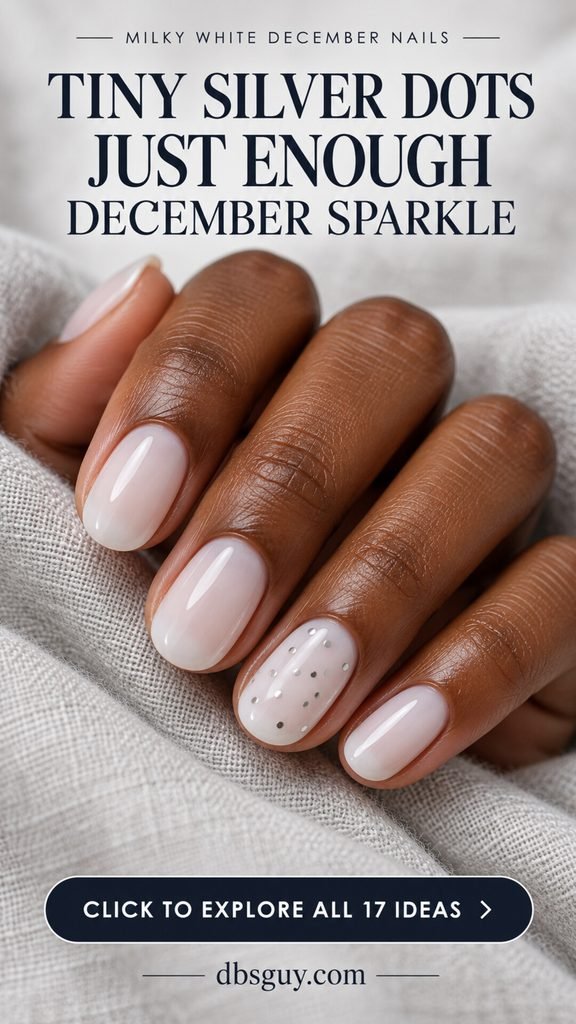
Ask for small, separated silver dots across the ring nail. A painted metallic dot gives a flatter result; little nail-art discs can have a different reflection and texture. Decide which you prefer before the detail is added.
For short nails, reduce the number of dots instead of packing them tightly together. Leave milky white visible between every mark. If you are trying painted dots at home, practice the size first: the amount of polish on a tool can make a bigger difference than expected. This is a useful option when you want festive light without the stronger sparkle of a full glitter nail.
16. Milky White With a Fine Side Swoop
A brighter white side swoop creates a soft outline over a translucent milky base. The curve follows one side and moves toward the tip, giving the manicure a little flow without adding another color.
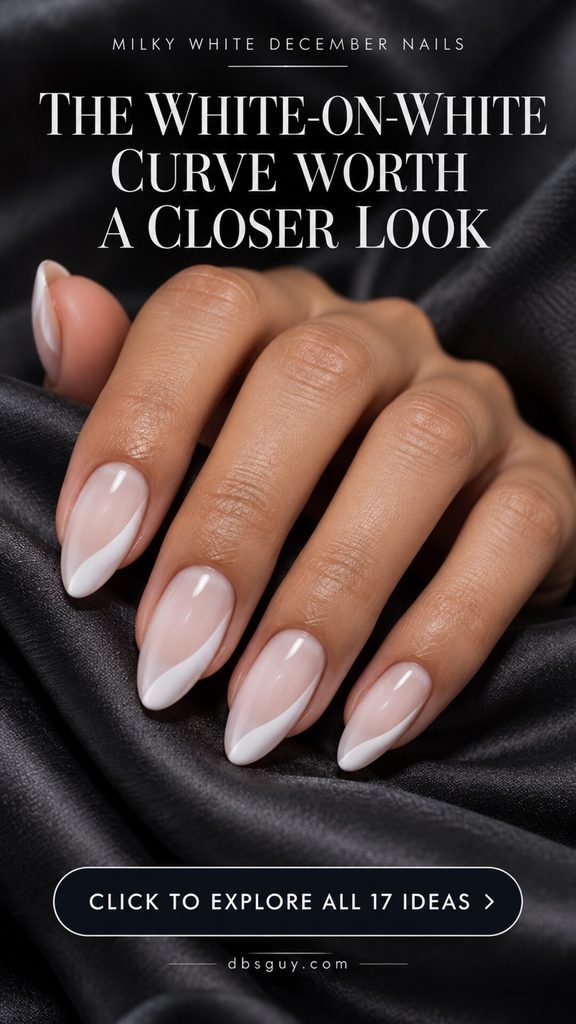
Ask for a narrow opaque white curve over a sheer milky background. Show where the swoop should begin and how much of the tip it should cover. It can become slightly fuller near the edge while leaving the middle of the nail open.
On shorter nails, use a finer curve and a smaller sweep at the tip. If the two whites are too similar in coverage, the detail may be difficult to see; test the contrast before repeating it. This is a pretty choice when you like French-inspired shapes but want an asymmetrical version with a softer overall appearance.
17. Milky White With a Soft Snowfall Accent
A scattering of tiny white dots looks like gentle snowfall over a milky base. It is a subtle winter detail, with the opaque marks appearing more clearly when you look closely at the accent nail.
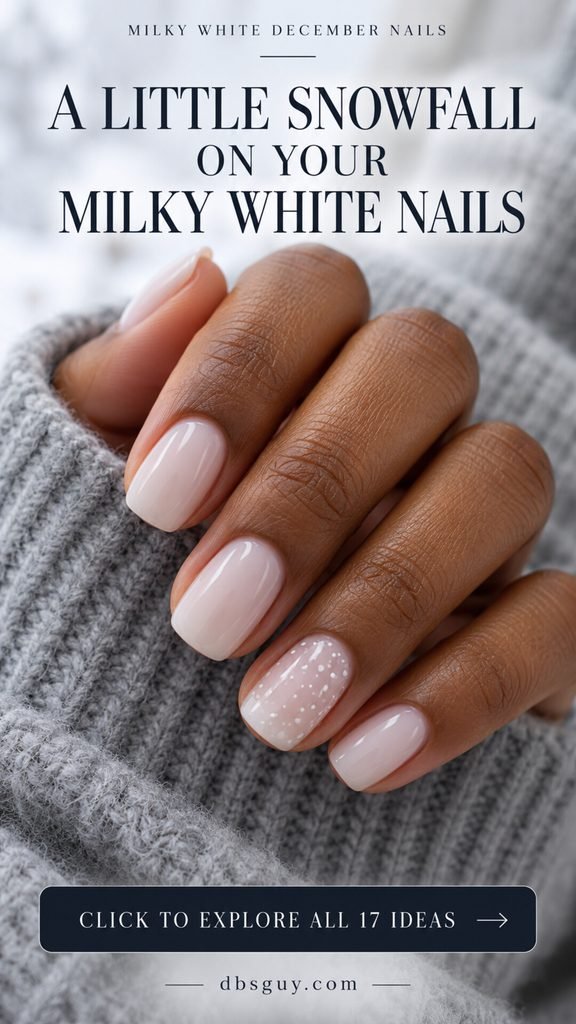
Ask for one snowy ring nail with small white dots of slightly varied sizes. Keep the base translucent enough for the dots to show. The goal is a loose scattering, not a dense layer that hides the white underneath.
On short nails, use fewer dots and leave small open areas between them. A fine dotting tool can help with a regular-polish version, but test the size on a spare tip first. This is a lovely final choice if you want a December reference without a detailed snowflake. The other nails can stay plain, making that little snowfall feel like a quiet surprise.
Choose Your Milky White Before You Choose the Art
The most useful question is how much of your natural nail you want to see. A sheer white can leave the free edge visible. A cloudier, more built-up finish softens that contrast. An opaque white covers more completely and can look brighter. Ask for the coverage you prefer instead of relying on the word “milky” alone.
For real product references, Essie describes Marshmallow as a cloudy sheer white, while Arctic Jelly is described as a translucent white with subtle yellow undertones. These descriptions show why two white polishes may give different results. They are examples to compare, not exact shade matches for the inspiration images.
Hold a swatch beside your hand in daylight and indoor lighting. A warmer white can feel creamy beside gold; a cooler-looking white can create a crisper effect beside silver. Neither is limited to a particular skin tone. Choose the contrast you enjoy and check it with the jewelry or outfit you plan to wear.
Make the White Details Visible Without Making Them Bigger
For a bow, side swoop, or snowfall design, use a translucent base and a more opaque white detail. Increasing that difference in coverage can make the artwork easier to see while keeping the color palette soft. Making every line thicker is not the only solution.
Finish also changes what you notice. Gloss creates a clear reflection, matte diffuses it, and pearl adds a luminous sheen. Check a sample at a normal viewing distance as well as up close. A design that is deliberately subtle may look almost plain across a room, which can be exactly the effect you want.
If you are asking for a glazed finish, clarify the product type. OPI distinguishes lacquer glaze toppers from Chrome Effects powders used over gel. Both can change the appearance of a base color, but the service, application, and reflection are not identical. Describe the softness or shine you want and let your artist suggest a compatible approach.
A Simple Brief for Your Nail Appointment
Send one main reference with your preferred nail length, shape, and coverage. For example: “Short oval nails, a sheer milky white base, and one tiny flat silver snowflake.” That gives your artist more useful information than a collection of unrelated images.
Then name the detail you do not want to lose. It might be the narrowness of the silver tip, the transparency under a bow, or the small size of a pearl. If you prefer smooth nails, say so before choosing charms or crystals. Confirm whether the artwork needs extra time and ask for the price before the appointment.
For repeated lines or a special finish, approve one sample nail first. A small adjustment to coverage or scale at that point can make the rest of the manicure much closer to what you had in mind.
Questions About Milky White December Nails
Do milky white nails have to be gel?
No. The color and coverage do not determine the product system. For example, OPI lists Infinite Shine Funny Bunny as a sheer white crème in a no-lamp formula. Check the exact product line when shopping or booking; similar shade names can appear in different systems, and instructions are not interchangeable.
How many coats create the milky look?
There is no single number that works for every formula and every nail. Start with a product designed for your preferred coverage, follow its directions, and assess a sample. Extra layers can change translucency, color, and thickness. If you want full coverage, choosing a more opaque formula may make more sense than repeatedly layering a very sheer one.
Why can a sheer white look uneven?
A translucent finish lets differences underneath remain visible, while uneven application can also create patchiness. Those are different issues. Compare the result with the product’s intended finish and avoid repeatedly dragging the brush through a layer that has started to set. At the salon, ask to see the base before adding artwork so you can agree on the coverage.
Which designs suit very short nails?
Plain gloss, a soft pearl glaze, a small silver edge, or one accent color need little drawing space. Dots can be reduced in number, and a bow or snowflake can be simplified. Keep the length comfortable and adapt the artwork around it rather than assuming extensions are necessary.
How can milky white feel festive without glitter?
Try the gray branch, white bow, snowfall dots, or matte-and-gloss tips. A tiny pearl gives dimension without glitter, while the pink-to-white fade keeps everything focused on color. Pick one detail that suggests the mood you want and let the remaining nails stay quiet.
Will this manicure work after the holidays?
Most of these ideas are easy to wear beyond December. Plain milky white, a pearl glaze, metallic trim, and soft ombré have no Christmas-specific motif. Even the winter branch and snowfall accents can feel at home through the rest of the season.
Let One Small Detail Be Enough
Choose your favorite white first, then decide whether it needs anything else. A good soft base can be the entire manicure. If you want an accent, keep the part you love most—a silver edge, a little bow, or one pearl—and scale it to your own nails. That is what makes a reference feel personal when you finally wear it.
Image note: These are AI-generated manicure inspiration images, not photographs of tested salon results. Actual coverage, color, reflection, and texture will vary with products, natural nails, lighting, and application. Styling suggestions are editorial; the linked manufacturer resources support the product-finish explanations.