Turn a plain box into a Santa coat, a smiling snowman, or a red-nosed reindeer with solid wrapping paper and a few cut-paper details. The gift stays inside its usual packaging; the character goes on the broad, smooth front.
For Christmas gift wrapping for kids, choose Santa if you want mostly straight cuts, the snowman for a tall box, or the reindeer when you have room for antlers. Below are three complete designs, with suggested sizes, placement steps, and ways children can help.
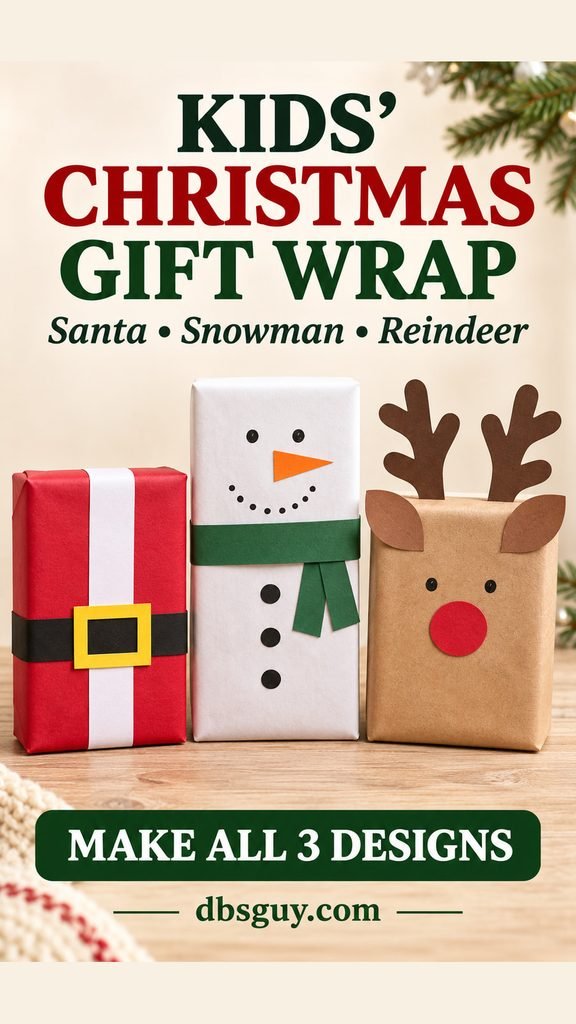
The images are AI-generated craft concepts, not photographs of tested projects. Use them to guide colors and placement; the measurements below are suggested starting points for your own box.
Gather One Small Wrapping Kit
Check the paper you already have before buying character-print rolls. Plain wrap lets the face or outfit stand out, and the little details use only scraps.
- Base wrap: solid red for Santa, opaque white for the snowman, and brown kraft paper for the reindeer.
- Details: white, black, yellow, orange, green, and brown paper. Use firm brown cardstock for antlers so they can stand above the box.
- Tools: scissors, a ruler, a pencil, a black marker, clear tape, and a glue stick. For children helping, choose age-appropriate supplies and follow their labels.
- A box with a flat front: put soft gifts in a suitable box first. Keep any original toy instructions and age labels with the gift.
These versions use drawn eyes and flat paper pieces instead of bells, plastic eyes, or real buttons. Flat decorations still need supervision. For a child who mouths objects, draw the details directly on the wrap and have an adult help with opening and cleanup. The American Academy of Pediatrics advises keeping small removable holiday trimmings away from young children.
If you are still choosing what goes inside, start with 30 Best Christmas Gifts for Kids by Age, then fit the wrapping to the actual package.
Wrap the Box Before Adding the Character
Choose the front before cutting anything. A face is easier to place on a smooth panel than over a thick wrapping seam.
- Set the gift in its box and close it. Write the recipient’s name on a temporary note so you can identify it while working.
- Test-fit the wrap around the box before cutting. Allow a small overlap along the back, then check that the paper at each end reaches across the opening without excessive bunching.
- Tape the main overlap on the back. Fold the end paper against the box, crease the side triangles inward, and fold the remaining flaps over each other.
- Turn the smooth front upward. Arrange every decoration without glue first, then attach the pieces once the spacing looks right.
Use opaque white paper for the snowman; thin tissue alone may let a dark package show through. Before drawing any faces, try your marker on a scrap of the same wrap and let it dry. If it smears on a coated surface, switch to matte paper.
1. Make a Santa Coat With Paper Strips
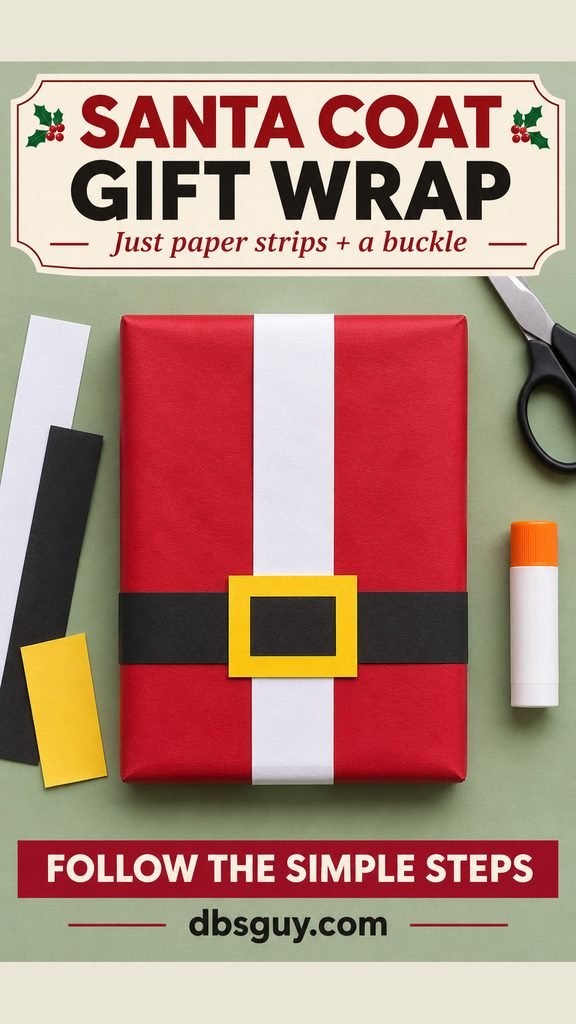
Santa’s coat is a useful first choice when you are wrapping several presents. A white center strip, black belt, and yellow buckle create the outfit without a face, beard, or shaped topper. Because the decoration lies flat, this box is also easier to stack.
Cut the Pieces for Your Box
For a front approximately 6 inches wide and 8 inches tall, start with:
- One white strip, about 1¼ inches wide by 8 inches long.
- One black belt strip, about 1 inch wide by 6 inches long.
- One yellow rectangle, about 1¾ inches wide by 1½ inches tall.
- One smaller black rectangle, about 1¼ inches wide by 1 inch tall.
The two rectangles make a layered paper buckle. You do not need to cut a hole in the yellow piece. On a larger gift, widen the strips before making the buckle bigger; a tiny belt can disappear against a broad red box.
Build the Coat From the Bottom Layer Up
- Place the white strip vertically down the middle of the red front. Trim it to the front panel and glue it flat.
- Lay the black belt horizontally across the lower third of the box. Keep it level and place it over the white strip.
- Glue the small black rectangle onto the center of the yellow rectangle, leaving a visible yellow border on every side.
- Center that buckle over the belt where it crosses the white strip. The black center should visually join the black belt.
- Press the layers flat and put the recipient’s name on the back, where it will not interrupt the coat.
If the buckle looks oversized, lay it on the box before gluing and check how much red remains around it. The belt should still be visible on both sides. Keep the decoration on the front rather than taping extra layers across the back opening seam.
A child’s part: an adult can precut the strips, then let the child arrange the white trim and build the two-layer buckle. A slightly uneven yellow border still reads clearly as Santa’s belt.
2. Give a Snowman Box a Flat Paper Scarf
A tall, white-wrapped box gives you space for a face above the scarf and buttons below it. A narrow game box, clothing box, or boxed craft kit can work, provided it has a broad enough panel for the features. One box is enough; you do not need to build a tower of separate presents.
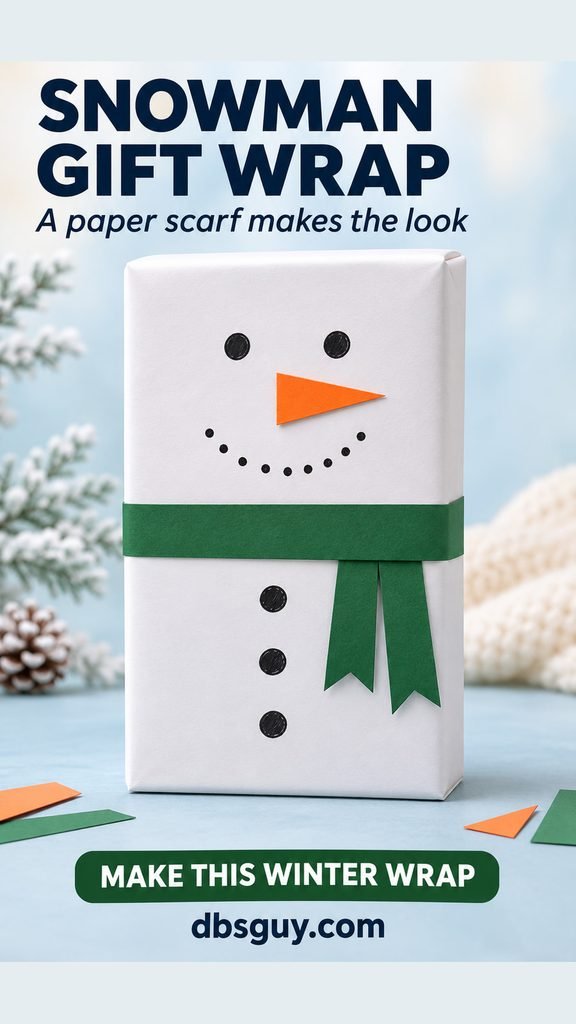
For a front around 6 inches wide and 10 inches tall, cut an orange triangle about 1½ inches long, one green strip about 1 inch wide by 7 inches long, and two green strips about ¾ inch wide by 3 inches long. The longer strip becomes the scarf band; the two shorter ones become its hanging ends.
Place the Face Before the Scarf
- Lightly mark two eye positions in the upper third of the front. Keep them on the same level, with space for the nose underneath.
- Draw the eyes in black. Glue the orange triangle below them with its point facing to the side.
- Add a curved smile using small black dots. Leave a clear gap beneath the smile for the scarf.
- Position the two short green strips on the right side below the face. Attach their top ½ inch to the box; let the rest lie flat downward. You can snip a shallow V into each lower end.
- Glue the long green strip across the front, covering the tops of the two tails. Fold its extra length around the side edges. This suggests a scarf without tying a loop around the gift.
- Draw three larger black circles vertically below the scarf, leaving the tails to their right. These are the snowman’s buttons.
On a shorter box, move the face upward and shorten the scarf tails before squeezing the buttons together. Keep a little white space between the smile and band so the scarf does not look like part of the mouth.
For a child who mouths paper pieces, an adult can draw the orange nose and green scarf directly on matte wrap instead. Keep the same placement. If children are helping decorate, the dotted smile and three buttons are straightforward jobs after an adult marks the positions.
3. Turn Kraft Paper Into a Red-Nosed Reindeer
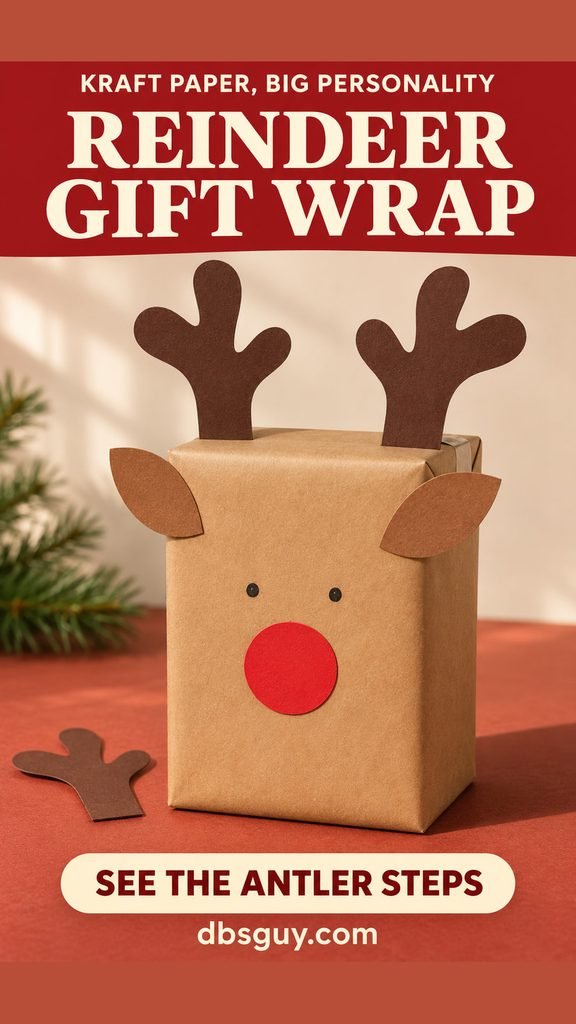
Brown kraft paper supplies the reindeer’s face color, so the main work is cutting two ears and two antlers. Save this design for a gift that can sit upright with clear space above it. The antlers are the part most likely to bend in a crowded shopping bag.
Make Chunky Antlers With Attachment Tabs
For a box front around 6 by 8 inches, draw one antler about 4 inches tall in total: roughly 3 inches of visible antler plus a 1-inch-long rectangular base tab. Give it a broad trunk and two or three short, rounded branches. Keep the narrowest parts about ½ inch wide as a starting point.
Cut it from firm dark-brown cardstock, then trace it and flip the copy to make a mirrored pair. Also cut two brown oval ears about 1½ inches long and a red circle about 1½ inches across. Check all the pieces against the box before committing to these sizes.
Attach the Antlers Behind the Face
- Lay the wrapped box face down. Place one antler near each upper corner, with its base tab flat against the back and its branches rising above the top edge.
- Tape each base tab securely to the back. Add a second piece of tape across the tab if needed, then turn the box over to check that the pair sits at a similar height.
- Glue an ear at each upper front corner, angled outward. Keep the ears lower than the antler branches so the two shapes remain distinct.
- Draw two black eyes below the ears. Glue the red circle centrally beneath them, leaving a little space between the eyes and nose.
- Let the adhesive set according to its directions before moving the box. Lift the present by the box, rather than by the antlers.
If the antlers droop, shorten their branches or glue a matching cardstock layer behind each one. More tape at the base cannot support a long, floppy upper section. For transport, keep the antlers separate and attach them when you arrive, or give the finished box its own container with space above it.
A child’s part: let them trace the red nose, choose the eye positions, or arrange the ears. An adult can handle the branch cuts and rear attachment. Drawing the eyes directly on the wrap also means fewer separate pieces to prepare.
Keep the Wrapping Easy to Open
Decorate the front and leave the main back seam accessible. On the final piece of tape, fold a small end back onto itself to make a grip tab. An adult can start the opening there instead of pulling off the character’s nose or antlers.
If you are making several gifts, finish and label one box before putting the next on the table. For children helping with gifts for other people, give each child one wrapped box and a small set of precut pieces. Keep spare cutouts and tools with the adult rather than scattered among the presents.
After unwrapping, gather the paper, tape, and decorations promptly, especially around younger children. The wrap is presentation material; the toy or other gift inside has its own age guidance.
Questions About Christmas Character Gift Wrap
Do I need a printer or a cutting machine?
No. All three designs use simple hand-cut shapes. A ruler helps with Santa’s strips; trace a small round object for the reindeer’s nose. Make one antler on scrap paper first, then use it to trace the pair onto cardstock.
What if the gift is soft or oddly shaped?
Put it in a suitable box before adding the character. These layouts depend on a flat front. Loose wrapping around a stuffed animal makes it harder to keep the eyes, scarf, or belt in position.
Can I use construction paper?
Yes, for flat details such as the belt, nose, ears, and scarf. Check that the glue holds it to your wrap without curling. For raised antlers, use firmer cardstock or a reinforced double layer and test whether the shape stands before attaching it.
Which design should I choose when I have several gifts to wrap?
Start with Santa’s coat. Most pieces are straight strips or rectangles, so you can cut matching sets together. Keep the reindeer for a gift you can transport without crushing its antlers, and use the snowman when the box already gives you a tall white canvas.