
A few sheets of paper can change a room more than a box of tiny decorations. Hang a cluster of oversized stars, fill a window with white snowflakes, or run a generous paper chain along a staircase. The impact comes from scale, repetition, and choosing a place where the shapes can stand out.
These 15 paper Christmas decorations range from straightforward cutouts to projects that need a little more folding. Each idea includes suggested supplies, a manageable starting size, and instructions for getting the look. For an easy first project, choose the paper chain; for one dramatic focal point, start with the paper bag stars.
The images are AI-generated styling concepts, not photographs of tested projects. Use them for color and placement inspiration; handmade shapes and finished sizes will vary.

Gather a small paper-craft kit first
You do not need every kind of paper for every project. Pick your favorite decoration, then gather its supplies:
- Printer paper or lightweight craft paper: good starting choices for snowflakes, accordion folds, and folded-circle ornaments.
- Cardstock: useful for standing trees, house walls, wreath leaves, and sturdy garland cutouts. Try a scrap first; very thick sheets can be difficult to crease.
- Paper lunch bags, tissue paper, or matte wrapping paper: each serves a different purpose, explained below.
- Basic tools: scissors, pencil, ruler, glue stick, small amounts of craft glue, string, and clear tape. A hole punch and small clips are helpful extras.
Choose two main colors and one accent before cutting a large batch. Forest green, cream, and burgundy make an easy traditional combination; white and kraft paper keep the look quieter. The sizes below are starting points, so make one sample before committing all your paper.
Plan the display safely. Keep paper away from flames, heaters, and hot fixtures. Use battery-operated LED lights for any glowing display and follow their instructions. The National Fire Protection Association’s holiday guidance explains why decorations and burning candles need careful separation. Have an adult handle craft knives, hot glue, and difficult cuts.
1. Oversized paper bag stars for an empty wall
If you want a decoration people notice from the doorway, this is a strong place to start. Ordinary lunch bags open into dimensional stars with deep pockets and pointed edges. Two kraft stars and one white star look especially striking against a dark wall.
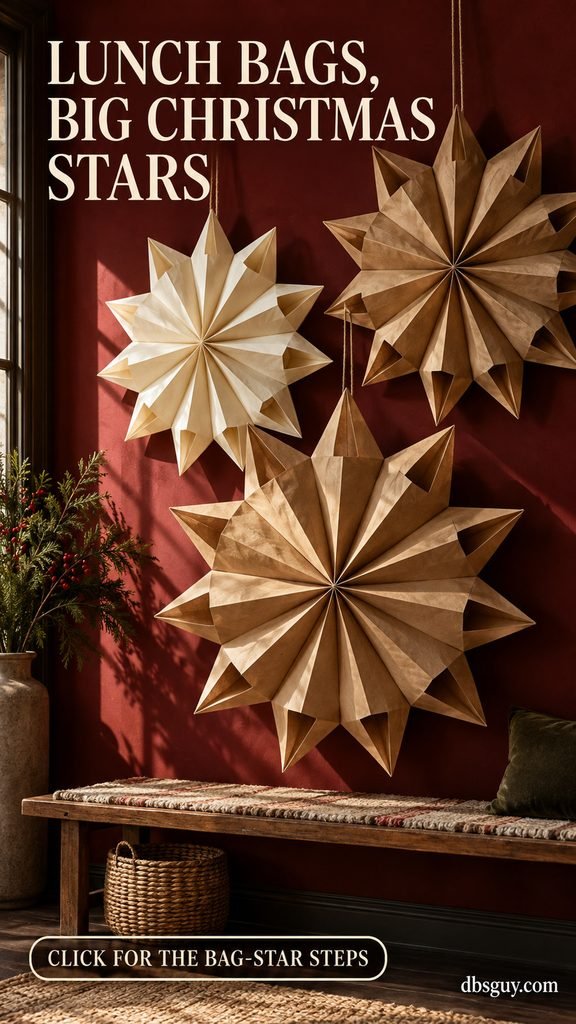
Gather: eight or nine matching standard paper lunch bags per star, glue, scissors, a hole punch, and string. The finished width depends on the bag’s length and how much you trim.
- Lay a bag flat with its opening at the top. Apply a thin glue line across the closed bottom and another up the middle, making an upside-down T.
- Press a second bag on top in the same direction. Continue stacking and gluing; let the adhesive set before cutting.
- Trim the open end of the stack into a point. For a simpler first star, skip decorative side cutouts.
- Fan the stack open gently. Check that the two outer faces meet without pulling; add another bag if necessary, then join those faces.
- Reinforce one hanging point with tape, punch a hole, and thread the string through it.
For a visual reference, The Merrythought’s original bag-star tutorial shows the construction. Smaller bags may need more bags to open into a full circle. If your scissors struggle with the stack, cut two thinner glued stacks separately, then join them.
Make it feel intentional: hang three stars at different heights above a bench or sideboard. Give the largest one space rather than surrounding every point with extra ornaments.
2. Cut-paper snowflakes that turn a window into a winter scene
A window gives white paper a beautiful backdrop without needing a complicated display. Mix a few large snowflakes with smaller ones, leaving gaps so their cutout patterns stay readable.

Start with lightweight white squares about 6, 8, and 10 inches across. You will also need scissors and thread, or a glass-compatible hanging method.
For a six-point design, fold a square diagonally, then fold the triangle in half again. Divide the smaller triangle’s pointed angle into three equal sections and fold those sections over each other. Trim the uneven outer ends to form a wedge. Cut small triangles or notches from its sides, keeping connecting strips intact, then unfold carefully.
The tricky part is the three-way fold. FirstPalette’s illustrated six-point snowflake guide makes the fold positions easier to see. Keep the first design simple; cutting across the whole wedge can leave you with disconnected pieces.
Flatten the finished snowflakes under a heavy book. Suspend them in front of the glass at varied heights, away from condensation. Crisp folds are part of the handmade look; the concept image shows how those folds can catch the light.
3. Accordion fan rosettes for a Christmas party backdrop
Round paper fans fill a large wall with color. They suit a dessert station, dining-room corner, or holiday photo spot, especially when the rest of the room is fairly simple.
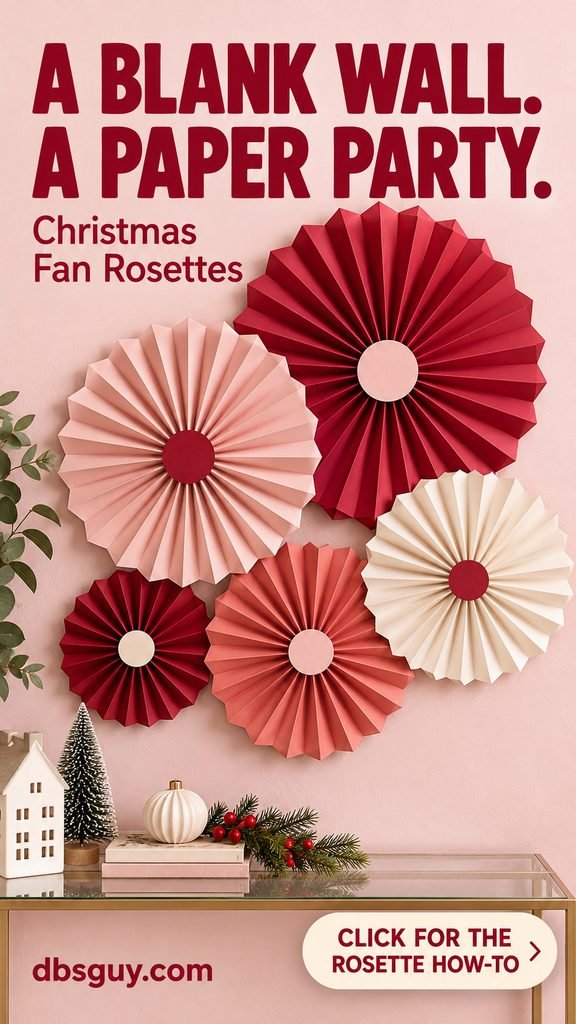
For each rosette: gather three or four equal lightweight paper squares, glue, and a small cardstock circle for the center. Start with 6-inch squares for a manageable sample; larger squares make a larger fan.
- Fold each square back and forth in even pleats about ½ inch wide.
- Fold each pleated strip in half and glue its inner edges together, creating a fan-shaped section.
- Glue neighboring sections together along their outer pleats.
- Open the joined sections into a circle and glue the first and last edges together. Add the center circle once the shape holds.
FirstPalette’s accordion-paper guide illustrates this fan-section method. Use lighter paper for smooth folds; heavy cardstock can spring open or make the center bulky.
Arrange five rosettes in a loose cluster with a large cranberry fan as the anchor. Mix blush, cream, and coral around it. Reinforce the back before attaching hanging string, and use fasteners appropriate for the surface and the finished decoration’s weight.
4. A three-color paper chain with a more polished look
The familiar paper chain gets its grown-up look from consistent strip widths and a restrained palette. Burgundy, forest green, and cream create enough contrast for the loops to stand out along a white staircase.
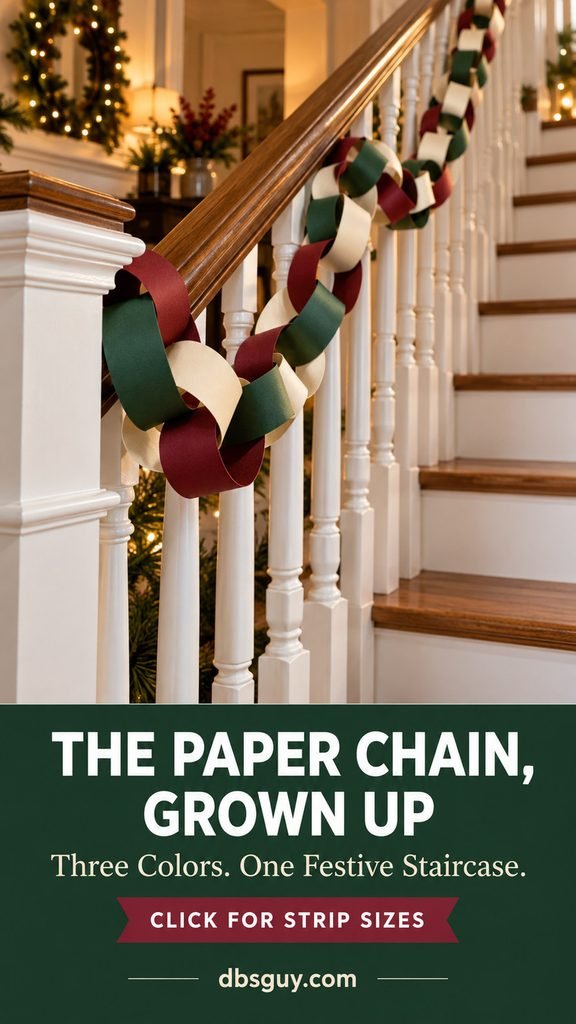
Cut medium-weight paper into 1½-by-8-inch strips. Overlap the ends of the first strip by about ½ inch and glue or tape them into a loop. Thread the next strip through that loop before closing it. Repeat your color sequence as you build.
Make a short sample and measure its hanging length before cutting the full batch. Interlocking loops do not add up to their individual circumferences, and a deep swag uses more chain than a straight run.
Let the joints set before hanging. Support the chain at several points so its weight does not pull on one paper seam. On stairs, drape it outside the railing and preserve a clear handhold and walkway. A hutch or wall above a sideboard works well if the banister is a busy traffic spot.
5. Folded-circle baubles with sculptural paper fins
These ornaments begin as flat circles and become round shapes with open spaces between their fins. They are a useful alternative when you like dimensional paper ornaments but do not want to tackle a true honeycomb glue pattern.

For one ornament: cut eight matching circles, about 3 to 4 inches across, from lightweight paper. Use a drinking glass or another round object as a tracing guide. Gather a glue stick and a loop of string.
- Fold every circle in half with its decorative side inward.
- Glue the outside half of one folded circle to the outside half of the next. Align the curved edges and center folds.
- Continue until all eight are joined in a folded stack.
- Secure the knotted ends of a hanging loop along the central spine, with the loop extending above the ornament.
- Bring the first and last free halves together, gluing them around the string. Spread the fins evenly.
Use plum, dusty pink, and muted gold for the look shown. The concept includes gold ornament caps as an optional finish; the paper-and-string construction works without them. Keep glue off the unjoined faces so the fins can open freely.
6. Slot-together cardstock trees for a standing forest
These trees take up very little shelf depth and need no wooden trunk or special base. Two matching flat shapes intersect to make a four-sided standing tree.

Choose cardstock firm enough to stand but easy enough to cut. Draw a simple evergreen silhouette with three or four stepped branch levels and a flat bottom. Starting heights of 6, 8, and 10 inches make a varied little forest. Trace two identical copies for each tree.
Mark the midpoint of both trees’ heights. On one copy, cut a central slot from the top to that midpoint; on the other, cut from the bottom to the midpoint. Slide the two slots together and open the shapes at a right angle.
If a narrow slit grips too tightly, widen it a tiny amount to match your cardstock’s thickness. If the fit is loose, a small glue dot at the intersection can stabilize it. Both bottom edges must touch the table; otherwise the tree will lean.
Group cream, forest green, sage, and rust trees on a dark wooden shelf. Angle a few of them so their intersecting planes show, and leave a little room between the bases.
7. Smooth paper cone trees for a simple centerpiece
For a quieter Christmas table, smooth cones bring height and shape without small embellishments. The difference from the slot trees is their clean, continuous surface and round footprint.

Gather: cardstock, pencil, scissors, tape or glue, and a ruler. Draw a quarter-circle wedge with two straight sides meeting at a right angle. A string tied to a pencil can help you draw the curved edge evenly.
Try wedge radii of 7, 9, and 12 inches. These measurements describe the sloping side, not the finished vertical height; a 12-inch wedge needs a sheet large enough to contain it. Roll the straight edges toward each other until you have a cone. Overlap slightly, secure the seam, and trim the bottom if needed so it sits level.
Dry-fit before adding glue. A narrow overlap gives a wider base; more overlap makes a slimmer cone. Keep the seams facing the back of the arrangement.
Four cones in green, sage, cream, and kraft paper make a calm centerpiece. Add one small paper star if you like. For dinner, move the tallest cones to a sideboard if they interrupt conversation or compete with serving dishes.
8. A white paper village with battery LED glow
A row of simple houses makes a windowsill feel like a tiny Christmas street. White cardstock keeps the buildings cohesive, while different wall heights give the row a more interesting skyline.

This is the most involved cutting project in the list. Gather cardstock, a ruler, pencil, glue, and battery LED tealights. An adult can use a craft knife and cutting mat for the windows; drawn windows are an easier unlit alternative.
- For a small house, draw an 8½-by-3-inch wall strip. Mark four 2-inch panels plus a ½-inch joining tab.
- Cut doors and windows while the strip is flat. Leave enough paper between openings to support the walls.
- Score the panel boundaries gently with a blunt tool, fold into a square tube, and glue the tab behind the first panel. Leave the bottom open.
- Cut two triangles with 2-inch bases and 1-inch heights. Add a small folding tab beneath each base and glue them above two opposite walls as gable ends.
- Cut a roof approximately 2½ by 3¼ inches. Fold halfway along the 3¼-inch dimension, dry-fit it over the gables, and glue it in place.
Set the house over a battery LED tealight on the sill, keeping the switch accessible from underneath. Increase the wall height for taller houses. Simple rectangles make easier windows than intricate cutwork; crossbars and chimneys are optional details.
Never substitute a burning candle. Follow the LED product’s placement instructions, and keep the village indoors on a dry surface away from heat.
9. A holly-leaf paper wreath for an interior door
Layered leaves turn a plain cardboard ring into a full-looking wreath. The folded leaf centers add just enough dimension to make the green shades readable from across the room.

Cut a cardboard ring about 12 inches across with a 7-inch opening. Gather green cardstock, red paper, glue, and a ribbon loop for hanging.
Draw one holly leaf about 4 inches long, with a pointed tip and a few broad notches on each side. Trace roughly 30 leaves to start, adding more if your ring needs coverage. Fold each leaf lightly along its center. Attach the hanging loop to the back of the ring before covering it.
Glue leaves around the ring, overlapping their bases and keeping their tips mostly aimed in the same direction. Add a second, offset layer where cardboard shows. Finish with clusters of three red paper circles and a small cream bow.
Two or three green shades create a fuller visual effect than one solid color. Keep this wreath on an interior door: untreated paper will not hold up to rain or damp outdoor air.
10. Layered paper poinsettias for a holiday table
A large red paper flower can carry a whole place setting. Make a few as table accents, or put one on a wrapped gift where its pointed layers have space to spread.

For a flower approximately 7 to 8 inches across, cut six red pointed petals about 4 inches long and six about 3 inches long. Gather a 2-inch cardstock backing circle, green paper leaves, and small gold paper dots. Optional gold beads give the raised center shown in the concept image.
Crease each petal gently lengthwise. Make a short cut at its base, overlap the cut edges slightly, and glue them to create a shallow cup. Attach the larger petals around the backing circle, then stagger the smaller ones above them. Cover the center with gold dots or firmly attached beads and add green leaves underneath.
Let the flower dry before moving it; a freshly glued center can shift and flatten the layers. Keep craft materials separate from food and out of young children’s reach, especially if you use loose beads.
Deep red paper with a little surface texture gives a rich result. For a lighter scheme, use cream petals and keep the green leaves and gold center.
11. A kraft-paper gingerbread garland for the kitchen
Gingerbread shapes bring warmth to a breakfast nook without baking anything. The flat silhouettes are easy to store, and their drawn icing gives a simple brown cutout plenty of personality.
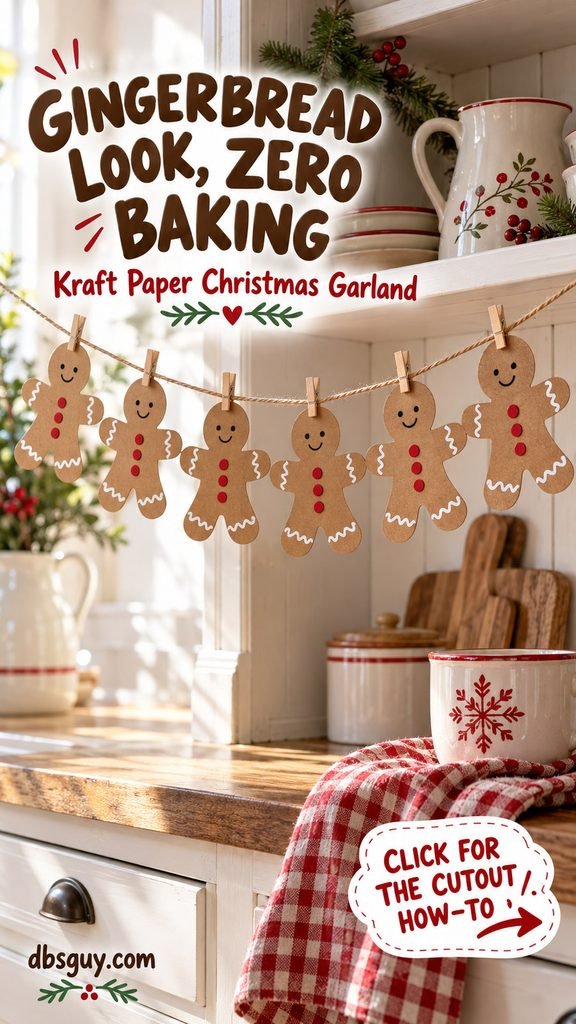
Use kraft cardstock, a white opaque pen, a black marker, red paper, string, and small clips. Draw a gingerbread person about 5 to 6 inches tall, keeping the arms and legs broad enough to resist tearing. Cut one sample, then trace it for a coordinated set.
Add a smiling face, white squiggles at the wrists and ankles, and three red paper buttons. Let the pen dry before clipping six figures to the string. Space them evenly so each silhouette stays distinct.
Hang the strand on a hutch, cabinet, or kitchen wall away from the stove, steam, and food preparation. A red gingham towel nearby brings out the red buttons without needing more decorations.
If you do not have clips, use two small holes near each figure’s shoulders. Two attachment points help prevent the cutouts from spinning backward.
12. One oversized paper bow as the main statement
A big bow works best when you let it be the focal point. A cranberry-pink version against a pale sage door feels festive with very little surrounding decoration.
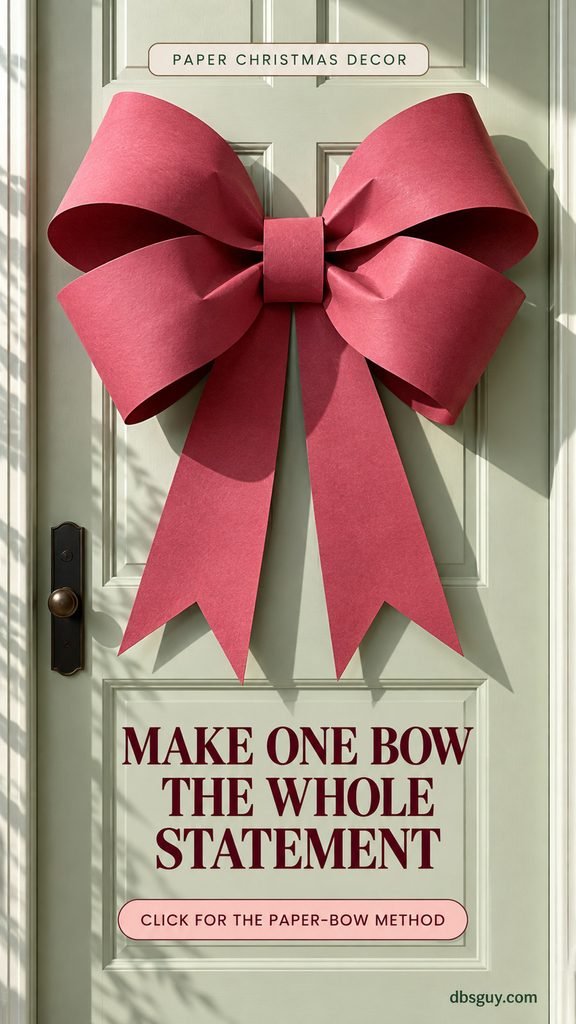
Use: sturdy matte wrapping paper or flexible lightweight cardstock, tape, glue, and a small cardboard backing. Begin with two 16-by-4-inch strips for the loops, two 14-by-3-inch strips for tails, and a 1½-inch-wide center band.
- Curve each wide strip into a flattened loop, overlapping and securing its ends. Keep the outer curve rounded rather than pressing it flat.
- Bring the joined ends of both loops together in the middle. Pinch these inner ends gently and tape them to the backing.
- Cut V-notches into the tail ends and attach the tops behind the loops.
- Wrap the center band around the middle, fastening it at the back. Adjust the loops before hanging.
The final width depends on the loop overlap and how deeply you pinch the center. Try a half-size scrap-paper version first. Thin glossy gift wrap may droop or show white crease marks; matte paper with some body is easier to shape.
Attach the backing using a door-compatible hanger or fastener. Check that the bow and tails clear the handle and do not catch when the door opens.
13. Folded-paper angels with delicate fan wings
Cream pleats and a gold paper head make a small angel ornament feel special without many supplies. Display one on a tree or suspend a pair from a decorative branch.
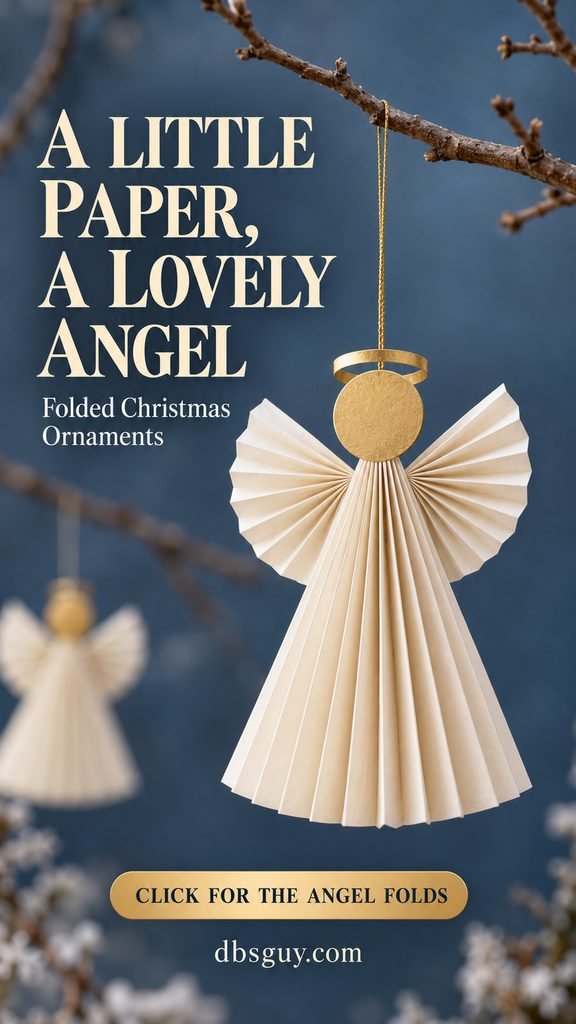
For one angel, cut a lightweight cream rectangle approximately 6 by 8 inches for the dress and two 3-by-3-inch squares for the wings. You also need glue, string, and a gold cardstock circle about 1¼ inches across.
Accordion-fold the dress rectangle into narrow, even pleats, working across its 8-inch width so the pleated strip stays 6 inches long. Pinch and glue one short end together, then spread the opposite end into a fan.
Accordion-fold each wing square, fold that strip in half, and glue its inner edges to form a small fan. Attach one wing to each side near the dress’s pinched top. Glue the gold circle above the dress and secure a hanging loop behind it. A narrow gold paper strip can form an optional halo.
Keep the wings small enough that they do not overpower the dress. If the top feels fragile, add a narrow scrap of cardstock behind the head and shoulders as hidden reinforcement.
14. A colorful paper lightbulb garland with no plugs
Oversized bulb silhouettes bring a playful, midcentury feeling to a shelf or party wall. They are flat paper decorations, so the color does the work instead of actual illumination.

Gather colored cardstock, charcoal paper, glue, and dark string. Draw a rounded teardrop bulb approximately 5 inches tall, with a short, narrow neck. Cut seven or more copies in teal, red, mustard, and coral.
For each bulb, cut two small charcoal rectangles wide enough to cover its neck. Sandwich the neck and the garland string between the rectangles, gluing securely. Let the caps dry flat before lifting the strand.
Check the color sequence on the table first, then leave a small gap between bulbs when attaching them. The string should sit through the top of each cap so the rounded bulb hangs below it.
A shallow arc above a shelf keeps the silhouettes visible. Avoid adding so many colors that the garland disappears into a busy background; repeating four shades gives it rhythm.
15. Tissue-paper tassels for a soft winter mantel
Fringed tissue has a softer appearance than folded cardstock. White, ice blue, and silver-gray tassels look especially pretty against a dark wall and can stay up as winter decor after Christmas.
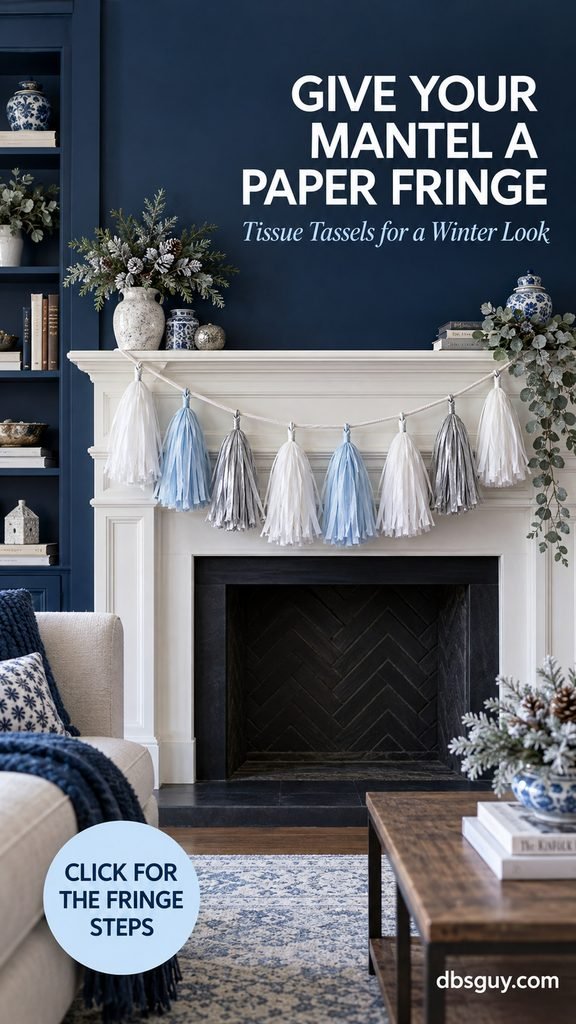
For each tassel, stack two tissue rectangles about 10 by 16 inches. Fold across the 16-inch length, bringing the short ends together so the folded piece measures 10 by 8 inches.
- With the fold at the top, cut narrow fringe upward from the open bottom, stopping about 1 inch below the fold.
- Unfold the tissue carefully. You should have fringe on both ends and an intact band across the center.
- Roll that intact center band from one side to the other, keeping the fringes free.
- Twist the middle gently, bend it into a hanging loop, and secure the neck with tape or thread.
- Thread the tassels onto string and separate the fringe with your fingers.
Start with eight tassels, then adjust the spacing to fit your display. Metallic tissue is optional; ordinary gray paper keeps the supplies simple. Do not pull hard on the fringe, which tears easily.
Use a mantel only when its fireplace will remain unused for the entire display. Otherwise, choose a shelf or wall away from heat. Keep the strand high enough that children or pets cannot pull it down.
Make the display feel coordinated
You do not need to make all 15 projects. Choose one large focal decoration and one smaller repeat: stars above a sideboard with a paper forest below, or window snowflakes with a pale tassel garland nearby. Check the arrangement from the doorway before adding more.
For hanging, follow the fastener’s specific surface, weight, application, and removal instructions. A lightweight decoration can still damage paint if the adhesive is unsuitable. Command’s manufacturer guidance is useful if you choose that brand; requirements can differ by product. An existing curtain rod or suitable interior-door hanger may be simpler.
After the holidays, store flat cutouts between sheets of paper. Keep dimensional ornaments in a shallow box where the fins and loops will not be crushed. Only fold a decoration closed if its joining method allows it—forcing a permanently glued star shut can tear it.
Questions about paper Christmas decorations
What is the easiest decoration to make first?
The paper chain has the simplest repeated construction: cut equal strips, close a loop, and thread the next strip through. Gingerbread and lightbulb garlands are good choices if you prefer drawing and cutting to folding.
Can I use printer paper instead of cardstock?
Yes for snowflakes, fan folds, angels, and folded-circle baubles. Standing trees, house walls, large cutouts, and wreath bases need more support. Make one small sample before substituting thin paper in a structural project.
Which ideas work well for crafting with children?
Paper chains and decorating pre-cut gingerbread figures offer straightforward tasks. Match the activity to the child’s age and abilities. Adults should do intricate cuts, handle craft knives or hot glue, and supervise small embellishments.
Can paper decorations go outside?
These designs are intended for dry indoor spaces. Rain, condensation, wind, and damp air can weaken the paper and glue. Choose materials designed for outdoor use for exposed doors, porches, and railings.
Can I recycle them afterward?
Check your local recycling program before adding craft paper to the bin. Remove string, ribbon, clips, caps, and other nonpaper pieces where possible. Glitter, coatings, heavy glue, and some tissue papers may affect acceptance. Reuse intact decorations when you can.