Gold glitter tips give a green manicure a bright little edge; tiny stars make it playful. The prettiest balance depends on where you leave breathing room: a sheer center, a quiet patch of sage, or just one accent nail among the sparkle.
These 17 cute St. Patrick’s Day nail ideas keep both details in the design while changing the shape, finish, and placement. Start with sage micro tips for a small-scale look, emerald double French for a defined edge, or milky nails with one shamrock if you want the holiday detail to be unmistakable.

The images are AI-generated manicure concepts, not photos of completed or tested salon work. Use them as references for color and placement; your nail length, products, and artist will affect the result.
For a wider mix of holiday colors and motifs, browse 25 St. Patrick’s Day Nail Ideas From Understated Green to Full Glitter. The looks below focus specifically on glitter tips and tiny stars.
1. Short Sage Nails With Gold Micro Tips
Soft sage covers the nail while a very fine gold-glitter edge follows its rounded tip. The little star sits off to one side rather than directly above the glitter, so the two gold details remain easy to see. This is a good starting point if you like a full-color manicure but want the decoration to stay small.

Keep the rounded shape you already have and ask for the narrowest glitter band that still shows individual sparkles. On a small nail, shrink the star before widening the tip. A glitter polish with fine particles makes more sense for this delicate edge than large, irregular flakes.
2. Emerald Double French With Floating Gold Stars
Here, green belongs at the edge instead of across the whole nail. An emerald curved band sits beneath a separate gold-glitter tip, with a sheer pink center and a star floating inside it. The two visible bands give this almond manicure more definition than a single glitter French.

Show your artist the boundary between the colors: you want to see emerald below the gold, not have the glitter cover the green completely. Ask to approve the proportions on one nail first. For a shorter version, make both bands shallower and use a smaller star so the pink center remains visible.
3. Mint Squares With Diagonal Glitter Corners
A diagonal glitter corner gives a square nail a different rhythm from a curved French tip. Pale mint is the main color, and gold sweeps across one corner of each free edge. A tiny star on the mint side echoes the sparkle without disappearing into it.

Choose the direction of the diagonal before the art begins. Repeating it across the hand makes the set feel coordinated; changing direction on every finger creates a busier effect. If you are trying this with regular polish, a small detail brush lets you establish the angled boundary before filling the outer corner with glitter. Let each layer dry as directed.
4. Emerald Ovals With a Gold Glitter Fade
This version softens the line between green and gold. The glitter is dense at the oval tips, then becomes sparse farther down the emerald base. A few small stars sit in the clearer green area, where their shapes can still be recognized.

The important salon detail is the direction of the fade: the most gold belongs at the free edge, with less toward the center. Ask to leave the lower part of the nail mostly green. If the glitter reaches evenly from tip to cuticle, you will get an allover sparkle manicure instead of the graduated effect shown here.
5. Lime Outlines With Gold Micro-French Edges
A fine lime curve near the base of the nail introduces green without filling the nail plate. The outer tip carries the gold glitter, leaving a generous stretch of sheer pink between the two lines. Tiny gold stars sit near the lime curves, making this a light, graphic option for someone who usually wears neutrals.

Bring the reference rather than requesting only a “double French,” since that phrase can suggest two neighboring tip bands. Specify a lime outline toward the cuticle end, a separate gold free edge, and a visible gap between polish and skin. On shorter nails, put the lime outline on just the ring fingers if the two curves feel crowded.
6. Milky Nails With One Tiny Shamrock
Milky blush-white nails make a small green shamrock easy to spot. Put it on the ring finger and let the other nails carry gold stars. A slim glitter French edge ties every finger together, including the accent nail, so the shamrock feels part of the set.

For the pictured motif, request three heart-shaped leaves and a short stem. Choose a small nail-art decal if you would rather avoid painting that detail yourself, and follow its application and sealing directions. Leave space around the shamrock instead of adding a star beside it; the other fingers already provide the celestial detail.
7. Green Jelly Coffin Nails With Glitter Bands
Translucent green gives this longer set a glassy appearance. Straight gold-glitter bands emphasize the flat coffin tips, while several small stars sit across the green centers. This is the option to save when you want the color itself to have depth rather than an opaque cream finish.

Ask to see a jelly-green swatch over a clear sample before committing: a sheer finish will look different over a natural free edge, a sheer extension, or an opaque base. Keep the glitter concentrated in the end bands so it does not hide the transparency. If you prefer less length, a shorter tapered square can keep the straight glitter edge.
8. Matte Sage With Glossy Gold Tips
The difference here is texture. Muted sage has a matte finish, while the gold-glitter tips catch the light. Small gold stars repeat that contrast across short squoval nails. It is a quieter palette than emerald, but the two finishes give you something interesting to notice up close.

Tell your nail artist that only the green should look matte and the glitter should retain its shine. A single matte finish over the entire design changes that contrast. Ask the artist to choose a compatible product sequence rather than trying to improvise layers from different systems at home. If you want a simpler appointment, request the same layout with a glossy finish throughout.
9. Negative-Space Nails With Emerald Side Swoops
An emerald swoop runs along one side of each sheer nail, leaving the middle open for a gold star. A glitter line finishes the free edge. Compared with a full green base, this placement lets you wear a strong emerald shade in a smaller amount.

The width of the swoop matters more than matching every curve exactly. Ask for a visible sheer center from the start; a thick green wave can easily take it over. This is especially useful on almond nails, where the curve can follow the taper. For broader square nails, keep the swoop close to one side rather than stretching it across the whole tip.
10. Velvet Emerald With Gold-Tipped Starlight
A luminous diagonal band gives these deep green nails their velvet cat-eye appearance. Fine gold-glitter tips add a separate kind of sparkle, and the stars sit on the darker green areas where they remain legible. This has more visual movement than a cream-color manicure, even though the artwork stays sparse.

Take this one to an artist who offers magnetic nail finishes and show them the direction of the light band you want. The reference illustrates a possible effect, not an exact result every magnetic polish will reproduce. Keep the glitter edge narrow and avoid adding more scattered glitter over the center; the green shimmer needs room to be the main feature.
11. Mint Gingham With a Glitter-Tipped Accent
One green-and-white gingham nail turns this mint set into a small pattern moment. The remaining nails carry the tiny gold stars, and all the square tips have a fine glitter edge. Keeping the stars off the checked nail makes the gingham easier to read.

Ask for checks large enough to remain recognizable at your actual nail length. A very tiny grid can lose its shape, especially once the glitter tip takes up part of the nail. If hand-painted checks are more detail than you want, use a suitable gingham nail decal on one finger and keep the surrounding nails simple. Match the plain mint to one of the lighter greens in the pattern.
12. Blush and Kelly Green Split Nails
A lengthwise split gives each nail a sheer blush half and a saturated green half. The glitter band crosses both colors at the tip, while the star stays on the blush side. On a tapered coffin shape, the straight split creates a particularly graphic result.

This is worth taking to a salon if crisp linework is your priority. Ask for a near-even split with the same color on the same side of each nail, then approve one finger before repeating it. Keep the boundary undecorated: another gold stripe down the middle would add a second strong line and change the balance of the design.
13. Olive Marble With Straight Gold Edges
Olive and pale sage swirl together beneath narrow gold-glitter tips. The marble gives this square set an earthy feel, and the small stars make it more playful. Choose it if bright grass green is not a color you reach for but you still want a green St. Patrick’s Day manicure.
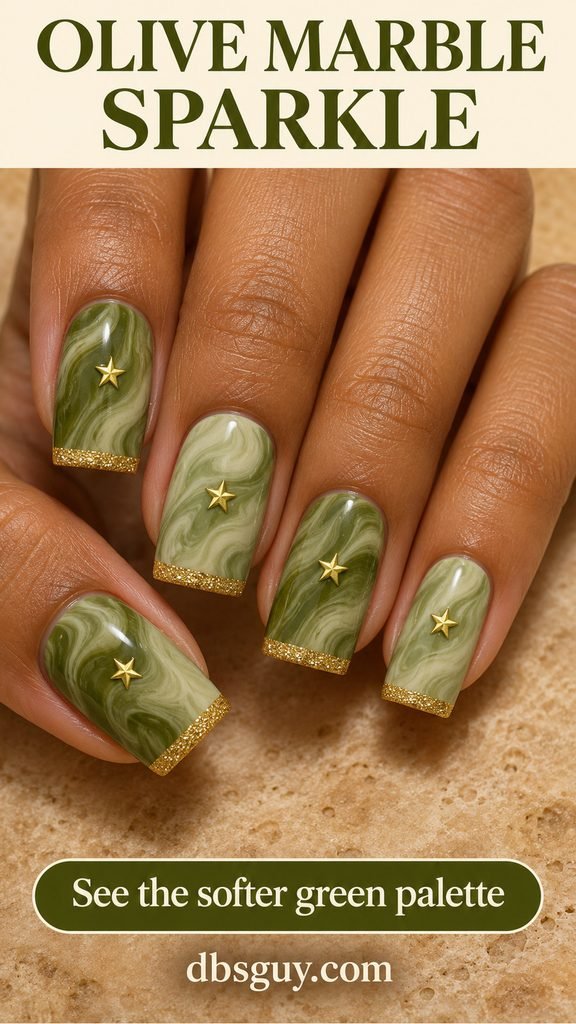
Keep the marble soft rather than filling it with high-contrast dark veins. A quieter patch under each star helps its outline show. The straight glitter edge already supplies the gold, so there is no need to add metallic veining as well. For a shorter version, ask for broader, fewer swirls instead of compressing an intricate pattern into a smaller nail.
14. Forest Stilettos With Gold V-Tips
Pointed stiletto nails make room for a deep gold-glitter V. The glitter wraps the point, leaving a dark forest-green center below it and one little star on that green area. This is the strongest tip shape in the collection, suited to someone who already enjoys long, pointed nails.

Discuss length before discussing the artwork. The reference relies on enough space for the two sides of the V to meet cleanly without swallowing the star. If the length is impractical for you, ask for the same color placement on a shorter almond and accept a softer point. Keep both arms of the V similar in width so the glitter follows the shape intentionally.
15. Mint Ovals With One Little Daisy
A white daisy with a yellow center gives mint nails a spring detail alongside the holiday colors. Keep it on the ring finger, with gold stars on the surrounding nails and a glitter tip on every finger. The flower does not need a leaf or extra dots to read clearly.

The concept image shows a slightly raised flower. If you prefer a smooth surface, request a painted daisy or a flat decal instead and explain that texture preference before the appointment. On short ovals, place the flower above the glitter edge with a border of mint around it. The open border helps the white petals remain distinct from the gold.
16. Five Green Shades With Matching Gold Details
When choosing one green is the difficult part, use a different shade on each nail. This lineup moves from pale mint through sage and olive to emerald and forest green. Identical glitter tips and one star per nail make the changing colors feel like a deliberate set.

Lay out five real swatches before painting, arranged from light to dark. Check them together in the light where you usually see your hands; two greens that look different in their bottles may look very similar on the nail. Use the same gold for every tip and star. That repeated detail is what connects the pale thumb to the much darker pinky.
17. Sheer Peach Nails With Tiny Green Constellations
For the least green coverage, move the color into the stars. A sheer peach base and fine gold-glitter tips stay neutral, while small forest-green stars provide the holiday color. Three linked stars on the ring finger form a tiny constellation; the other nails need only one each.

Choose a sheer base you like against your own skin rather than trying to match the pictured peach exactly. For the constellation, ask for a fine connecting line that remains lighter visually than the stars. If that line is too much detail for your nail length, keep the three-star cluster and leave the stars unconnected. You will still have the same small green focal point.
Before You Choose Your Set
Pick the detail you care about most: a fine gold edge, a transparent green base, or a recognizable little motif. Bring one favorite reference and tell your artist what you want to keep small. That is more useful than combining every accent into the same manicure.
Frequently Asked Questions
Which designs are the most manageable for an at-home manicure?
For a first attempt, choose one solid green, a fine glitter edge, and small star decals compatible with your polish. The short sage layout in idea 1 gives you a clear target without extra patterns. A crisp micro tip still takes brush control; practice one edge before painting the whole hand. Save the magnetic finish, mixed matte-and-gloss surface, or detailed split-color work for an artist if those techniques are new to you.
Can I use regular nail polish for gold glitter tips and stars?
Yes. Choose air-dry color, glitter polish, a suitable top coat, and nail-art decals labeled for that system. Follow each product’s directions for preparation, drying, and sealing. Essie’s French manicure guide explains tracing a tip with a detail brush and adjusting its depth. For these concepts, the green-and-gold placement is an editorial variation. Do not substitute air-drying for the curing directions on a gel product.
How do I keep tiny stars visible beside a glitter tip?
Give each star a clear patch of base color. On short nails, one small star is usually enough for the layout; on longer nails, a few can sit below the glitter fade. Match the star size to your nail rather than copying the scale of a close-up image. If you dislike raised decoration, request painted stars or flat decals instead of charms.
What should I tell my nail artist before the appointment?
Send your favorite numbered image and name the details you want to keep: your preferred length, the green shade, the tip width, and whether the stars should be painted or applied. Mention any texture preference, especially for the daisy and star embellishments. Ask whether the design needs more appointment time, and choose an achievable version together rather than expecting an exact copy of an AI concept.